1. Spring
1.1. Spring简介
1.1.1. Spring是什么
Spring是分层的 Java SE/EE应用 full-stack 轻量级开源框架,以 IoC(Inverse Of Control:反转控制)和 AOP(Aspect Oriented Programming:面向切面编程)为内核。
提供了展现层 SpringMVC 和持久层 Spring JDBCTemplate 以及业务层事务管理等众多的企业级应用技术,还能整合开源世界众多著名的第三方框架和类库,逐渐成为使用最多的Java EE 企业应用开源框架。
1.1.2. Spring发展历程
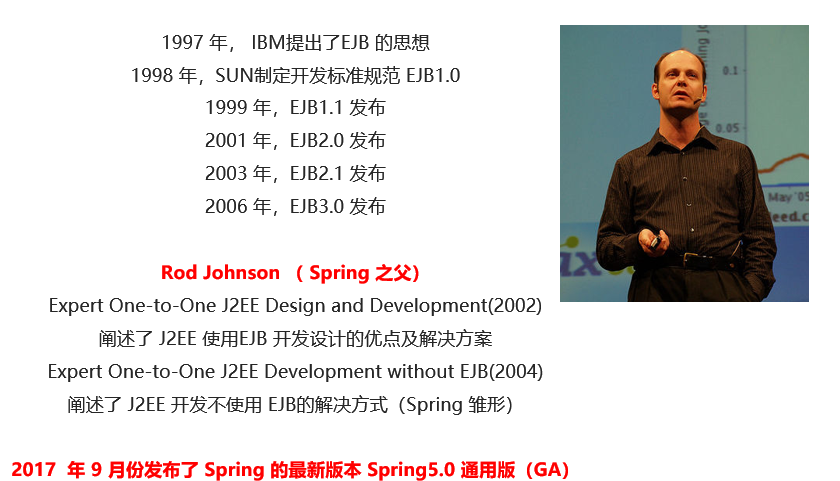
1.1.3. Spring的优势
- 方便解耦,简化开发: 通过
Spring提供的IoC容器,可以将对象间的依赖关系交由Spring进行控制,避免硬编码所造成的过度耦合。用户也不必再为单例模式类、属性文件解析等这些很底层的需求编写代码,可以更专注于上层的应用。 AOP编程的支持: 通过Spring的AOP功能,方便进行面向切面编程,许多不容易用传统OOP实现的功能可以通过AOP轻松实现。- 声明式事务的支持: 可以将我们从单调烦闷的事务管理代码中解脱出来,通过声明式方式灵活的进行事务管理,提高开发效率和质量。
- 方便程序的测试: 可以用非容器依赖的编程方式进行几乎所有的测试工作,测试不再是昂贵的操作,而是随手可做的事情。
- 方便集成各种优秀框架:
Spring对各种优秀框架(Struts、Hibernate、Hessian、Quartz等)的支持。 - 降低
JavaEE API的使用难度:Spring对JavaEE API(如JDBC、JavaMail、远程调用等)进行了薄薄的封装层,使这些API的使用难度大为降低。 - Java 源码是经典学习范例:
Spring的源代码设计精妙、结构清晰、匠心独用,处处体现着大师对Java设计模式灵活运用以及对Java技术的高深造诣。它的源代码无意是 Java 技术的最佳实践的范例。
1.1.4. Spring的体系结构

1.2. Spring快速入门
1.2.1. Spring程序开发步骤
- 导入
Spring开发的基本包坐标,配置pom.xml - 编写
Dao接口和实现类 - 创建
Spring核心配置文件 - 在
Spring配置文件中配置UserDaoImpl - 使用
Spring的API获得Bean实例
1.2.2. 导入Spring开发的基本包坐标,配置pom.xml
    <properties>
        <spring.version>5.0.5.RELEASE</spring.version>
    </properties>

    <dependencies>
        <!--导入spring的context坐标,context依赖core、beans、expression-->
        <dependency>
            <groupId>org.springframework</groupId>
            <artifactId>spring-context</artifactId>
            <version>${spring.version}</version>
        </dependency>
    </dependencies>
<?xml version="1.0" encoding="UTF-8"?>
<project xmlns="http://maven.apache.org/POM/4.0.0"
xmlns:xsi="http://www.w3.org/2001/XMLSchema-instance"
xsi:schemaLocation="http://maven.apache.org/POM/4.0.0 http://maven.apache.org/xsd/maven-4.0.0.xsd">
<modelVersion>4.0.0</modelVersion>
<groupId>org.example</groupId>
<artifactId>MyBatis_001</artifactId>
<version>1.0-SNAPSHOT</version>
<properties>
<maven.compiler.source>8</maven.compiler.source>
<maven.compiler.target>8</maven.compiler.target>
</properties>
<!--dependencies 依赖包的意思-->
<dependencies>
<!--mybatis坐标-->
<dependency>
<groupId>org.mybatis</groupId>
<artifactId>mybatis</artifactId>
<version>3.5.4</version>
</dependency>
<!--mysql驱动坐标-->
<dependency>
<groupId>mysql</groupId>
<artifactId>mysql-connector-java</artifactId>
<version>5.1.6</version>
<scope>runtime</scope>
</dependency>
<!--单元测试坐标-->
<dependency>
<groupId>junit</groupId>
<artifactId>junit</artifactId>
<version>4.12</version>
<scope>
test
</scope>
</dependency>
<!--日志坐标-->
<dependency>
<groupId>log4j</groupId>
<artifactId>log4j</artifactId>
<version>1.2.12</version>
</dependency>
<dependency>
<groupId>org.junit.jupiter</groupId>
<artifactId>junit-jupiter</artifactId>
<version>RELEASE</version>
<scope>compile</scope>
</dependency>
<!-- 分页助手 -->
<dependency>
<groupId>com.github.pagehelper</groupId>
<artifactId>pagehelper</artifactId>
<version>3.7.5</version>
</dependency>
<dependency>
<groupId>com.github.jsqlparser</groupId>
<artifactId>jsqlparser</artifactId>
<version>0.9.1</version>
</dependency>
<!--导入spring的context坐标,context依赖core、beans、expression-->
<dependency>
<groupId>org.springframework</groupId>
<artifactId>spring-context</artifactId>
<version>5.0.5.RELEASE</version>
</dependency>
</dependencies>
</project>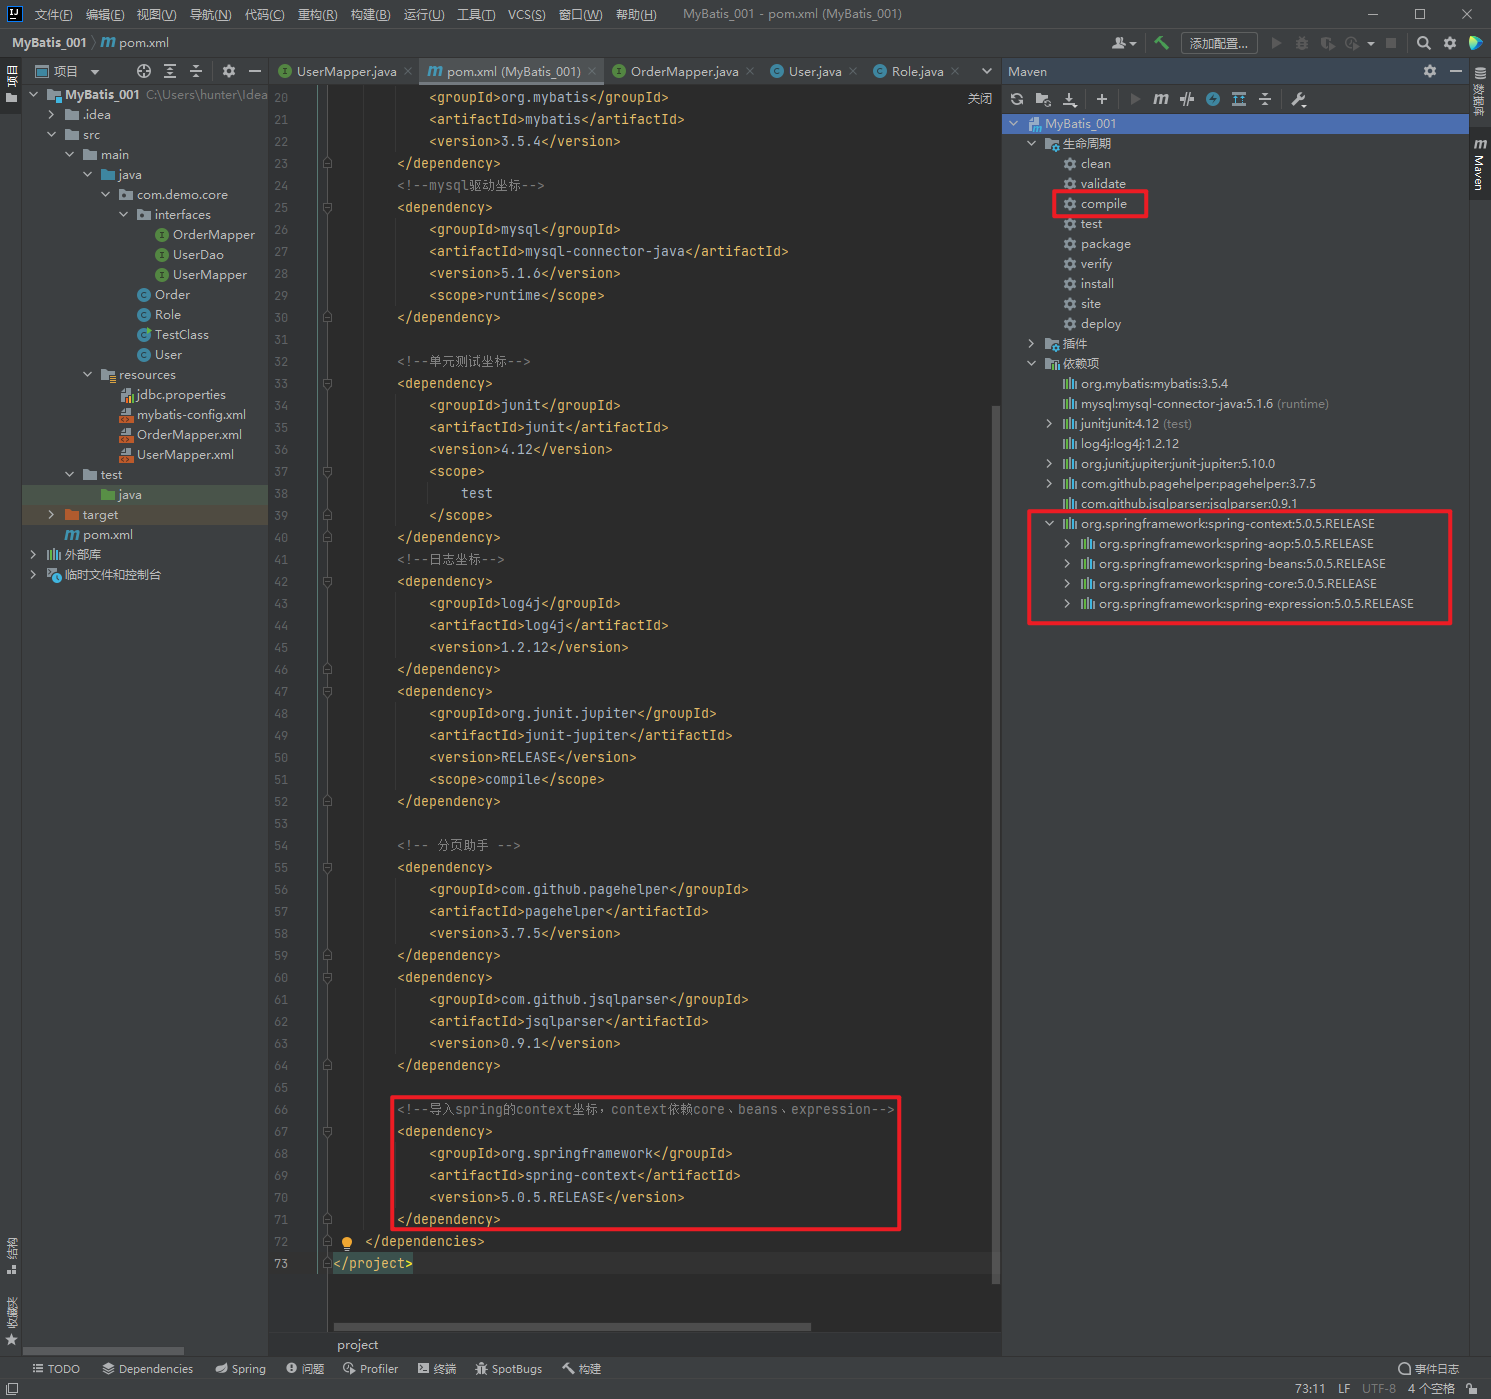
1.2.3. 编写Dao接口和实现类
package com.demo.core.interfaces;

public interface UserDao {
    public void save();

}
package com.demo.core.impl;
import com.demo.core.interfaces.UserDao;
public class UserDaoImpl implements UserDao {
@Override
public void save() {
System.out.println("UserDao save method running....");
}
}1.2.4. 配置xml文件
在类路径下resources创建applicationContext.xml配置文件
<?xml version="1.0" encoding="UTF-8" ?>
<beans xmlns="http://www.springframework.org/schema/beans"
       xmlns:xsi="http://www.w3.org/2001/XMLSchema-instance"
       xsi:schemaLocation="
              http://www.springframework.org/schema/beans
              http://www.springframework.org/schema/beans/spring-beans.xsd">
</beans>
1.2.5. 在Spring配置文件中配置UserDaoImpl
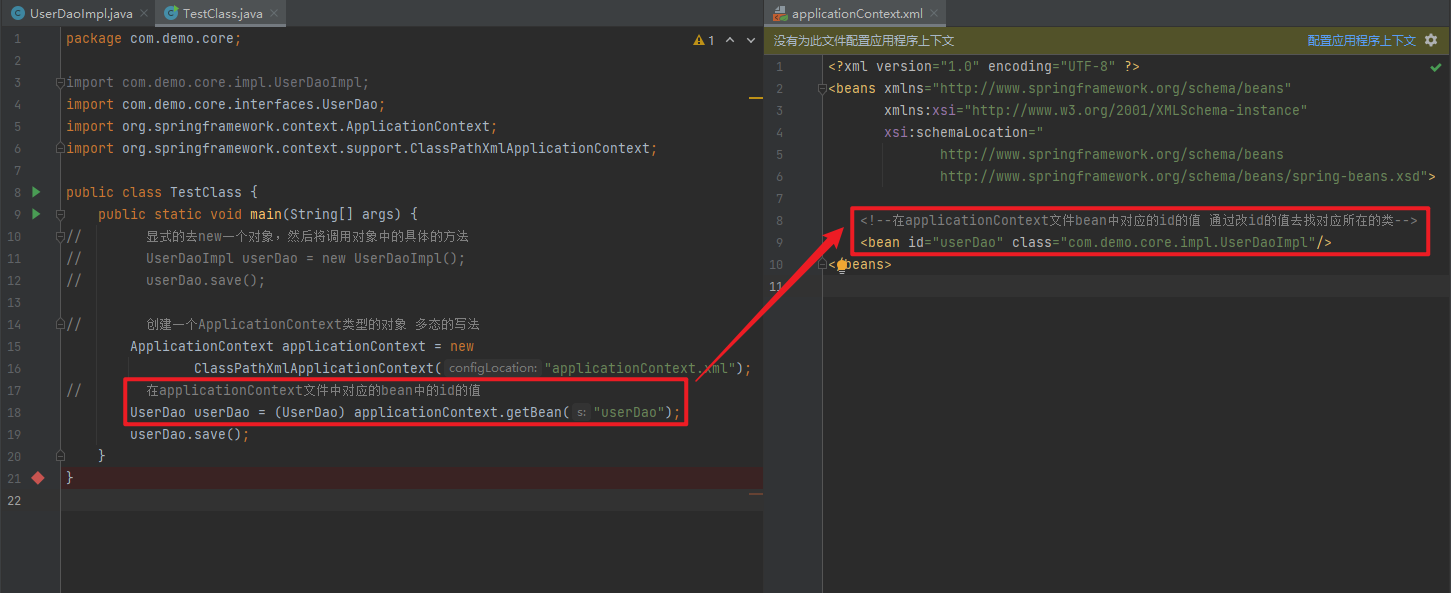
在applicationContext文件中创建bean,该bean中的id代表获取时的名称,class指向需要通过反射实例化的类的名称
<?xml version="1.0" encoding="UTF-8" ?>
<beans xmlns="http://www.springframework.org/schema/beans"
       xmlns:xsi="http://www.w3.org/2001/XMLSchema-instance"
       xsi:schemaLocation="
              http://www.springframework.org/schema/beans
              http://www.springframework.org/schema/beans/spring-beans.xsd">

    <!--在applicationContext文件bean中对应的id的值 通过改id的值去找对应所在的类-->
    <bean id="userDao" class="com.demo.core.impl.UserDaoImpl"/>
</beans>
1.2.6. 使用Spring的API获得Bean实例
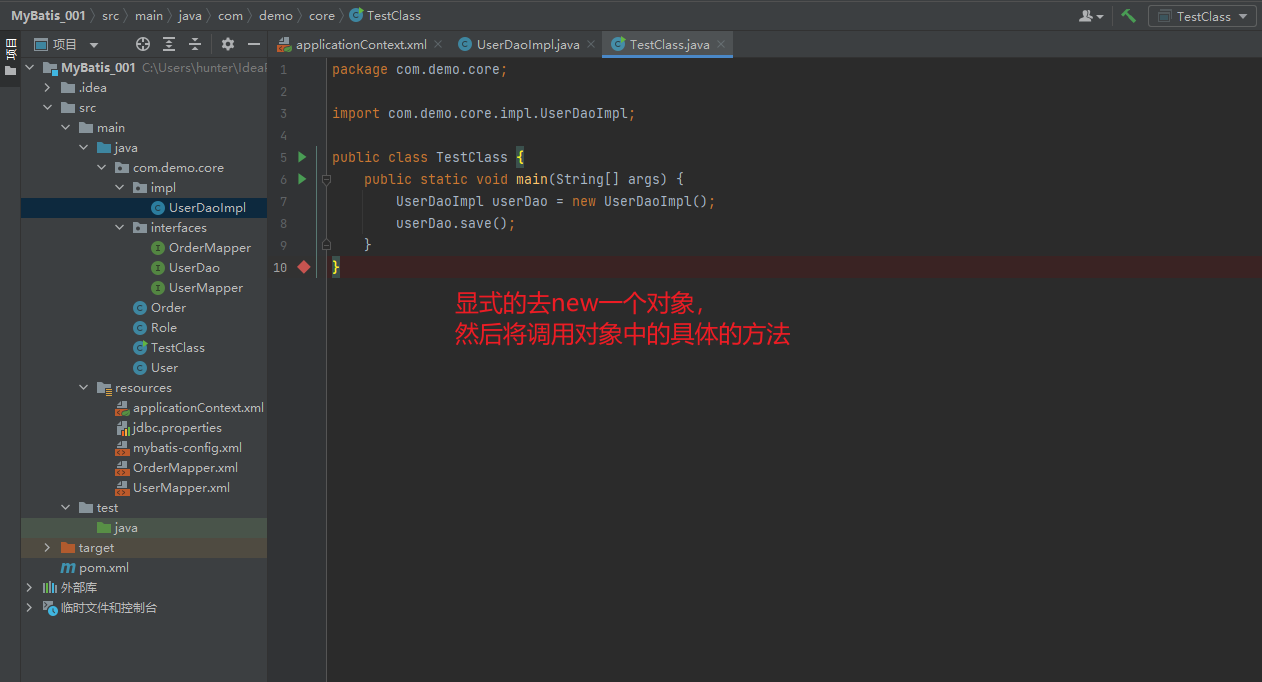
package com.demo.core;

import com.demo.core.impl.UserDaoImpl;

public class TestClass {
    public static void main(String[] args) {
        UserDaoImpl userDao = new UserDaoImpl();
        userDao.save();
    }
}
package com.demo.core;

import com.demo.core.interfaces.UserDao;
import org.springframework.context.ApplicationContext;
import org.springframework.context.support.ClassPathXmlApplicationContext;

public class TestClass {
    public static void main(String[] args) {
//        显式的去new一个对象,然后将调用对象中的具体的方法
//        UserDaoImpl userDao = new UserDaoImpl();
//        userDao.save();

//        创建一个ApplicationContext类型的对象 多态的写法
        ApplicationContext applicationContext = new
                ClassPathXmlApplicationContext("applicationContext.xml");

//        在applicationContext文件中对应的bean中的id的值
//        applicationContext对象调用getBean方法
        UserDao userDao = (UserDao) applicationContext.getBean("userDao");
        userDao.save();
    }
}

1.3. Spring配置文件
1.3.1. Bean标签基本配置
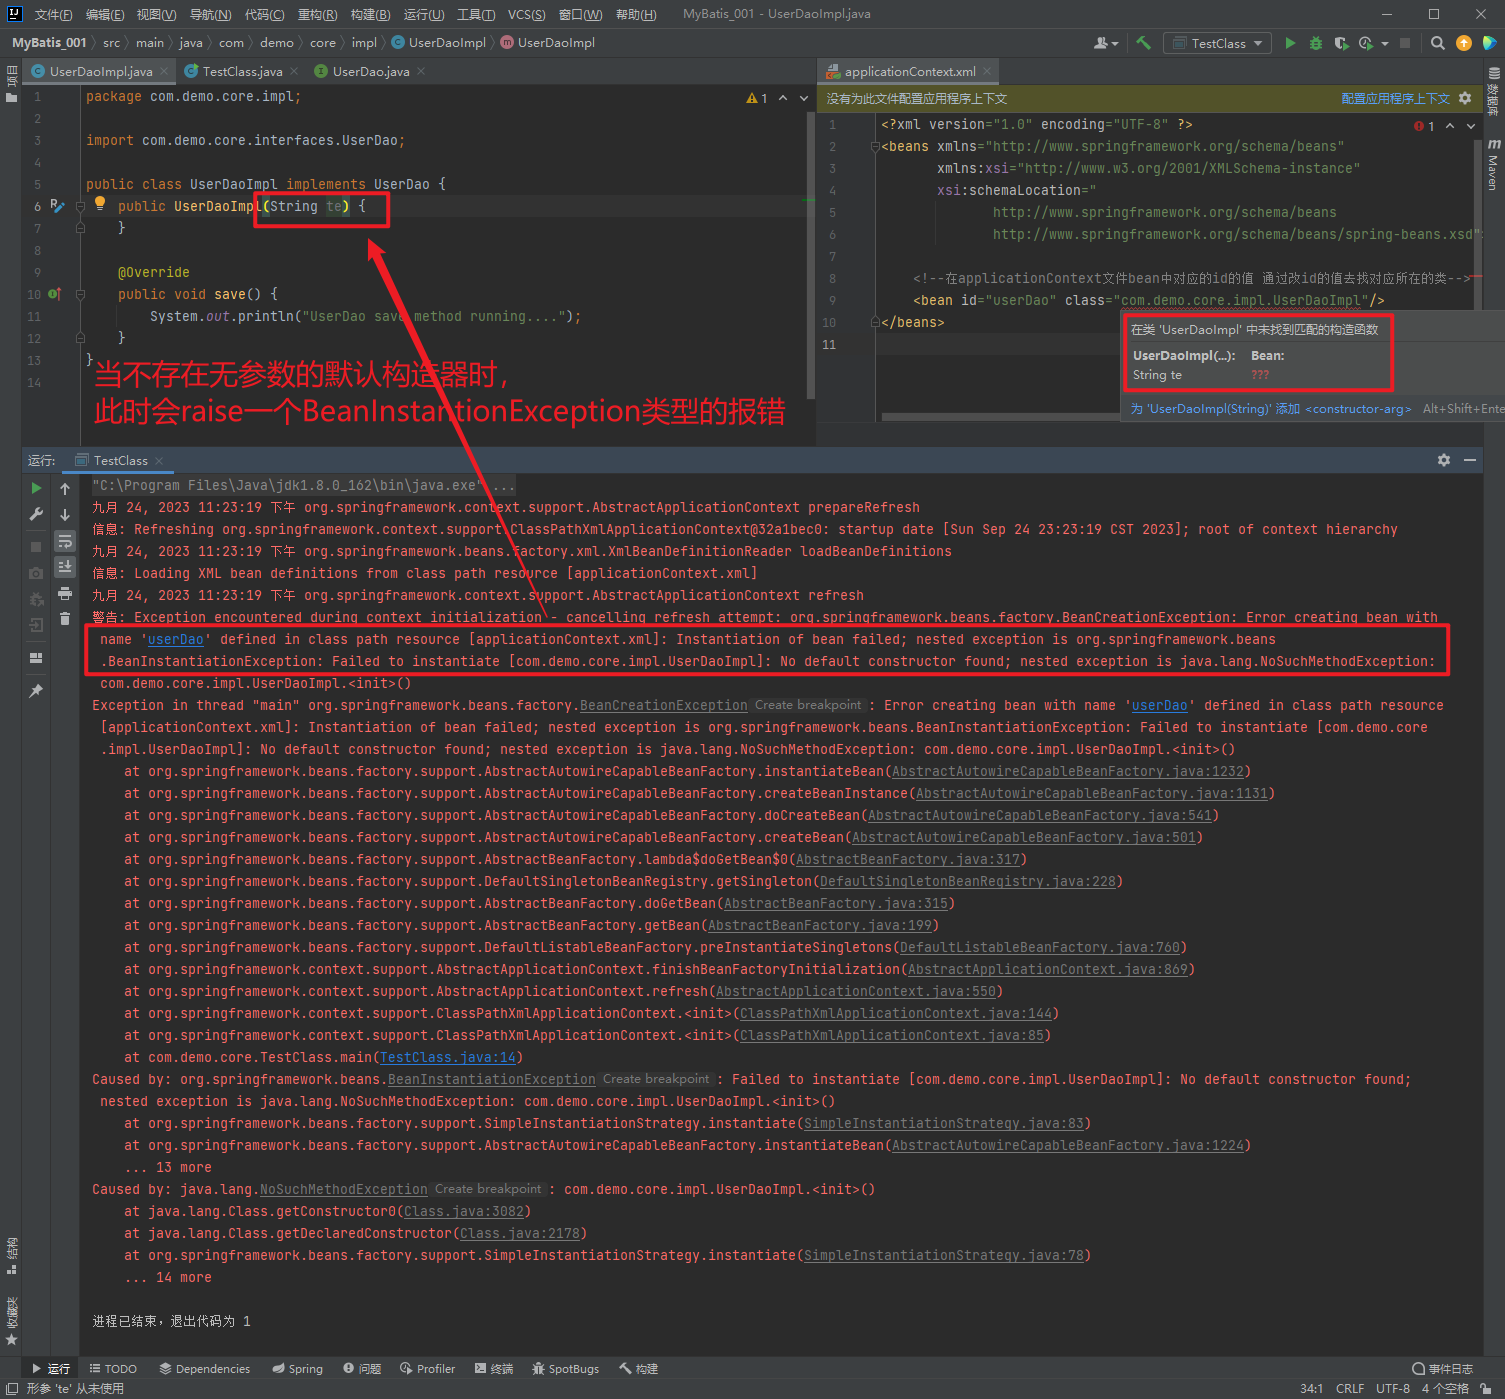
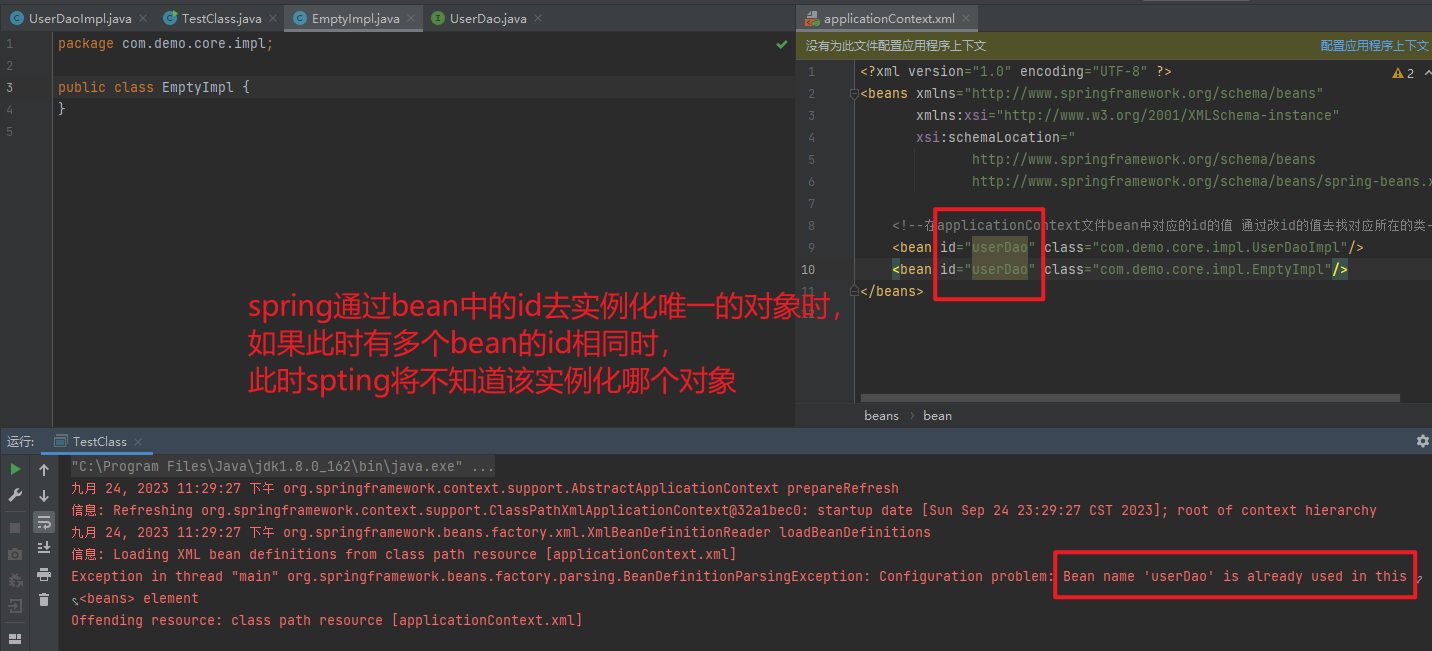
用于配置对象交由Spring来创建。默认情况下它调用的是类中的无参构造函数,如果没有无参构造函数则不能创建成功。
基本属性:
id: Bean实例在Spring容器中的唯一标识
class: Bean的全限定名称
1.3.2. Bean标签范围配置
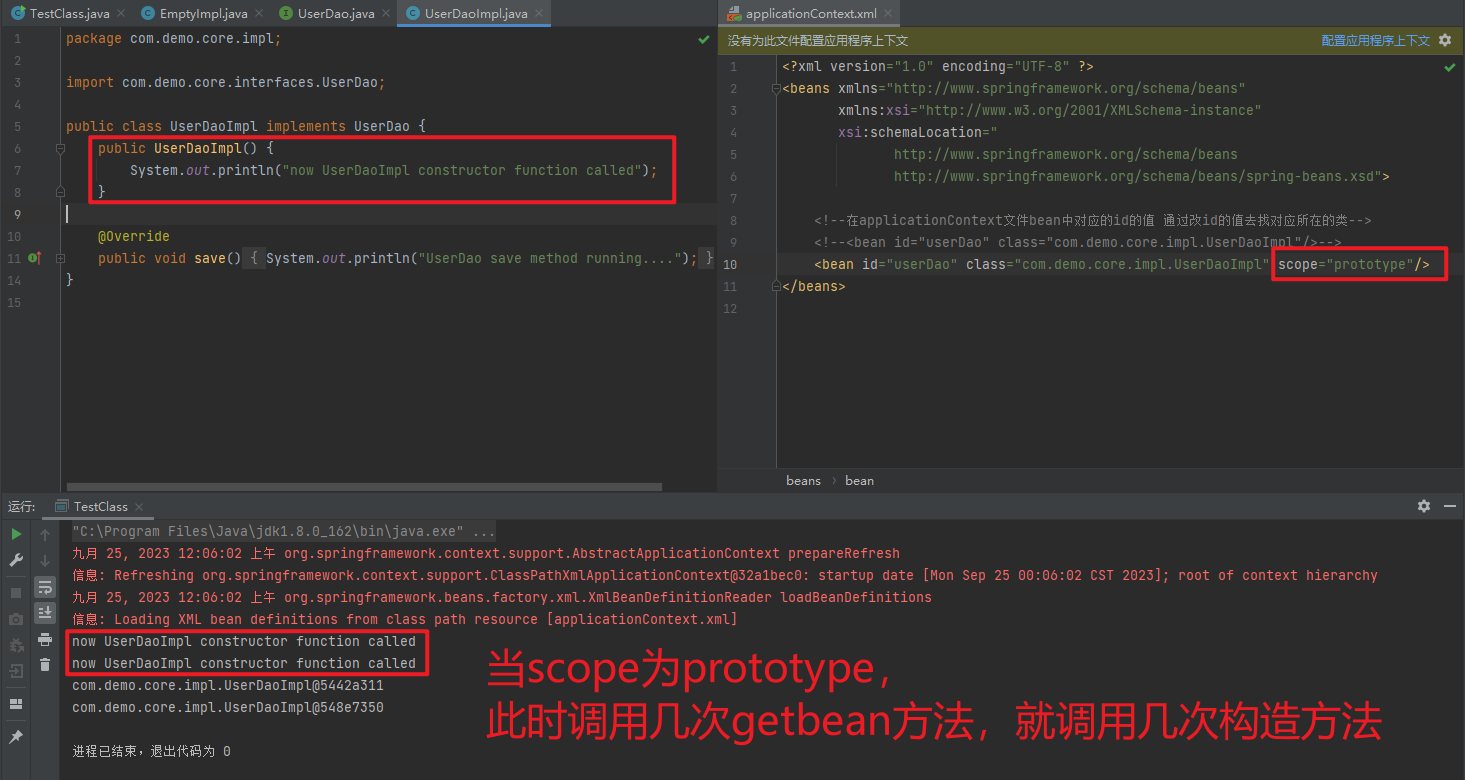
scope: 指对象的作用范围(作用域),取值如下:
| 取值范围 | 说明 |
| singleton | 默认值,单例的 |
| prototype | 多例的 |
| request | WEB 项目中,Spring 创建一个 Bean 的对象,将对象存入到 request 域中 |
| session | WEB 项目中,Spring 创建一个 Bean 的对象,将对象存入到 session 域中 |
| global session | WEB 项目中,应用在 Portlet环境,如果没有 Portlet环境那么globalSession相当于 session |
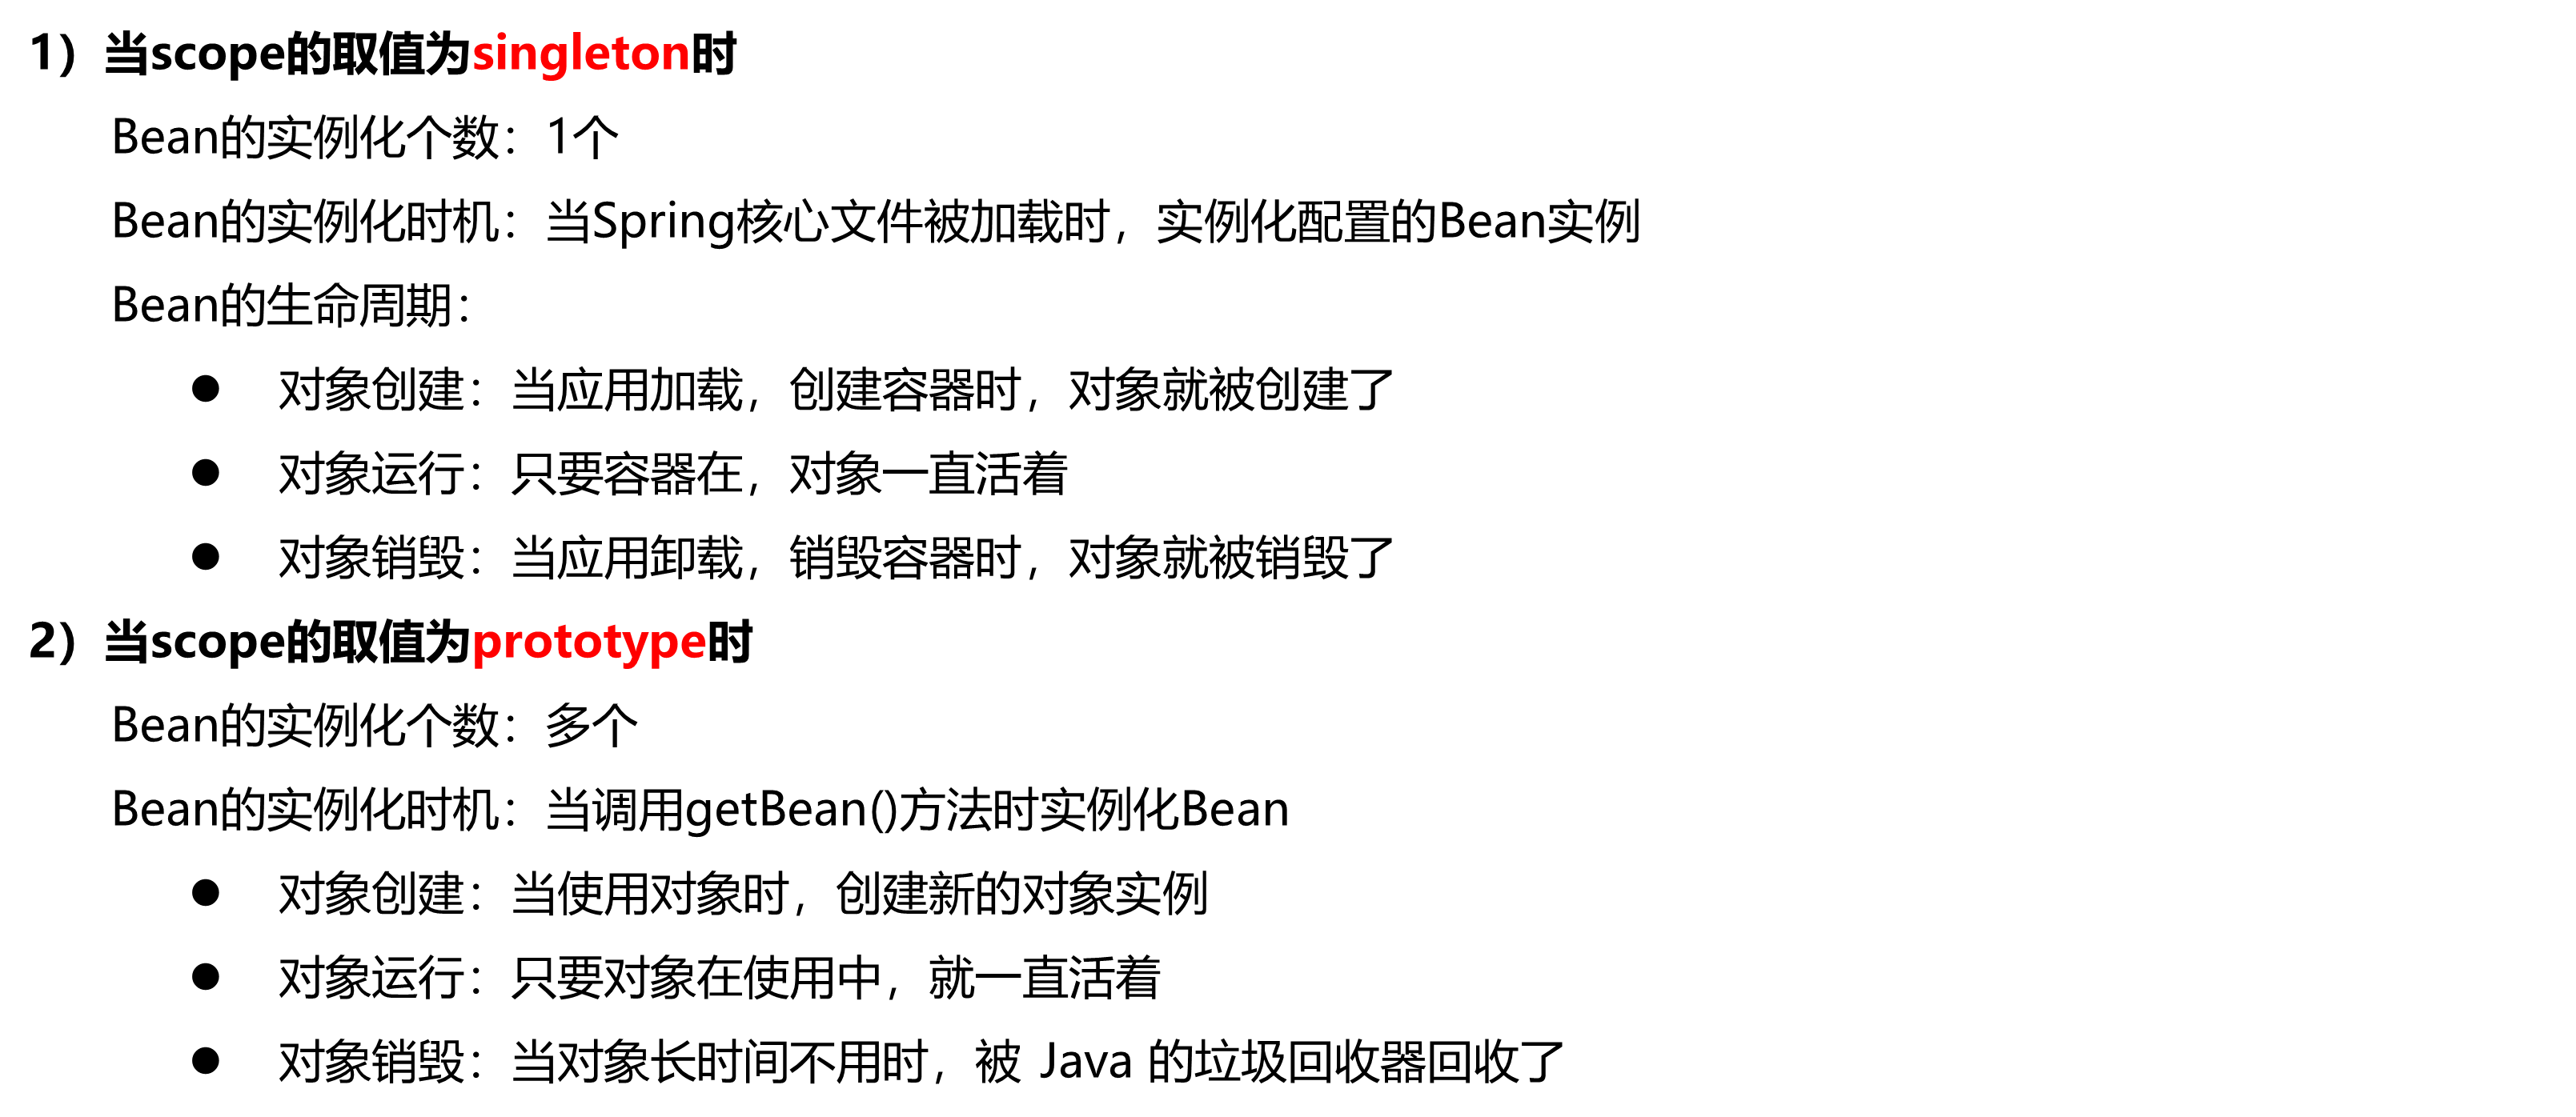
1.3.2.1. singleton
- 单例
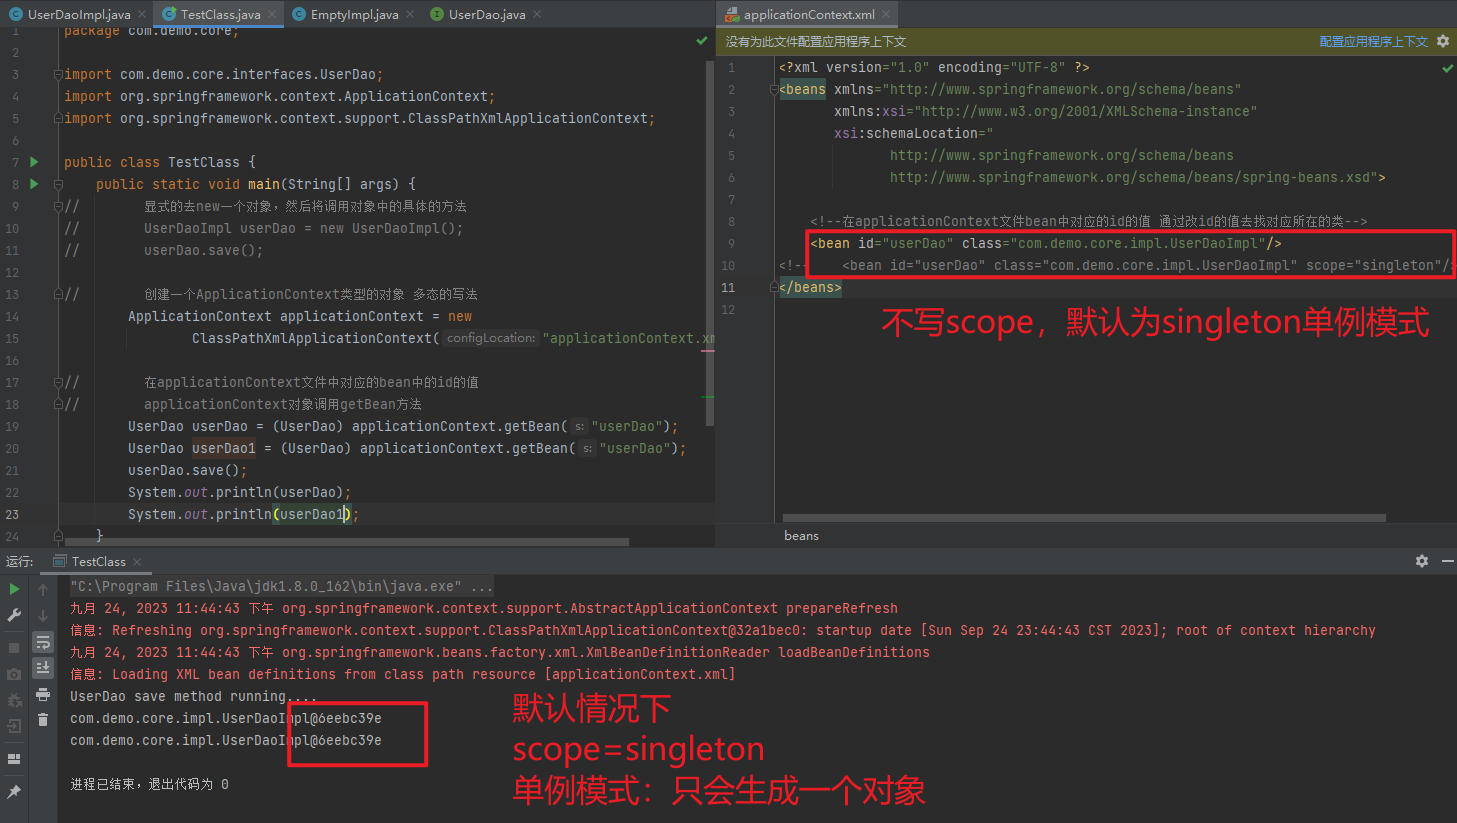
Bean实例化一次

1.3.2.2. prototype
- 多例
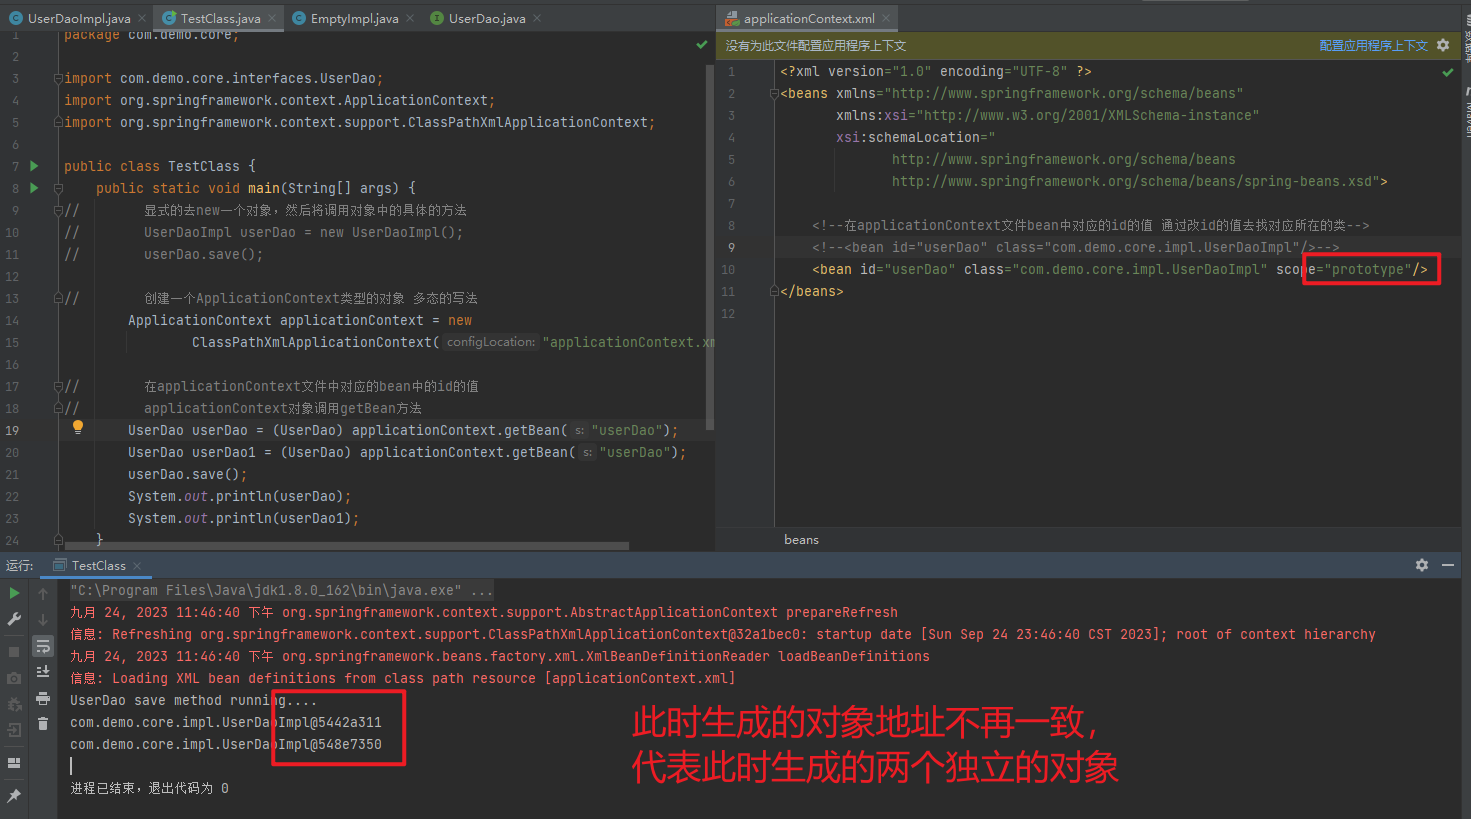
Bean实例化多次
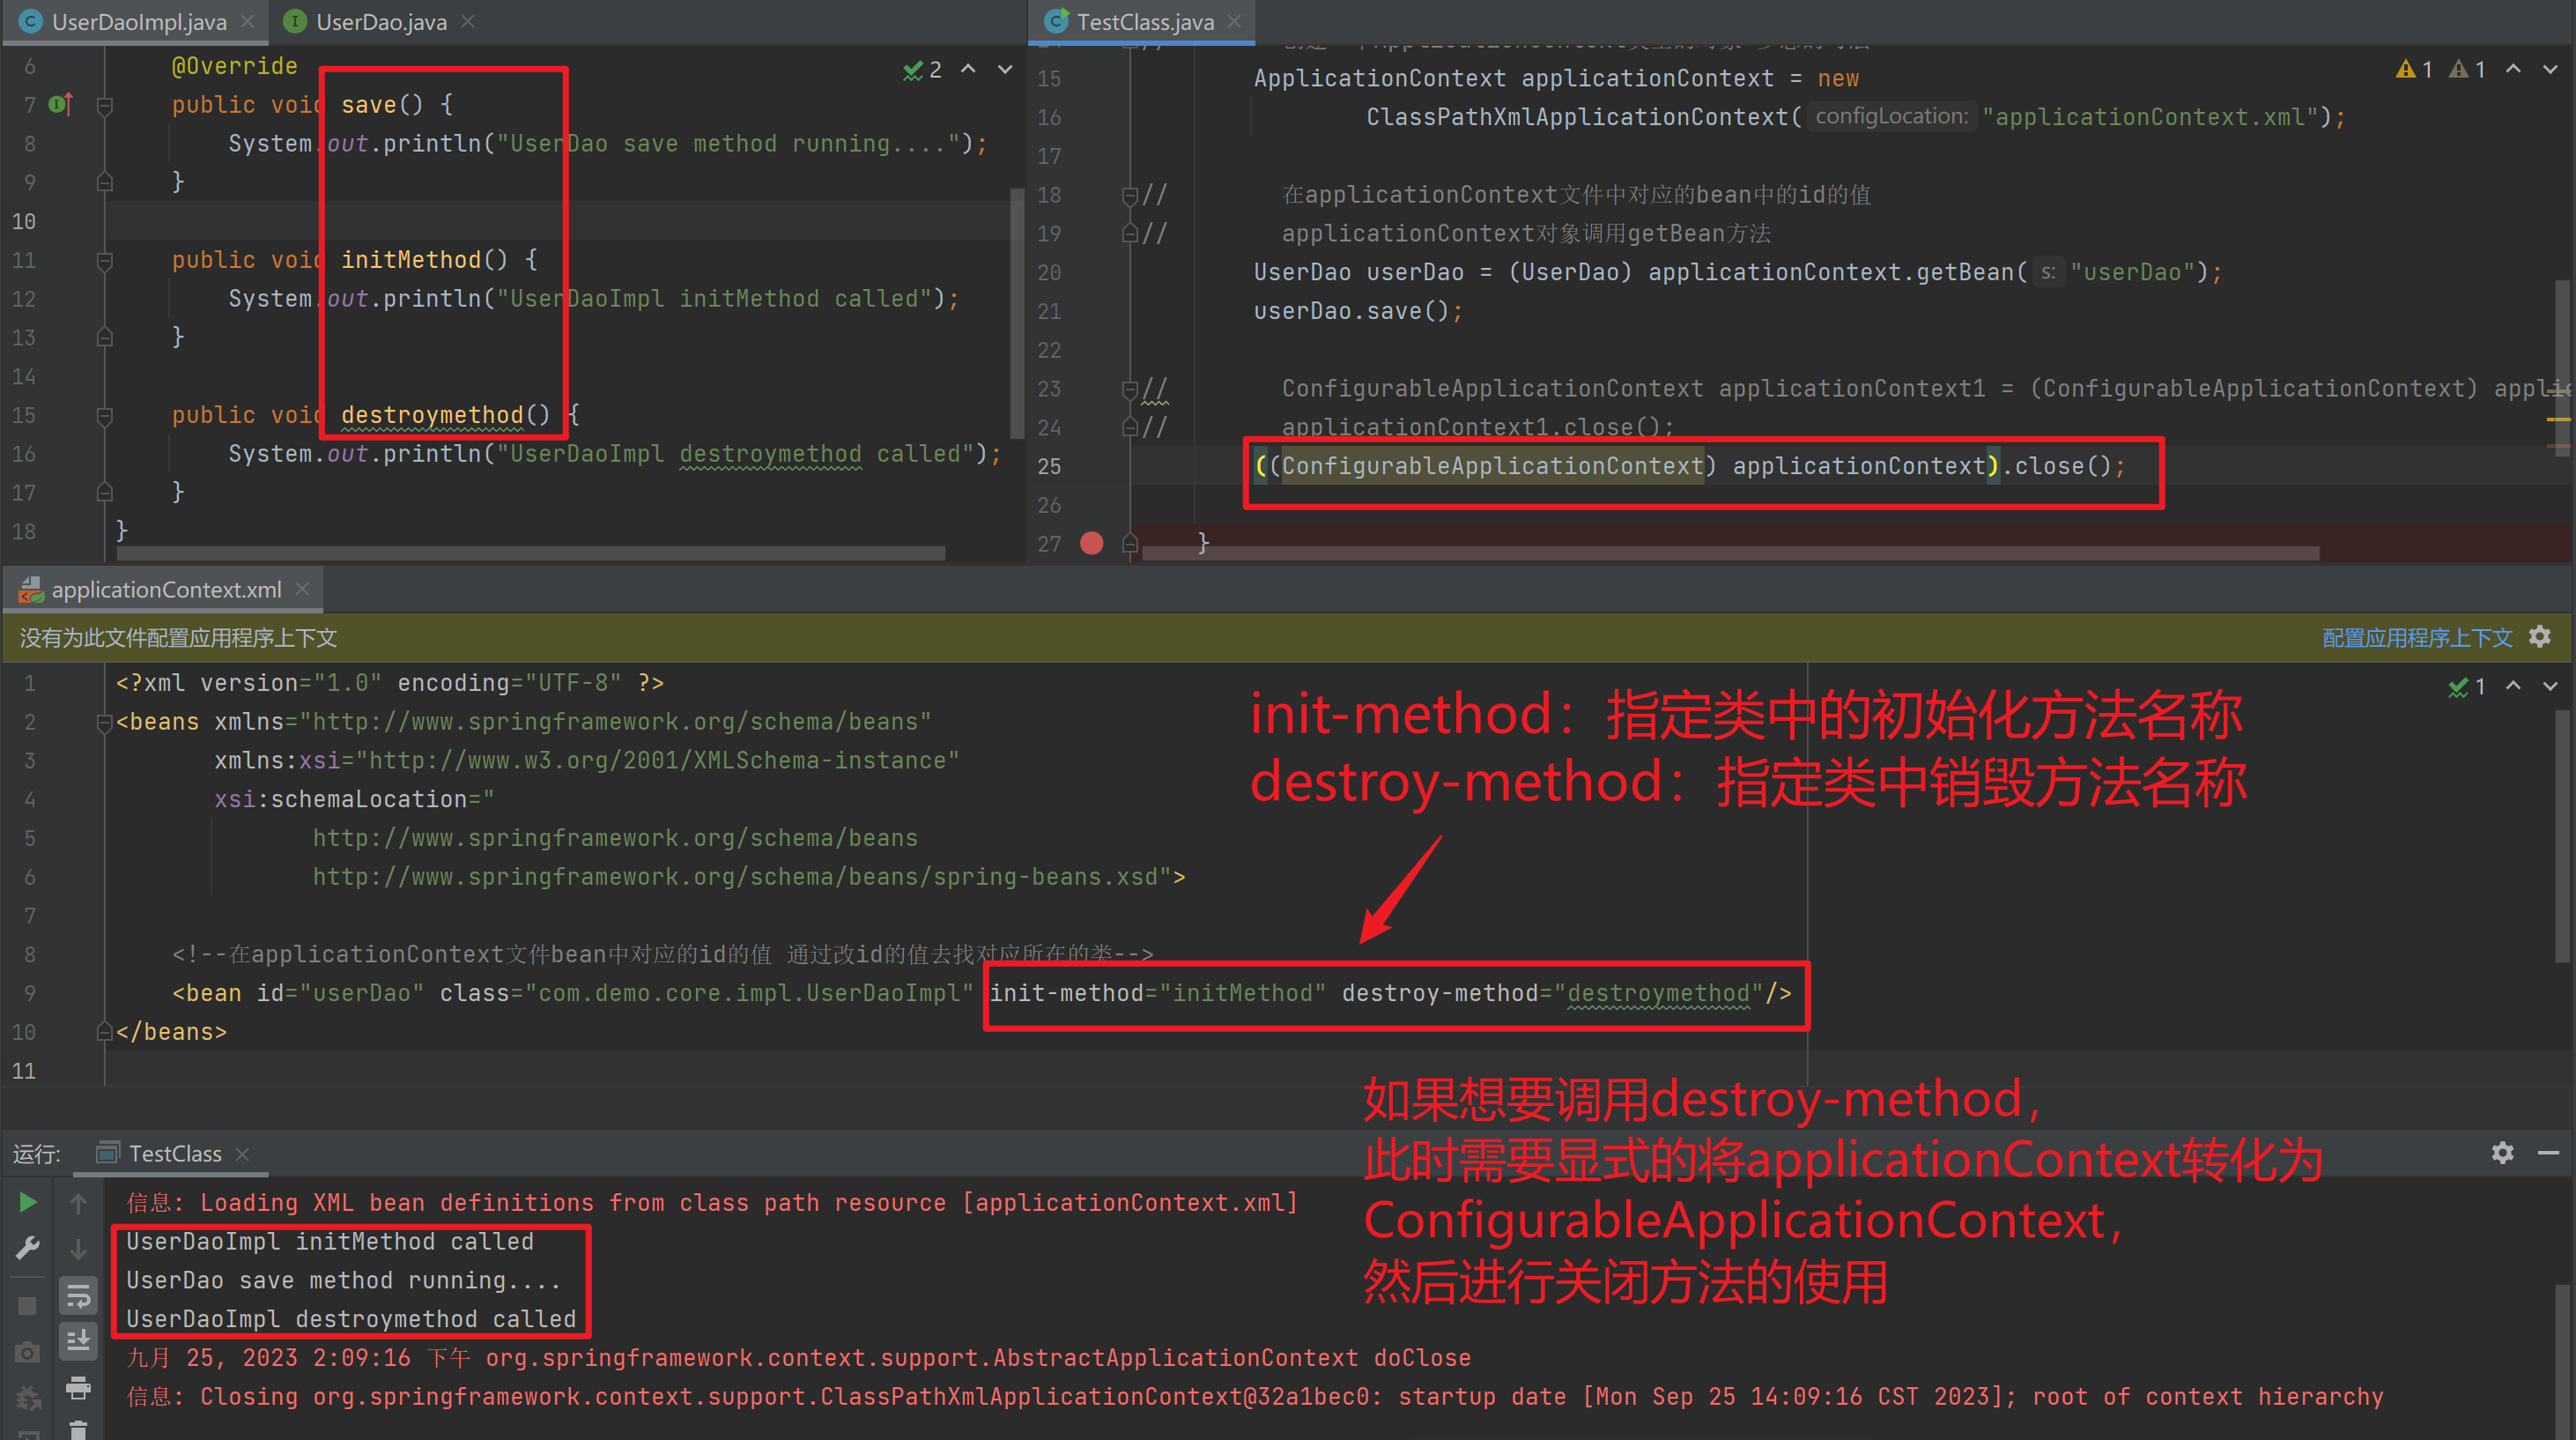
1.3.3. Bean生命周期配置
init-method:指定类中的初始化方法名称
destroy-method:指定类中销毁方法名称
package com.demo.core;

import com.demo.core.interfaces.UserDao;
import org.springframework.context.ApplicationContext;
import org.springframework.context.ConfigurableApplicationContext;
import org.springframework.context.support.ClassPathXmlApplicationContext;

public class TestClass {
    public static void main(String[] args) {
//        显式的去new一个对象,然后将调用对象中的具体的方法
//        UserDaoImpl userDao = new UserDaoImpl();
//        userDao.save();

//        创建一个ApplicationContext类型的对象 多态的写法
        ApplicationContext applicationContext = new
                ClassPathXmlApplicationContext("applicationContext.xml");

//        在applicationContext文件中对应的bean中的id的值
//        applicationContext对象调用getBean方法
        UserDao userDao = (UserDao) applicationContext.getBean("userDao");
        userDao.save();

//        ConfigurableApplicationContext applicationContext1 = (ConfigurableApplicationContext) applicationContext;
//        applicationContext1.close();
        ((ConfigurableApplicationContext) applicationContext).close();

    }
}
package com.demo.core.impl;
import com.demo.core.interfaces.UserDao;
public class UserDaoImpl implements UserDao {
@Override
public void save() {
System.out.println("UserDao save method running....");
}
public void initMethod() {
System.out.println("UserDaoImpl initMethod called");
}
public void destroymethod() {
System.out.println("UserDaoImpl destroymethod called");
}
}<?xml version="1.0" encoding="UTF-8" ?>
<beans xmlns="http://www.springframework.org/schema/beans"
xmlns:xsi="http://www.w3.org/2001/XMLSchema-instance"
xsi:schemaLocation="
http://www.springframework.org/schema/beans
http://www.springframework.org/schema/beans/spring-beans.xsd">
<!--在applicationContext文件bean中对应的id的值 通过改id的值去找对应所在的类-->
<bean id="userDao" class="com.demo.core.impl.UserDaoImpl" init-method="initMethod" destroy-method="destroymethod"/>
</beans>package com.demo.core.interfaces;
public interface UserDao {
public void save();
}
1.3.4. Bean实例化三种方式
- 无参
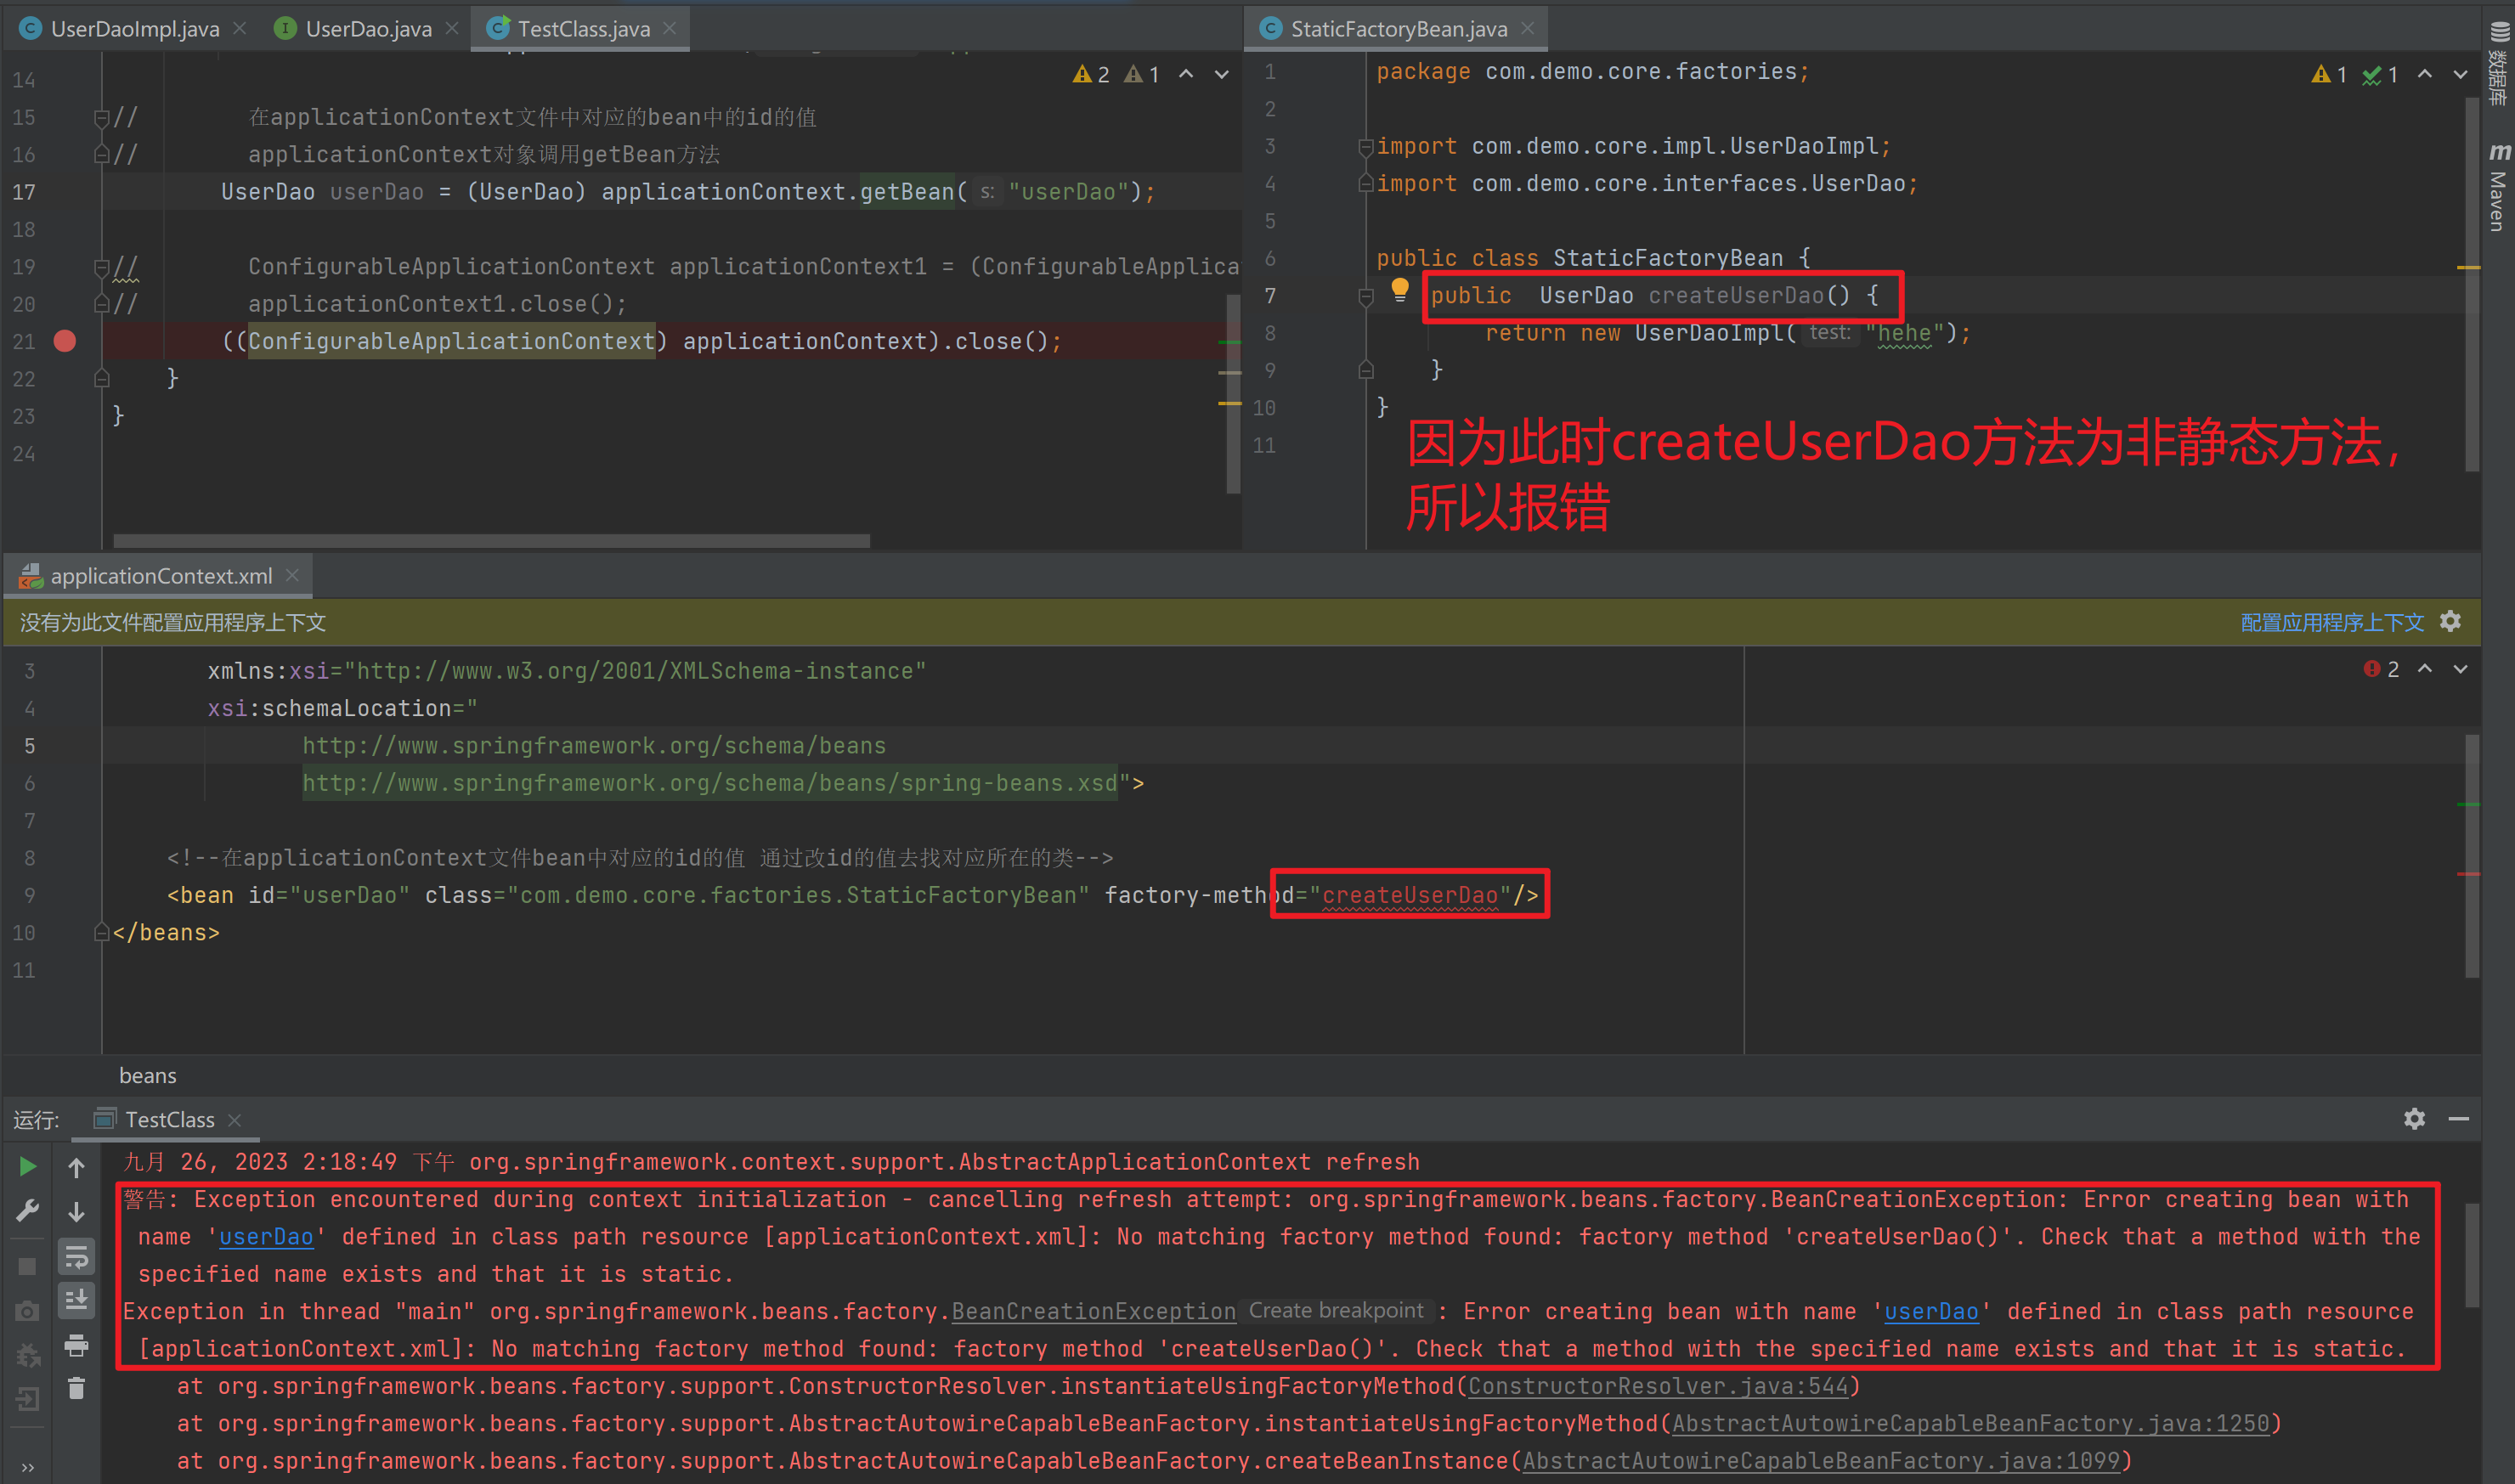
构造方法实例化 - 工厂
静态方法实例化 - 工厂实例方法实例化
1.3.4.1. 使用无参构造方法实例化
它会根据默认无参构造方法来创建类对象,如果bean中没有默认无参构造函数,将会创建失败
<bean id="userDao" class="com.itbihuo.dao.impl.UserDaoImpl"/>1.3.4.2. 工厂静态方法实例化
工厂的静态方法返回Bean实例
package com.demo.core;

import com.demo.core.interfaces.UserDao;
import org.springframework.context.ApplicationContext;
import org.springframework.context.ConfigurableApplicationContext;
import org.springframework.context.support.ClassPathXmlApplicationContext;

public class TestClass {
    public static void main(String[] args) {

//        创建一个ApplicationContext类型的对象 多态的写法
        ApplicationContext applicationContext = new
                ClassPathXmlApplicationContext("applicationContext.xml");

//        在applicationContext文件中对应的bean中的id的值
//        applicationContext对象调用getBean方法
        UserDao userDao = (UserDao) applicationContext.getBean("userDao");

//        ConfigurableApplicationContext applicationContext1 = (ConfigurableApplicationContext) applicationContext;
//        applicationContext1.close();
        ((ConfigurableApplicationContext) applicationContext).close();
    }
}
package com.demo.core.factories;
import com.demo.core.impl.UserDaoImpl;
import com.demo.core.interfaces.UserDao;
public class StaticFactoryBean {
public static UserDao createUserDao() {
return new UserDaoImpl("hehe");
}
}package com.demo.core.impl;
import com.demo.core.interfaces.UserDao;
public class UserDaoImpl implements UserDao {
public UserDaoImpl(String test) {
System.out.println("now UserDaoImpl");
}
@Override
public void save() {
System.out.println("UserDao save method running....");
}
public void initMethod() {
System.out.println("UserDaoImpl initMethod called");
}
public void destroymethod() {
System.out.println("UserDaoImpl destroymethod called");
}
}<?xml version="1.0" encoding="UTF-8" ?>
<beans xmlns="http://www.springframework.org/schema/beans"
xmlns:xsi="http://www.w3.org/2001/XMLSchema-instance"
xsi:schemaLocation="
http://www.springframework.org/schema/beans
http://www.springframework.org/schema/beans/spring-beans.xsd">
<!--在applicationContext文件bean中对应的id的值 通过改id的值去找对应所在的类-->
<bean id="userDao" class="com.demo.core.factories.StaticFactoryBean" factory-method="createUserDao"/>
</beans>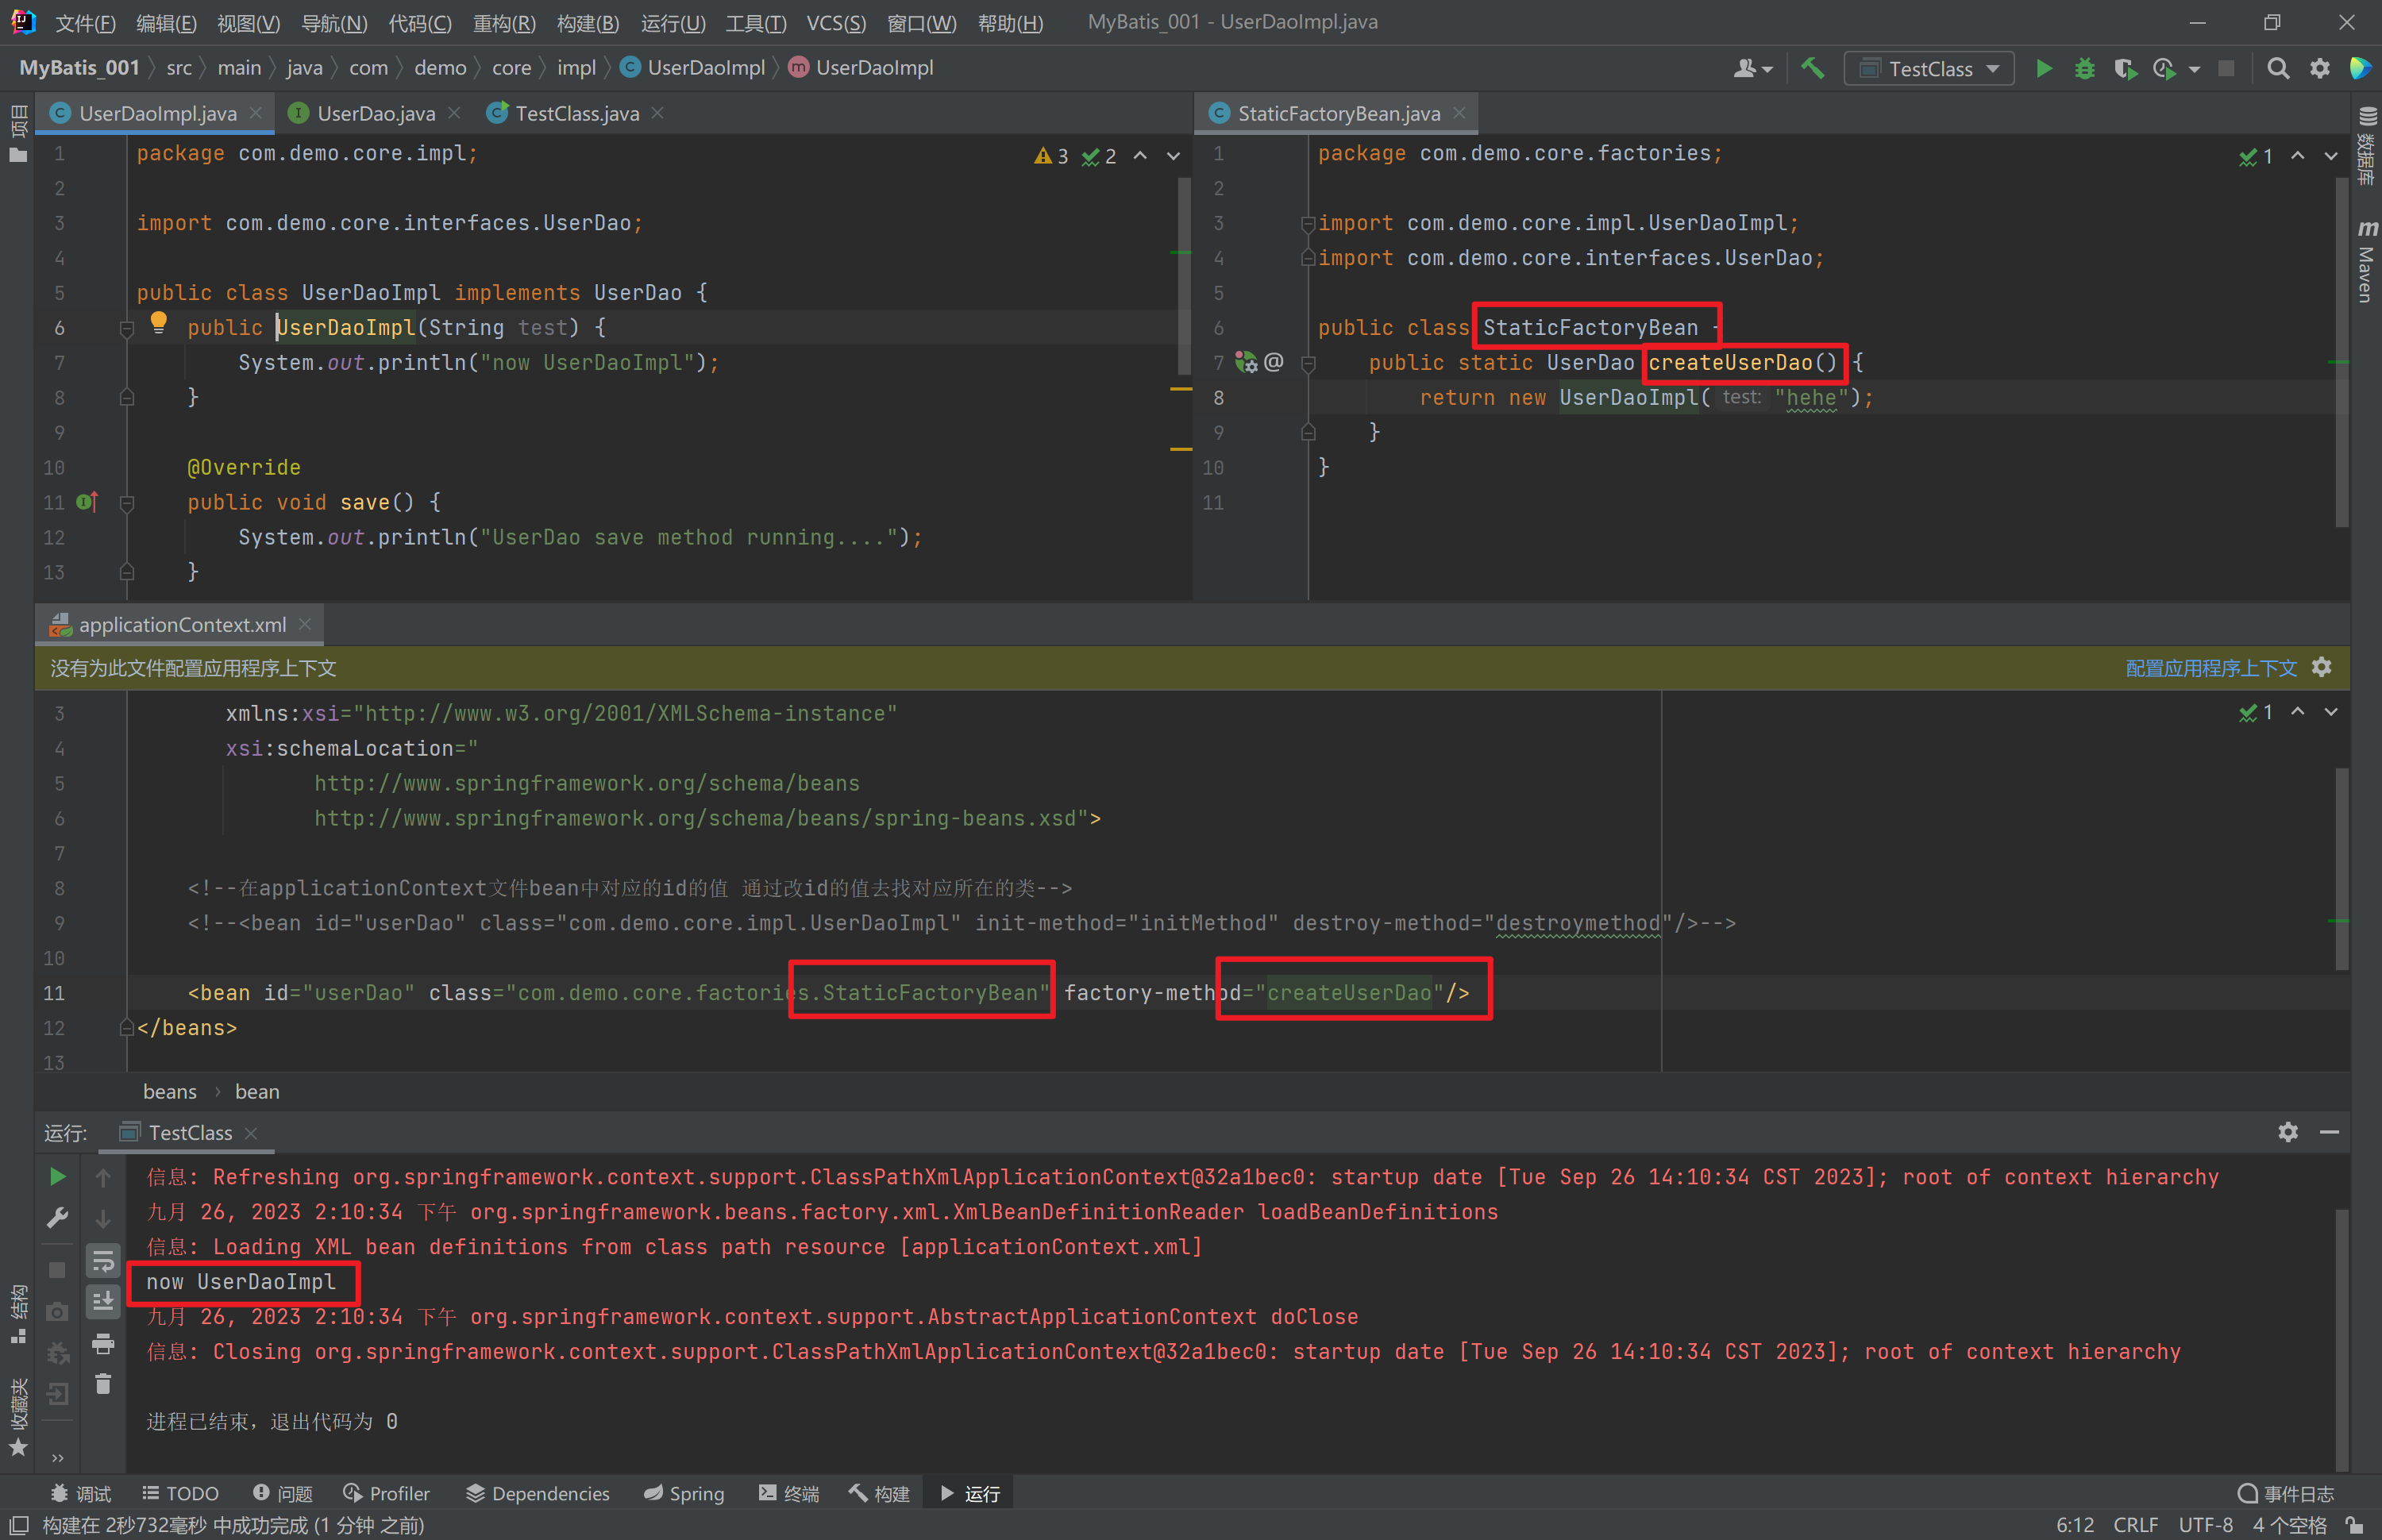
如果是非静态方法,则报错
1.3.4.3. 工厂实例方法实例化
工厂的非静态方法返回Bean实例
package com.demo.core;

import com.demo.core.interfaces.UserDao;
import org.springframework.context.ApplicationContext;
import org.springframework.context.ConfigurableApplicationContext;
import org.springframework.context.support.ClassPathXmlApplicationContext;

public class TestClass {
    public static void main(String[] args) {

//        创建一个ApplicationContext类型的对象 多态的写法
        ApplicationContext applicationContext = new
                ClassPathXmlApplicationContext("applicationContext.xml");

//        在applicationContext文件中对应的bean中的id的值
//        applicationContext对象调用getBean方法
        UserDao userDao = (UserDao) applicationContext.getBean("userDao");

//        ConfigurableApplicationContext applicationContext1 = (ConfigurableApplicationContext) applicationContext;
//        applicationContext1.close();
        ((ConfigurableApplicationContext) applicationContext).close();
    }
}
package com.demo.core.factories;
import com.demo.core.impl.UserDaoImpl;
import com.demo.core.interfaces.UserDao;
public class NonStaticFactoryBean {
public UserDao createUserDao() {
return new UserDaoImpl("hahaha");
}
}package com.demo.core.impl;
import com.demo.core.interfaces.UserDao;
public class UserDaoImpl implements UserDao {
public UserDaoImpl(String test) {
System.out.println("now UserDaoImpl");
}
@Override
public void save() {
System.out.println("UserDao save method running....");
}
public void initMethod() {
System.out.println("UserDaoImpl initMethod called");
}
public void destroymethod() {
System.out.println("UserDaoImpl destroymethod called");
}
}<?xml version="1.0" encoding="UTF-8" ?>
<beans xmlns="http://www.springframework.org/schema/beans"
xmlns:xsi="http://www.w3.org/2001/XMLSchema-instance"
xsi:schemaLocation="
http://www.springframework.org/schema/beans
http://www.springframework.org/schema/beans/spring-beans.xsd">
<!--在applicationContext文件bean中对应的id的值 通过改id的值去找对应所在的类-->
<bean id="nonStaticFactoryBean" class="com.demo.core.factories.NonStaticFactoryBean"/>
<bean id="userDao" factory-bean="nonStaticFactoryBean" factory-method="createUserDao"/>
</beans>
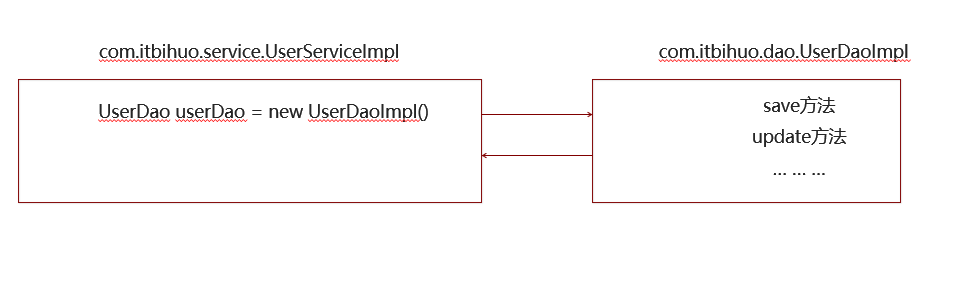
1.3.5. Bean的依赖注入入门
- 创建
UserService,UserService内部在调用UserDao的save()方法
package com.demo.core.interfaces;

public interface UserService {
    public void save();
}
package com.demo.core.impl;
import com.demo.core.interfaces.UserDao;
import com.demo.core.interfaces.UserService;
import org.springframework.context.ApplicationContext;
import org.springframework.context.support.ClassPathXmlApplicationContext;
public class UserServiceImpl implements UserService {
@Override
public void save() {
ApplicationContext applicationContext = new
ClassPathXmlApplicationContext("applicationContext.xml");
UserDao userDao = (UserDao) applicationContext.getBean("userDao");
userDao.save();
}
}- 将
UserServiceImpl的创建权交给Spring
<?xml version="1.0" encoding="UTF-8" ?>
<beans xmlns="http://www.springframework.org/schema/beans"
       xmlns:xsi="http://www.w3.org/2001/XMLSchema-instance"
       xsi:schemaLocation="
              http://www.springframework.org/schema/beans
              http://www.springframework.org/schema/beans/spring-beans.xsd">

    <!--在applicationContext文件bean中对应的id的值 通过改id的值去找对应所在的类-->
    <bean id="nonStaticFactoryBean" class="com.demo.core.factories.NonStaticFactoryBean"/>
    <bean id="userDao" factory-bean="nonStaticFactoryBean" factory-method="createUserDao"/>
    <bean id="userService" class="com.demo.core.impl.UserServiceImpl"/>
</beans>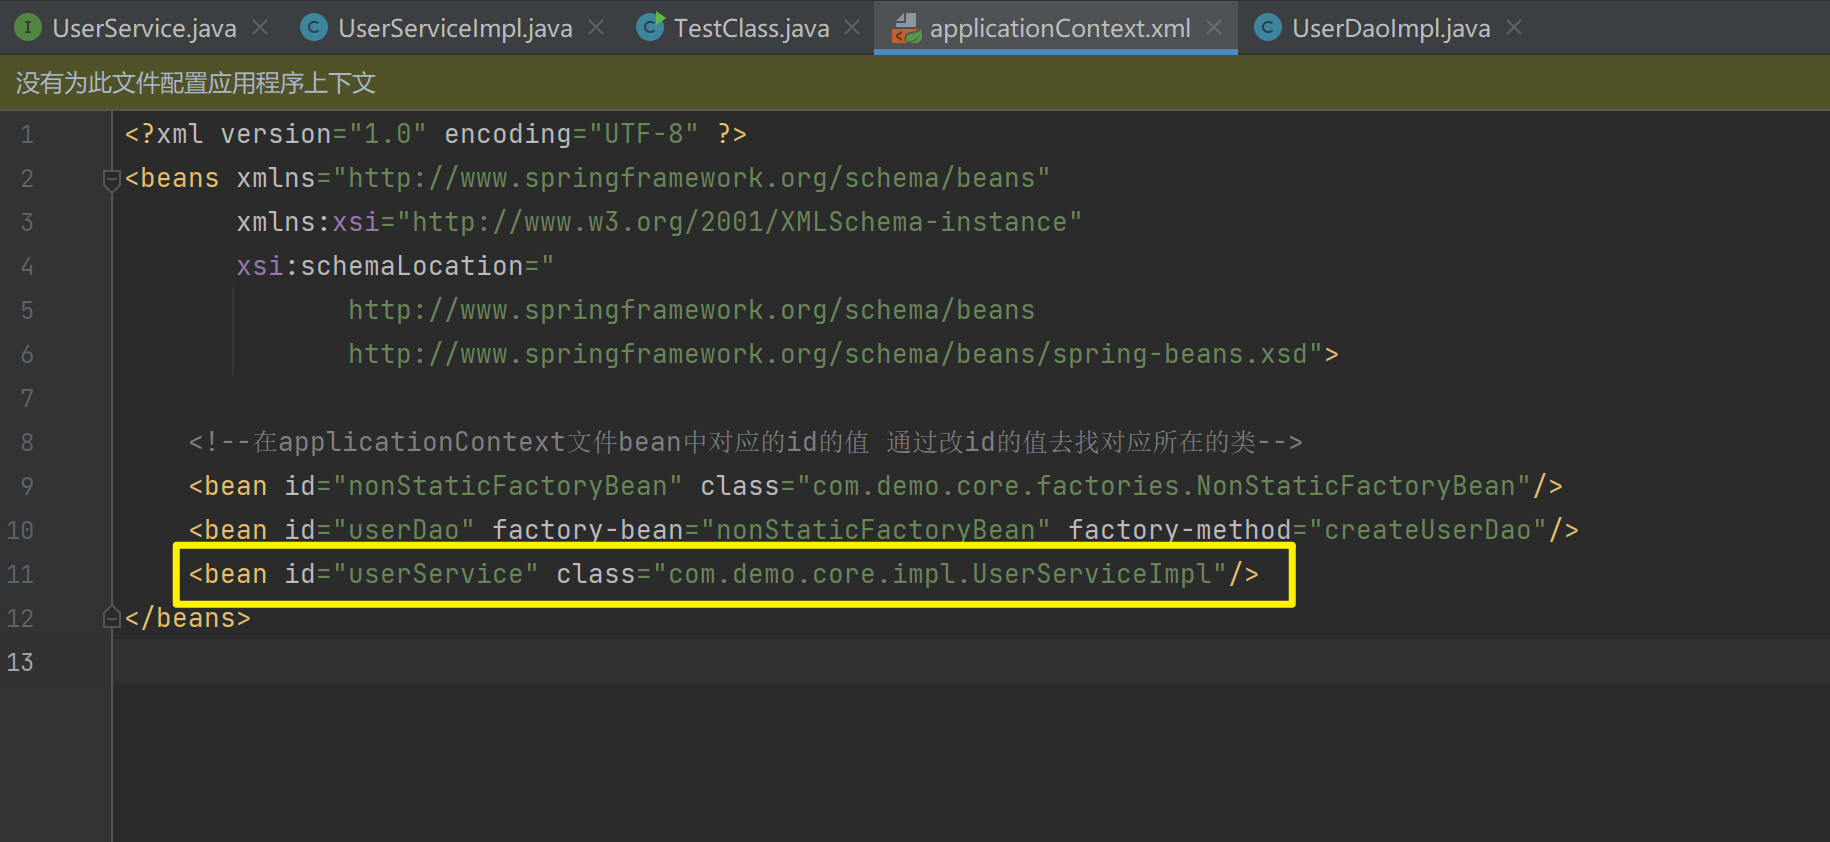
- 从
Spring容器中获得UserService进行操作
package com.demo.core;

import com.demo.core.interfaces.UserService;
import org.springframework.context.ApplicationContext;
import org.springframework.context.support.ClassPathXmlApplicationContext;

public class TestClass {
    public static void main(String[] args) {
        ApplicationContext applicationContext = new
                ClassPathXmlApplicationContext("applicationContext.xml");
        UserService userService = (UserService) applicationContext.getBean("userService");
        userService.save();
    }
}
1.3.6. Bean的依赖注入分析
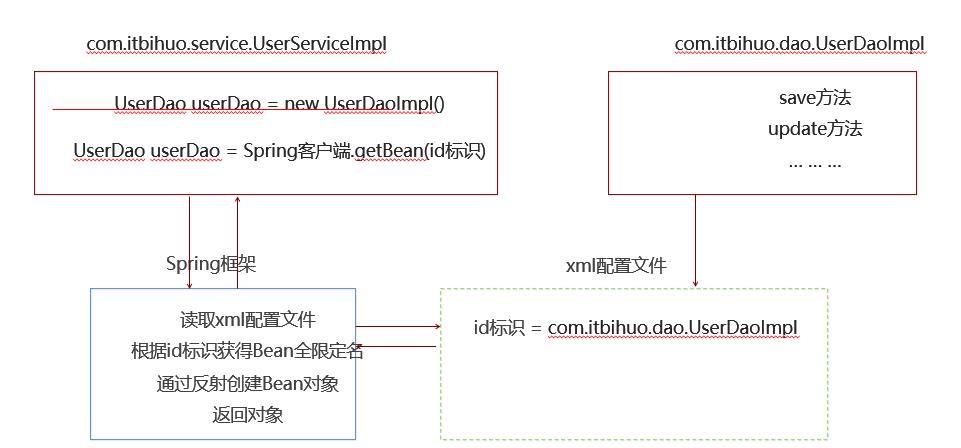
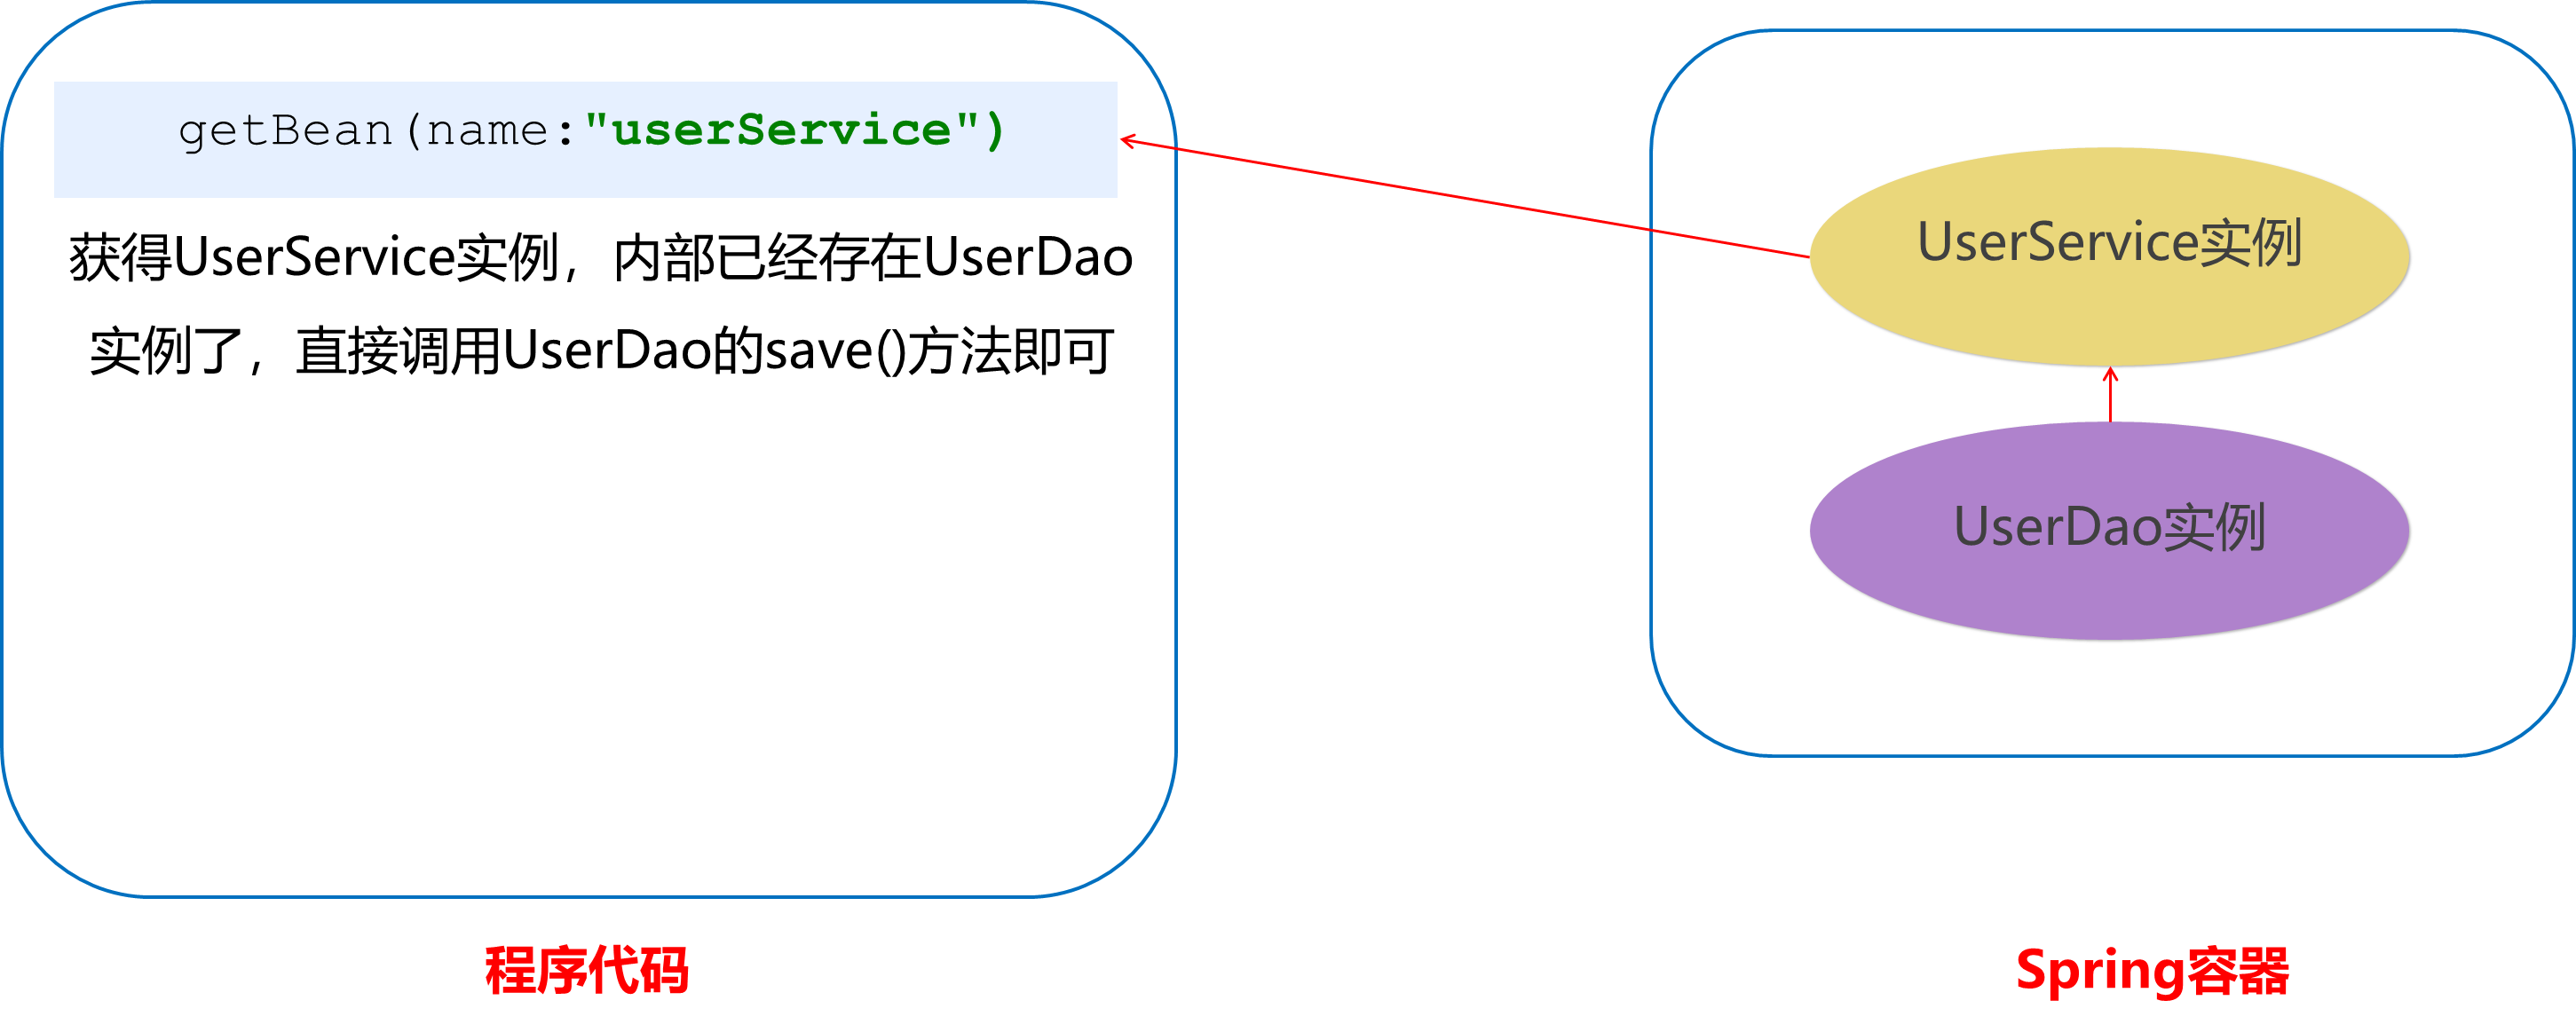
目前UserService实例和UserDao实例都存在与Spring容器中,当前的做法是在容器外部获得UserService实例和UserDao实例,然后在程序中进行结合。
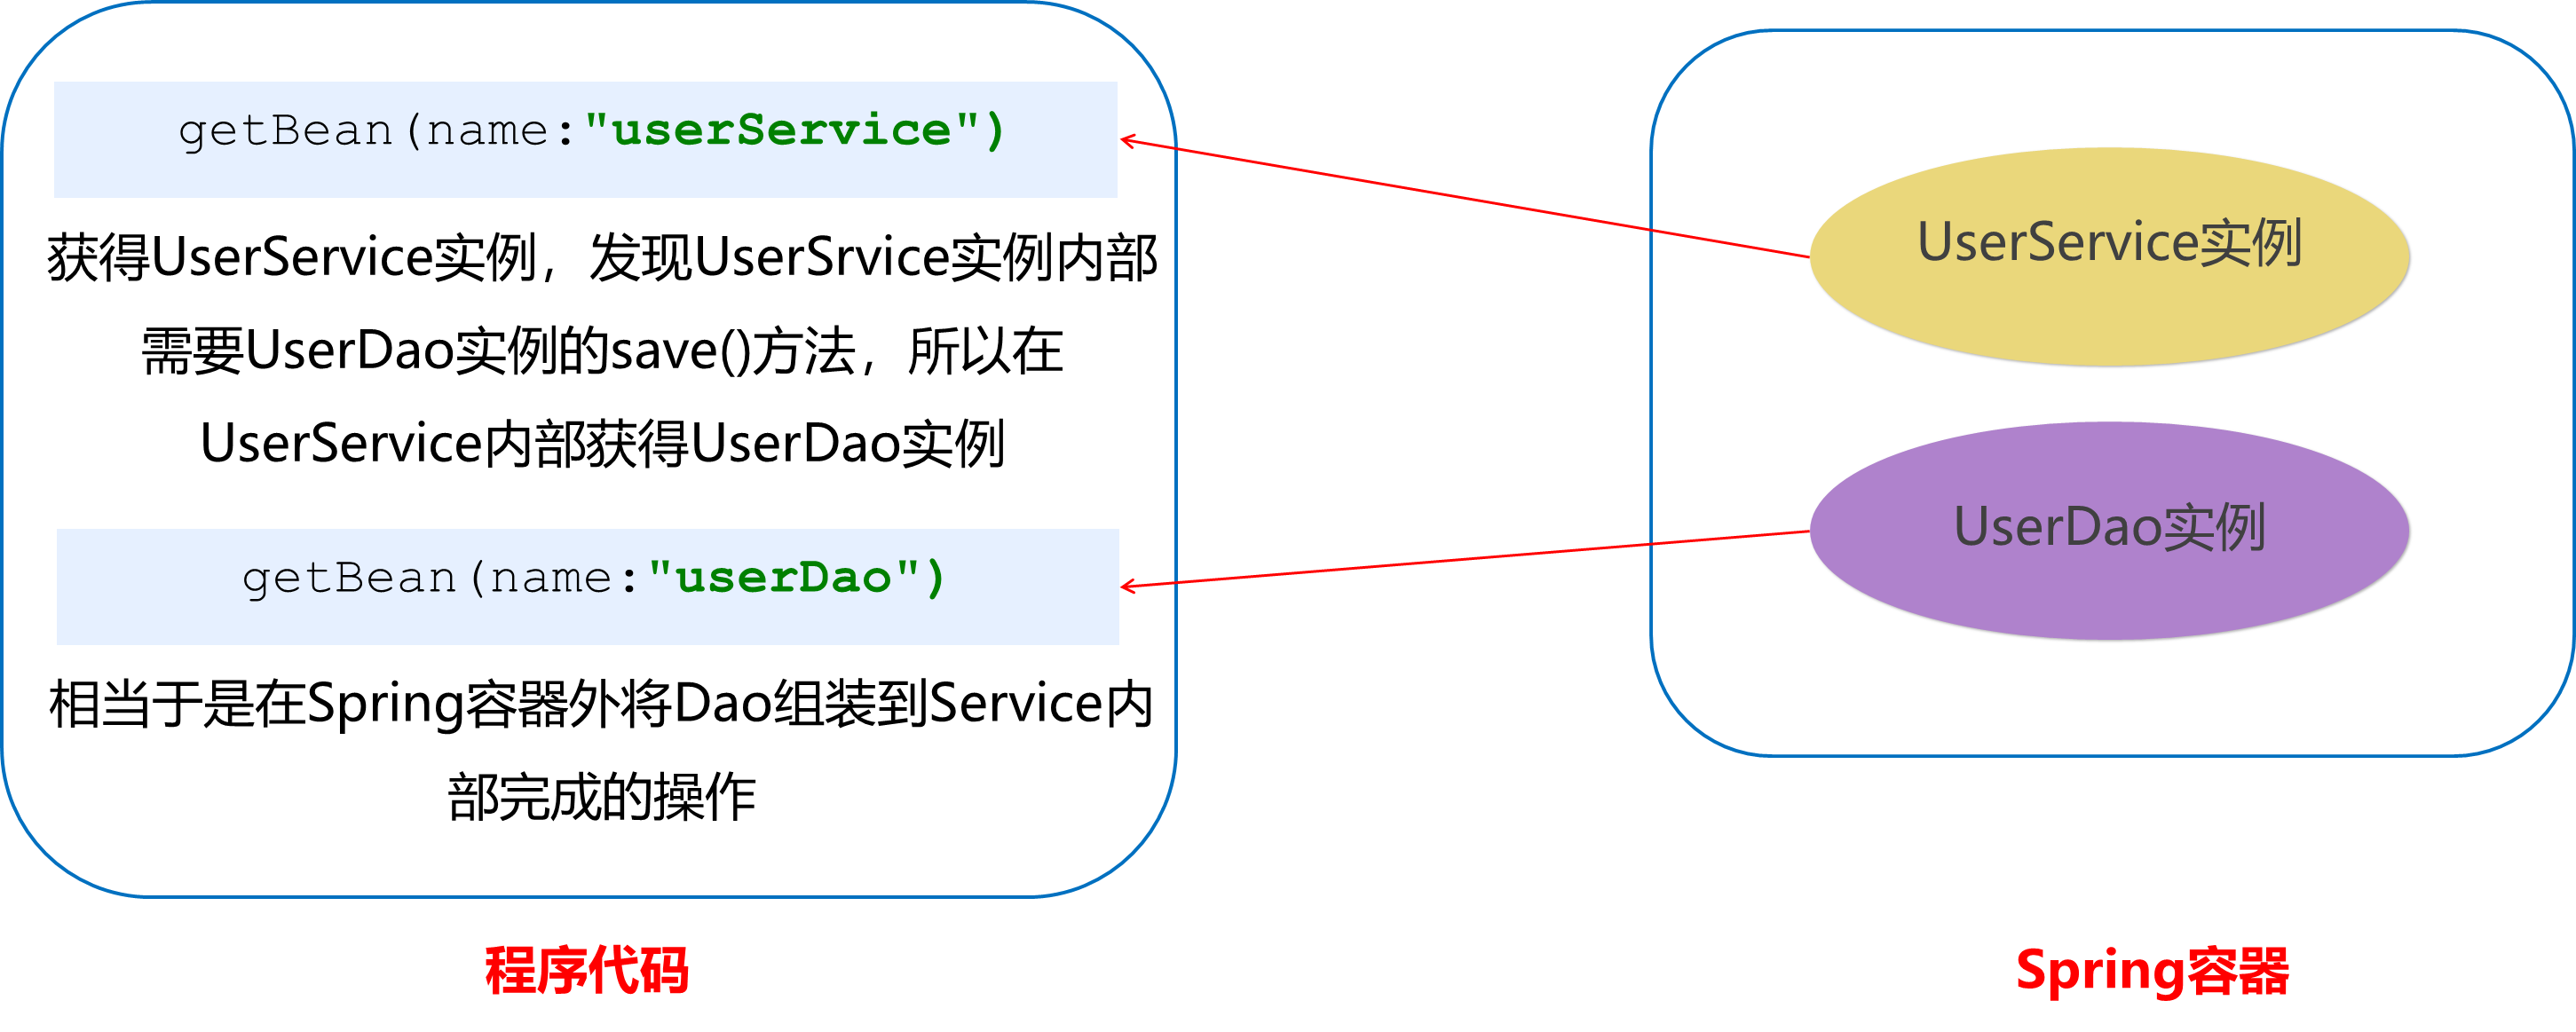
因为UserService和UserDao都在Spring容器中,而最终程序直接使用的是UserService,所以可以在Spring容器中,将UserDao设置到UserService内部。
1.3.7. Bean的依赖注入概念
依赖注入(Dependency Injection):它是 Spring 框架核心 IOC 的具体实现。
在编写程序时,通过控制反转,把对象的创建交给了Spring,但是代码中不可能出现没有依赖的情况。IOC解耦只是降低他们的依赖关系,但不会消除。例如:业务层仍会调用持久层的方法。
那这种业务层和持久层的依赖关系,在使用 Spring 之后,就让 Spring 来维护了。
简单的说,就是坐等框架把持久层对象传入业务层,而不用我们自己去获取。
1.3.8. Bean的依赖注入方式
怎么将UserDao怎样注入到UserService内部呢?
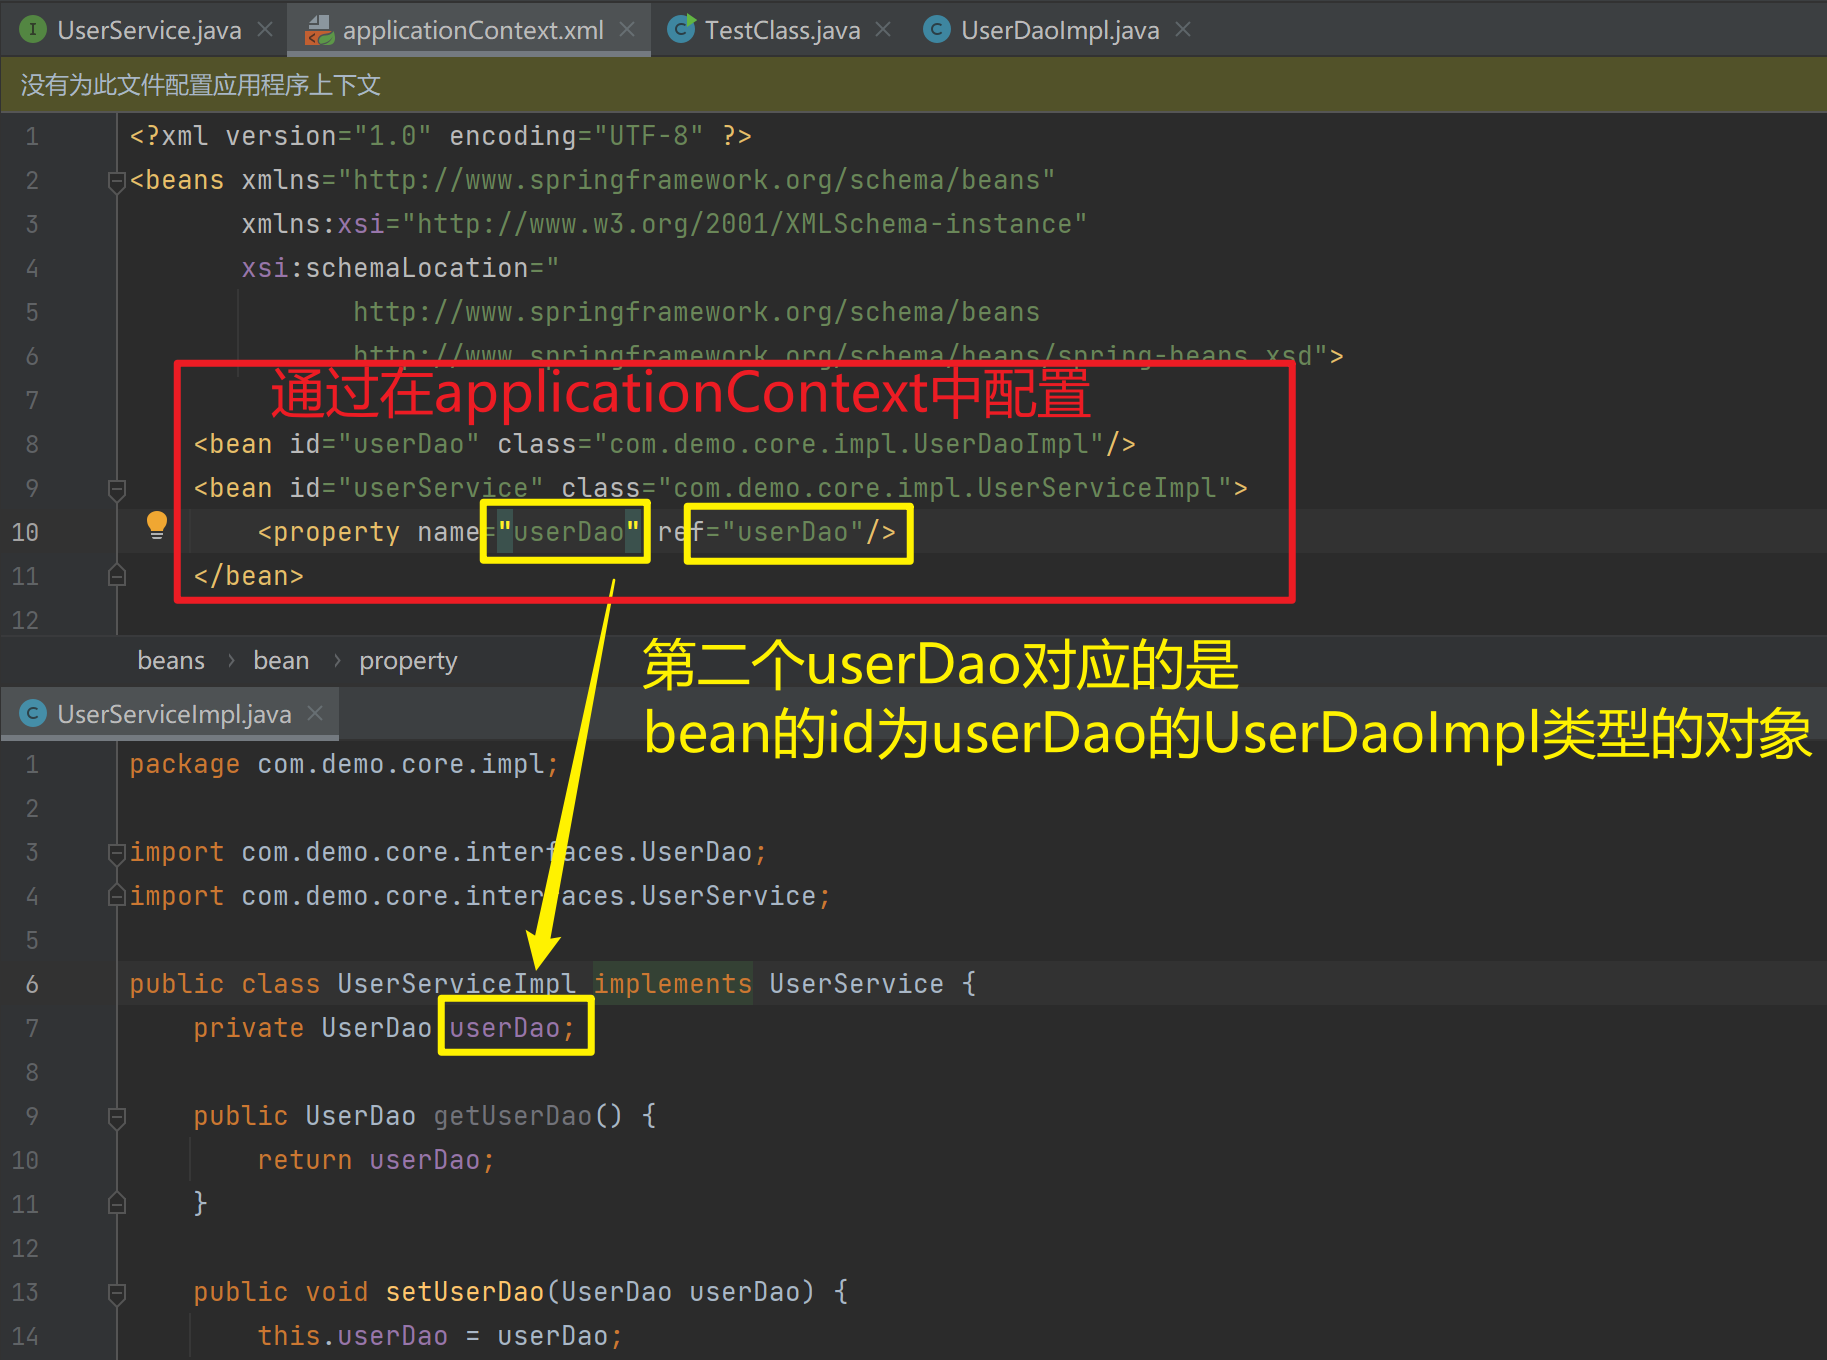
1.3.8.1. set方法
1.3.8.1.1. property
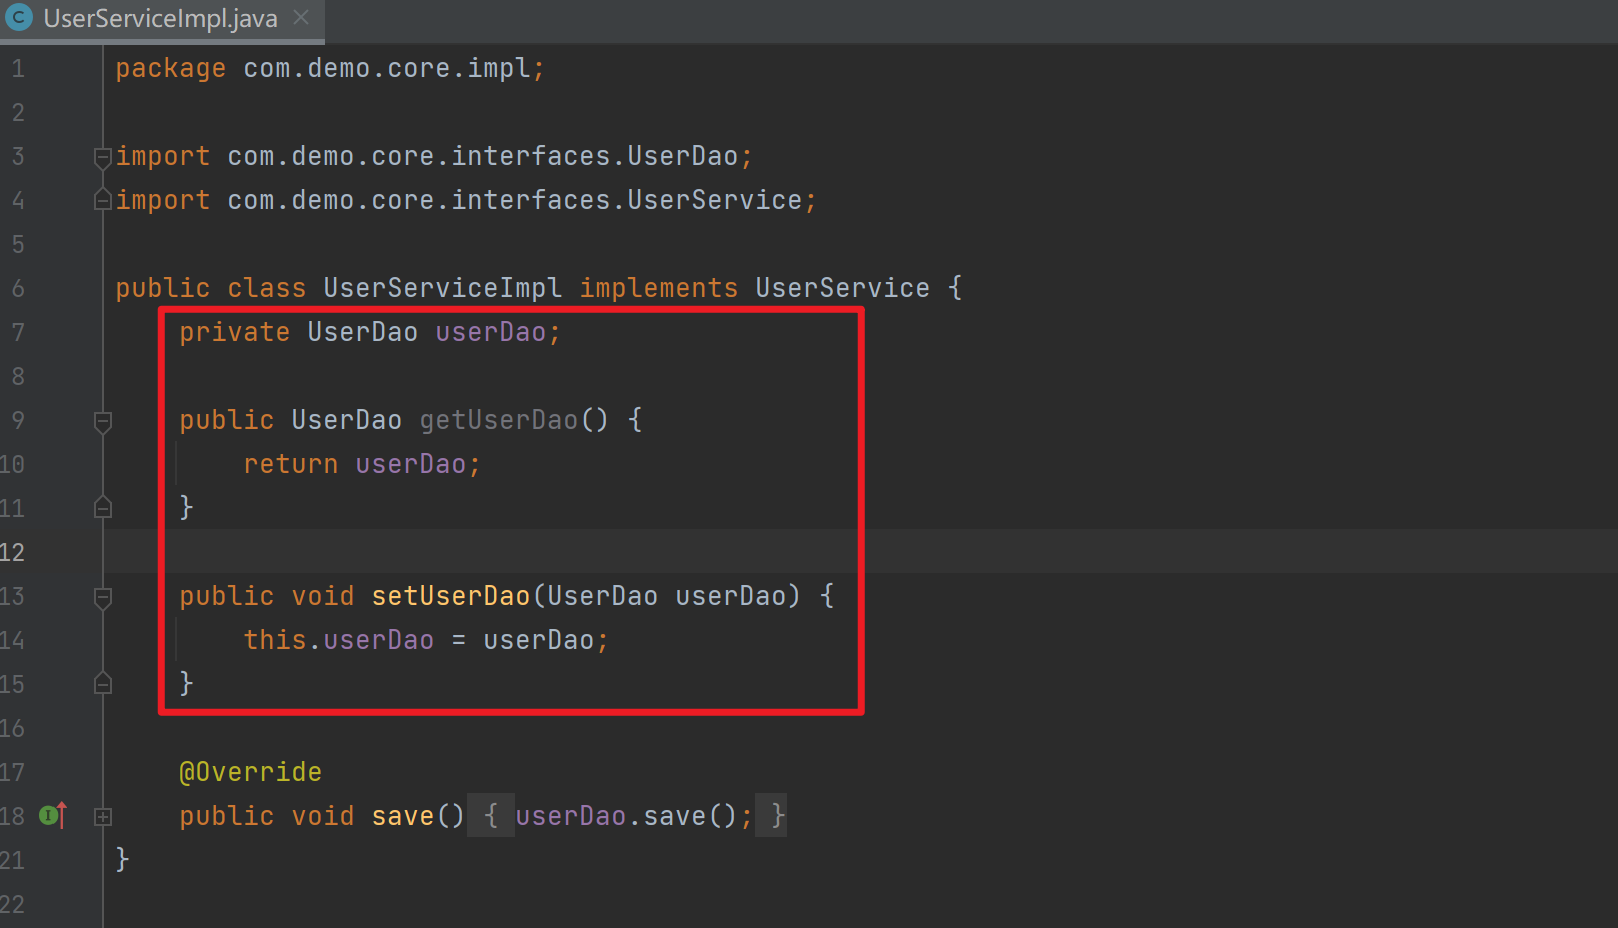
在UserServiceImpl中添加setUserDao方法
package com.demo.core.impl;

import com.demo.core.interfaces.UserDao;
import com.demo.core.interfaces.UserService;

public class UserServiceImpl implements UserService {
    private UserDao userDao;

    public UserDao getUserDao() {
        return userDao;
    }

    public void setUserDao(UserDao userDao) {
        this.userDao = userDao;
    }

    @Override
    public void save() {
        userDao.save();
    }
}
配置Spring容器调用set方法进行注入
<?xml version="1.0" encoding="UTF-8" ?>
<beans xmlns="http://www.springframework.org/schema/beans"
       xmlns:xsi="http://www.w3.org/2001/XMLSchema-instance"
       xsi:schemaLocation="
              http://www.springframework.org/schema/beans
              http://www.springframework.org/schema/beans/spring-beans.xsd">


    <bean id="nonStaticFactoryBean" class="com.demo.core.factories.NonStaticFactoryBean"/>
    <bean id="userDao" factory-bean="nonStaticFactoryBean" factory-method="createUserDao"/>
    <bean id="userService" class="com.demo.core.impl.UserServiceImpl">
        <property name="userDao" ref="userDao"/>
    </bean>
</beans>
package com.demo.core;
import com.demo.core.interfaces.UserService;
import org.springframework.context.ApplicationContext;
import org.springframework.context.support.ClassPathXmlApplicationContext;
public class TestClass {
public static void main(String[] args) {
ApplicationContext applicationContext = new
ClassPathXmlApplicationContext("applicationContext.xml");
UserService userService = (UserService) applicationContext.getBean("userService");
userService.save();
}
}package com.demo.core.impl;
import com.demo.core.interfaces.UserDao;
public class UserDaoImpl implements UserDao {
public UserDaoImpl() {
System.out.println("now UserDaoImpl");
}
@Override
public void save() {
System.out.println("UserDao save method running....");
}
public void initMethod() {
System.out.println("UserDaoImpl initMethod called");
}
public void destroymethod() {
System.out.println("UserDaoImpl destroymethod called");
}
}
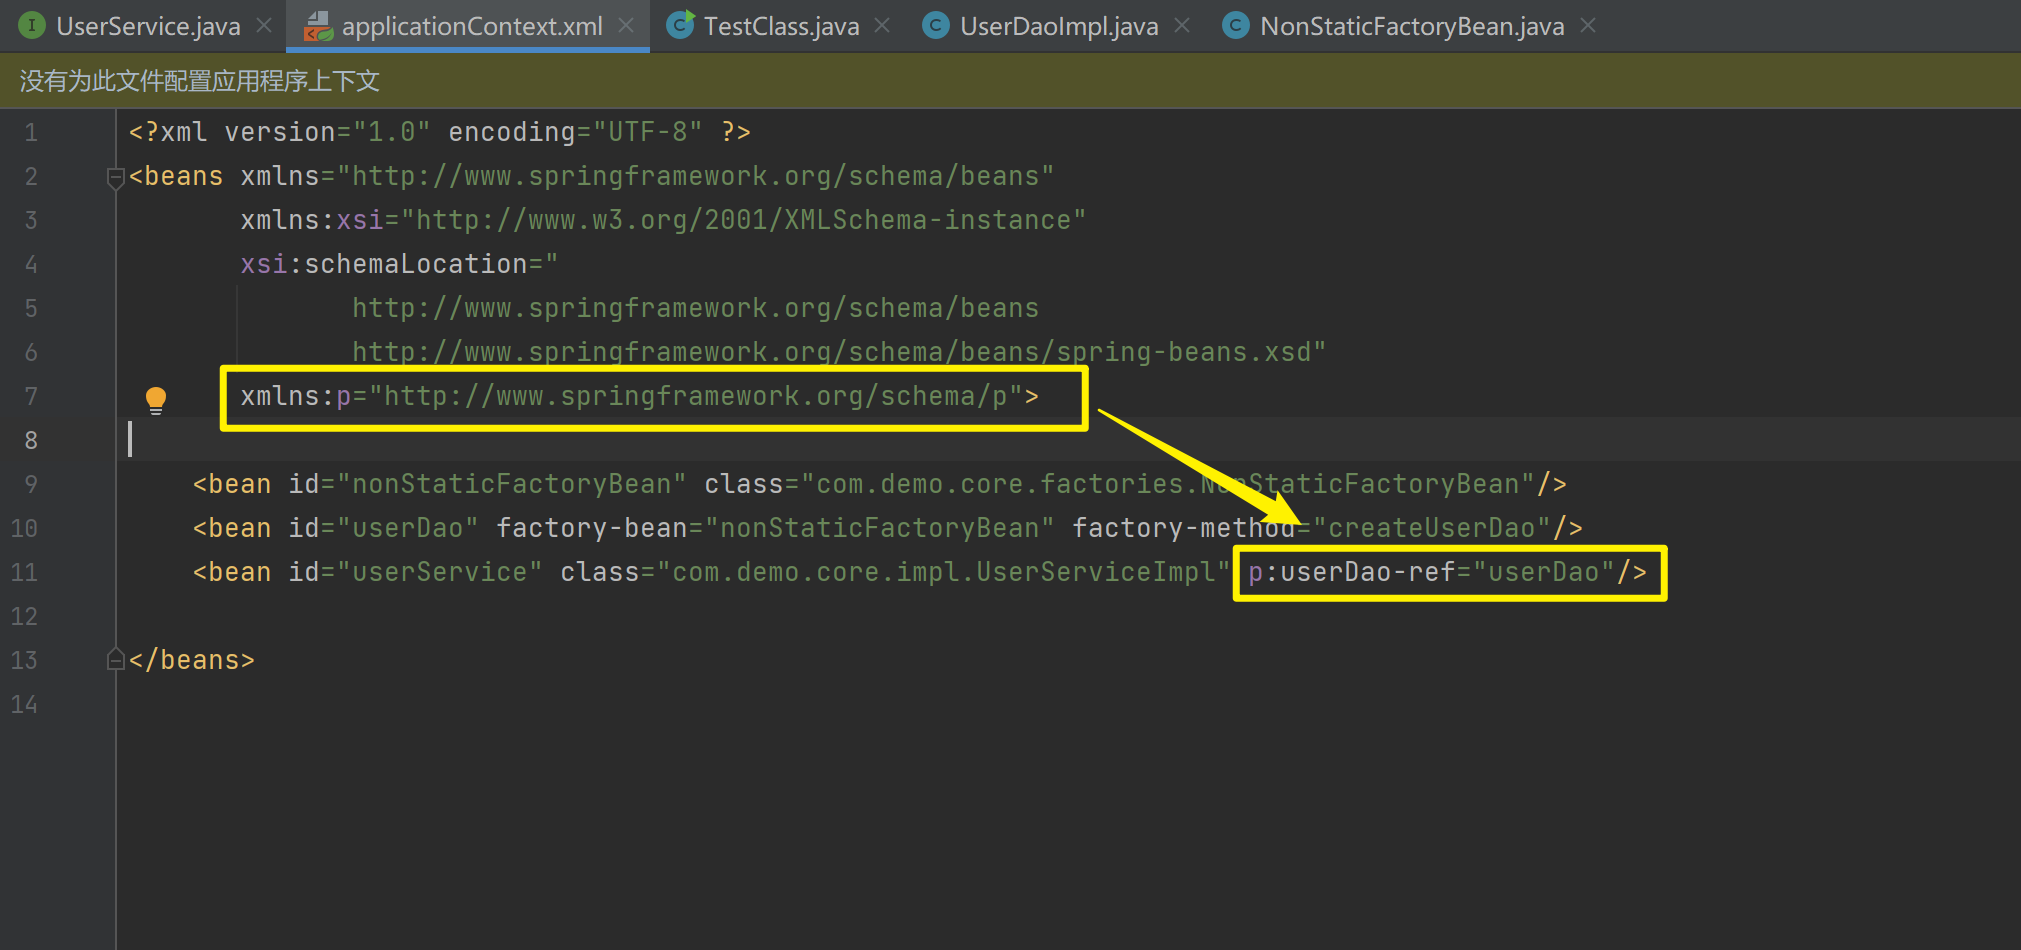
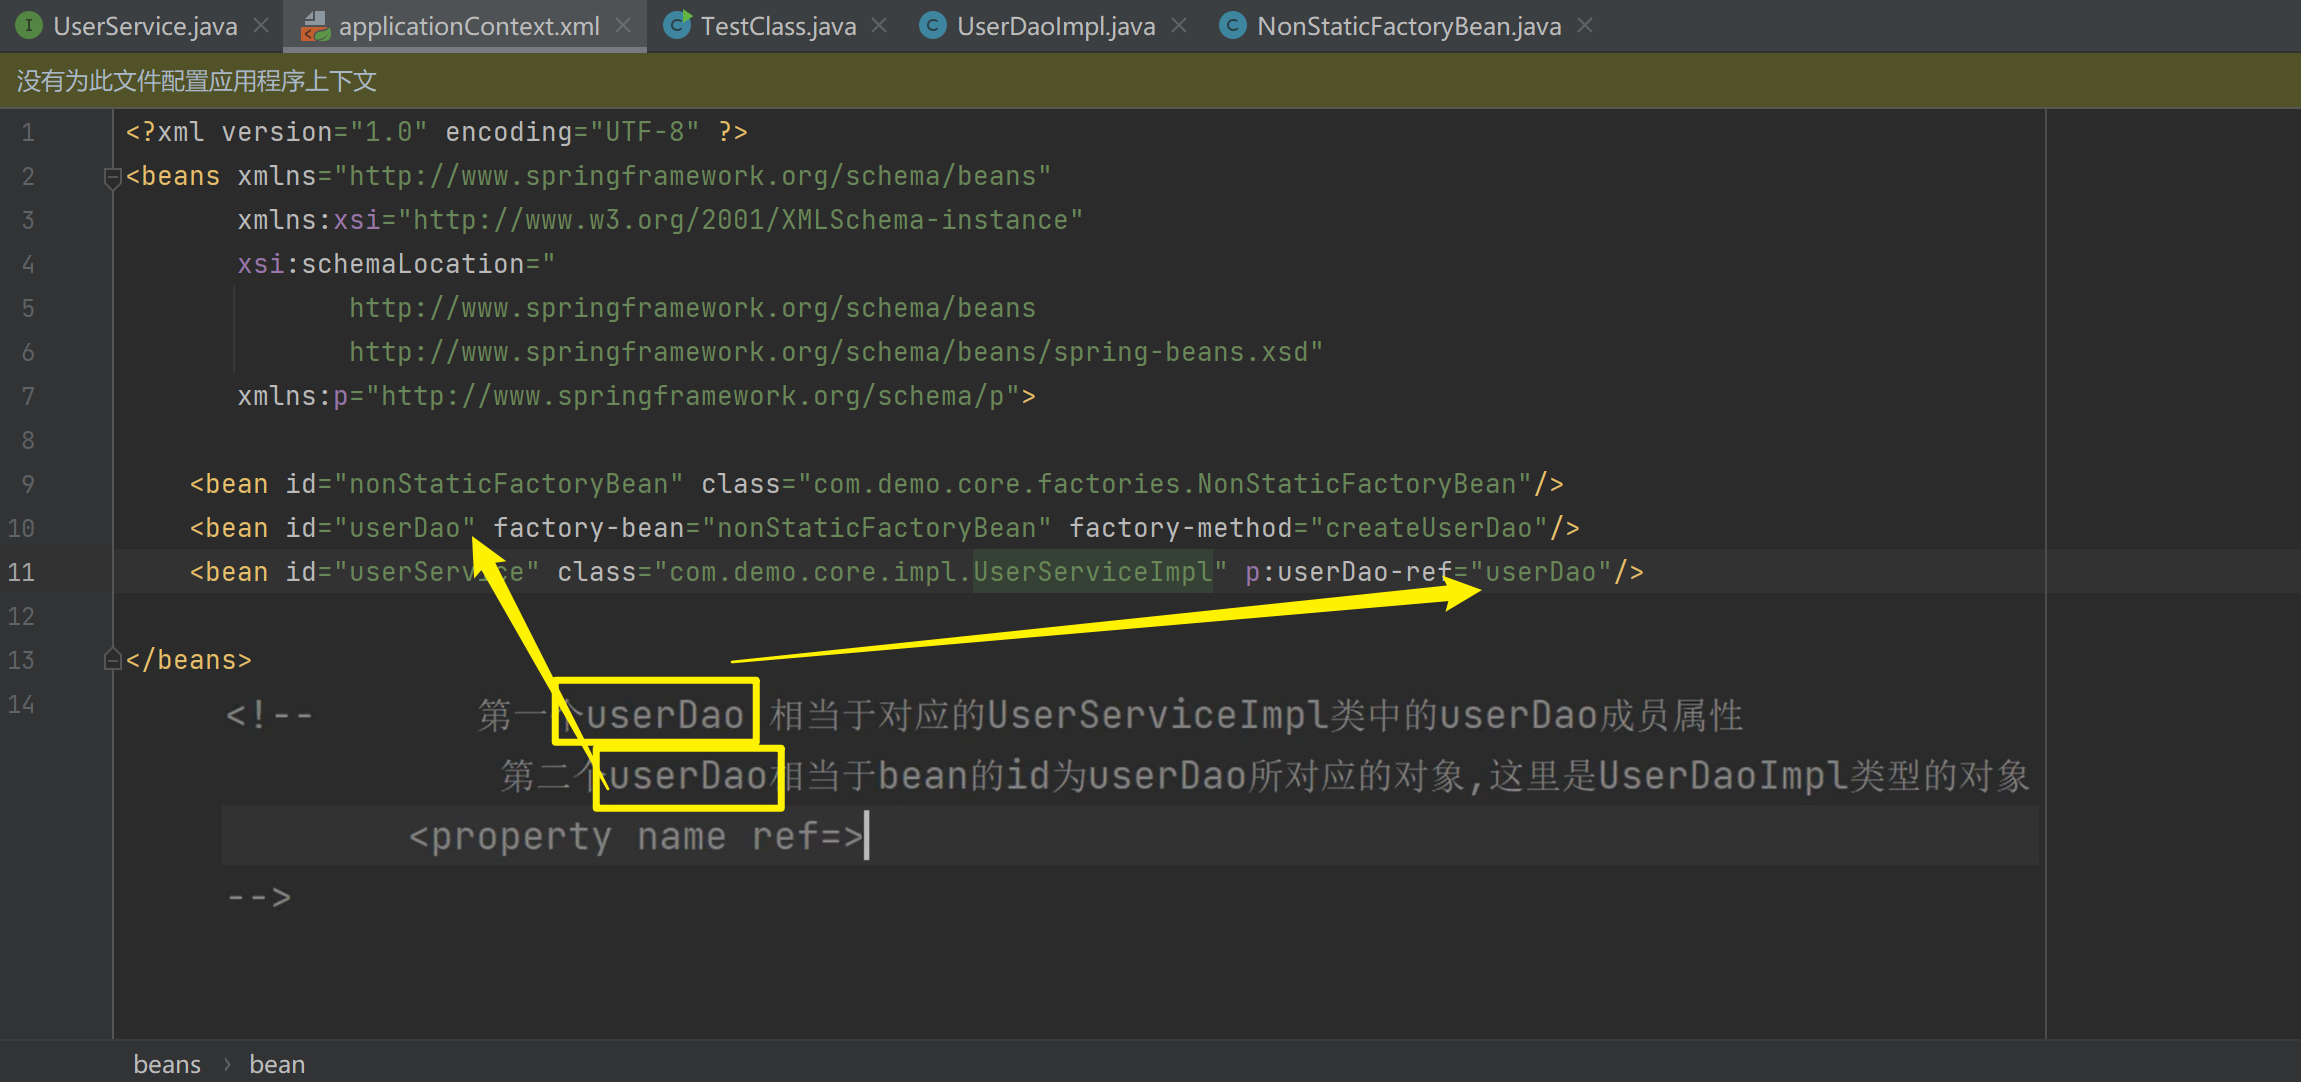
1.3.8.1.2. P命名空间注入
P命名空间注入本质也是set方法注入,但比起上述的set方法注入更加方便,主要体现在配置文件中,如下:
首先,需要引入P命名空间:xmlns:p="http://www.springframework.org/schema/p">
<?xml version="1.0" encoding="UTF-8" ?>
<beans xmlns="http://www.springframework.org/schema/beans"
       xmlns:xsi="http://www.w3.org/2001/XMLSchema-instance"
       xsi:schemaLocation="
              http://www.springframework.org/schema/beans
              http://www.springframework.org/schema/beans/spring-beans.xsd"
       xmlns:p="http://www.springframework.org/schema/p">

    <bean id="nonStaticFactoryBean" class="com.demo.core.factories.NonStaticFactoryBean"/>
    <bean id="userDao" factory-bean="nonStaticFactoryBean" factory-method="createUserDao"/>
    <bean id="userService" class="com.demo.core.impl.UserServiceImpl">
        <property name="userDao" ref="userDao"/>
    </bean>

</beans>其次,需要修改注入方式:<bean id="userService" class="com.demo.core.impl.UserServiceImpl" p:userDao-ref="userDao"/>
<?xml version="1.0" encoding="UTF-8" ?>
<beans xmlns="http://www.springframework.org/schema/beans"
       xmlns:xsi="http://www.w3.org/2001/XMLSchema-instance"
       xsi:schemaLocation="
              http://www.springframework.org/schema/beans
              http://www.springframework.org/schema/beans/spring-beans.xsd"
       xmlns:p="http://www.springframework.org/schema/p">

    <bean id="nonStaticFactoryBean" class="com.demo.core.factories.NonStaticFactoryBean"/>
    <bean id="userDao" factory-bean="nonStaticFactoryBean" factory-method="createUserDao"/>
    <bean id="userService" class="com.demo.core.impl.UserServiceImpl" p:userDao-ref="userDao"/>
</beans>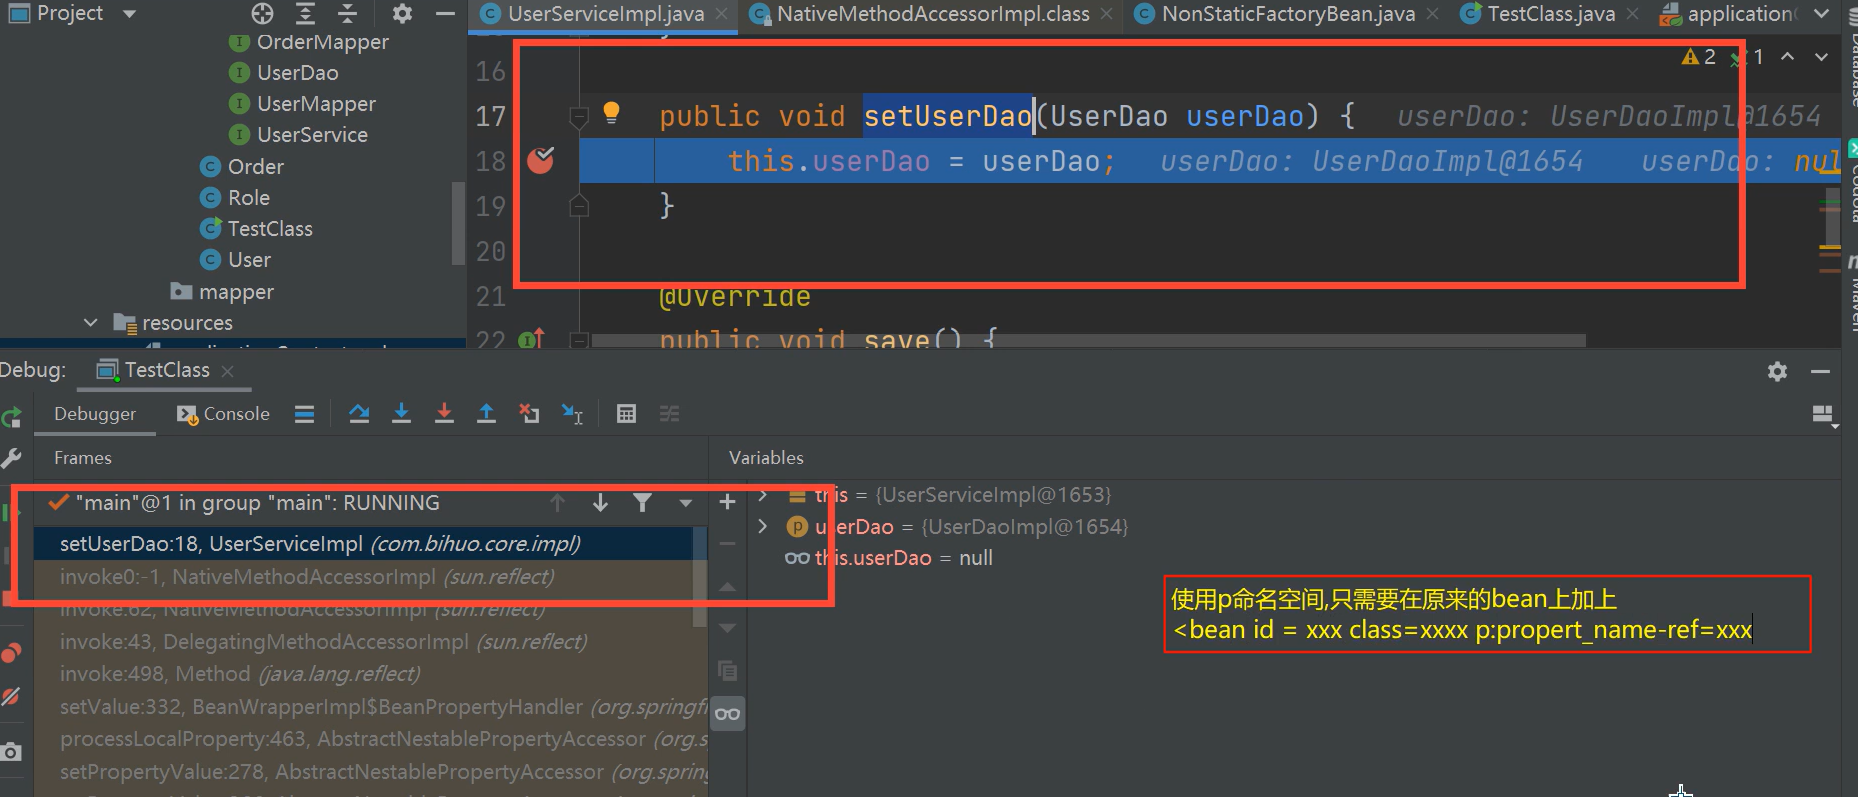
1.3.8.2. 构造方法
1.3.8.2.1. constructor-arg
package com.demo.core.impl;

import com.demo.core.interfaces.UserDao;

public class UserDaoImpl implements UserDao {
    private String address;

    public UserDaoImpl(String address) {
        this.address = address;
    }

    @Override
    public void save() {
        System.out.println("save running... ...");
    }

}
package com.demo.core;
import com.demo.core.interfaces.UserDao;
import org.springframework.context.ApplicationContext;
import org.springframework.context.support.ClassPathXmlApplicationContext;
public class TestClass {
public static void main(String[] args) {
ApplicationContext applicationContext = new ClassPathXmlApplicationContext("applicationContext.xml");
UserDao userDao = (UserDao)
applicationContext.getBean("userDao");
userDao.save();
}
}<?xml version="1.0" encoding="UTF-8" ?>
<beans xmlns="http://www.springframework.org/schema/beans"
xmlns:xsi="http://www.w3.org/2001/XMLSchema-instance"
xsi:schemaLocation="
http://www.springframework.org/schema/beans
http://www.springframework.org/schema/beans/spring-beans.xsd">
<bean id="userDao" class="com.demo.core.impl.UserDaoImpl">
<constructor-arg name="address" value="hehe"></constructor-arg>
</bean>
</beans>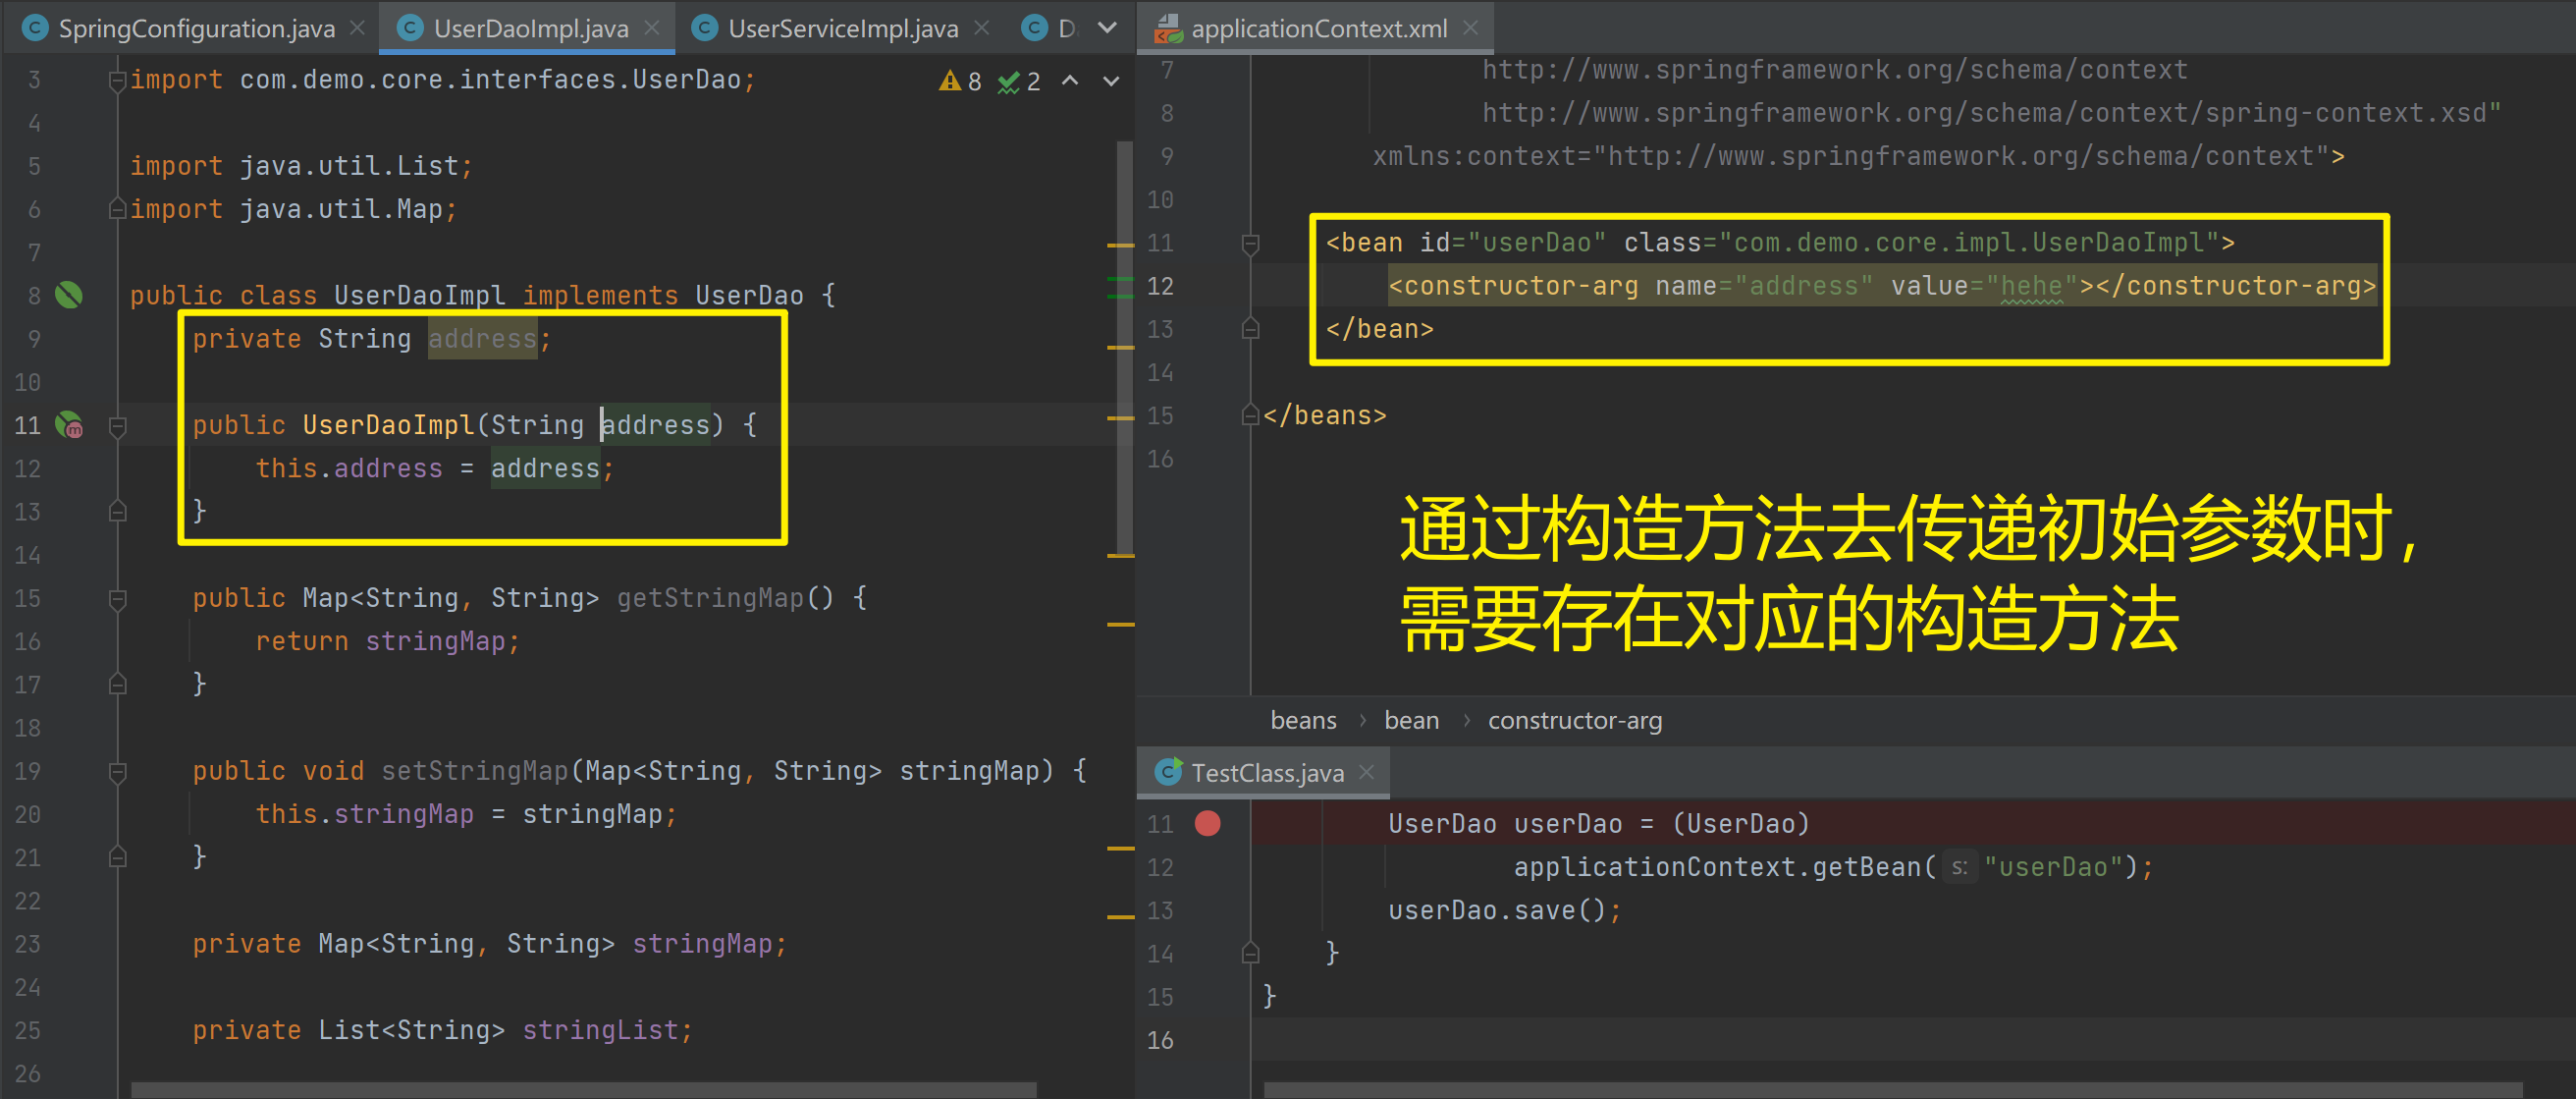
创建有参构造
<?xml version="1.0" encoding="UTF-8" ?>
<beans xmlns="http://www.springframework.org/schema/beans"
xmlns:xsi="http://www.w3.org/2001/XMLSchema-instance"
xsi:schemaLocation="
http://www.springframework.org/schema/beans
http://www.springframework.org/schema/beans/spring-beans.xsd"
xmlns:p="http://www.springframework.org/schema/p">
<bean id="nonStaticFactoryBean" class="com.demo.core.factories.NonStaticFactoryBean"/>
<bean id="userDao" factory-bean="nonStaticFactoryBean" factory-method="createUserDao"/>
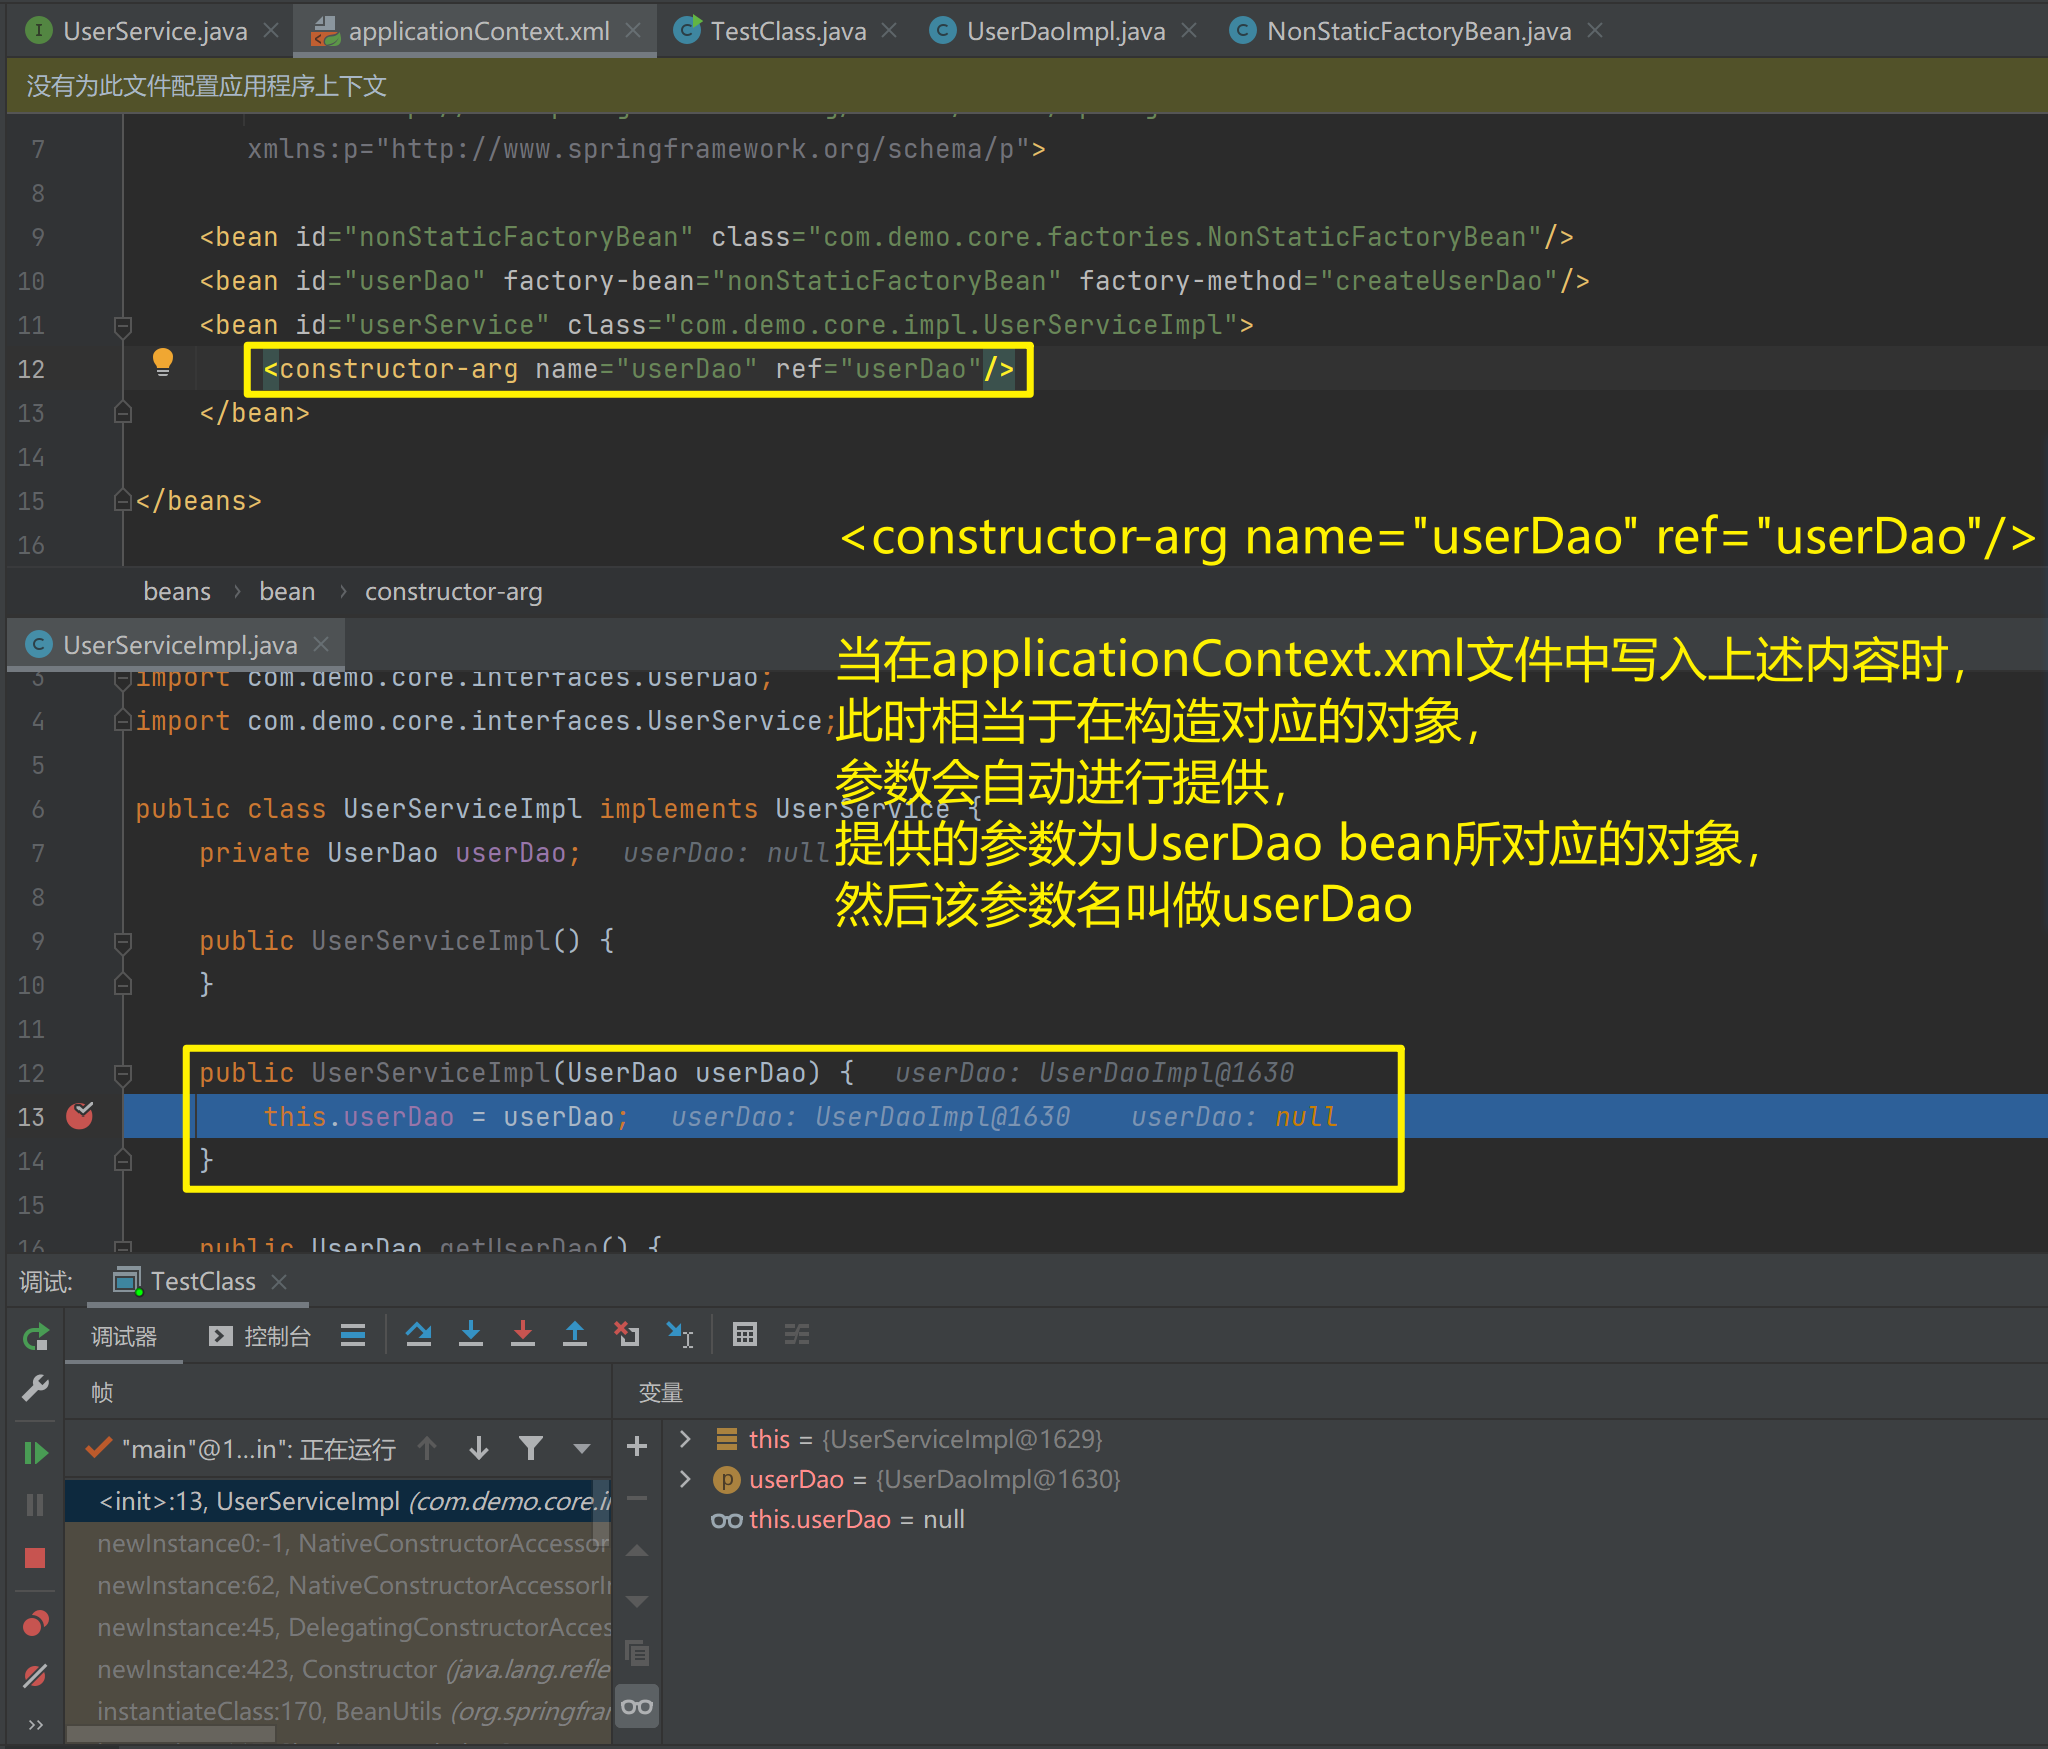
<bean id="userService" class="com.demo.core.impl.UserServiceImpl">
<constructor-arg name="userDao" ref="userDao"/>
</bean>
</beans>配置Spring容器调用有参构造时进行注入
package com.demo.core.impl;

import com.demo.core.interfaces.UserDao;
import com.demo.core.interfaces.UserService;

public class UserServiceImpl implements UserService {
    private UserDao userDao;

    public UserServiceImpl() {
    }

    public UserServiceImpl(UserDao userDao) {
        this.userDao = userDao;
    }

    public UserDao getUserDao() {
        return userDao;
    }

    public void setUserDao(UserDao userDao) {
        this.userDao = userDao;
    }

    @Override
    public void save() {
        userDao.save();
    }
}
1.3.9. Bean的依赖注入的数据类型
上面的操作,都是注入的引用Bean,处了对象的引用可以注入,普通数据类型,集合等都可以在容器中进行注入。
注入数据的三种数据类型
- 普通数据类型
<?xml version="1.0" encoding="UTF-8" ?>
<beans xmlns="http://www.springframework.org/schema/beans"
       xmlns:xsi="http://www.w3.org/2001/XMLSchema-instance"
       xsi:schemaLocation="
              http://www.springframework.org/schema/beans
              http://www.springframework.org/schema/beans/spring-beans.xsd"
       xmlns:p="http://www.springframework.org/schema/p">

    <bean id="nonStaticFactoryBean" class="com.demo.core.factories.NonStaticFactoryBean"/>
    <bean id="userDao" factory-bean="nonStaticFactoryBean" factory-method="createUserDao"/>
    <bean id="userService" class="com.demo.core.impl.UserServiceImpl">

        <constructor-arg name="userDao" ref="userDao"/>
        <!--因为是普通类型,所以用value-->
        <property name="name" value="hehehe"/>
    </bean>
</beans>
package com.demo.core.impl;
import com.demo.core.interfaces.UserDao;
import com.demo.core.interfaces.UserService;
public class UserServiceImpl implements UserService {
private UserDao userDao;
private String name;
public String getName() {
return name;
}
public void setName(String name) {
this.name = name;
}
public UserServiceImpl(UserDao userDao, String name) {
this.userDao = userDao;
this.name = name;
}
public UserServiceImpl() {
}
public UserServiceImpl(UserDao userDao) {
this.userDao = userDao;
}
public UserDao getUserDao() {
return userDao;
}
public void setUserDao(UserDao userDao) {
this.userDao = userDao;
}
@Override
public void save() {
userDao.save();
}
}
- 集合数据类型
(List<String>)的注入
<?xml version="1.0" encoding="UTF-8" ?>
<beans xmlns="http://www.springframework.org/schema/beans"
       xmlns:xsi="http://www.w3.org/2001/XMLSchema-instance"
       xsi:schemaLocation="
              http://www.springframework.org/schema/beans
              http://www.springframework.org/schema/beans/spring-beans.xsd"
       xmlns:p="http://www.springframework.org/schema/p">

    <bean id="nonStaticFactoryBean" class="com.demo.core.factories.NonStaticFactoryBean"/>
    <bean id="userDao" factory-bean="nonStaticFactoryBean" factory-method="createUserDao"/>
    <bean id="userService" class="com.demo.core.impl.UserServiceImpl">

        <constructor-arg name="userDao" ref="userDao"/>
        <!--因为是普通类型,所以用value-->
<!--        <property name="name" value="hehehe"/>-->
        <property name="stringList">
            <list value-type="java.lang.String">
                <value>nihao</value>
                <value>hahaha</value>
                <value>123123123</value>
            </list>
        </property>
    </bean>
</beans>
package com.demo.core.impl;
import com.demo.core.interfaces.UserDao;
import com.demo.core.interfaces.UserService;
import java.util.List;
public class UserServiceImpl implements UserService {
private UserDao userDao;
private String name;
public List<String> stringList;
public List<String> getStringList() {
return stringList;
}
public void setStringList(List<String> stringList) {
this.stringList = stringList;
}
public UserServiceImpl(List<String> stringList) {
this.stringList = stringList;
}
public String getName() {
return name;
}
public void setName(String name) {
this.name = name;
}
public UserServiceImpl(UserDao userDao, String name) {
this.userDao = userDao;
this.name = name;
}
public UserServiceImpl() {
}
public UserServiceImpl(UserDao userDao) {
this.userDao = userDao;
}
public UserDao getUserDao() {
return userDao;
}
public void setUserDao(UserDao userDao) {
this.userDao = userDao;
}
@Override
public void save() {
userDao.save();
}
}
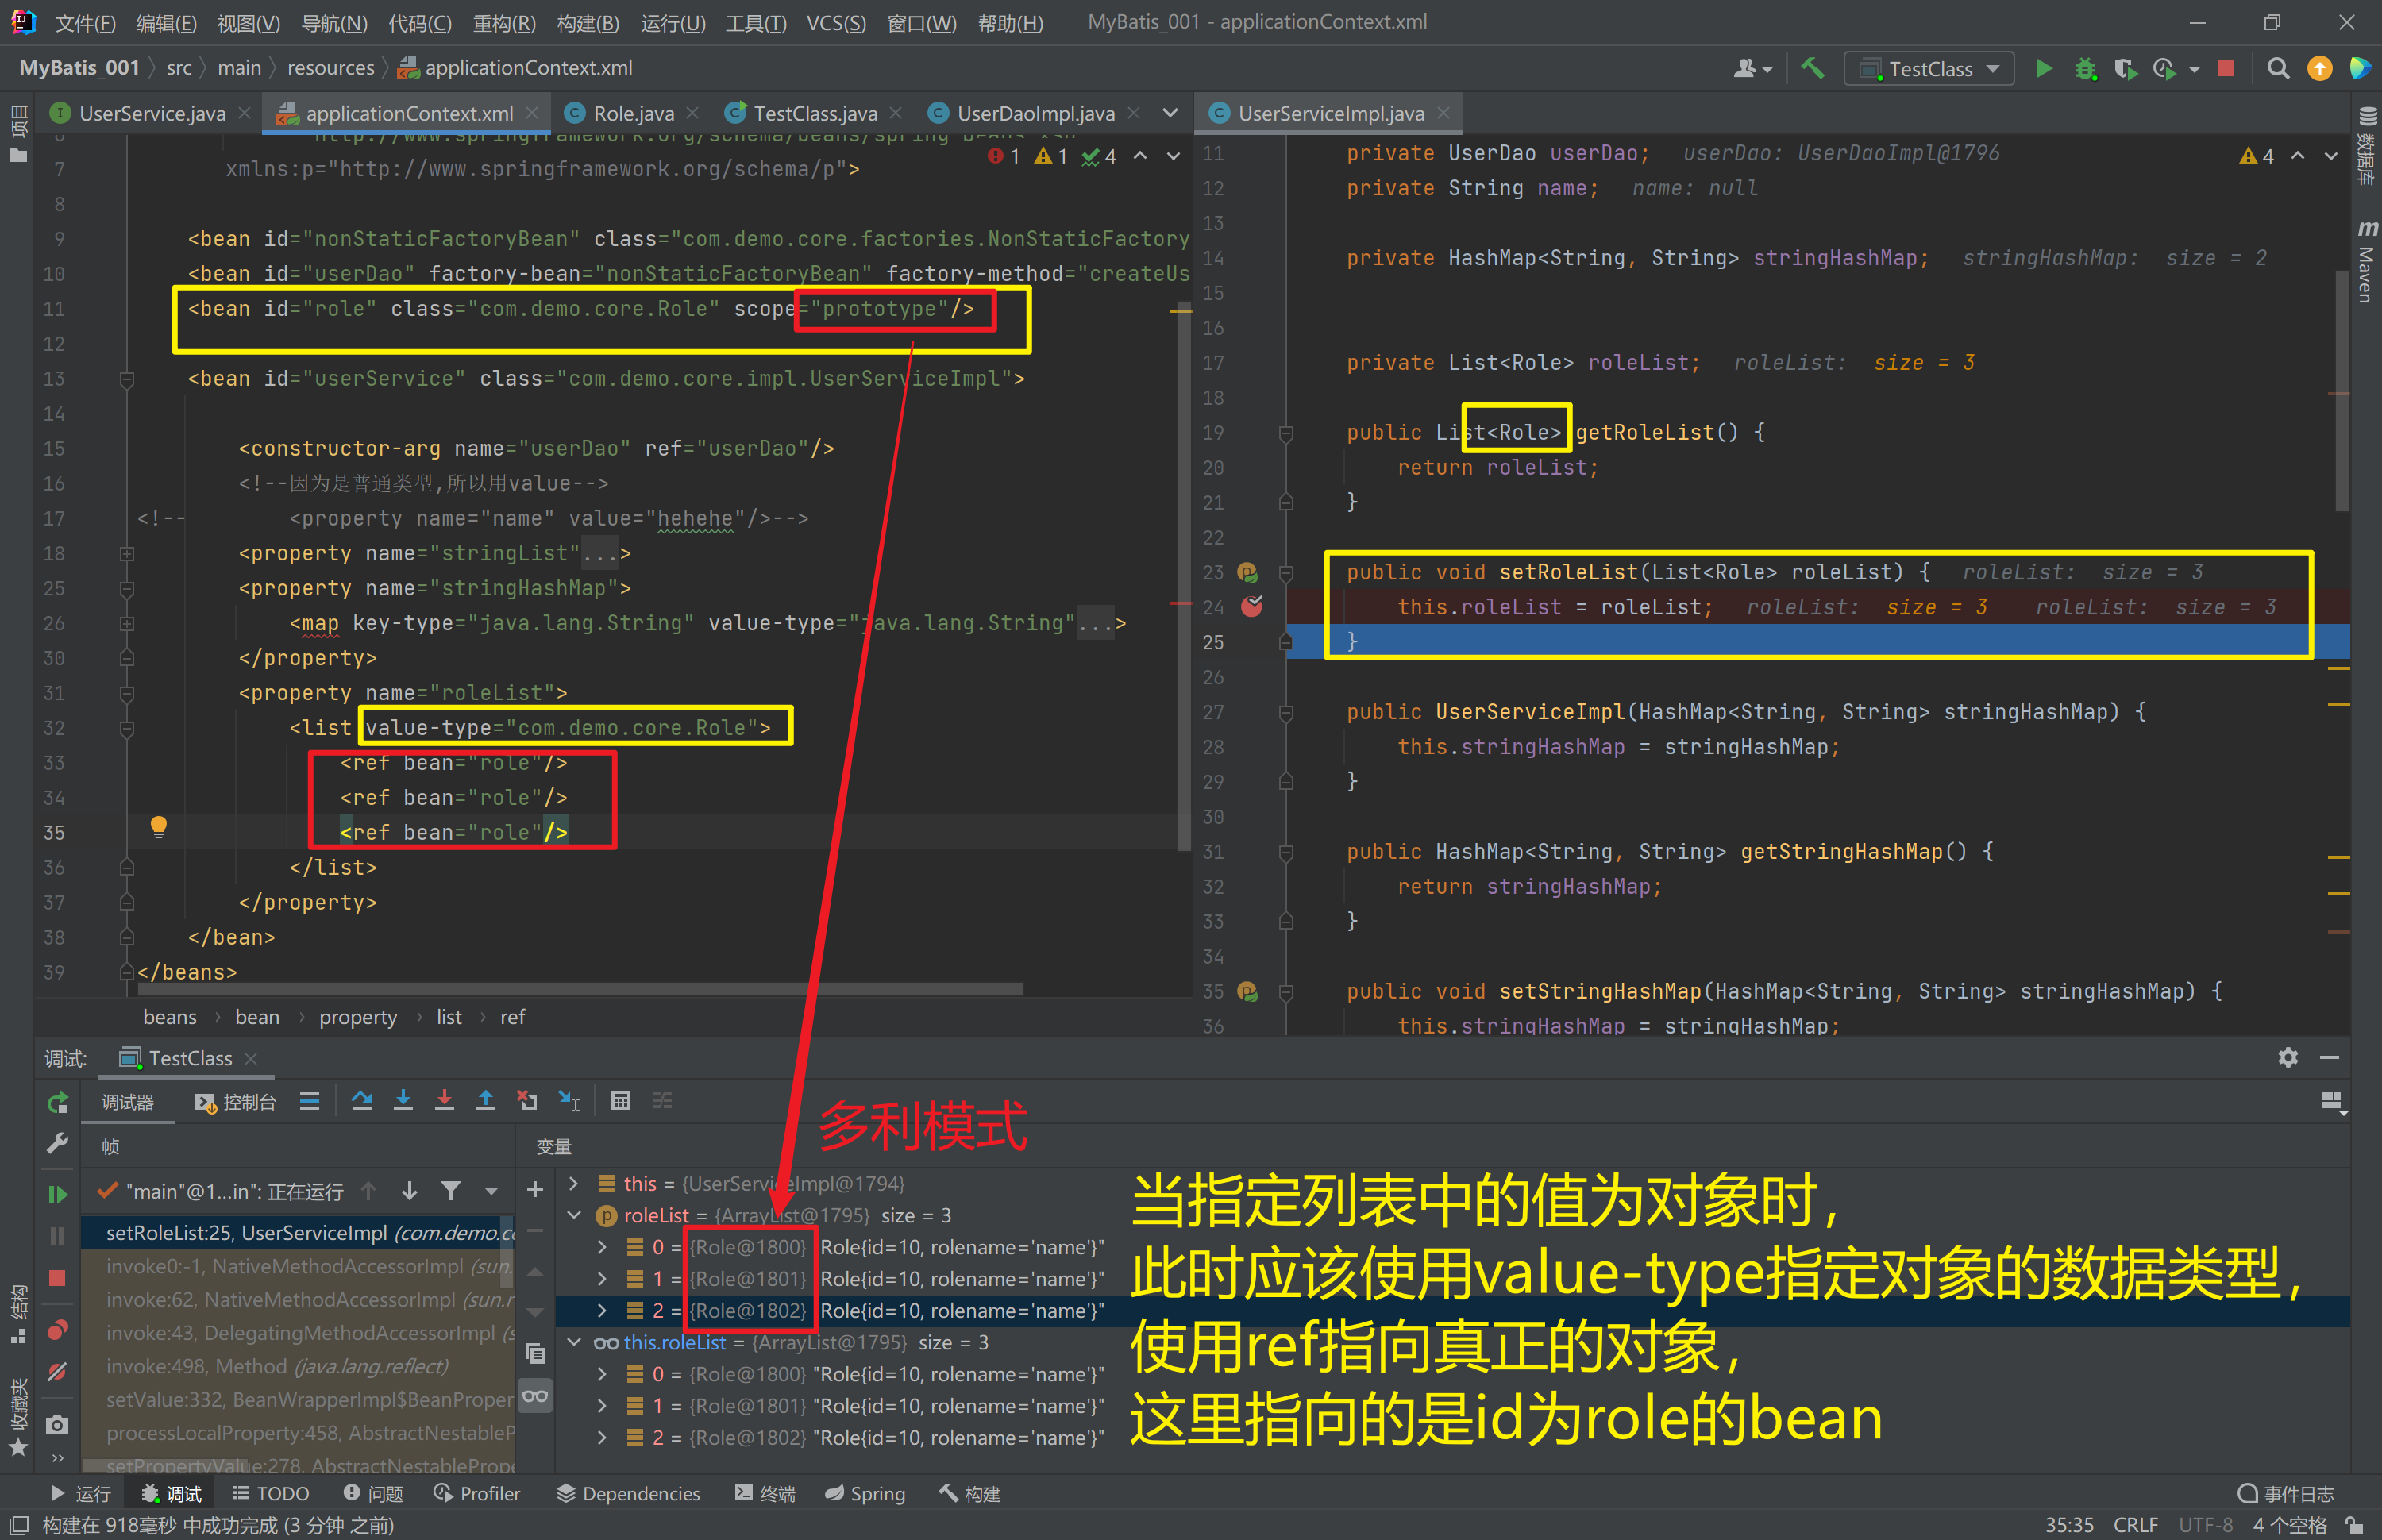
- 集合数据类型
(List<Role>)的注入
<?xml version="1.0" encoding="UTF-8" ?>
<beans xmlns="http://www.springframework.org/schema/beans"
xmlns:xsi="http://www.w3.org/2001/XMLSchema-instance"
xsi:schemaLocation="
http://www.springframework.org/schema/beans
http://www.springframework.org/schema/beans/spring-beans.xsd"
xmlns:p="http://www.springframework.org/schema/p">
<bean id="nonStaticFactoryBean" class="com.demo.core.factories.NonStaticFactoryBean"/>
<bean id="userDao" factory-bean="nonStaticFactoryBean" factory-method="createUserDao"/>
<bean id="role" class="com.demo.core.Role" scope="prototype"/>
<bean id="userService" class="com.demo.core.impl.UserServiceImpl">
<constructor-arg name="userDao" ref="userDao"/>
<!--因为是普通类型,所以用value-->
<!-- <property name="name" value="hehehe"/>-->
<property name="stringList">
<list value-type="java.lang.String">
<value>nihao</value>
<value>hahaha</value>
<value>123123123</value>
</list>
</property>
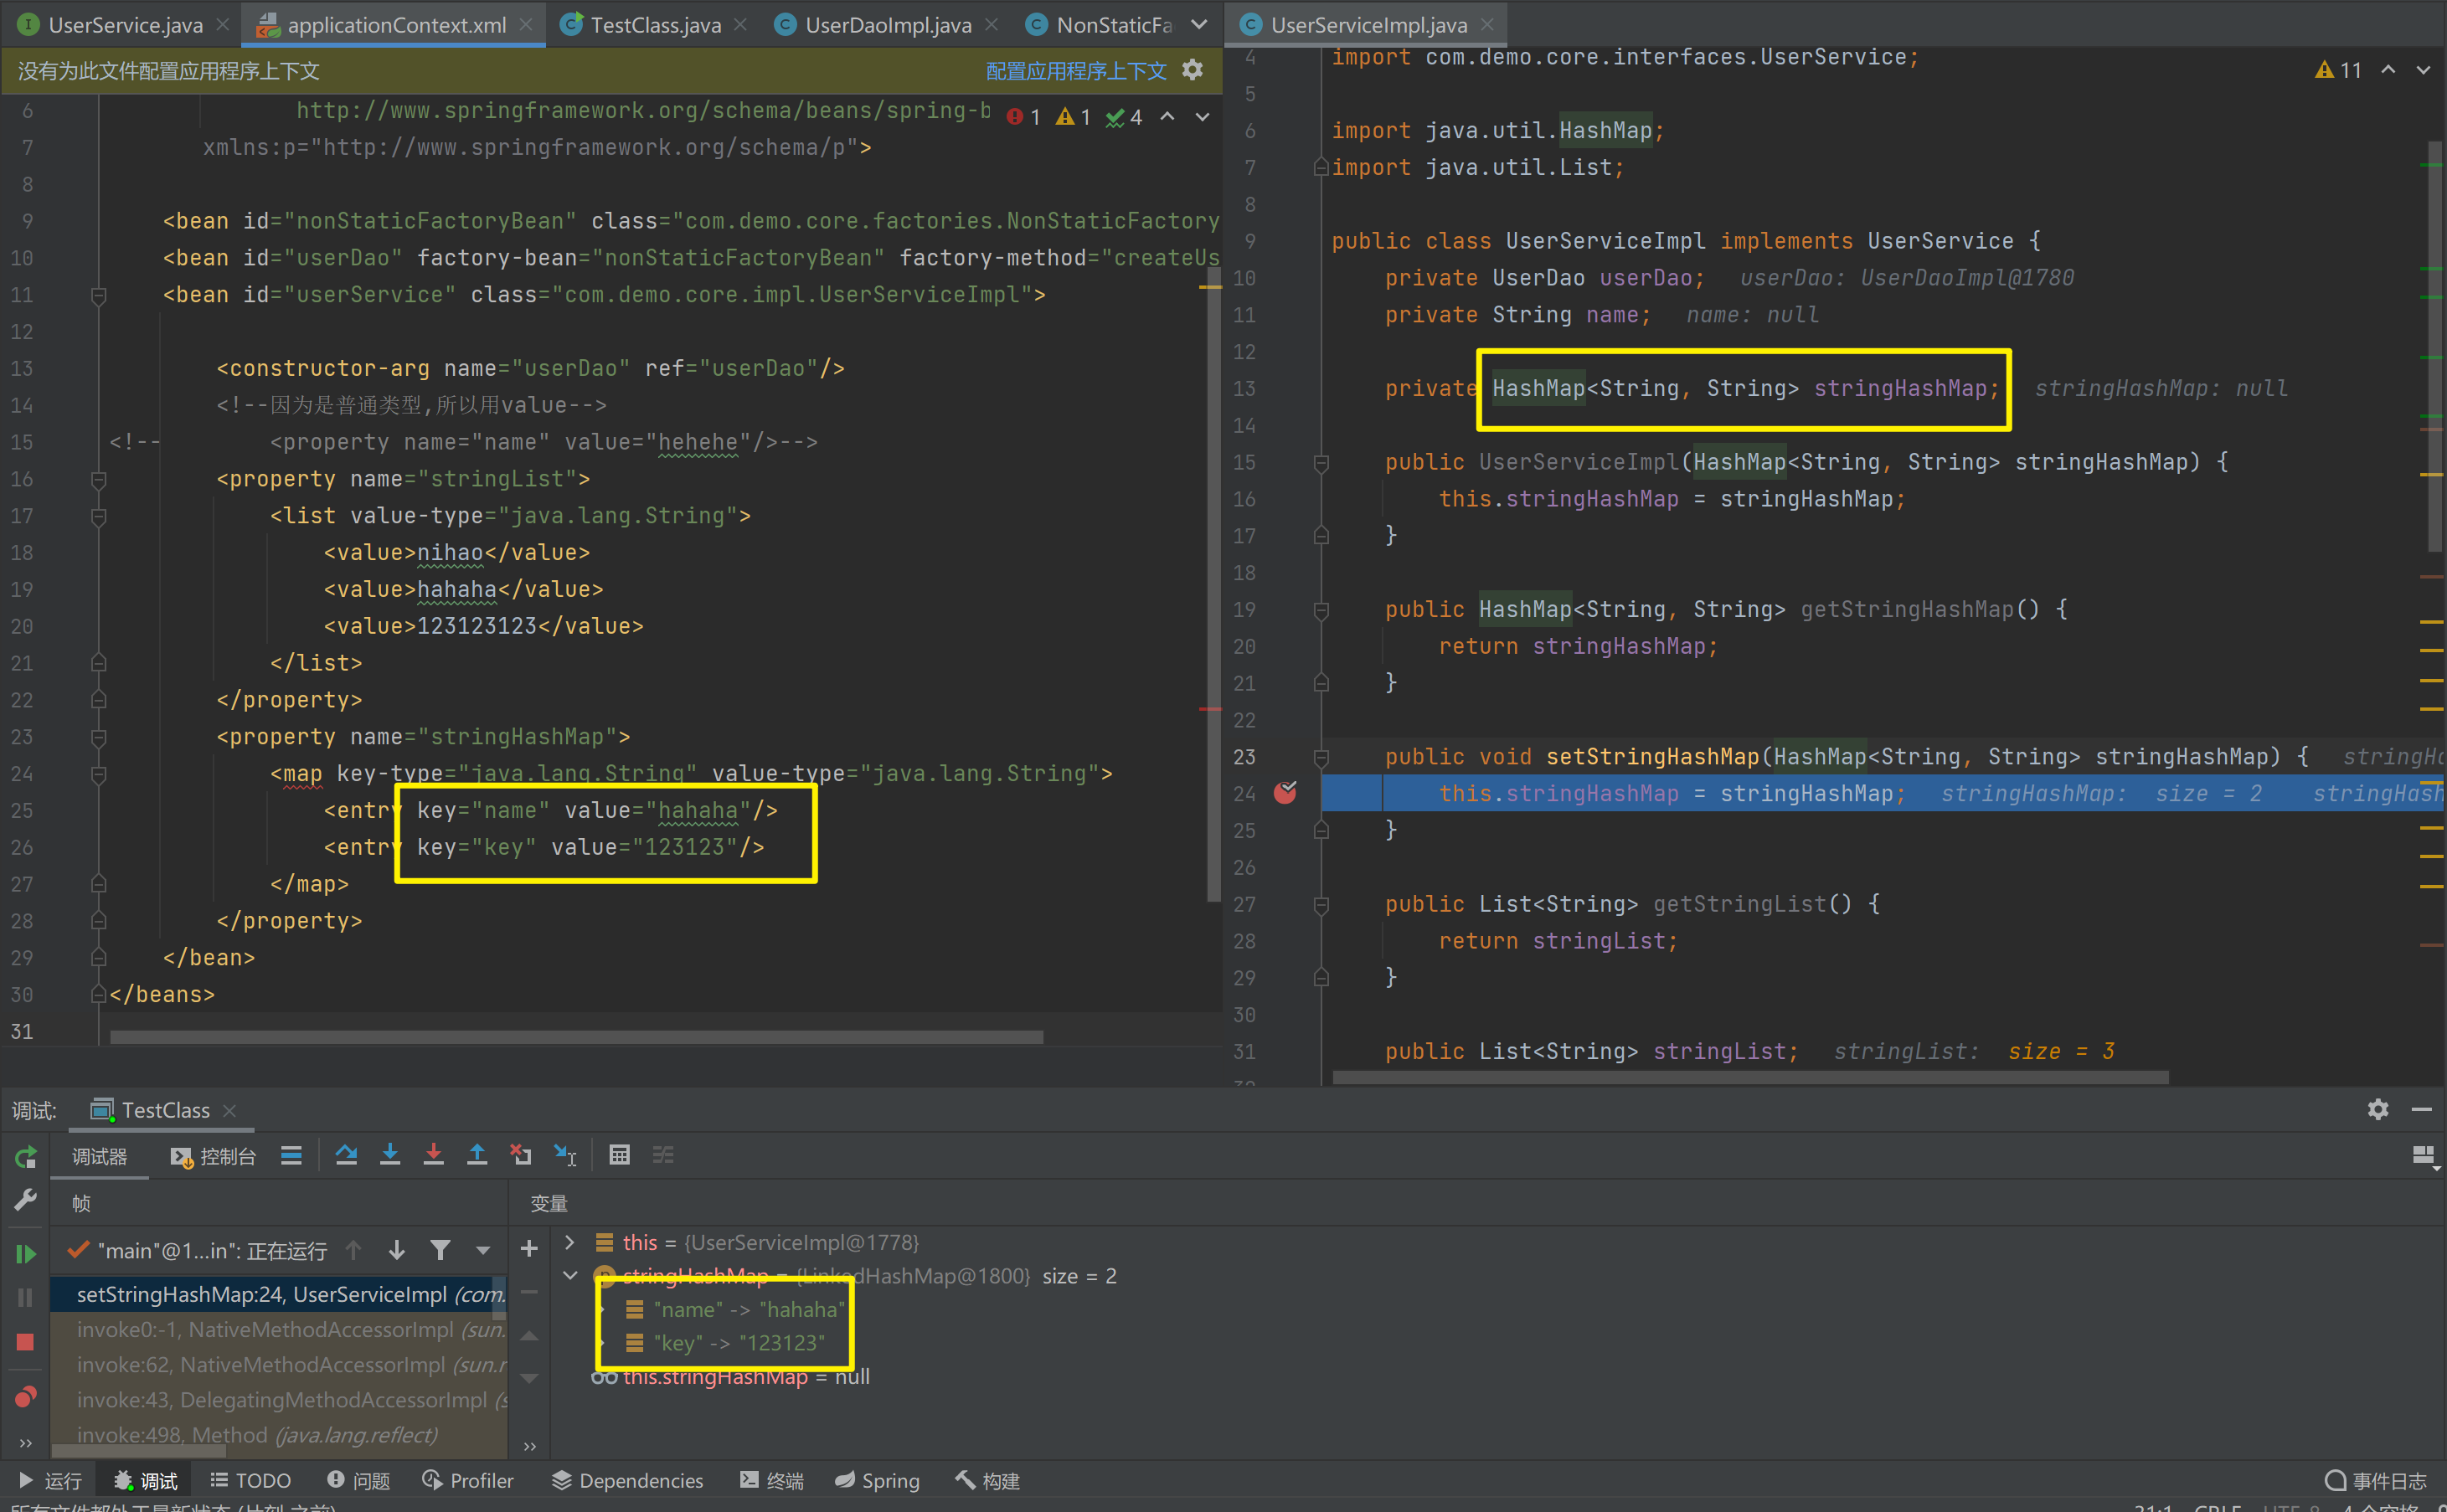
<property name="stringHashMap">
<map key-type="java.lang.String" value-type="java.lang.String">
<entry key="name" value="hahaha"/>
<entry key="key" value="123123"/>
</map>
</property>
<property name="roleList">
<list value-type="com.demo.core.Role">
<ref bean="role"/>
<ref bean="role"/>
<ref bean="role"/>
</list>
</property>
</bean>
</beans>package com.demo.core.impl;
import com.demo.core.Role;
import com.demo.core.interfaces.UserDao;
import com.demo.core.interfaces.UserService;
import java.util.HashMap;
import java.util.List;
public class UserServiceImpl implements UserService {
private UserDao userDao;
private String name;
private HashMap<String, String> stringHashMap;
private List<Role> roleList;
public List<Role> getRoleList() {
return roleList;
}
public void setRoleList(List<Role> roleList) {
this.roleList = roleList;
}
public UserServiceImpl(HashMap<String, String> stringHashMap) {
this.stringHashMap = stringHashMap;
}
public HashMap<String, String> getStringHashMap() {
return stringHashMap;
}
public void setStringHashMap(HashMap<String, String> stringHashMap) {
this.stringHashMap = stringHashMap;
}
public List<String> getStringList() {
return stringList;
}
public List<String> stringList;
public void setStringList(List<String> stringList) {
this.stringList = stringList;
}
public UserServiceImpl(List<String> stringList) {
this.stringList = stringList;
}
public String getName() {
return name;
}
public void setName(String name) {
this.name = name;
}
public UserServiceImpl(UserDao userDao, String name) {
this.userDao = userDao;
this.name = name;
}
public UserServiceImpl() {
}
public UserServiceImpl(UserDao userDao) {
this.userDao = userDao;
}
public UserDao getUserDao() {
return userDao;
}
public void setUserDao(UserDao userDao) {
this.userDao = userDao;
}
@Override
public void save() {
userDao.save();
}
}
- 集合数据类型
(Map<String, User>)的注入
public class UserDaoImpl implements UserDao {
    private Map<String,User> userMap;
    public void setUserMap(Map<String, User> userMap) {
        this.userMap = userMap;
    }
    public void save() {
        System.out.println(userMap);
        System.out.println("UserDao save method running....");
    }
}
<bean id="u1" class="com.itbihuo.domain.User"/>
<bean id="u2" class="com.itbihuo.domain.User"/>
<bean id="userDao" class="com.itbihuo.dao.impl.UserDaoImpl">
<property name="userMap">
<map>
<entry key="user1" value-ref="u1"/>
<entry key="user2" value-ref="u2"/>
</map>
</property>
</bean>- 集合数据类型
(HashMap<String, String>)的注入
<?xml version="1.0" encoding="UTF-8" ?>
<beans xmlns="http://www.springframework.org/schema/beans"
       xmlns:xsi="http://www.w3.org/2001/XMLSchema-instance"
       xsi:schemaLocation="
              http://www.springframework.org/schema/beans
              http://www.springframework.org/schema/beans/spring-beans.xsd"
       xmlns:p="http://www.springframework.org/schema/p">

    <bean id="nonStaticFactoryBean" class="com.demo.core.factories.NonStaticFactoryBean"/>
    <bean id="userDao" factory-bean="nonStaticFactoryBean" factory-method="createUserDao"/>
    <bean id="userService" class="com.demo.core.impl.UserServiceImpl">

        <constructor-arg name="userDao" ref="userDao"/>
        <!--因为是普通类型,所以用value-->
<!--        <property name="name" value="hehehe"/>-->
        <property name="stringList">
            <list value-type="java.lang.String">
                <value>nihao</value>
                <value>hahaha</value>
                <value>123123123</value>
            </list>
        </property>
        <property name="stringHashMap">
            <map key-type="java.lang.String" value-type="java.lang.String">
                <entry key="name" value="hahaha"/>
                <entry key="key" value="123123"/>
            </map>
        </property>
    </bean>
</beans>
package com.demo.core.impl;
import com.demo.core.interfaces.UserDao;
import com.demo.core.interfaces.UserService;
import java.util.HashMap;
import java.util.List;
public class UserServiceImpl implements UserService {
private UserDao userDao;
private String name;
private HashMap<String, String> stringHashMap;
public UserServiceImpl(HashMap<String, String> stringHashMap) {
this.stringHashMap = stringHashMap;
}
public HashMap<String, String> getStringHashMap() {
return stringHashMap;
}
public void setStringHashMap(HashMap<String, String> stringHashMap) {
this.stringHashMap = stringHashMap;
}
public List<String> getStringList() {
return stringList;
}
public List<String> stringList;
public void setStringList(List<String> stringList) {
this.stringList = stringList;
}
public UserServiceImpl(List<String> stringList) {
this.stringList = stringList;
}
public String getName() {
return name;
}
public void setName(String name) {
this.name = name;
}
public UserServiceImpl(UserDao userDao, String name) {
this.userDao = userDao;
this.name = name;
}
public UserServiceImpl() {
}
public UserServiceImpl(UserDao userDao) {
this.userDao = userDao;
}
public UserDao getUserDao() {
return userDao;
}
public void setUserDao(UserDao userDao) {
this.userDao = userDao;
}
@Override
public void save() {
userDao.save();
}
}
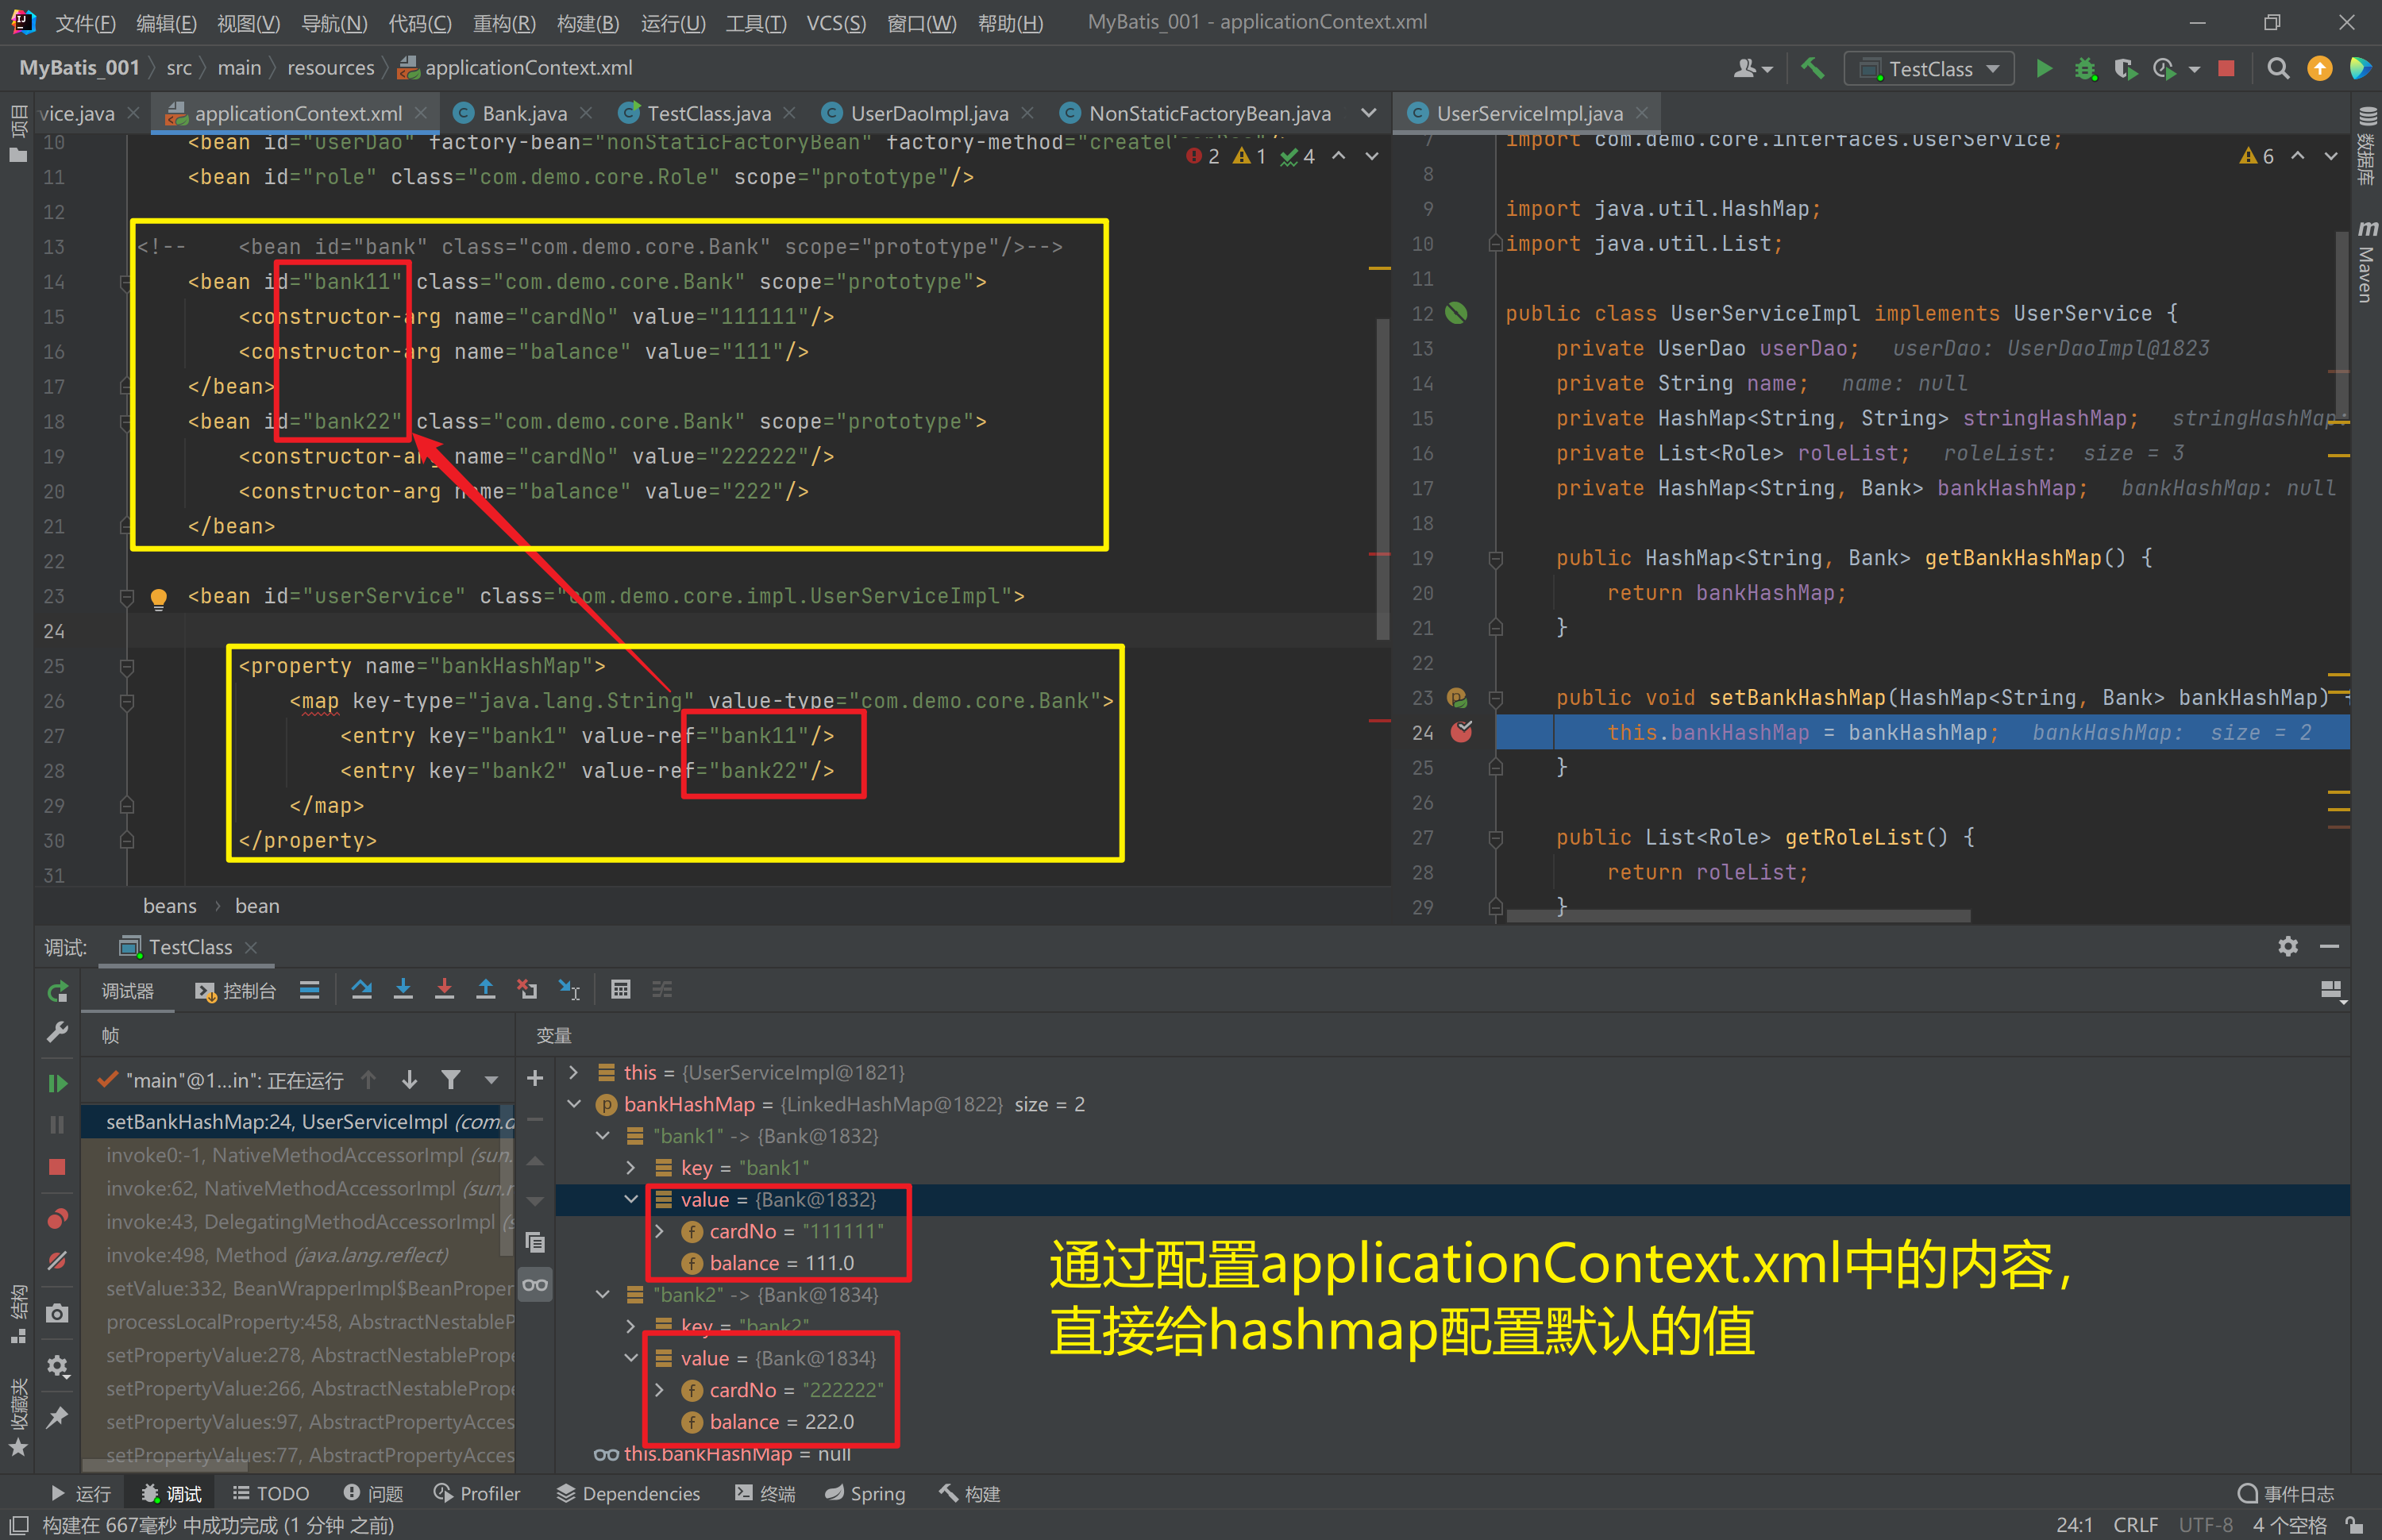
- 集合数据类型
(HashMap<String, Bank>)的注入
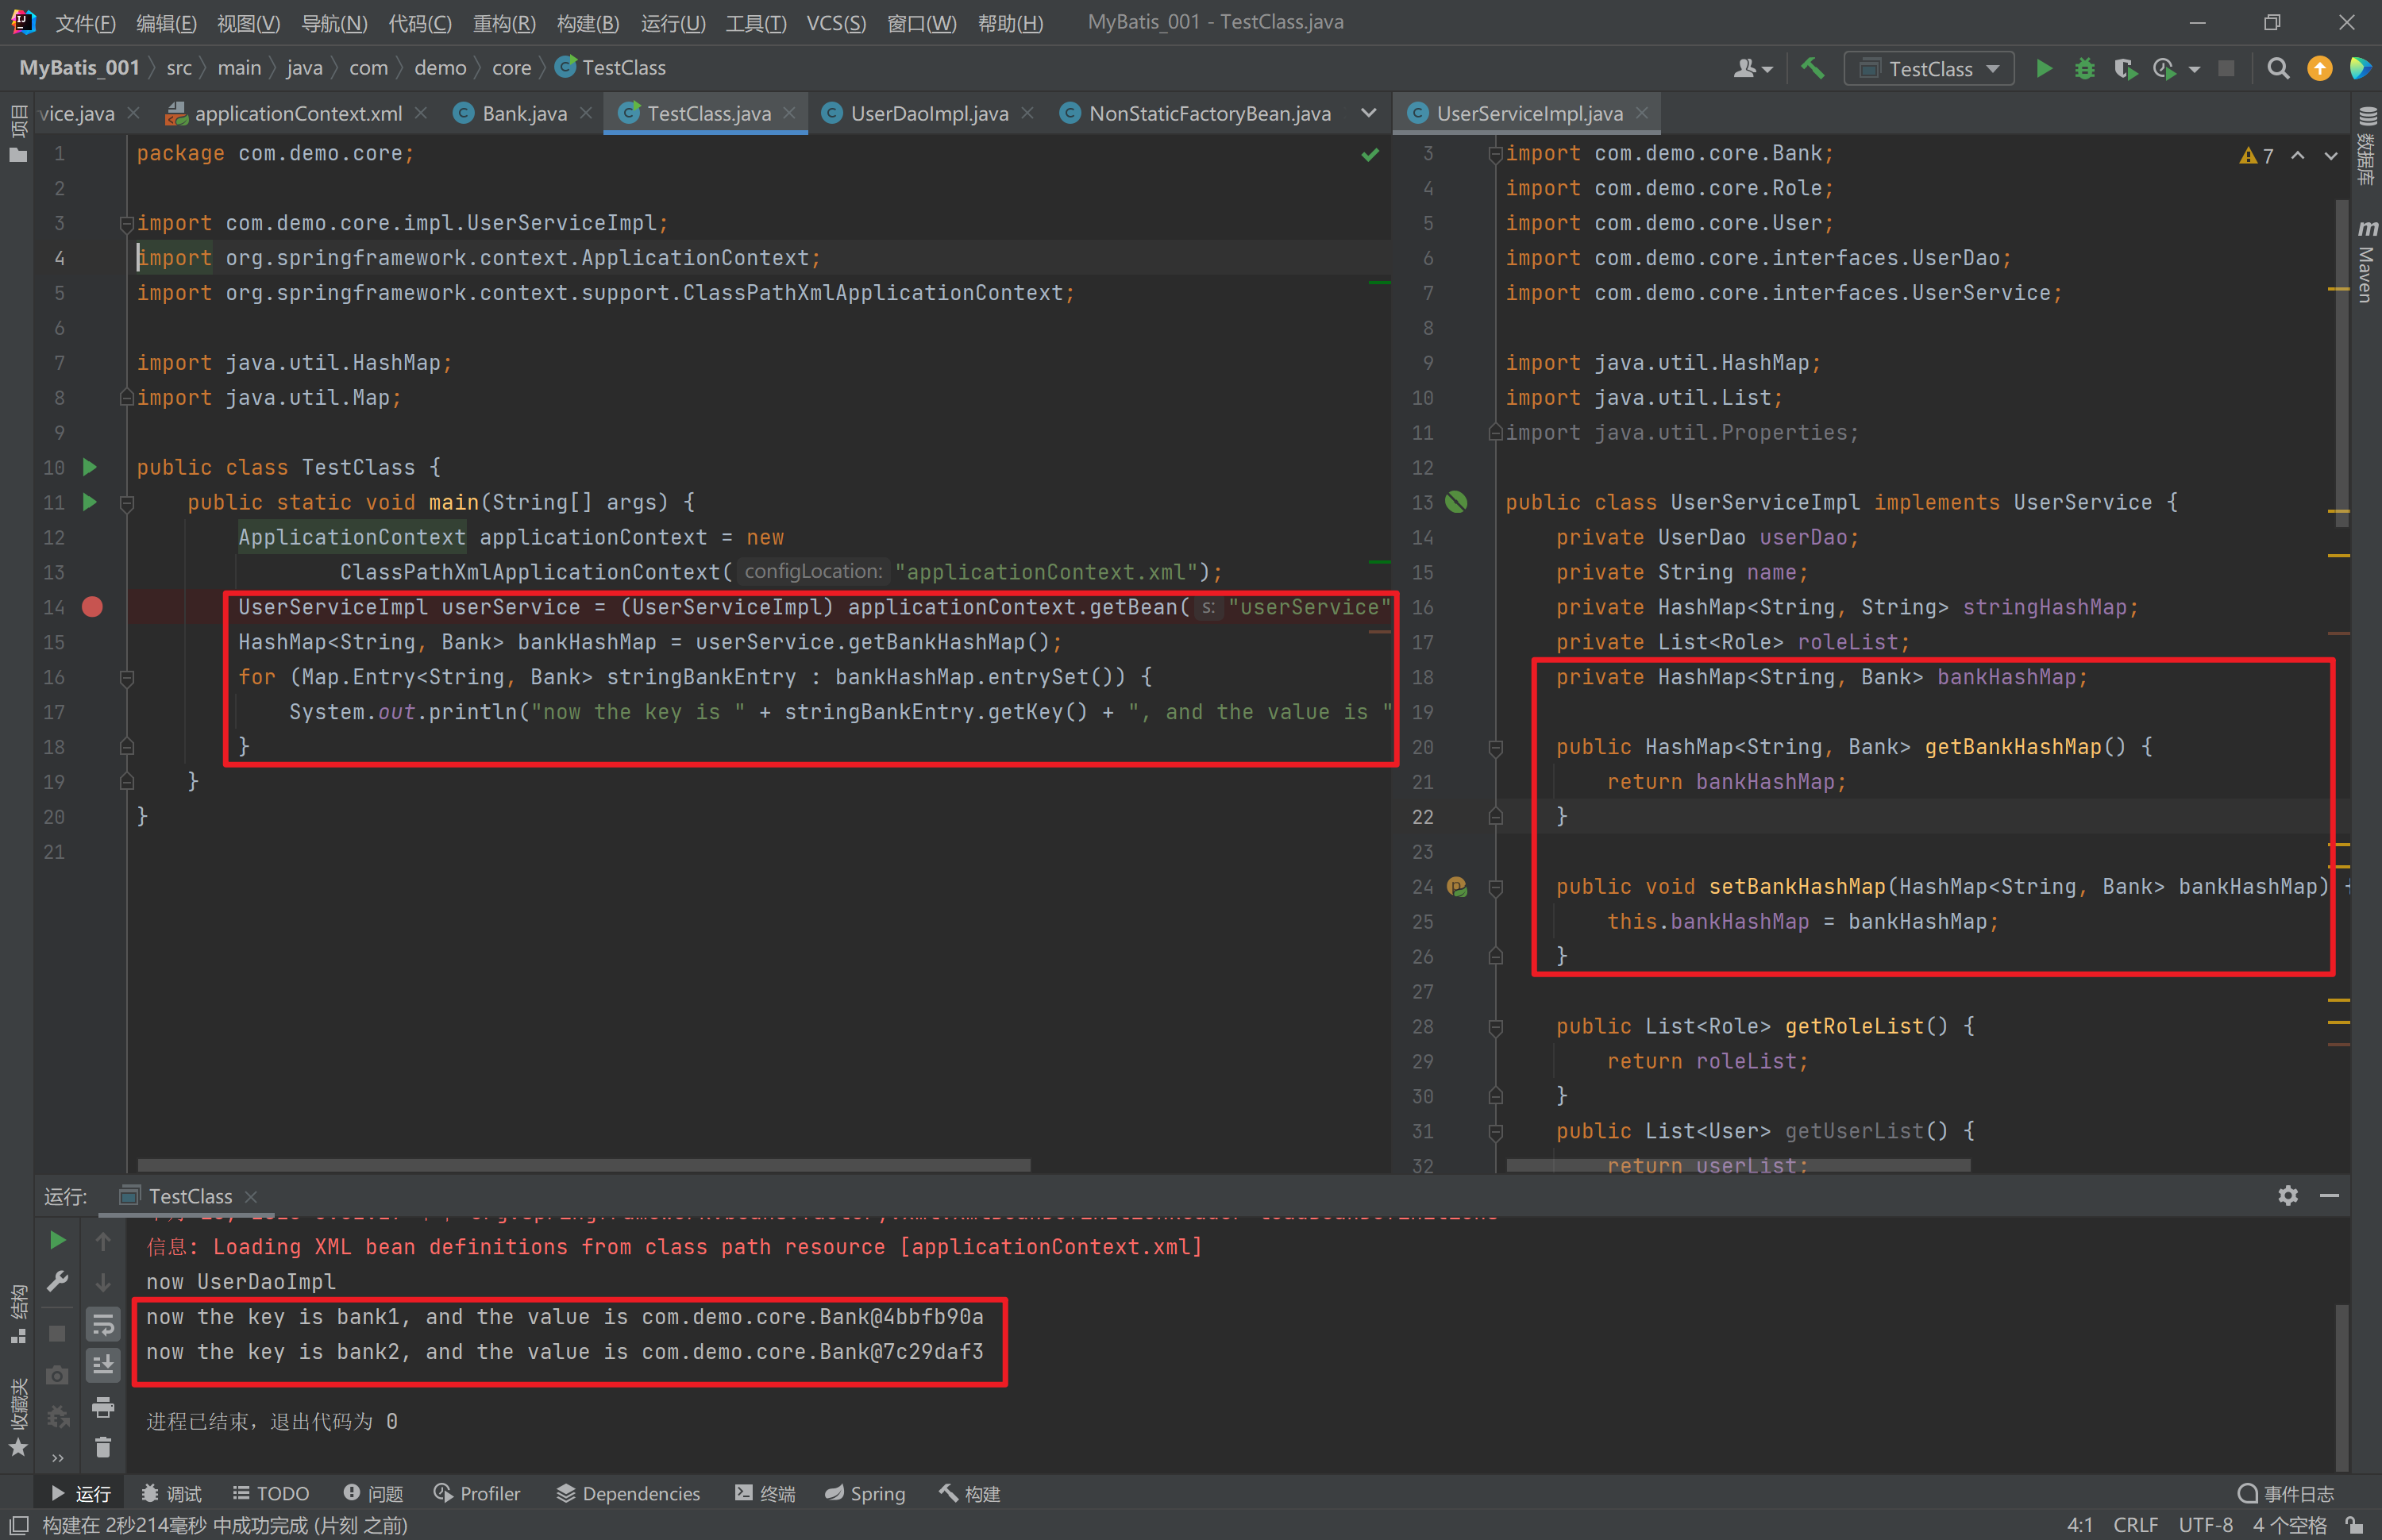
package com.demo.core;

import com.demo.core.impl.UserServiceImpl;
import org.springframework.context.ApplicationContext;
import org.springframework.context.support.ClassPathXmlApplicationContext;

import java.util.HashMap;
import java.util.Map;

public class TestClass {
    public static void main(String[] args) {
        ApplicationContext applicationContext = new
                ClassPathXmlApplicationContext("applicationContext.xml");
        UserServiceImpl userService = (UserServiceImpl) applicationContext.getBean("userService");
        HashMap<String, Bank> bankHashMap = userService.getBankHashMap();
        for (Map.Entry<String, Bank> stringBankEntry : bankHashMap.entrySet()) {
            System.out.println("now the key is " + stringBankEntry.getKey() + ", and the value is " + stringBankEntry.getValue());
        }
    }
}
<?xml version="1.0" encoding="UTF-8" ?>
<beans xmlns="http://www.springframework.org/schema/beans"
xmlns:xsi="http://www.w3.org/2001/XMLSchema-instance"
xsi:schemaLocation="
http://www.springframework.org/schema/beans
http://www.springframework.org/schema/beans/spring-beans.xsd"
xmlns:p="http://www.springframework.org/schema/p">
<bean id="nonStaticFactoryBean" class="com.demo.core.factories.NonStaticFactoryBean"/>
<bean id="userDao" factory-bean="nonStaticFactoryBean" factory-method="createUserDao"/>
<bean id="role" class="com.demo.core.Role" scope="prototype"/>
<!-- <bean id="bank" class="com.demo.core.Bank" scope="prototype"/>-->
<bean id="bank11" class="com.demo.core.Bank" scope="prototype">
<constructor-arg name="cardNo" value="111111"/>
<constructor-arg name="balance" value="111"/>
</bean>
<bean id="bank22" class="com.demo.core.Bank" scope="prototype">
<constructor-arg name="cardNo" value="222222"/>
<constructor-arg name="balance" value="222"/>
</bean>
<bean id="userService" class="com.demo.core.impl.UserServiceImpl">
<property name="bankHashMap">
<map key-type="java.lang.String" value-type="com.demo.core.Bank">
<entry key="bank1" value-ref="bank11"/>
<entry key="bank2" value-ref="bank22"/>
</map>
</property>
<constructor-arg name="userDao" ref="userDao"/>
<!--因为是普通类型,所以用value-->
<!-- <property name="name" value="hehehe"/>-->
<property name="stringList">
<list value-type="java.lang.String">
<value>nihao</value>
<value>hahaha</value>
<value>123123123</value>
</list>
</property>
<property name="stringHashMap">
<map key-type="java.lang.String" value-type="java.lang.String">
<entry key="name" value="hahaha"/>
<entry key="key" value="123123"/>
</map>
</property>
<property name="roleList">
<list value-type="com.demo.core.Role">
<ref bean="role"/>
<ref bean="role"/>
<ref bean="role"/>
</list>
</property>
</bean>
</beans>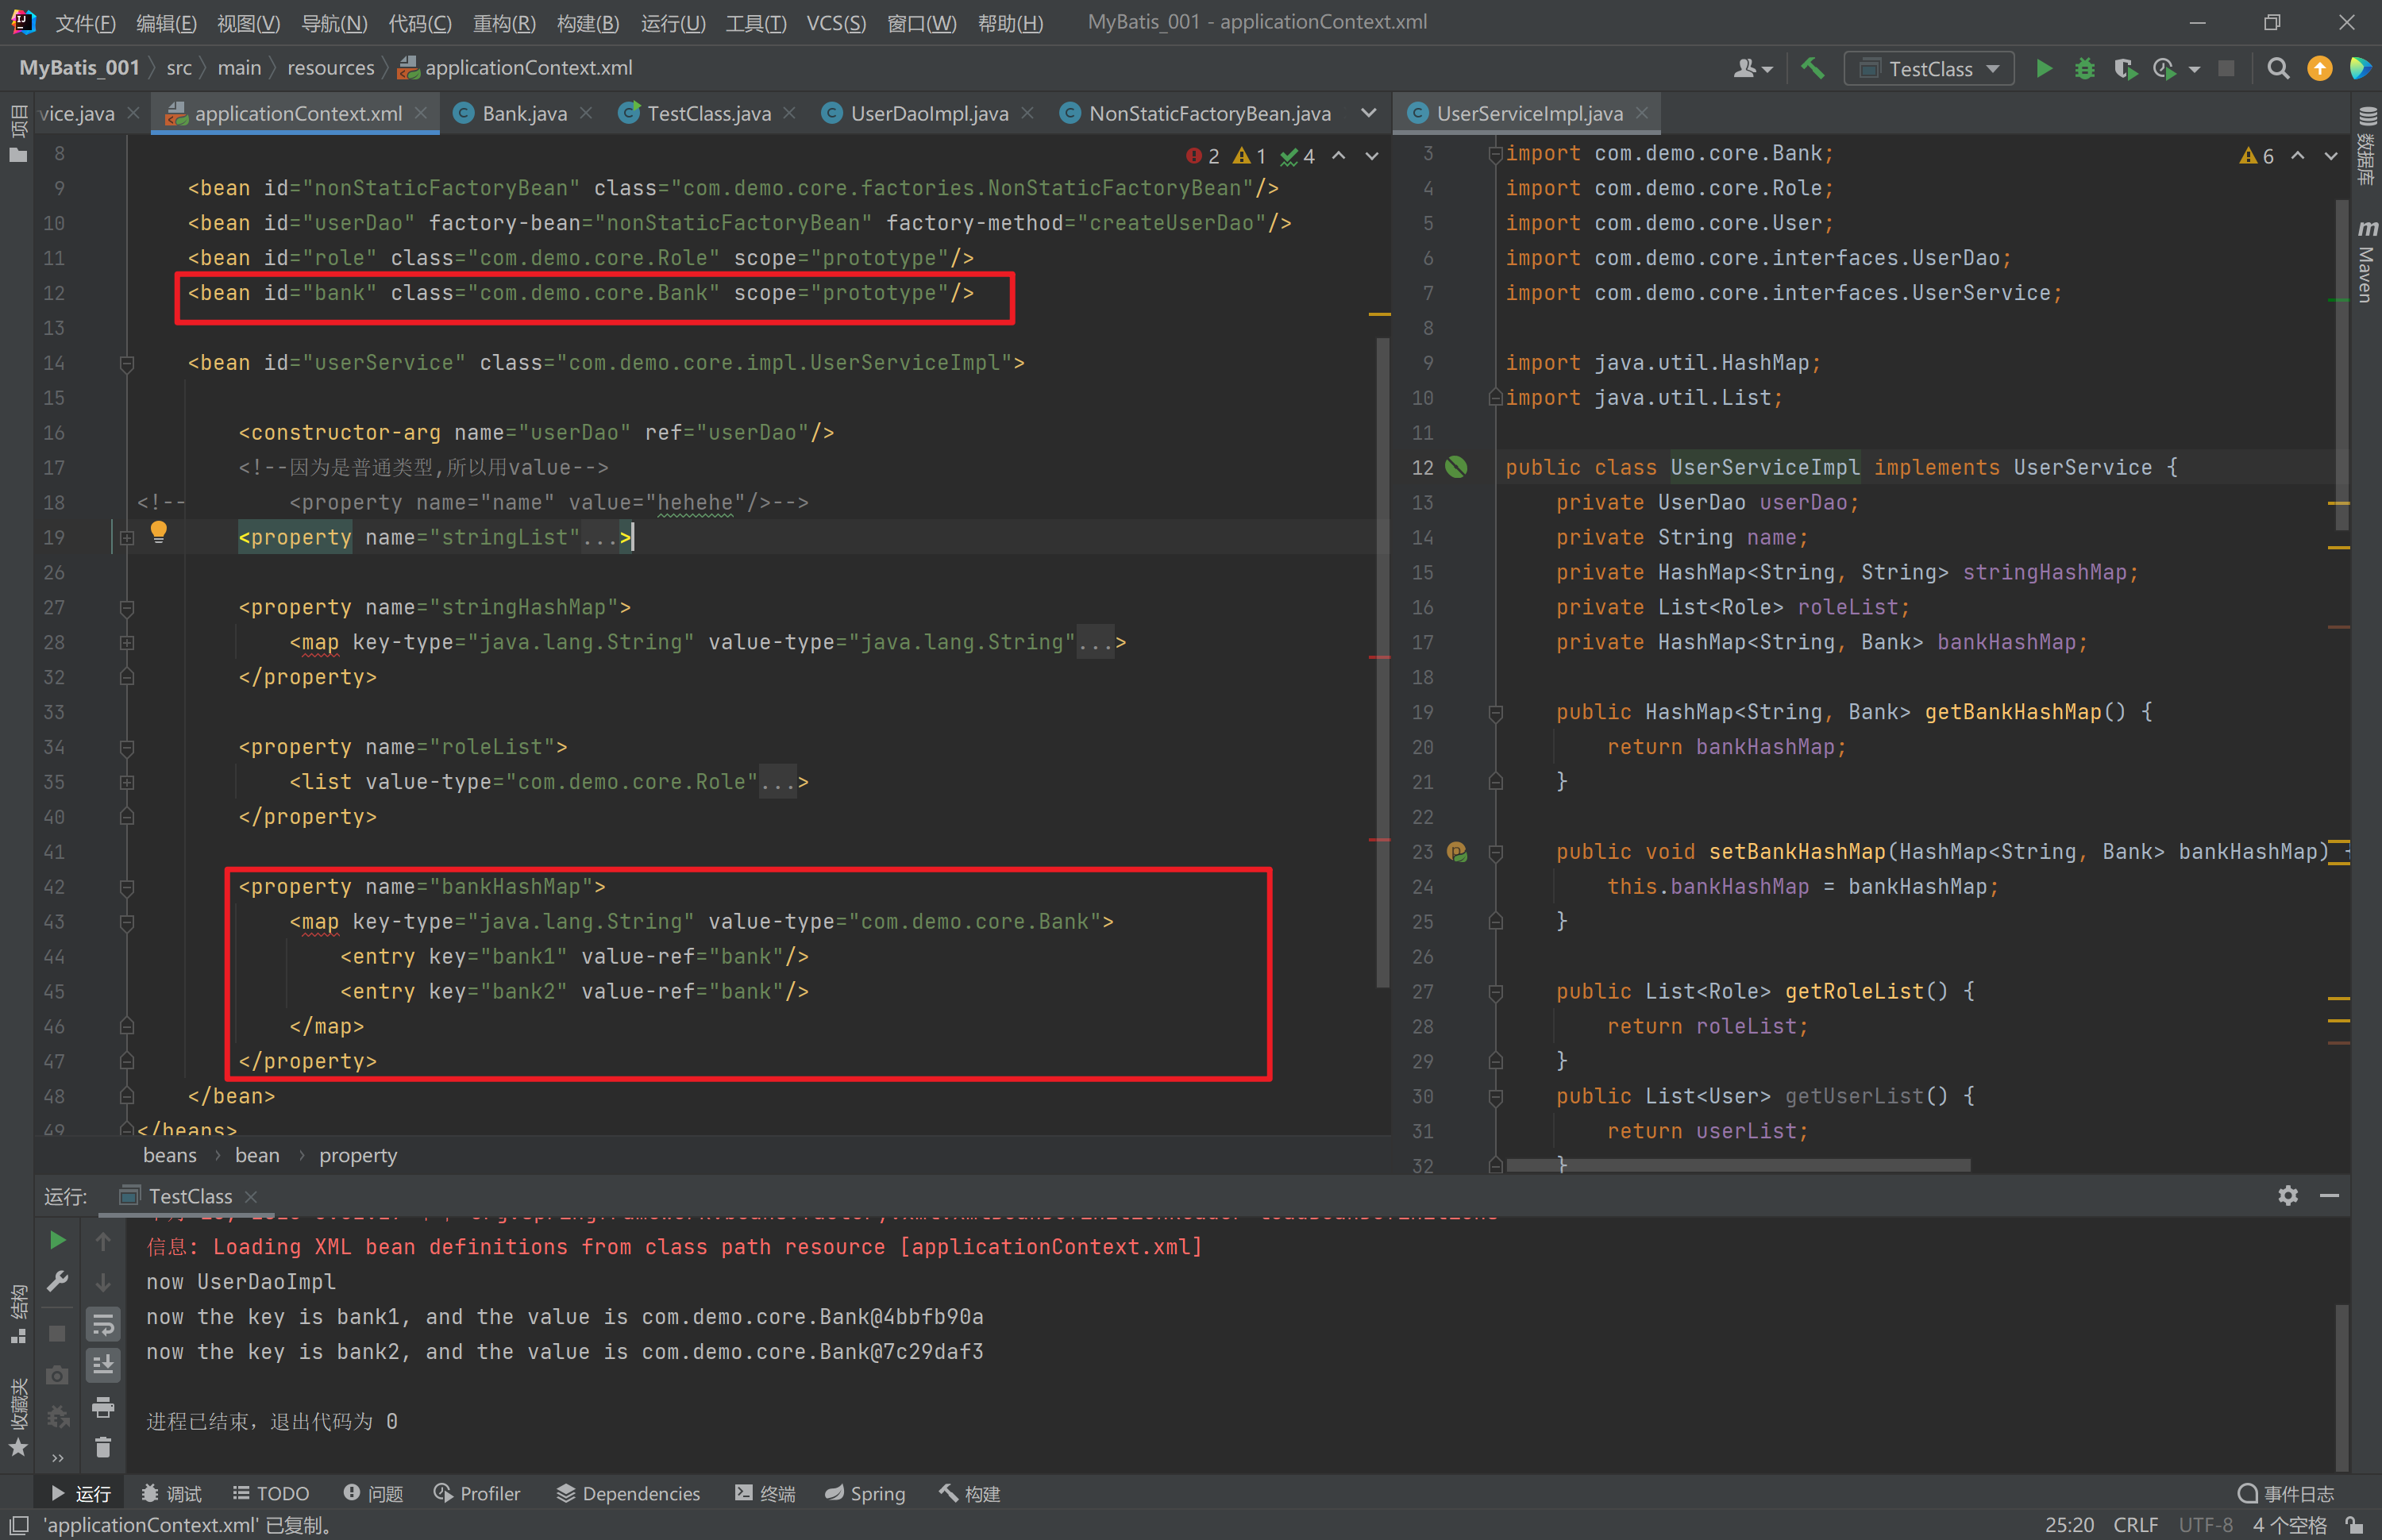
package com.demo.core;

public class Bank {
    private String cardNo;
    private double balance;

    public String getCardNo() {
        return cardNo;
    }

    public void setCardNo(String cardNo) {
        this.cardNo = cardNo;
    }

    public double getBalance() {
        return balance;
    }

    public void setBalance(double balance) {
        this.balance = balance;
    }

    public Bank() {
    }

    public Bank(String cardNo, double balance) {
        this.cardNo = cardNo;
        this.balance = balance;
    }
}
package com.demo.core.impl;
import com.demo.core.Bank;
import com.demo.core.Role;
import com.demo.core.User;
import com.demo.core.interfaces.UserDao;
import com.demo.core.interfaces.UserService;
import java.util.HashMap;
import java.util.List;
public class UserServiceImpl implements UserService {
private UserDao userDao;
private String name;
private HashMap<String, String> stringHashMap;
private List<Role> roleList;
private HashMap<String, Bank> bankHashMap;
public HashMap<String, Bank> getBankHashMap() {
return bankHashMap;
}
public void setBankHashMap(HashMap<String, Bank> bankHashMap) {
this.bankHashMap = bankHashMap;
}
public List<Role> getRoleList() {
return roleList;
}
public List<User> getUserList() {
return userList;
}
public void setUserList(List<User> userList) {
this.userList = userList;
}
private List<User> userList;
public void setRoleList(List<Role> roleList) {
this.roleList = roleList;
}
public UserServiceImpl(HashMap<String, String> stringHashMap) {
this.stringHashMap = stringHashMap;
}
public HashMap<String, String> getStringHashMap() {
return stringHashMap;
}
public void setStringHashMap(HashMap<String, String> stringHashMap) {
this.stringHashMap = stringHashMap;
}
public List<String> getStringList() {
return stringList;
}
public List<String> stringList;
public void setStringList(List<String> stringList) {
this.stringList = stringList;
}
public UserServiceImpl(List<String> stringList) {
this.stringList = stringList;
}
public String getName() {
return name;
}
public void setName(String name) {
this.name = name;
}
public UserServiceImpl(UserDao userDao, String name) {
this.userDao = userDao;
this.name = name;
}
public UserServiceImpl() {
}
public UserServiceImpl(UserDao userDao) {
this.userDao = userDao;
}
public UserDao getUserDao() {
return userDao;
}
public void setUserDao(UserDao userDao) {
this.userDao = userDao;
}
@Override
public void save() {
userDao.save();
}
}
分析
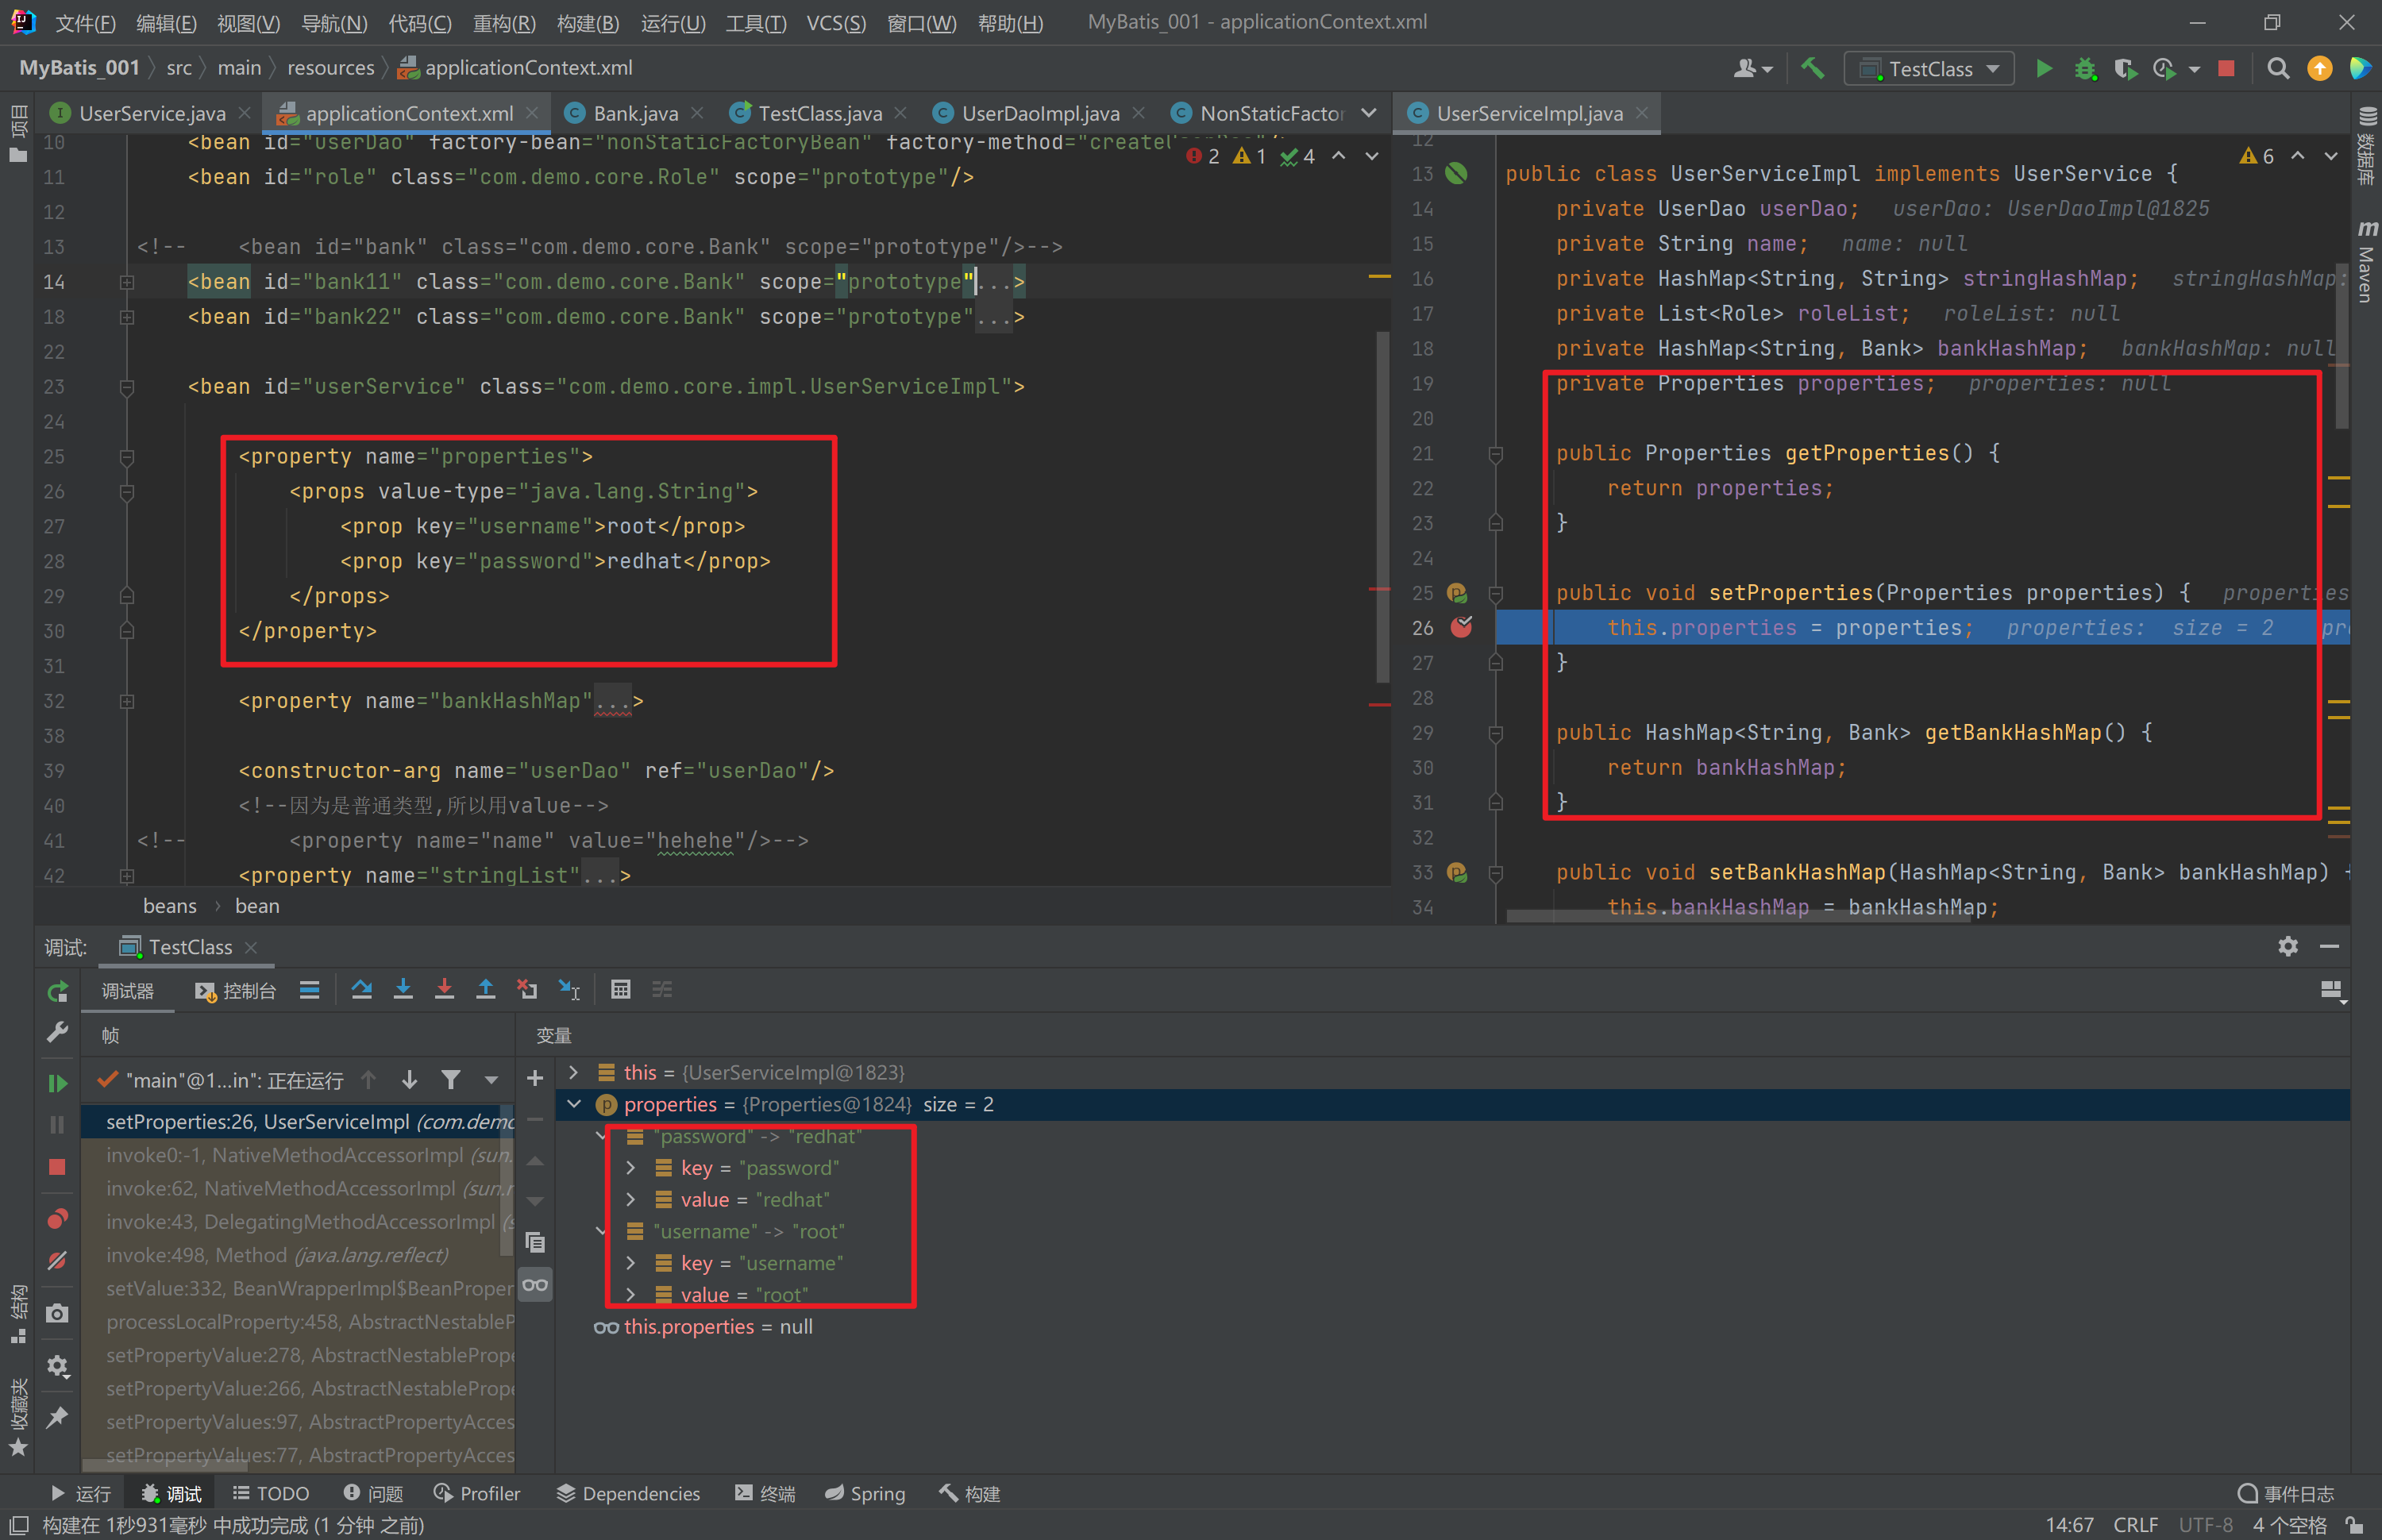
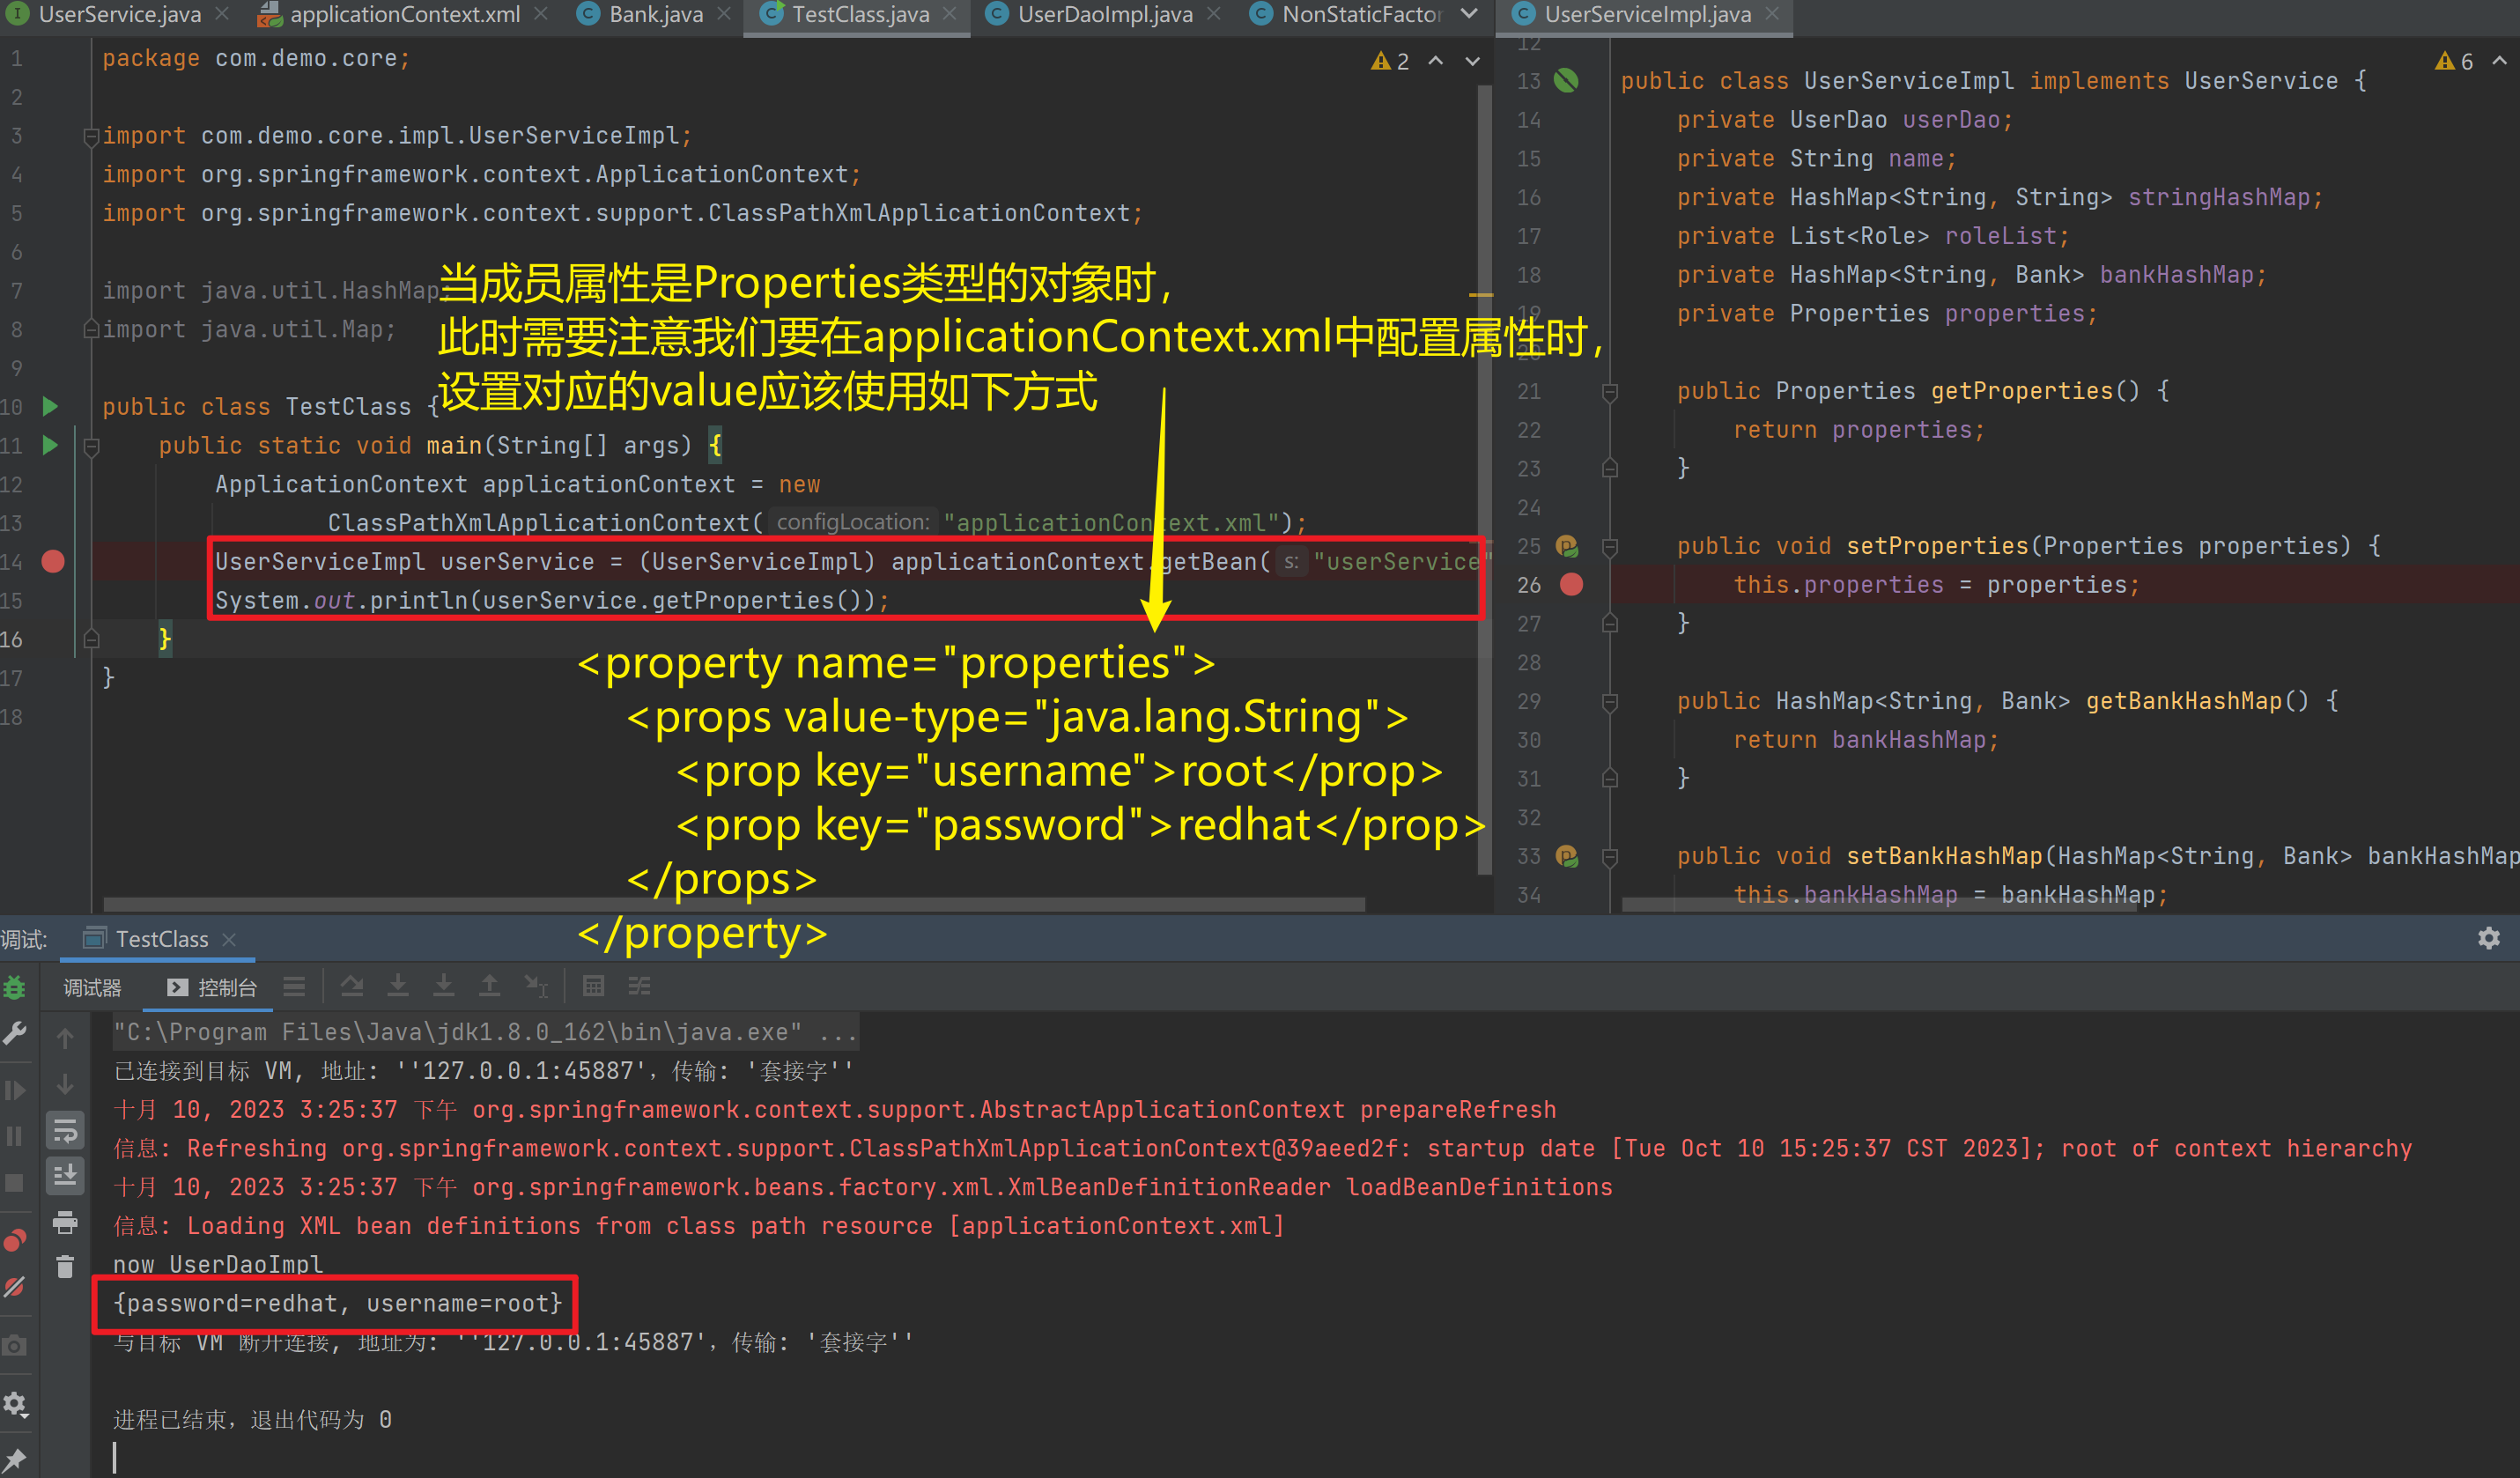
- 集合数据类型
(Properties)的注入
<bean id="userDao" class="com.itbihuo.dao.impl.UserDaoImpl">
<property name="properties">
    <props value-type="java.lang.String">
        <prop key="username">root</prop>
        <prop key="password">redhat</prop>
    </props>
</property>
</bean>
<?xml version="1.0" encoding="UTF-8" ?>
<beans xmlns="http://www.springframework.org/schema/beans"
xmlns:xsi="http://www.w3.org/2001/XMLSchema-instance"
xsi:schemaLocation="
http://www.springframework.org/schema/beans
http://www.springframework.org/schema/beans/spring-beans.xsd"
xmlns:p="http://www.springframework.org/schema/p">
<bean id="nonStaticFactoryBean" class="com.demo.core.factories.NonStaticFactoryBean"/>
<bean id="userDao" factory-bean="nonStaticFactoryBean" factory-method="createUserDao"/>
<bean id="role" class="com.demo.core.Role" scope="prototype"/>
<!-- <bean id="bank" class="com.demo.core.Bank" scope="prototype"/>-->
<bean id="bank11" class="com.demo.core.Bank" scope="prototype">
<constructor-arg name="cardNo" value="111111"/>
<constructor-arg name="balance" value="111"/>
</bean>
<bean id="bank22" class="com.demo.core.Bank" scope="prototype">
<constructor-arg name="cardNo" value="222222"/>
<constructor-arg name="balance" value="222"/>
</bean>
<bean id="userService" class="com.demo.core.impl.UserServiceImpl">
<property name="properties">
<props value-type="java.lang.String">
<prop key="username">root</prop>
<prop key="password">redhat</prop>
</props>
</property>
<property name="bankHashMap">
<map key-type="java.lang.String" value-type="com.demo.core.Bank">
<entry key="bank1" value-ref="bank11"/>
<entry key="bank2" value-ref="bank22"/>
</map>
</property>
<constructor-arg name="userDao" ref="userDao"/>
<!--因为是普通类型,所以用value-->
<!-- <property name="name" value="hehehe"/>-->
<property name="stringList">
<list value-type="java.lang.String">
<value>nihao</value>
<value>hahaha</value>
<value>123123123</value>
</list>
</property>
<property name="stringHashMap">
<map key-type="java.lang.String" value-type="java.lang.String">
<entry key="name" value="hahaha"/>
<entry key="key" value="123123"/>
</map>
</property>
<property name="roleList">
<list value-type="com.demo.core.Role">
<ref bean="role"/>
<ref bean="role"/>
<ref bean="role"/>
</list>
</property>
</bean>
</beans>package com.demo.core.impl;
import com.demo.core.Bank;
import com.demo.core.Role;
import com.demo.core.User;
import com.demo.core.interfaces.UserDao;
import com.demo.core.interfaces.UserService;
import java.util.HashMap;
import java.util.List;
import java.util.Properties;
public class UserServiceImpl implements UserService {
private UserDao userDao;
private String name;
private HashMap<String, String> stringHashMap;
private List<Role> roleList;
private HashMap<String, Bank> bankHashMap;
private Properties properties;
public Properties getProperties() {
return properties;
}
public void setProperties(Properties properties) {
this.properties = properties;
}
public HashMap<String, Bank> getBankHashMap() {
return bankHashMap;
}
public void setBankHashMap(HashMap<String, Bank> bankHashMap) {
this.bankHashMap = bankHashMap;
}
public List<Role> getRoleList() {
return roleList;
}
public List<User> getUserList() {
return userList;
}
public void setUserList(List<User> userList) {
this.userList = userList;
}
private List<User> userList;
public void setRoleList(List<Role> roleList) {
this.roleList = roleList;
}
public UserServiceImpl(HashMap<String, String> stringHashMap) {
this.stringHashMap = stringHashMap;
}
public HashMap<String, String> getStringHashMap() {
return stringHashMap;
}
public void setStringHashMap(HashMap<String, String> stringHashMap) {
this.stringHashMap = stringHashMap;
}
public List<String> getStringList() {
return stringList;
}
public List<String> stringList;
public void setStringList(List<String> stringList) {
this.stringList = stringList;
}
public UserServiceImpl(List<String> stringList) {
this.stringList = stringList;
}
public String getName() {
return name;
}
public void setName(String name) {
this.name = name;
}
public UserServiceImpl(UserDao userDao, String name) {
this.userDao = userDao;
this.name = name;
}
public UserServiceImpl() {
}
public UserServiceImpl(UserDao userDao) {
this.userDao = userDao;
}
public UserDao getUserDao() {
return userDao;
}
public void setUserDao(UserDao userDao) {
this.userDao = userDao;
}
@Override
public void save() {
userDao.save();
}
}
1.3.10. 引入其他配置文件(分模块开发)
实际开发中,Spring的配置内容非常多,这就导致Spring配置很繁杂且体积很大,所以,可以将部分配置拆解到其他配置文件中,而在Spring主配置文件通过import标签进行加载
<import resource="applicationContext-xxx.xml"/>1.3.11. 知识要点
Spring的重点配置
<bean>标签
    id属性:在容器中Bean实例的唯一标识,不允许重复
    class属性:要实例化的Bean的全限定名
    scope属性:Bean的作用范围,常用是Singleton(默认)和prototype
    <property>标签:属性注入
        name属性:属性名称
        value属性:注入的普通属性值
        ref属性:注入的对象引用值
        <list>标签
        <map>标签
        <properties>标签
    <constructor-arg>标签
<import>标签:导入其他的Spring的分文件
1.4. Spring相关API
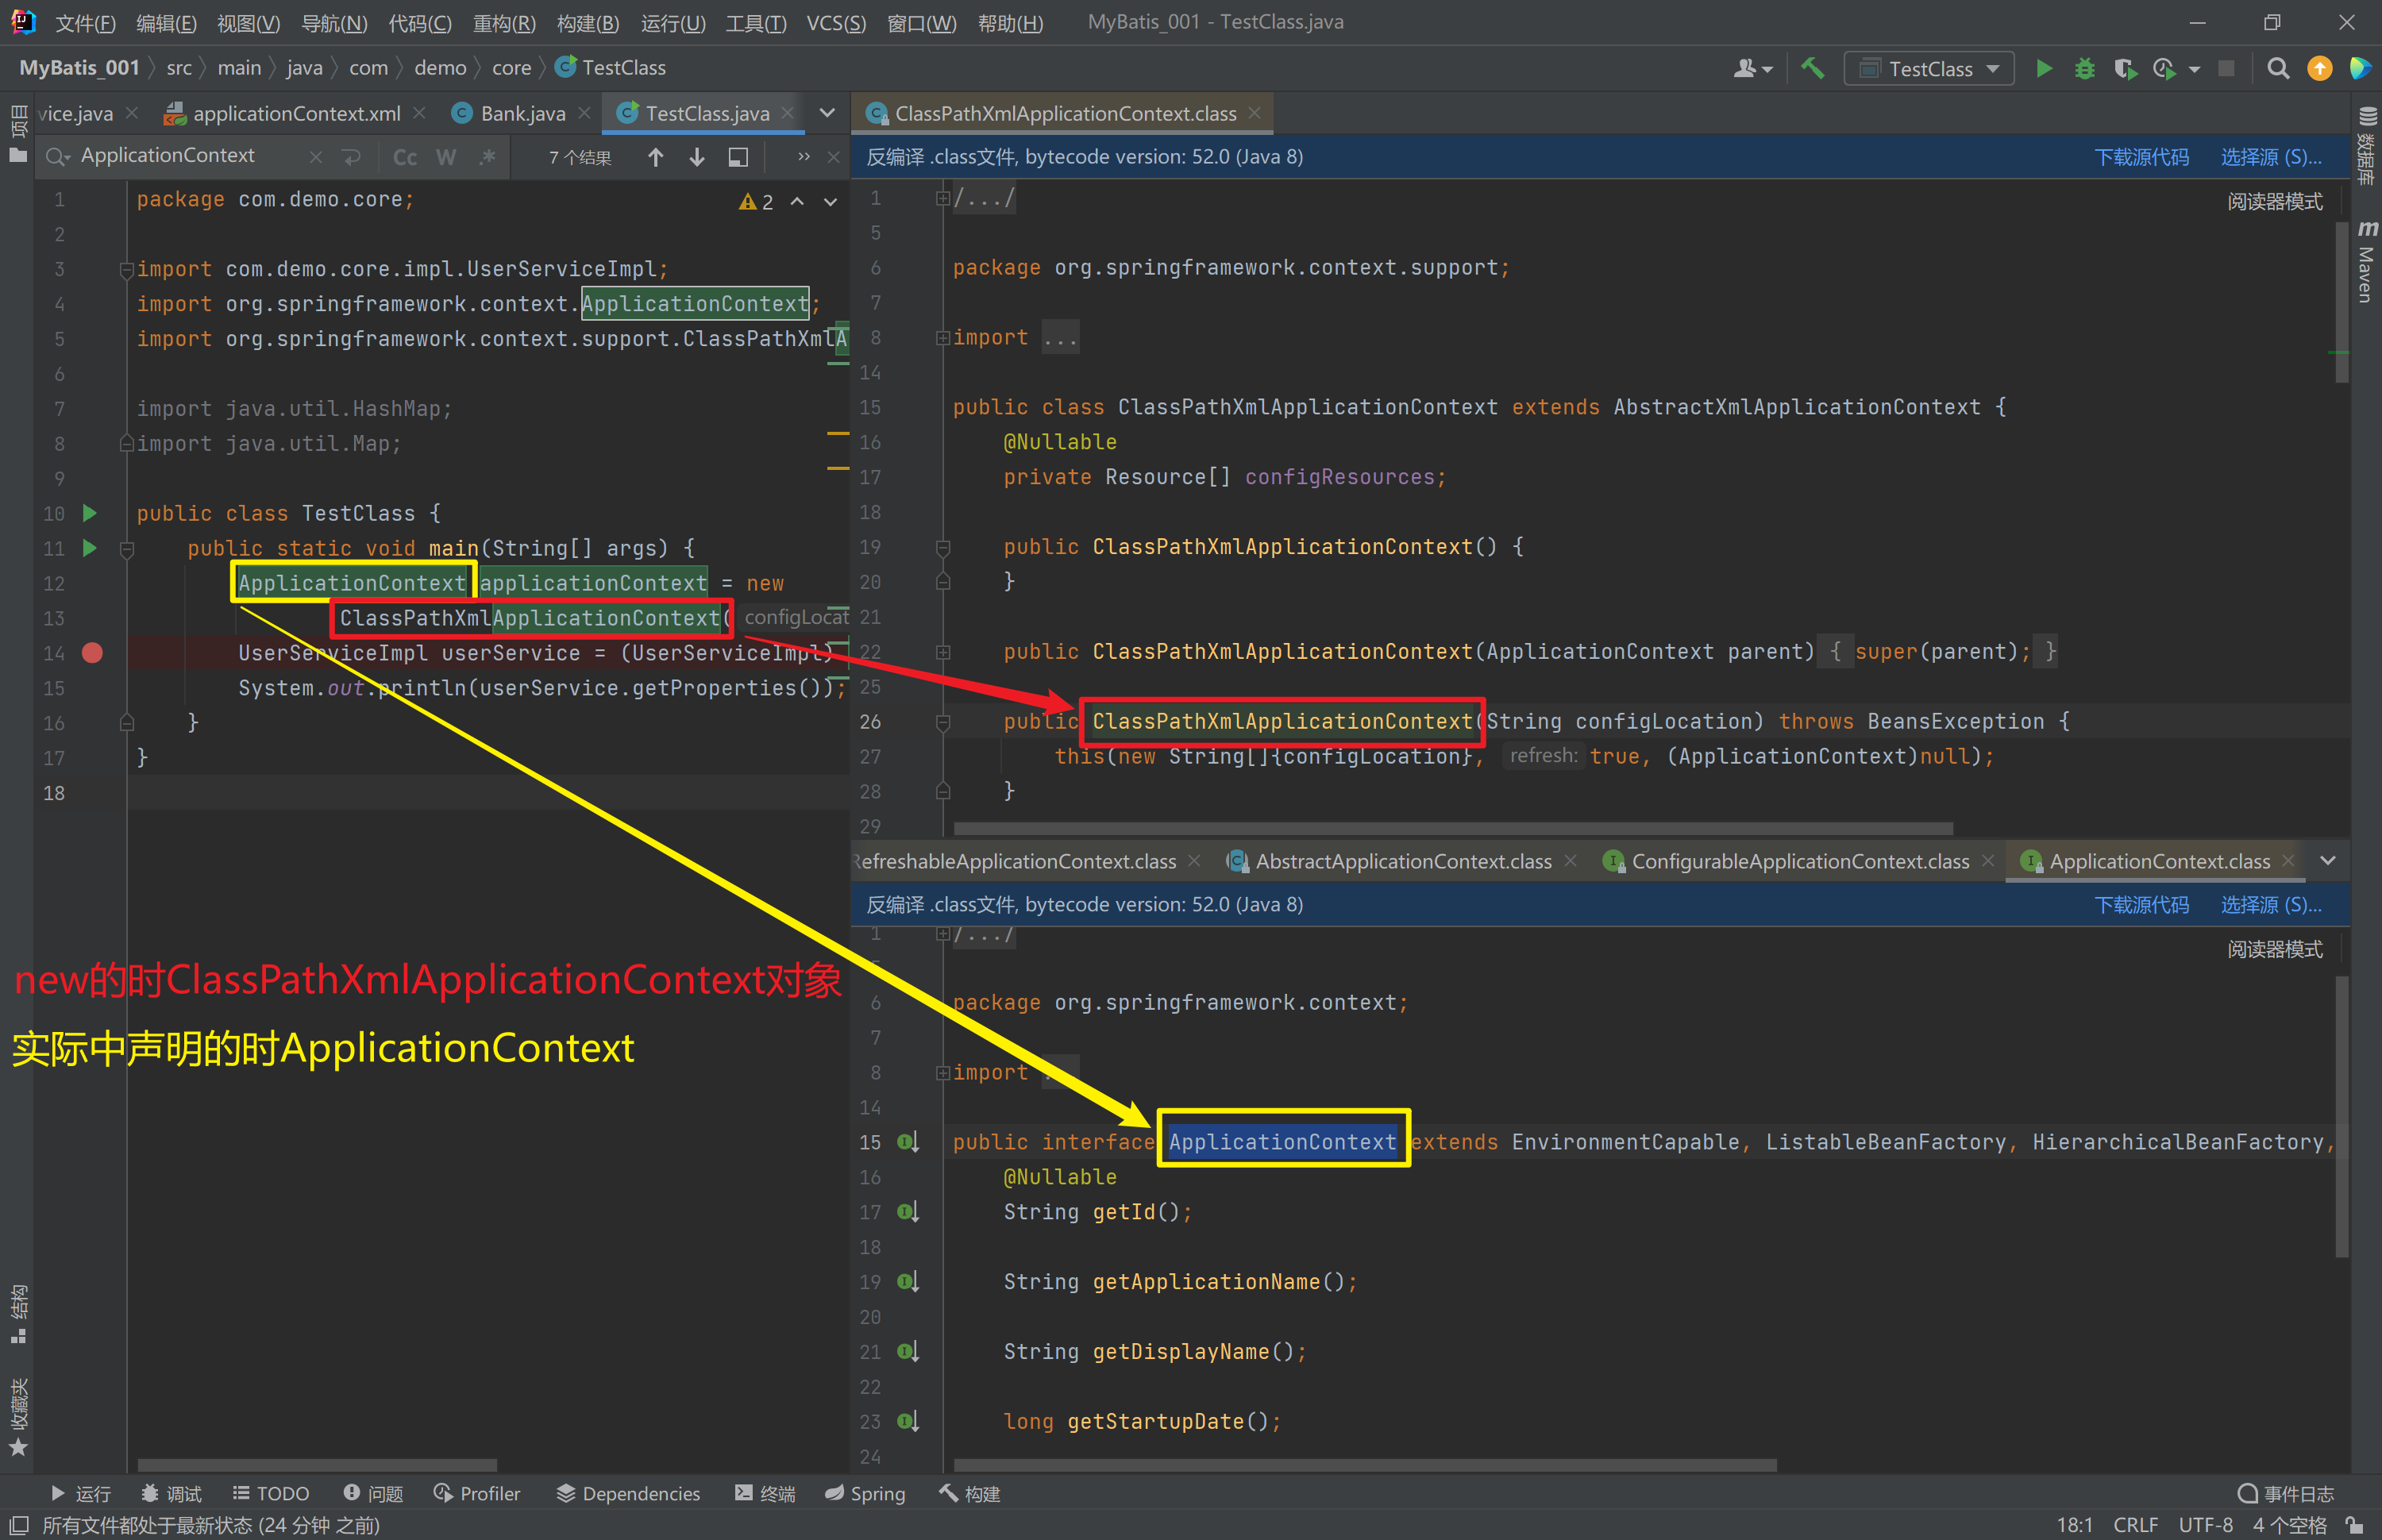
1.4.1. ApplicationContext的继承体系
applicationContext:接口类型,代表应用上下文,可以通过其实例获得 Spring 容器中的 Bean 对象
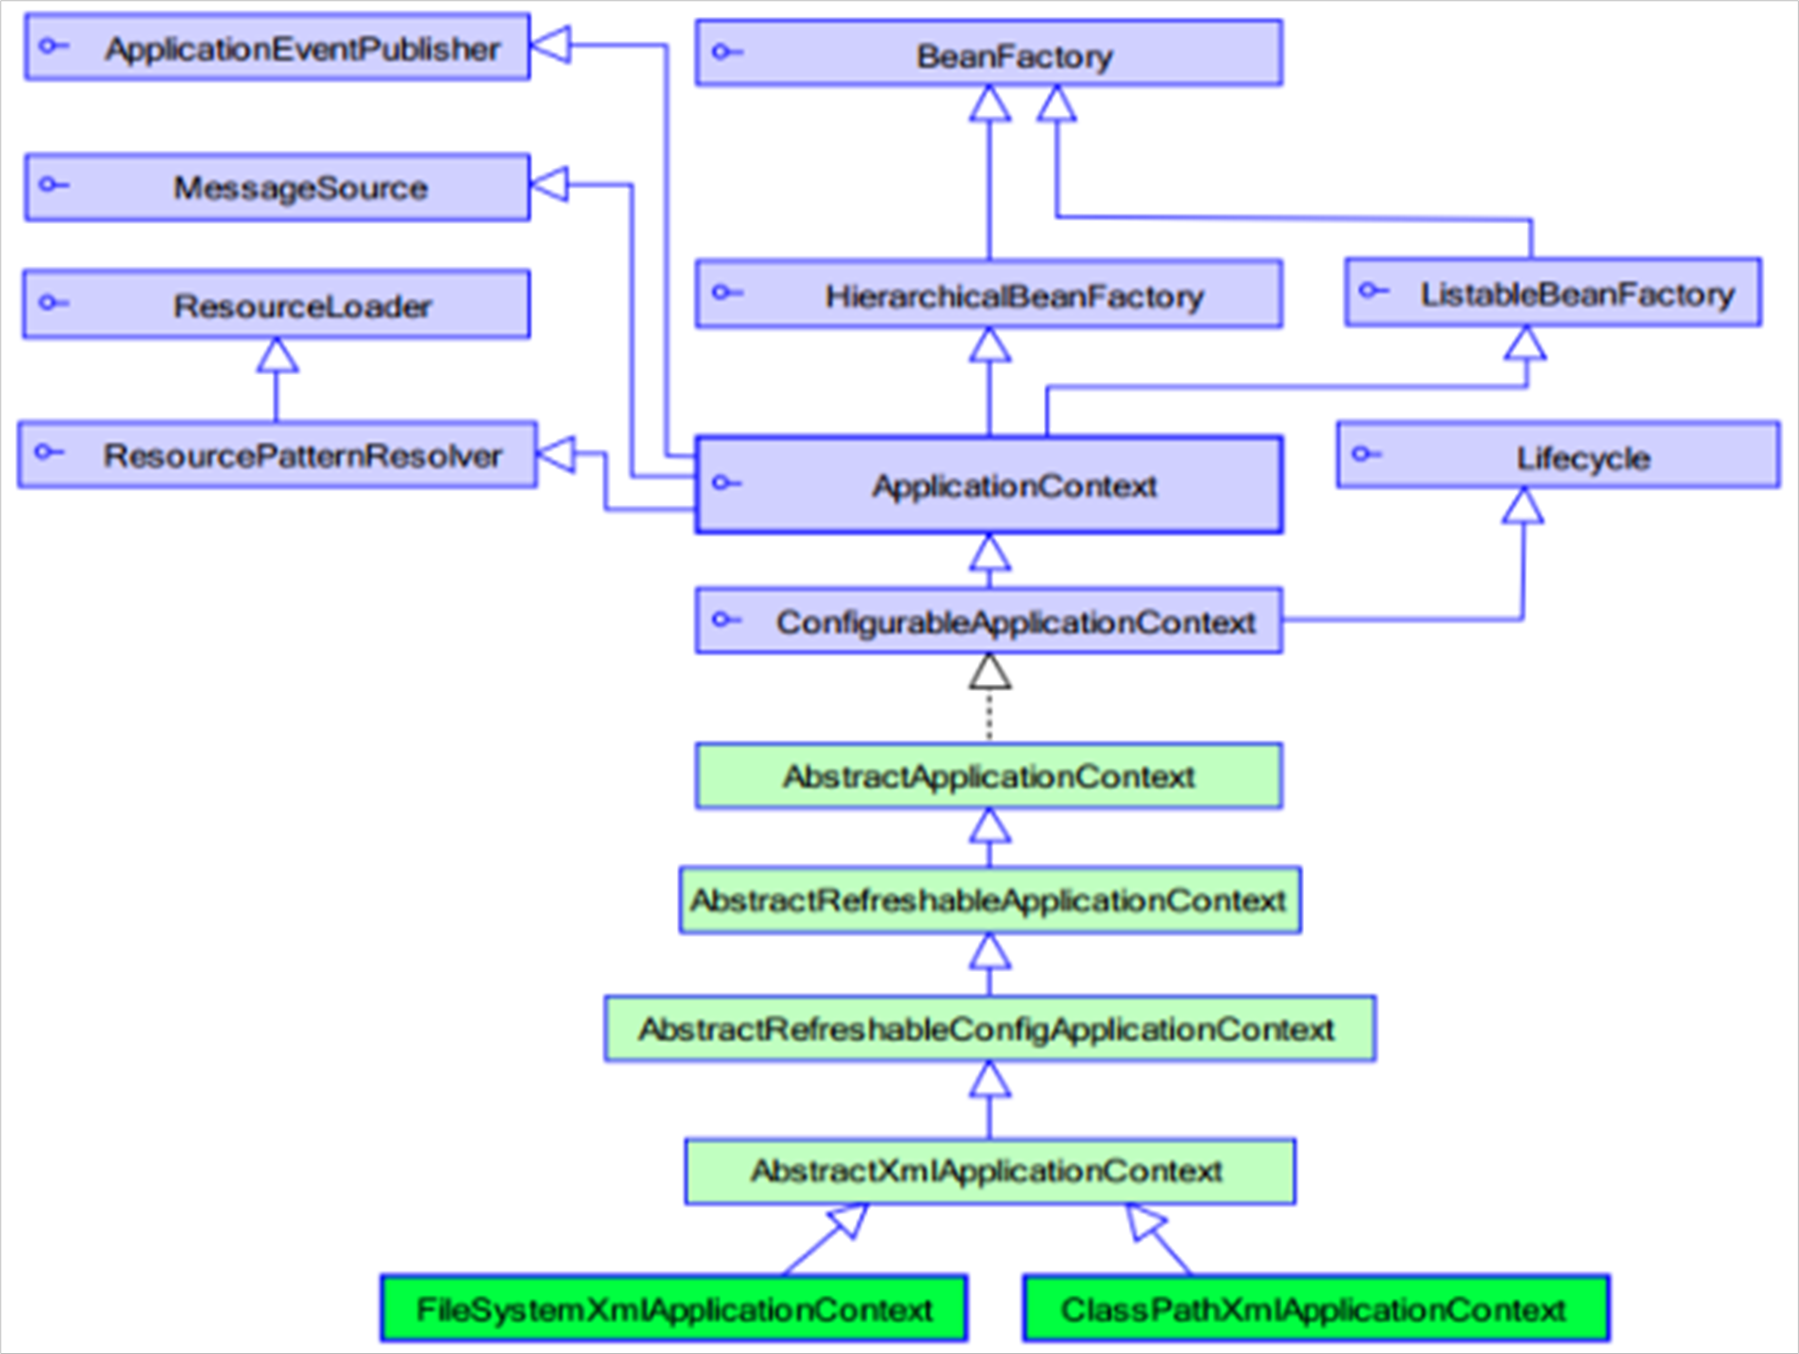
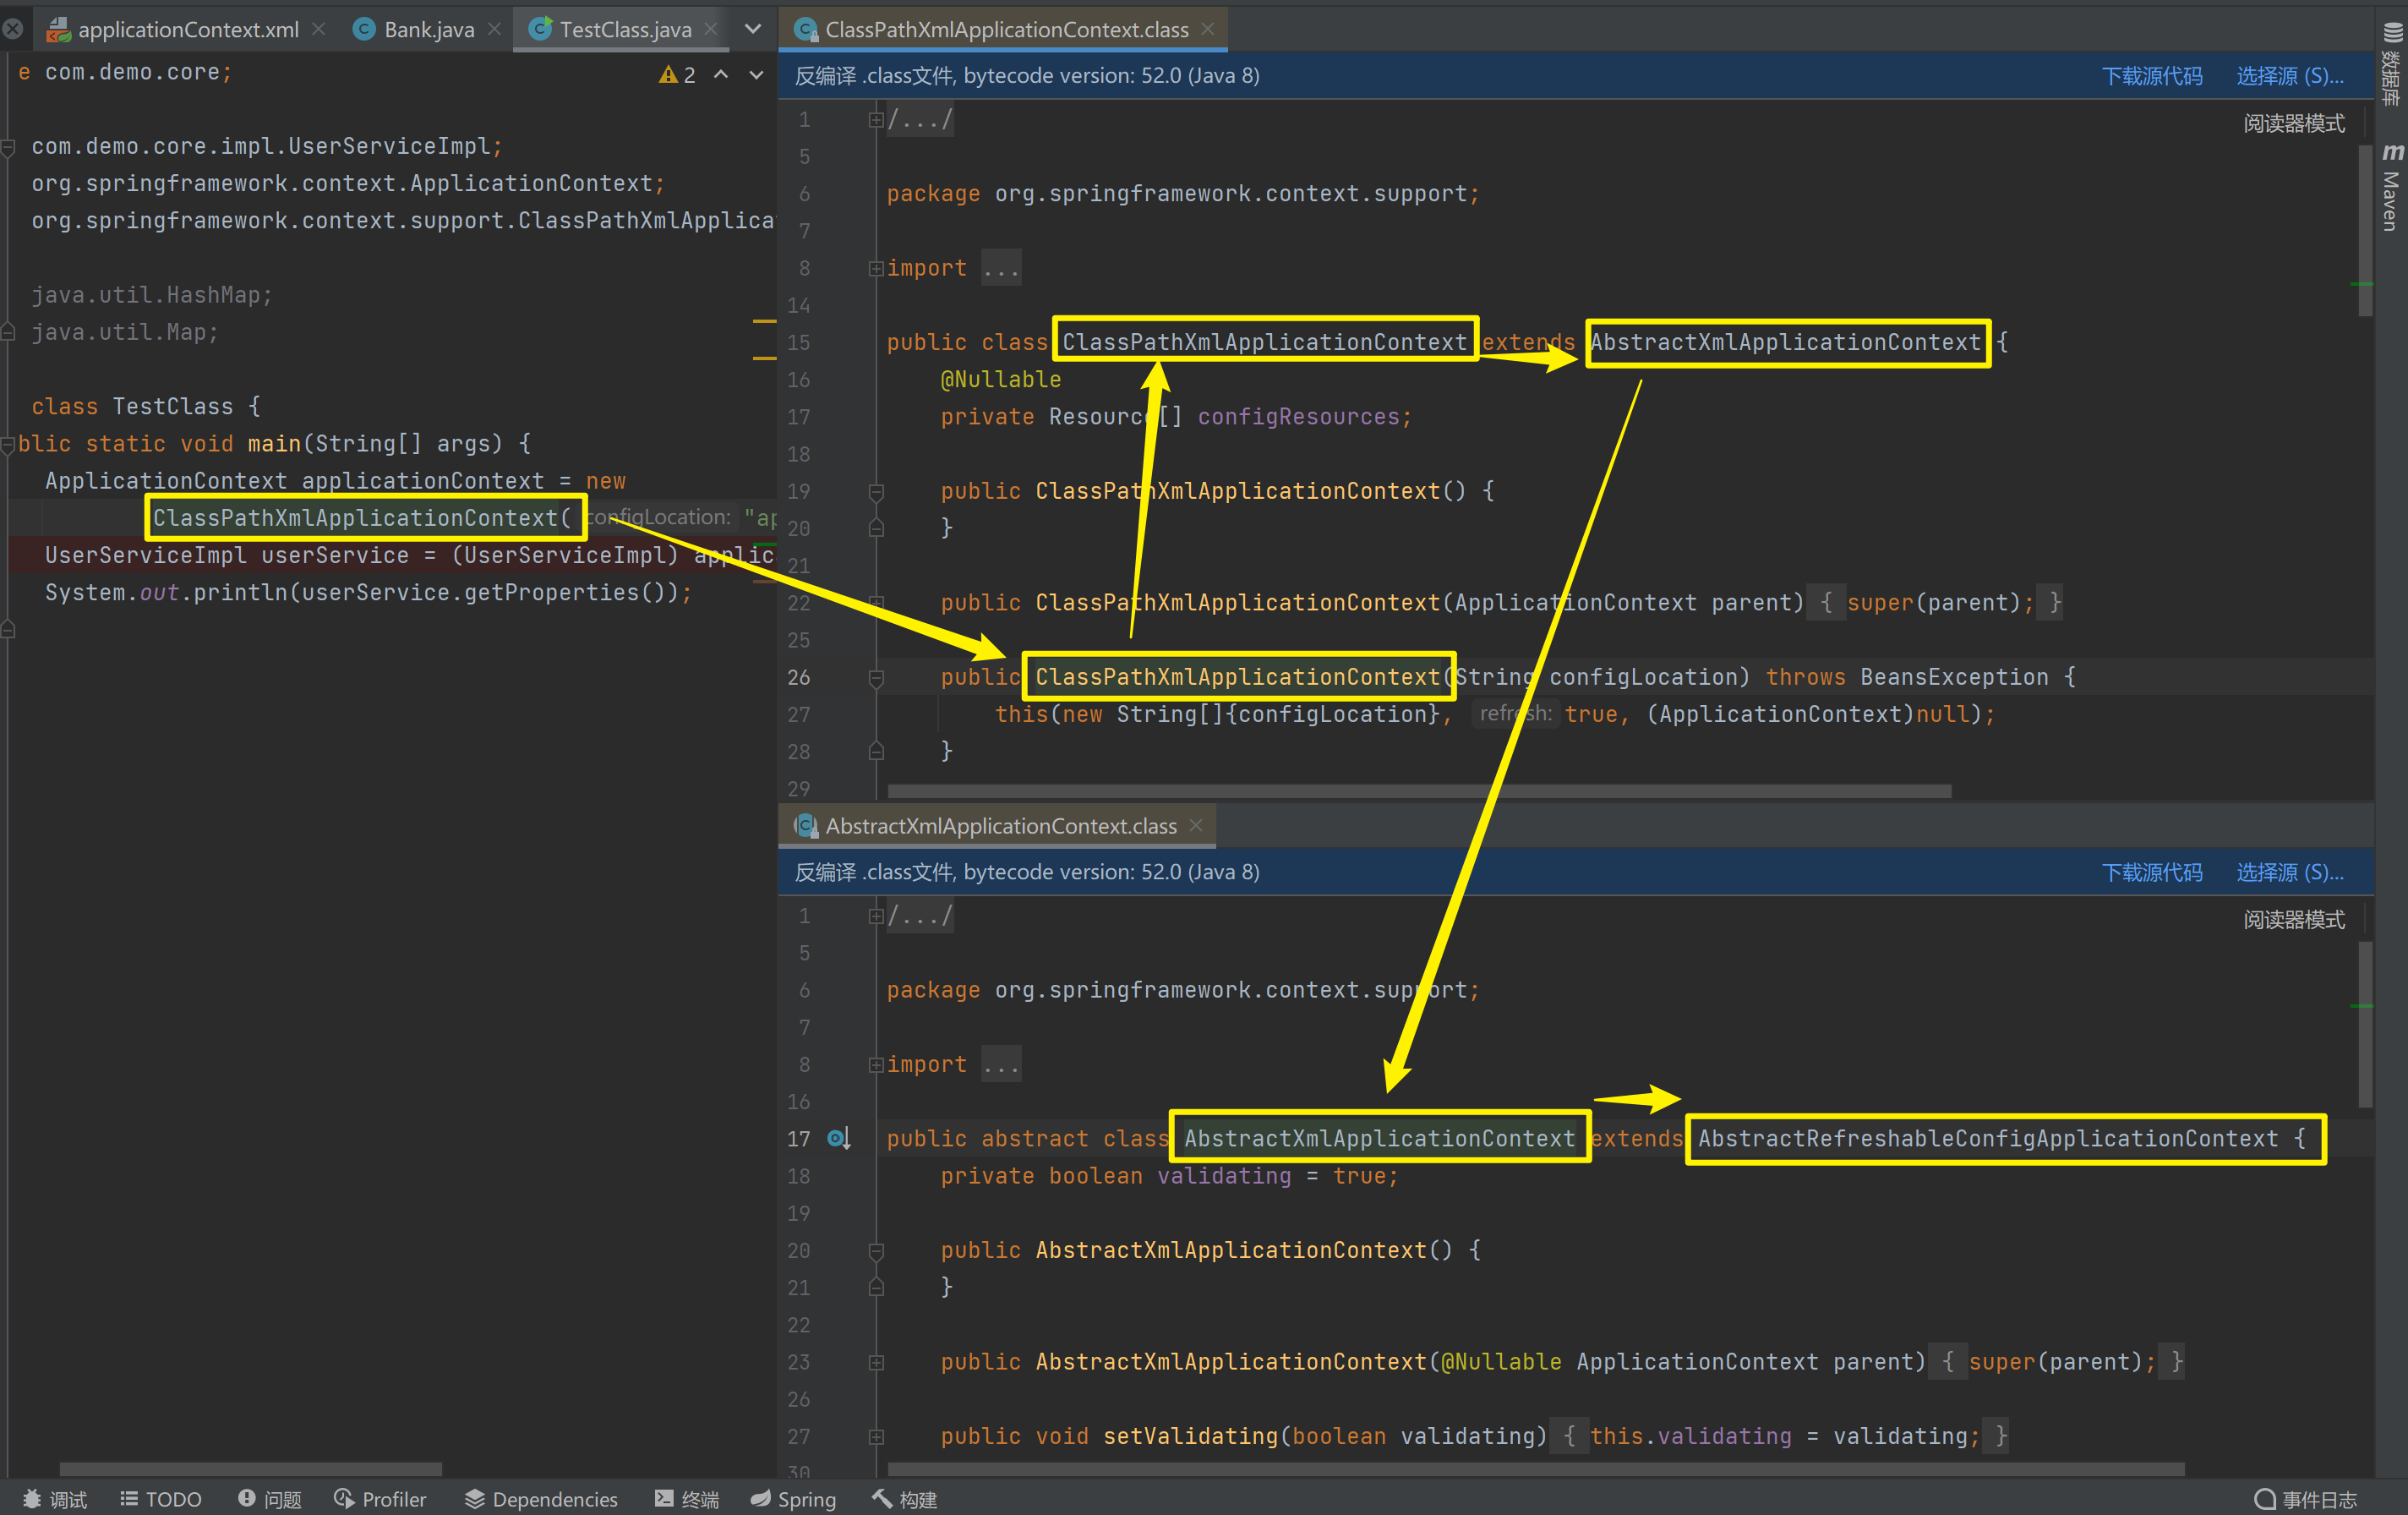
1.4.2. ApplicationContext的实现类
1)ClassPathXmlApplicationContext
它是从类的根路径下加载配置文件 推荐使用这种
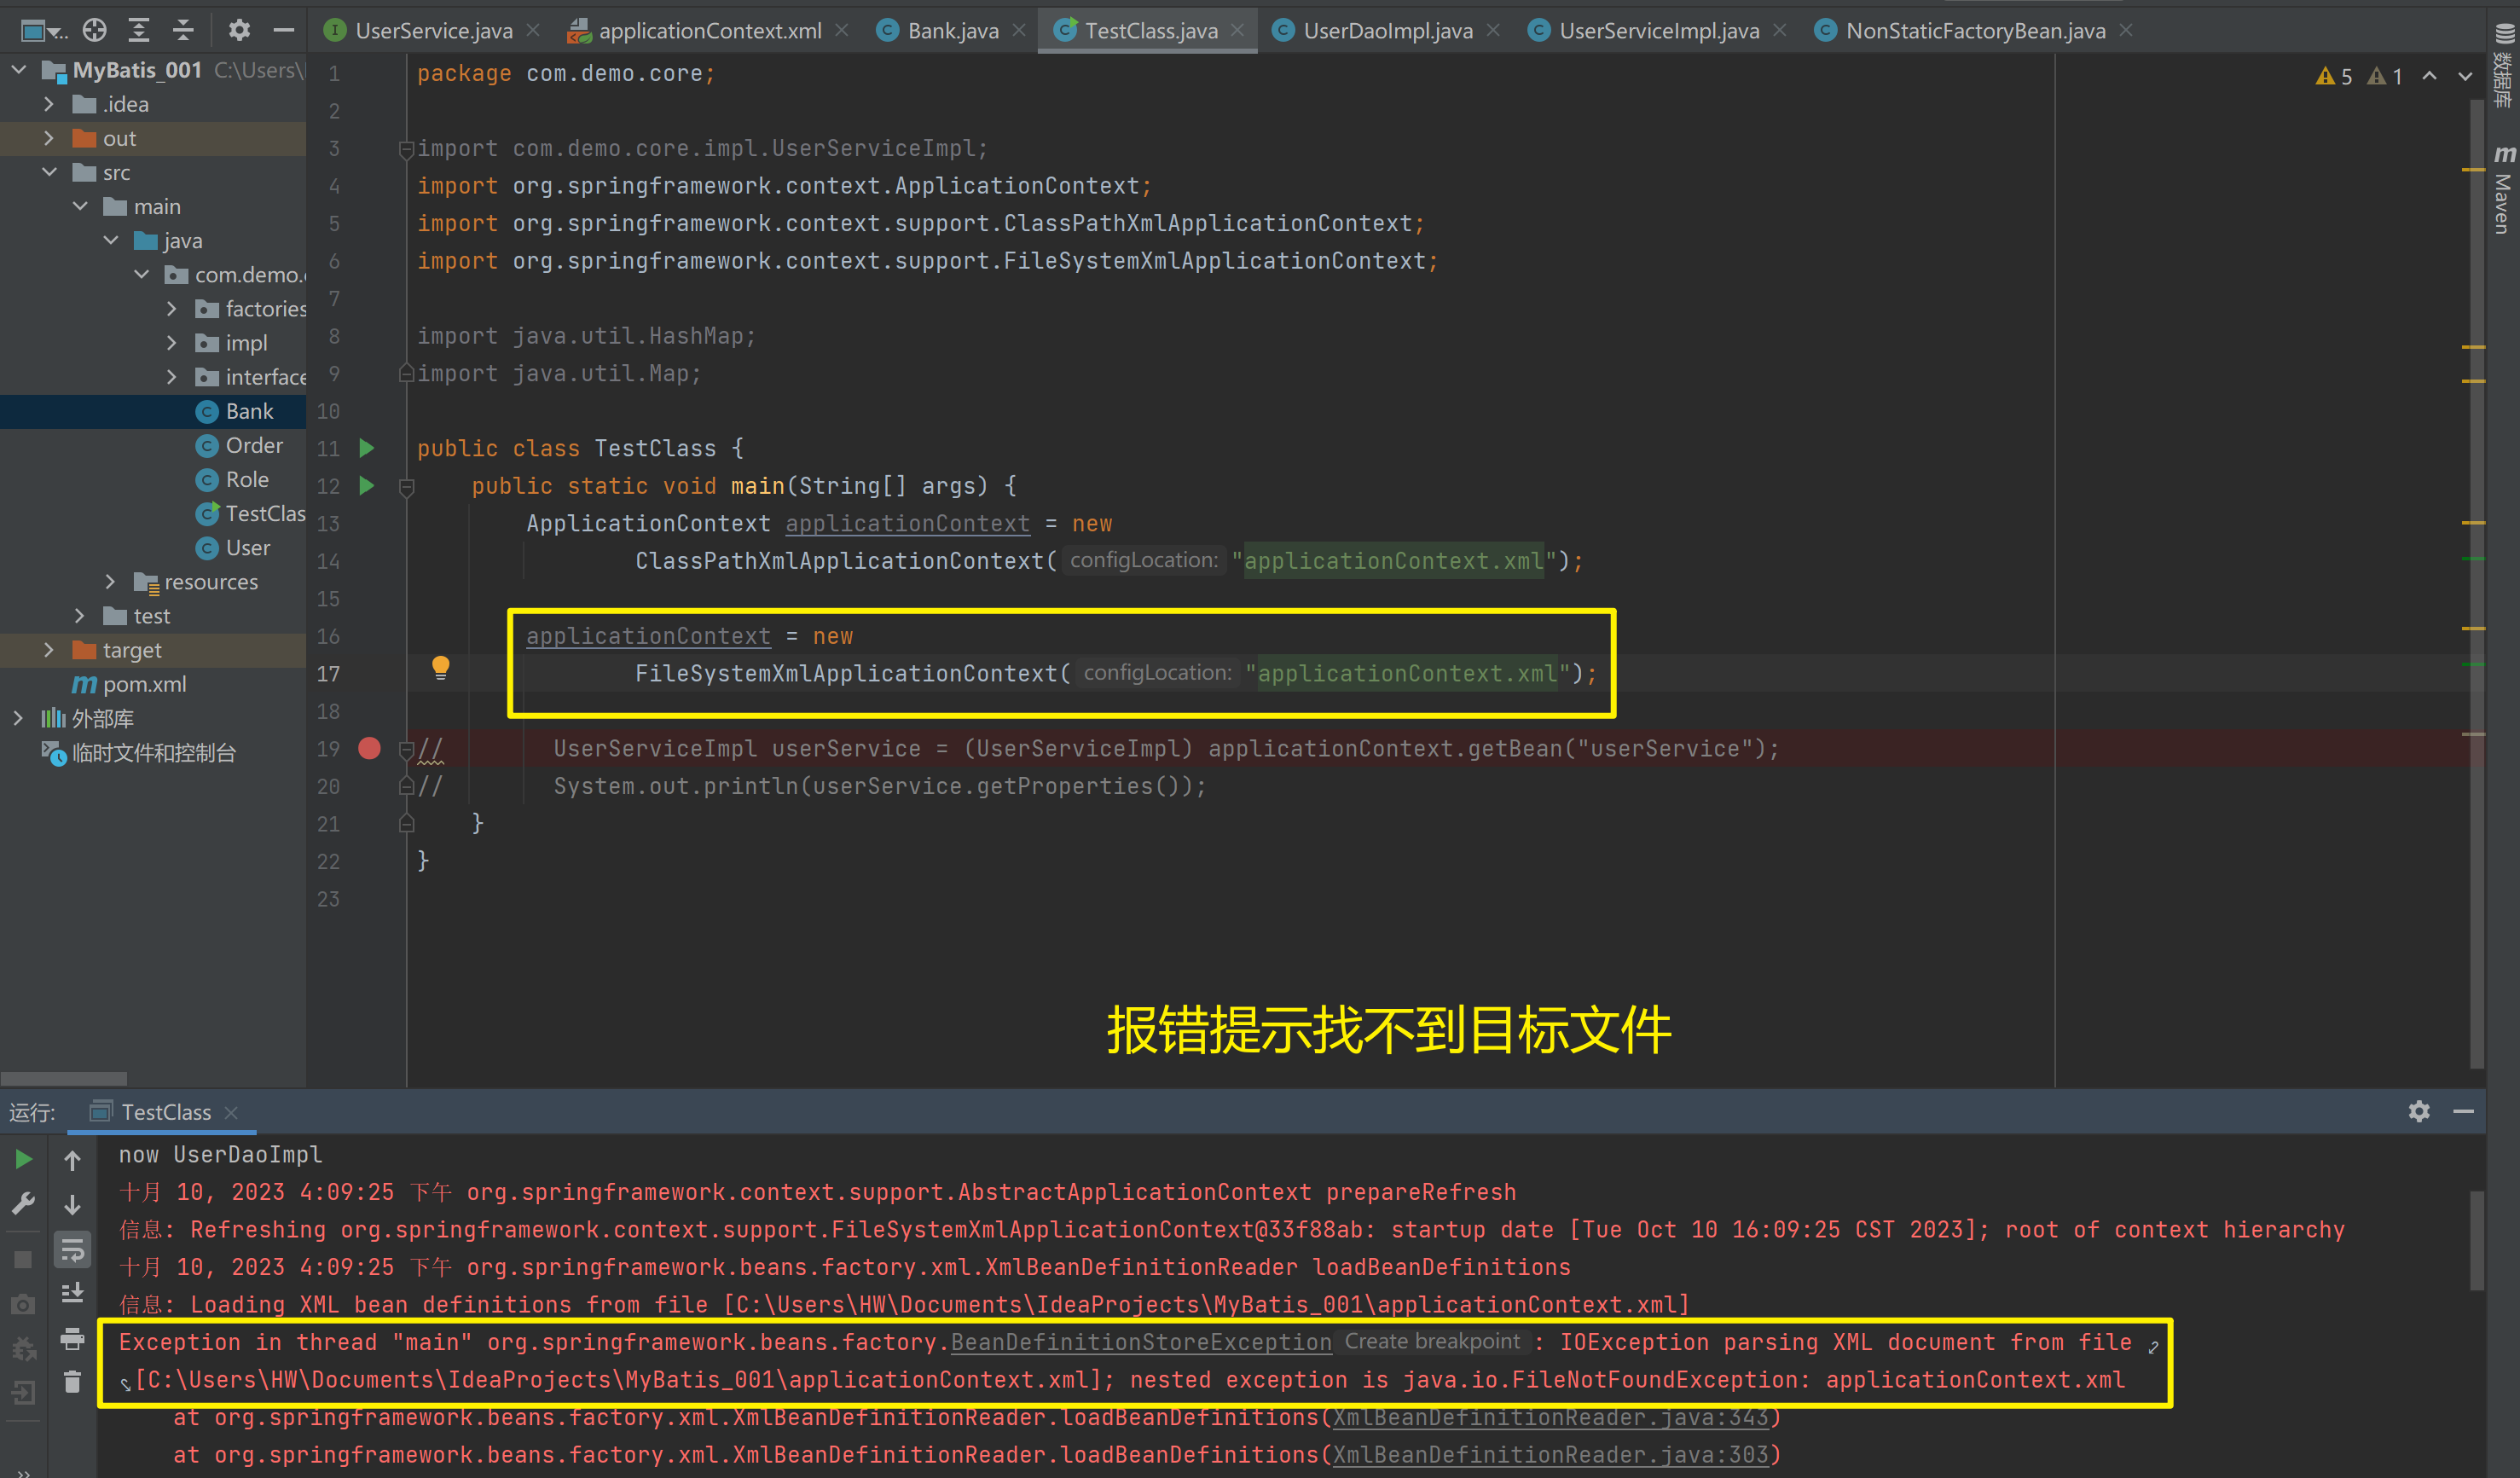
2)FileSystemXmlApplicationContext
它是从磁盘路径上加载配置文件,配置文件可以在磁盘的任意位置

3)AnnotationConfigApplicationContext
当使用注解配置容器对象时,需要使用此类来创建 spring 容器。它用来读取注解
1.4.3. getBean()方法使用
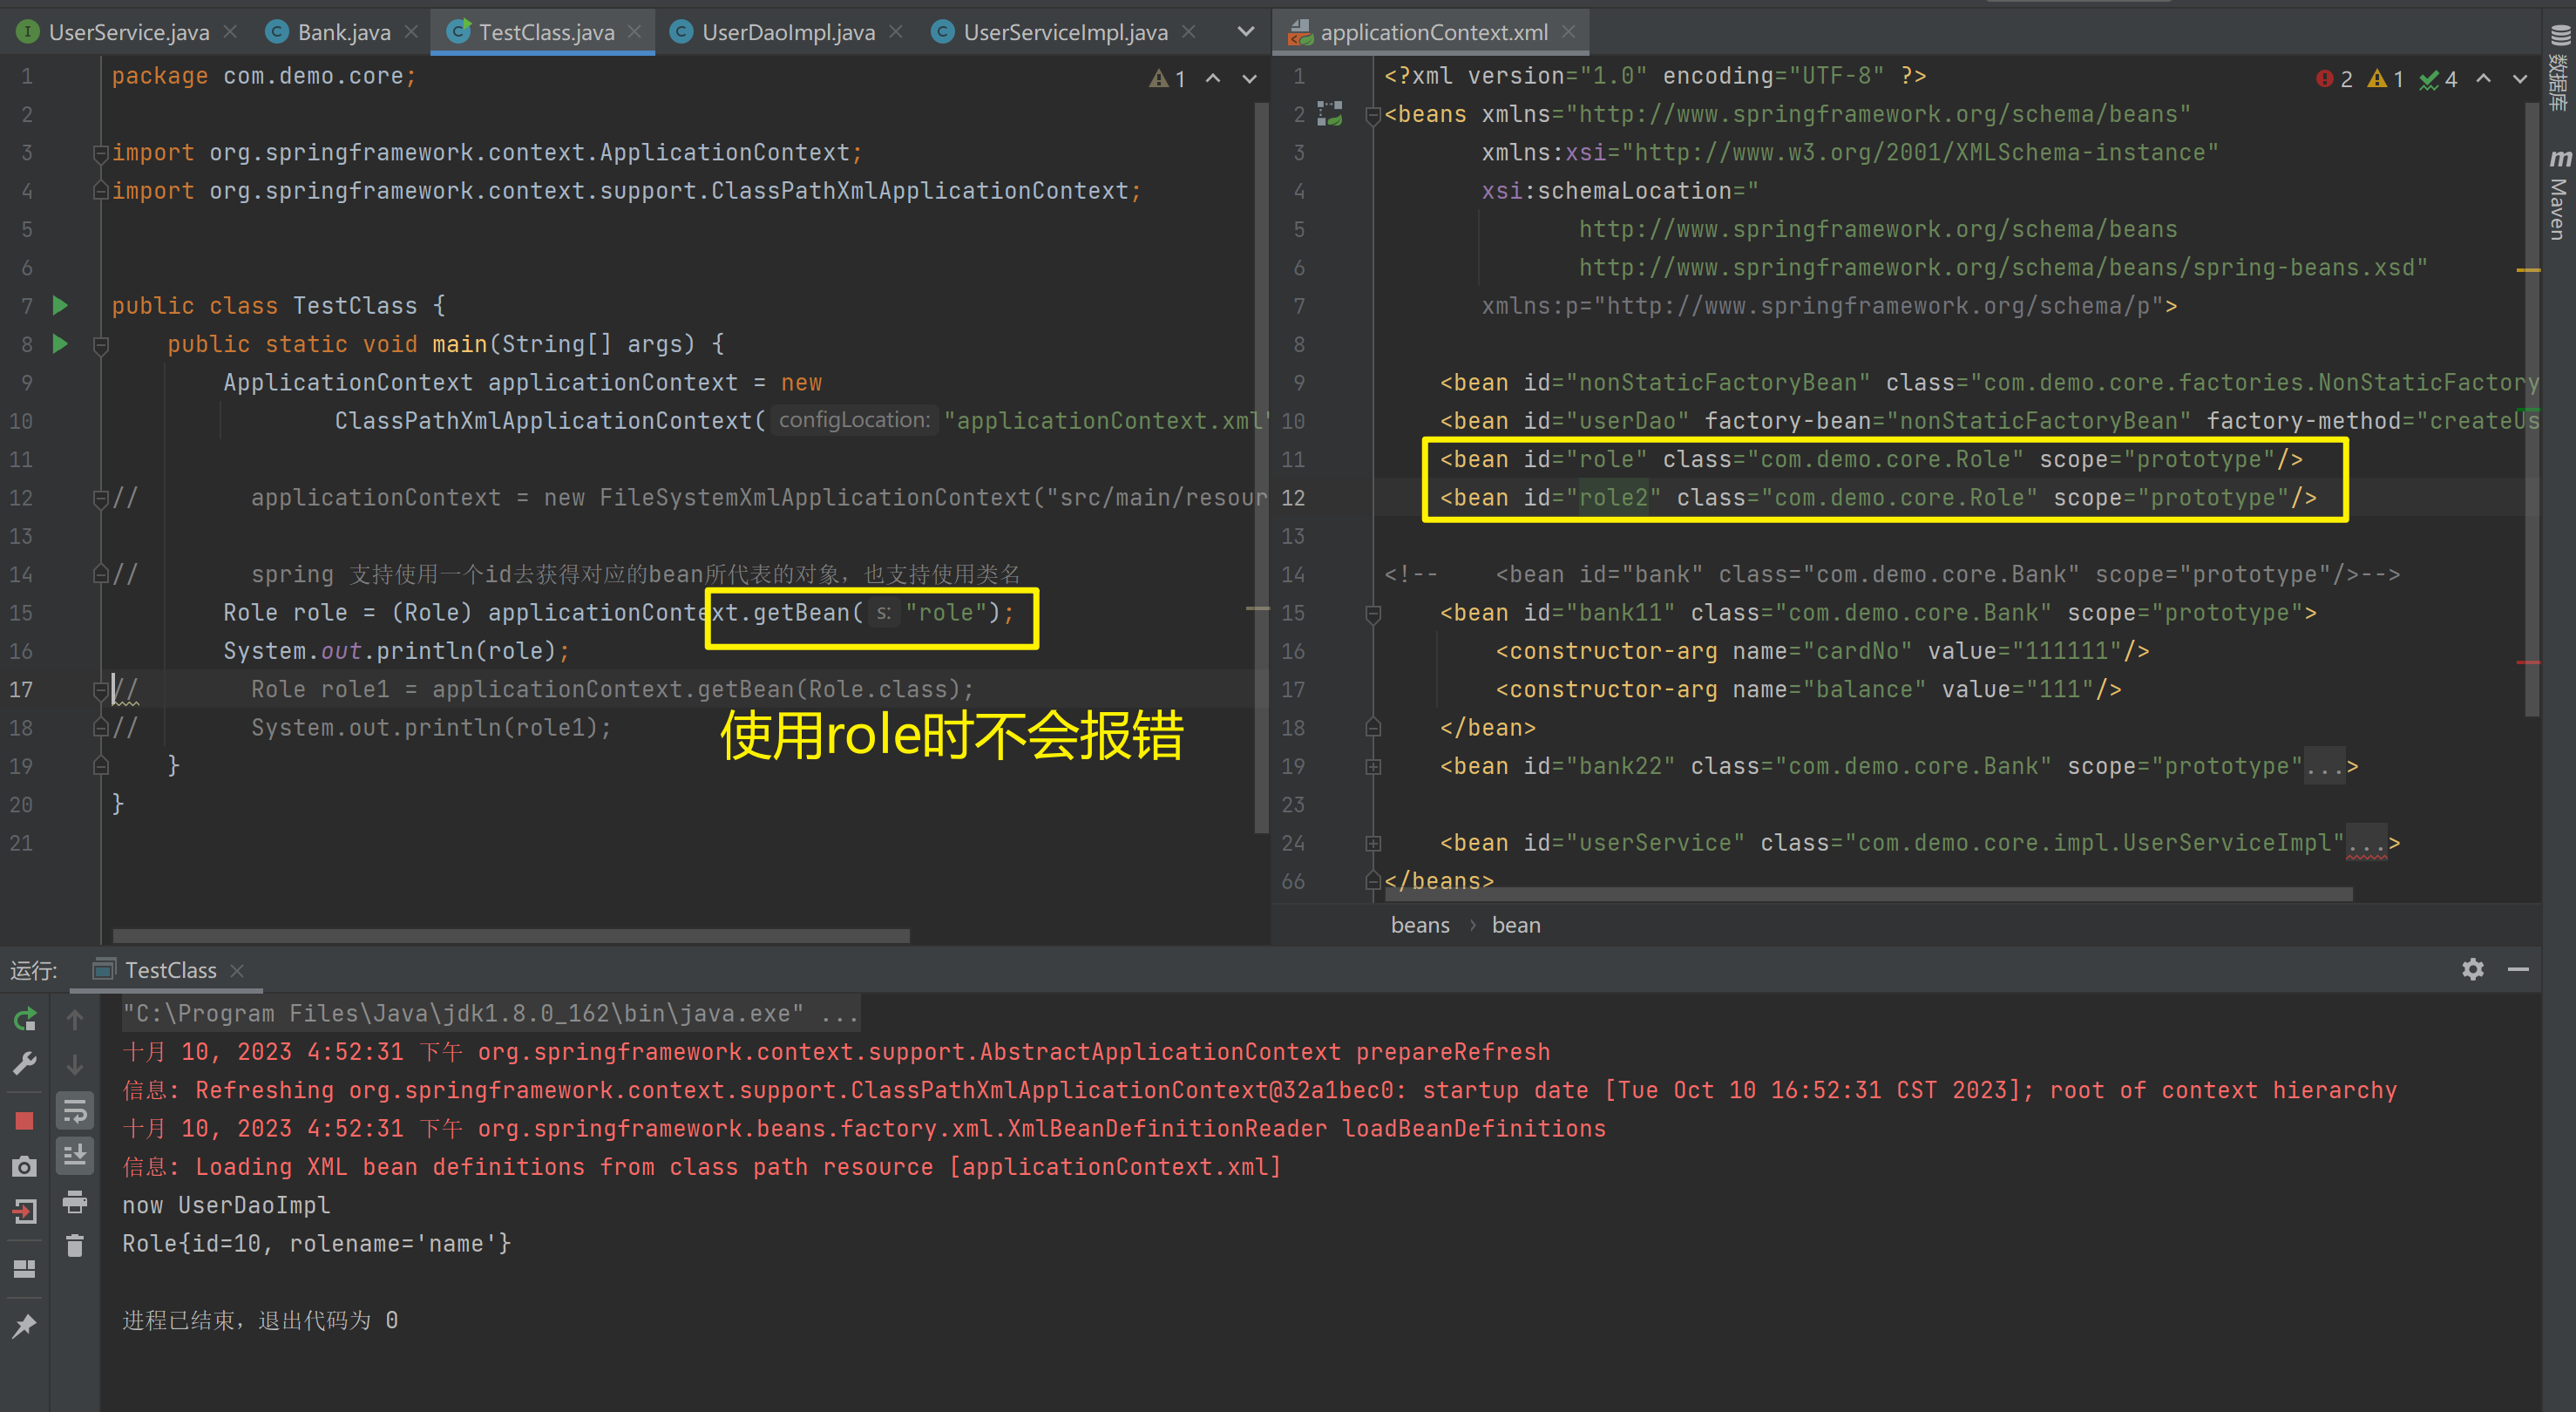
其中,当参数的数据类型是字符串时,表示根据Bean的id从容器中获得Bean实例,返回是Object,需要强转。当参数的数据类型是Class类型时,表示根据类型从容器中匹配Bean实例,当容器中相同类型的Bean有多个时,则此方法会报错。
public Object getBean(String name) throws BeansException {
    assertBeanFactoryActive();
    return getBeanFactory().getBean(name);
}
public <T> T getBean(Class<T> requiredType) throws BeansException {
     assertBeanFactoryActive();
     return getBeanFactory().getBean(requiredType);
 }
ApplicationContext applicationContext = new
ClassPathXmlApplicationContext("applicationContext.xml");
UserService userService1 = (UserService) applicationContext.getBean("userService");
UserService userService2 = applicationContext.getBean(UserService.class);spring 支持使用一个id去获得对应的bean所代表的对象,也支持使用类名
applicationContext.getBean(Role.class)与(Role) applicationContext.getBean("role")区别
package com.demo.core;

import org.springframework.context.ApplicationContext;
import org.springframework.context.support.ClassPathXmlApplicationContext;


public class TestClass {
    public static void main(String[] args) {
        ApplicationContext applicationContext = new
                ClassPathXmlApplicationContext("applicationContext.xml");

//        applicationContext = new FileSystemXmlApplicationContext("src/main/resources/applicationContext.xml");

//        spring 支持使用一个id去获得对应的bean所代表的对象,也支持使用类名
//        Role role = (Role) applicationContext.getBean("role");
//        System.out.println(role);
        Role role1 = applicationContext.getBean(Role.class);
        System.out.println(role1);
    }
}
<?xml version="1.0" encoding="UTF-8" ?>
<beans xmlns="http://www.springframework.org/schema/beans"
xmlns:xsi="http://www.w3.org/2001/XMLSchema-instance"
xsi:schemaLocation="
http://www.springframework.org/schema/beans
http://www.springframework.org/schema/beans/spring-beans.xsd"
xmlns:p="http://www.springframework.org/schema/p">
<bean id="nonStaticFactoryBean" class="com.demo.core.factories.NonStaticFactoryBean"/>
<bean id="userDao" factory-bean="nonStaticFactoryBean" factory-method="createUserDao"/>
<bean id="role" class="com.demo.core.Role" scope="prototype"/>
<bean id="role2" class="com.demo.core.Role" scope="prototype"/>
<!-- <bean id="bank" class="com.demo.core.Bank" scope="prototype"/>-->
<bean id="bank11" class="com.demo.core.Bank" scope="prototype">
<constructor-arg name="cardNo" value="111111"/>
<constructor-arg name="balance" value="111"/>
</bean>
<bean id="bank22" class="com.demo.core.Bank" scope="prototype">
<constructor-arg name="cardNo" value="222222"/>
<constructor-arg name="balance" value="222"/>
</bean>
<bean id="userService" class="com.demo.core.impl.UserServiceImpl">
<property name="properties">
<props value-type="java.lang.String">
<prop key="username">root</prop>
<prop key="password">redhat</prop>
</props>
</property>
<property name="bankHashMap">
<map key-type="java.lang.String" value-type="com.demo.core.Bank">
<entry key="bank1" value-ref="bank11"/>
<entry key="bank2" value-ref="bank22"/>
</map>
</property>
<constructor-arg name="userDao" ref="userDao"/>
<!--因为是普通类型,所以用value-->
<!-- <property name="name" value="hehehe"/>-->
<property name="stringList">
<list value-type="java.lang.String">
<value>nihao</value>
<value>hahaha</value>
<value>123123123</value>
</list>
</property>
<property name="stringHashMap">
<map key-type="java.lang.String" value-type="java.lang.String">
<entry key="name" value="hahaha"/>
<entry key="key" value="123123"/>
</map>
</property>
<property name="roleList">
<list value-type="com.demo.core.Role">
<ref bean="role"/>
<ref bean="role"/>
<ref bean="role"/>
</list>
</property>
</bean>
</beans>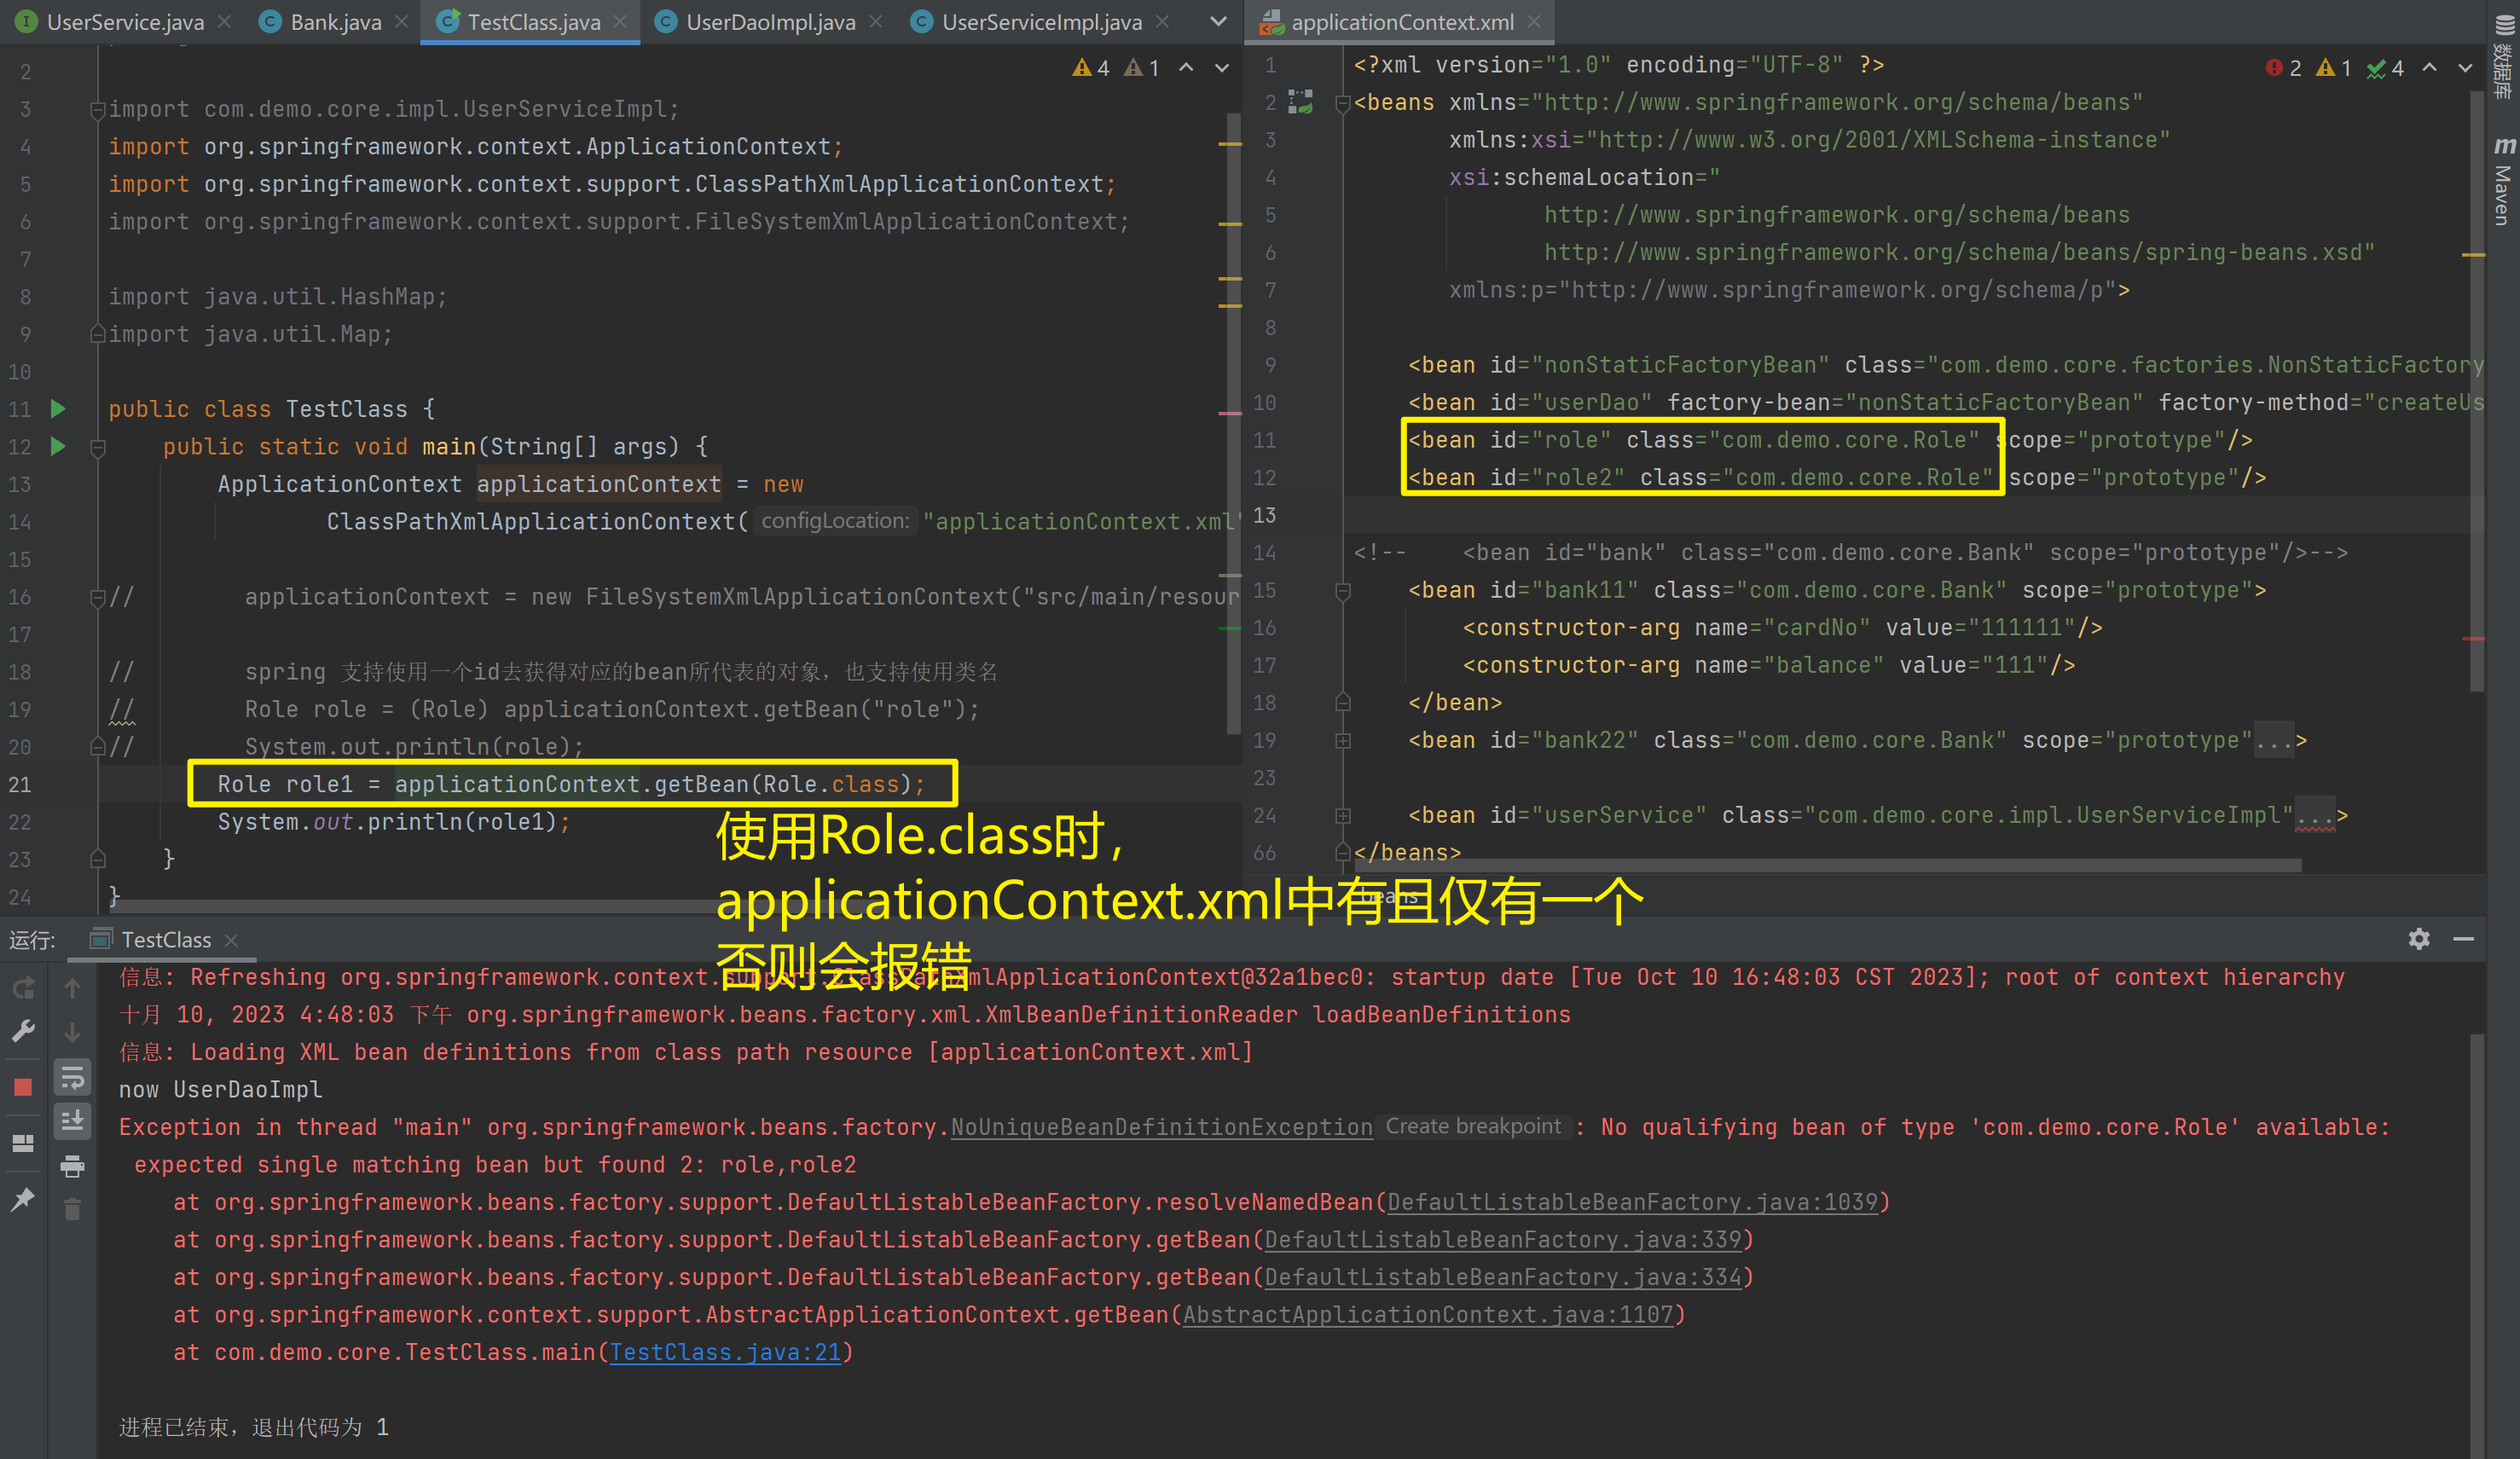
1.4.4. 知识要点
Spring的重点API
ApplicationContext app = new ClasspathXmlApplicationContext("xml文件")
app.getBean("id")
app.getBean(Class)
1.5. IoC和DI注解开发
1.5.1. Spring配置数据源
1.5.1.1. 1.1 数据源(连接池)的作用
• 数据源(连接池)是提高程序性能如出现的
• 事先实例化数据源,初始化部分连接资源
• 使用连接资源时从数据源中获取
• 使用完毕后将连接资源归还给数据源
常见的数据源(连接池):DBCP、C3P0、BoneCP、Druid等
1.5.1.2. 数据源的开发步骤
① 导入数据源的坐标和数据库驱动坐标
② 创建数据源对象
③ 设置数据源的基本连接数据
④ 使用数据源获取连接资源和归还连接资源
1.5.1.3. 数据源的手动创建
① 导入c3p0和druid的坐标
<!-- C3P0连接池 -->
<dependency>
    <groupId>c3p0</groupId>
    <artifactId>c3p0</artifactId>
    <version>0.9.1.2</version>
</dependency><!-- Druid连接池 -->
<dependency>
    <groupId>com.alibaba</groupId>
    <artifactId>druid</artifactId>
    <version>1.1.10</version>
</dependency>
① 导入mysql数据库驱动坐标
<!-- mysql驱动 -->
<dependency>
    <groupId>mysql</groupId>
    <artifactId>mysql-connector-java</artifactId>
    <version>5.1.39</version>
</dependency>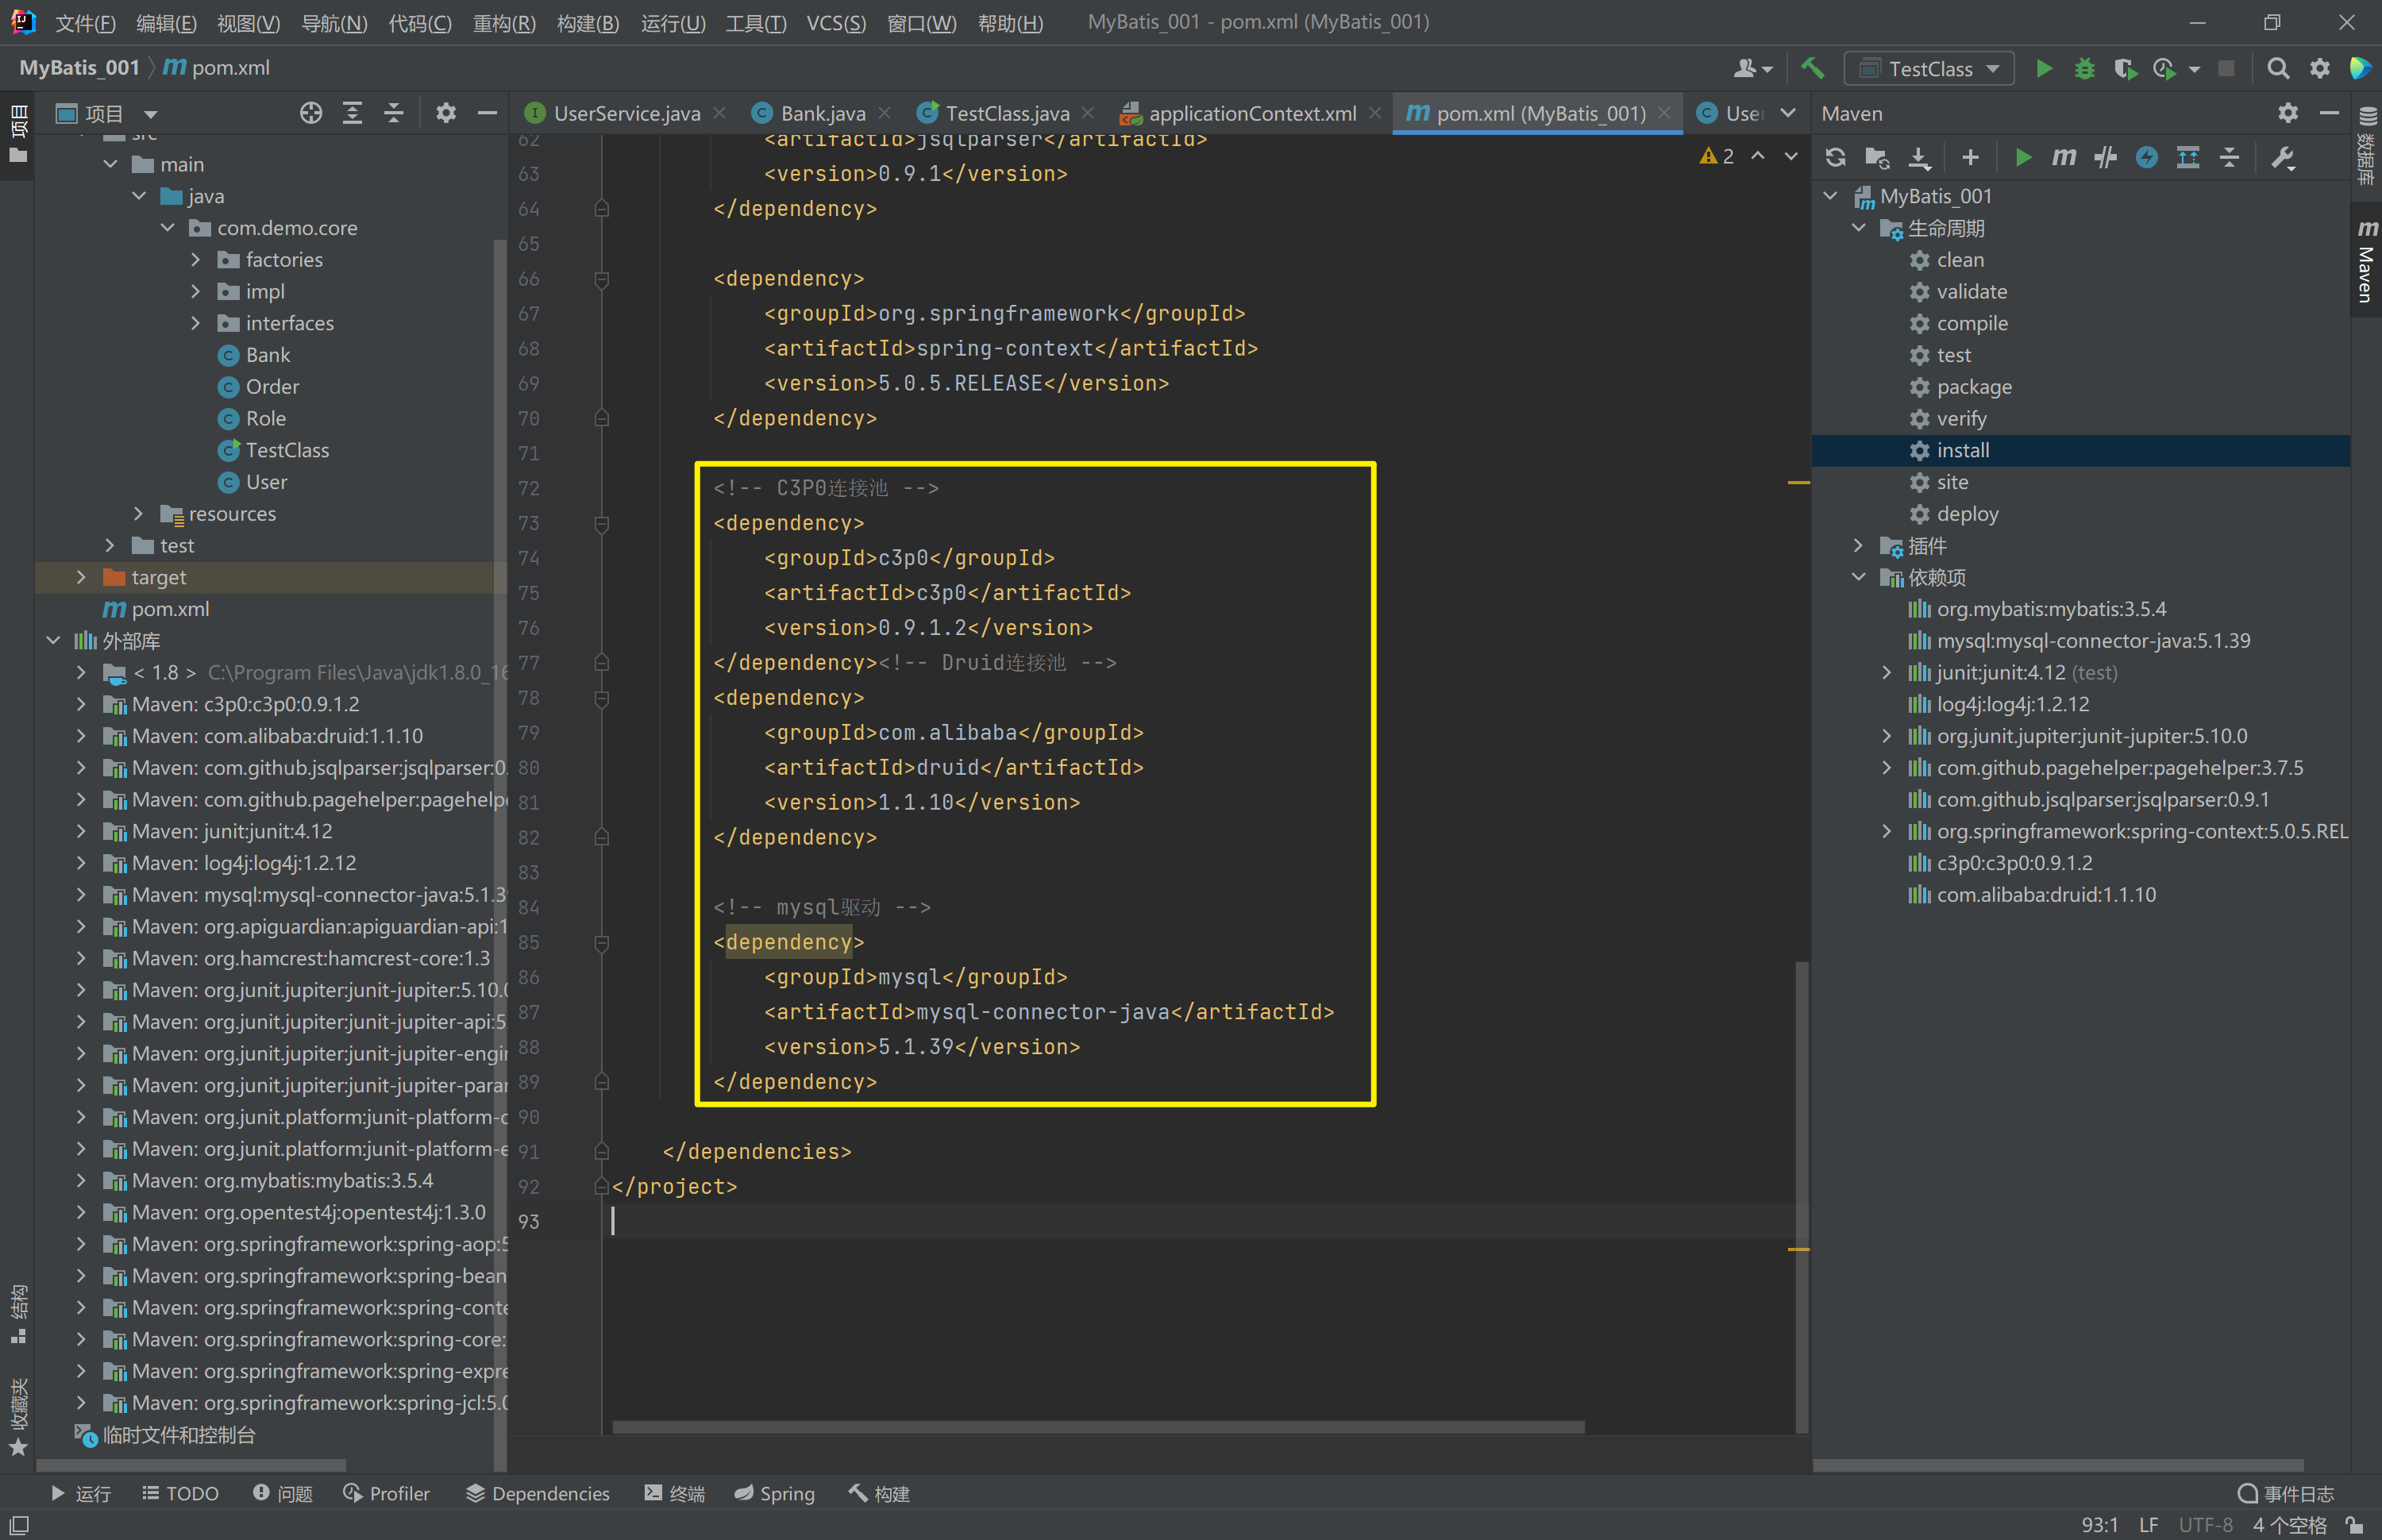
<?xml version="1.0" encoding="UTF-8"?>
<project xmlns="http://maven.apache.org/POM/4.0.0"
         xmlns:xsi="http://www.w3.org/2001/XMLSchema-instance"
         xsi:schemaLocation="http://maven.apache.org/POM/4.0.0 http://maven.apache.org/xsd/maven-4.0.0.xsd">
    <modelVersion>4.0.0</modelVersion>

    <groupId>org.example</groupId>
    <artifactId>MyBatis_001</artifactId>
    <version>1.0-SNAPSHOT</version>

    <properties>
        <maven.compiler.source>8</maven.compiler.source>
        <maven.compiler.target>8</maven.compiler.target>
    </properties>

    <!--dependencies 依赖包的意思-->
    <dependencies>
        <!--mybatis坐标-->
        <dependency>
            <groupId>org.mybatis</groupId>
            <artifactId>mybatis</artifactId>
            <version>3.5.4</version>
        </dependency>
        <!--mysql驱动坐标-->
        <dependency>
            <groupId>mysql</groupId>
            <artifactId>mysql-connector-java</artifactId>
            <version>5.1.6</version>
            <scope>runtime</scope>
        </dependency>

        <!--单元测试坐标-->
        <dependency>
            <groupId>junit</groupId>
            <artifactId>junit</artifactId>
            <version>4.12</version>
            <scope>
                test
            </scope>
        </dependency>
        <!--日志坐标-->
        <dependency>
            <groupId>log4j</groupId>
            <artifactId>log4j</artifactId>
            <version>1.2.12</version>
        </dependency>
        <dependency>
            <groupId>org.junit.jupiter</groupId>
            <artifactId>junit-jupiter</artifactId>
            <version>RELEASE</version>
            <scope>compile</scope>
        </dependency>

        <!-- 分页助手 -->
        <dependency>
            <groupId>com.github.pagehelper</groupId>
            <artifactId>pagehelper</artifactId>
            <version>3.7.5</version>
        </dependency>
        <dependency>
            <groupId>com.github.jsqlparser</groupId>
            <artifactId>jsqlparser</artifactId>
            <version>0.9.1</version>
        </dependency>

        <!--导入spring的context坐标,context依赖core、beans、expression-->
        <dependency>
            <groupId>org.springframework</groupId>
            <artifactId>spring-context</artifactId>
            <version>5.0.5.RELEASE</version>
        </dependency>

        <!-- C3P0连接池 -->
        <dependency>
            <groupId>c3p0</groupId>
            <artifactId>c3p0</artifactId>
            <version>0.9.1.2</version>
        </dependency><!-- Druid连接池 -->
        <dependency>
            <groupId>com.alibaba</groupId>
            <artifactId>druid</artifactId>
            <version>1.1.10</version>
        </dependency>

        <!-- mysql驱动 -->
        <dependency>
            <groupId>mysql</groupId>
            <artifactId>mysql-connector-java</artifactId>
            <version>5.1.39</version>
        </dependency>
    </dependencies>
</project>
② 创建C3P0连接池
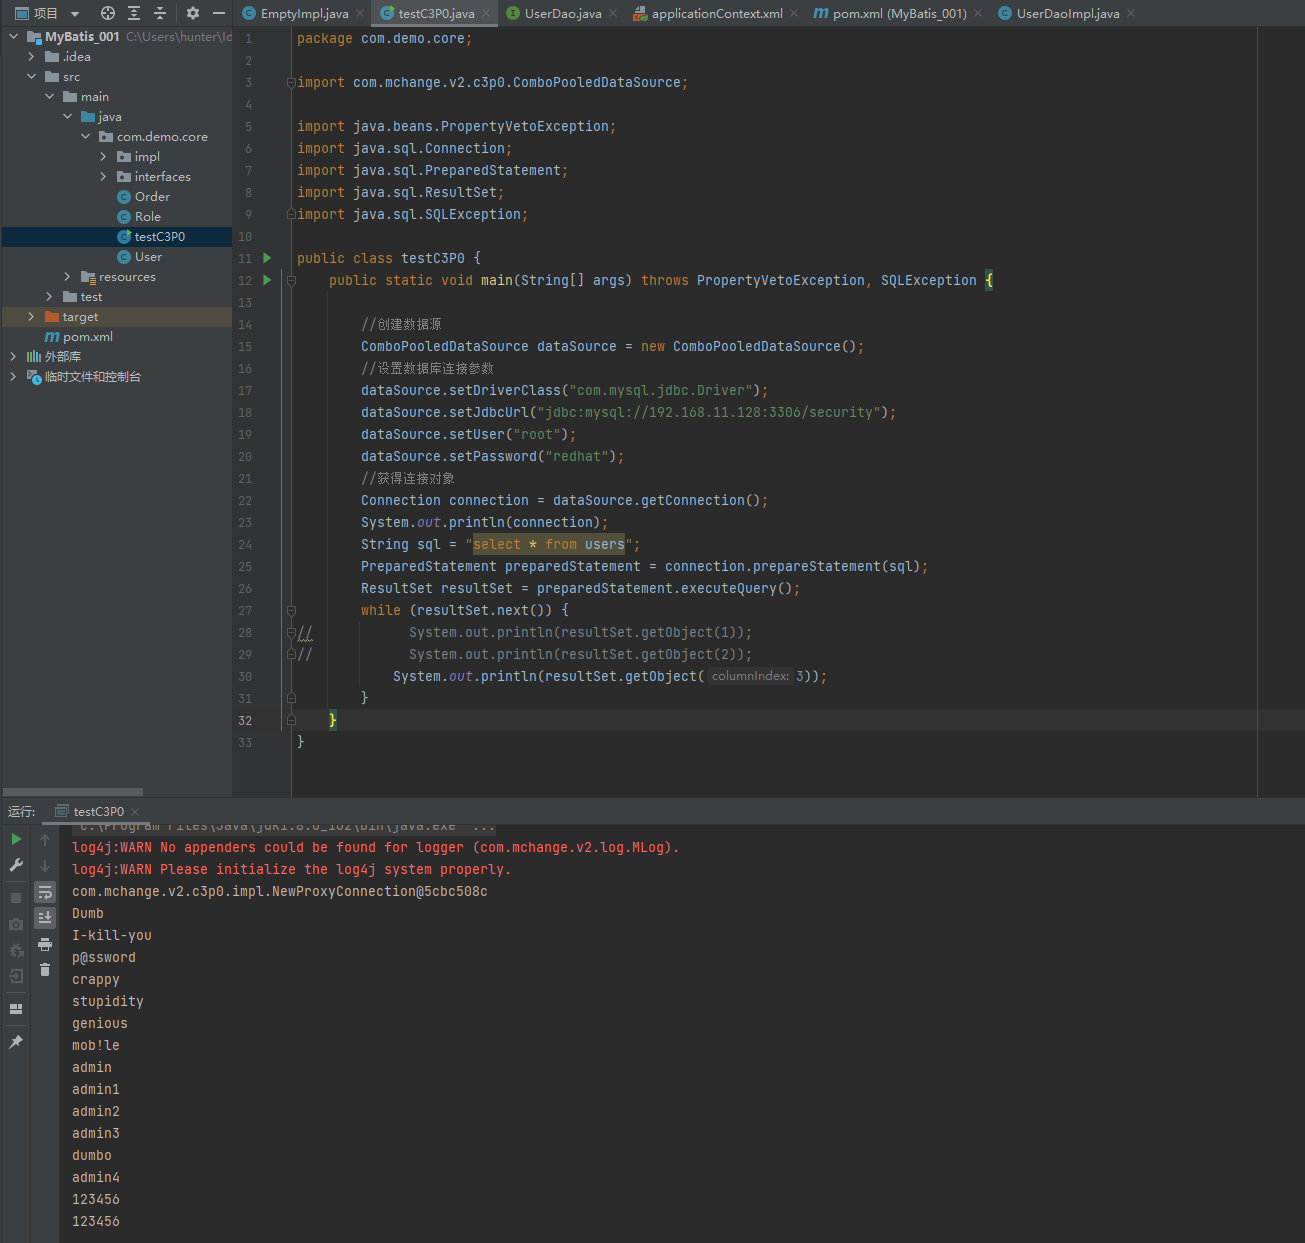
package com.demo.core;

import com.mchange.v2.c3p0.ComboPooledDataSource;

import java.beans.PropertyVetoException;
import java.sql.Connection;
import java.sql.PreparedStatement;
import java.sql.ResultSet;
import java.sql.SQLException;

public class testC3P0 {
    public static void main(String[] args) throws PropertyVetoException, SQLException {

        //创建数据源
        ComboPooledDataSource dataSource = new ComboPooledDataSource();
        //设置数据库连接参数
        dataSource.setDriverClass("com.mysql.jdbc.Driver");
        dataSource.setJdbcUrl("jdbc:mysql://192.168.11.128:3306/security");
        dataSource.setUser("root");
        dataSource.setPassword("redhat");
        //获得连接对象
        Connection connection = dataSource.getConnection();
        System.out.println(connection);
        String sql = "select * from users";
        PreparedStatement preparedStatement = connection.prepareStatement(sql);
        ResultSet resultSet = preparedStatement.executeQuery();
        while (resultSet.next()) {
//            System.out.println(resultSet.getObject(1));
//            System.out.println(resultSet.getObject(2));
            System.out.println(resultSet.getObject(3));
        }
    }
}
② 创建Druid连接池
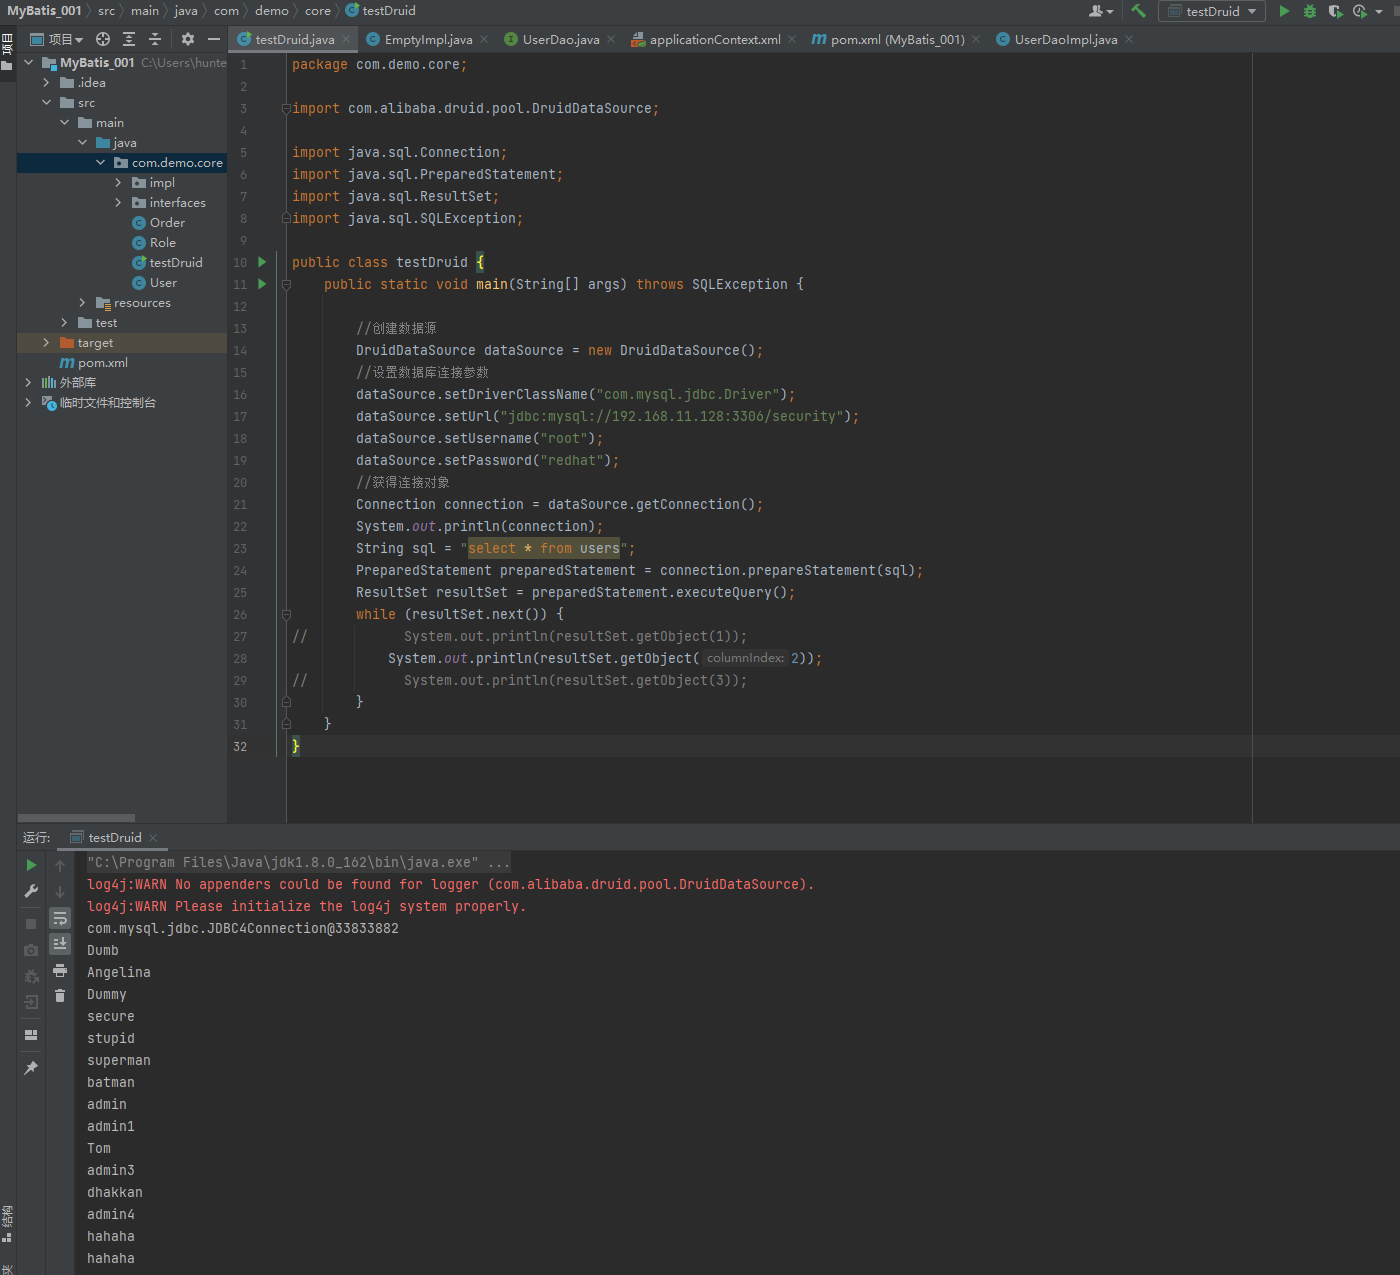
package com.demo.core;

import com.alibaba.druid.pool.DruidDataSource;

import java.sql.Connection;
import java.sql.PreparedStatement;
import java.sql.ResultSet;
import java.sql.SQLException;

public class testDruid {
    public static void main(String[] args) throws SQLException {

        //创建数据源
        DruidDataSource dataSource = new DruidDataSource();
        //设置数据库连接参数
        dataSource.setDriverClassName("com.mysql.jdbc.Driver");
        dataSource.setUrl("jdbc:mysql://192.168.11.128:3306/security");
        dataSource.setUsername("root");
        dataSource.setPassword("redhat");
        //获得连接对象
        // Connection connection = dataSource.getConnection();
        //最大等待毫秒数
        Connection connection = dataSource.getConnection(1000);
        System.out.println(connection);
        String sql = "select * from users";
        PreparedStatement preparedStatement = connection.prepareStatement(sql);
        ResultSet resultSet = preparedStatement.executeQuery();
        while (resultSet.next()) {
//            System.out.println(resultSet.getObject(1));
            System.out.println(resultSet.getObject(2));
//            System.out.println(resultSet.getObject(3));
        }
    }
}
③ 提取jdbc.properties配置文件
jdbc.driver=com.mysql.jdbc.Driver
jdbc.url=jdbc:mysql://192.168.11.128:3306/security
jdbc.username=root
jdbc.password=redhat
④ 读取jdbc.properties配置文件创建连接池
package com.demo.core;
import com.mchange.v2.c3p0.ComboPooledDataSource;
import java.beans.PropertyVetoException;
import java.sql.Connection;
import java.sql.PreparedStatement;
import java.sql.ResultSet;
import java.sql.SQLException;
import java.util.ResourceBundle;
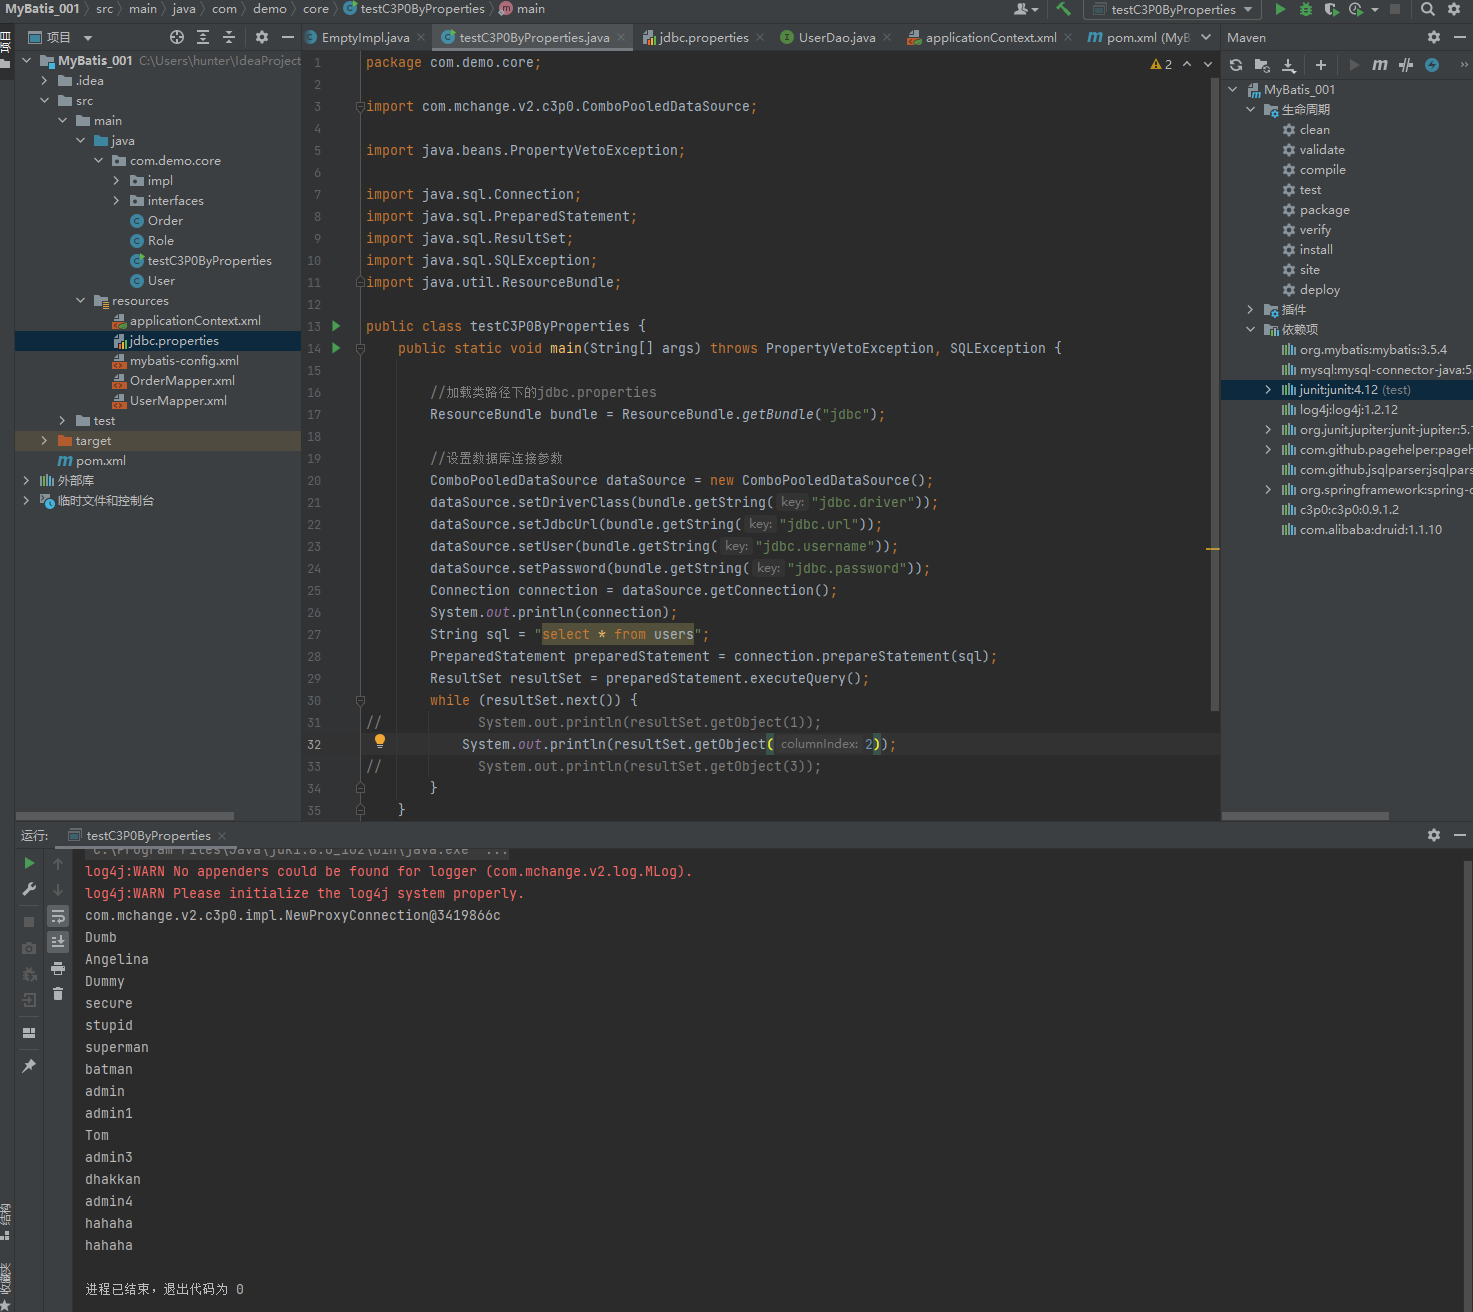
public class testC3P0ByProperties {
public static void main(String[] args) throws PropertyVetoException, SQLException {
//加载类路径下的jdbc.properties
ResourceBundle bundle = ResourceBundle.getBundle("jdbc");
//设置数据库连接参数
ComboPooledDataSource dataSource = new ComboPooledDataSource();
dataSource.setDriverClass(bundle.getString("jdbc.driver"));
dataSource.setJdbcUrl(bundle.getString("jdbc.url"));
dataSource.setUser(bundle.getString("jdbc.username"));
dataSource.setPassword(bundle.getString("jdbc.password"));
Connection connection = dataSource.getConnection();
System.out.println(connection);
String sql = "select * from users";
PreparedStatement preparedStatement = connection.prepareStatement(sql);
ResultSet resultSet = preparedStatement.executeQuery();
while (resultSet.next()) {
// System.out.println(resultSet.getObject(1));
System.out.println(resultSet.getObject(2));
// System.out.println(resultSet.getObject(3));
}
}
}
1.5.1.4. Spring配置数据源
可以将DataSource的创建权交由Spring容器去完成
DataSource有无参构造方法,而Spring默认就是通过无参构造方法实例化对象的
DataSource要想使用需要通过set方法设置数据库连接信息,而Spring可以通过set方法进行字符串注入
<bean id="dataSource" class="com.alibaba.druid.pool.DruidDataSource">
    <property name="driverClassName" value="com.mysql.jdbc.Driver"/>
    <property name="url" value="jdbc:mysql://192.168.100.141:3306/security"/>
    <property name="username" value="root"/>
    <property name="password" value="redhat"/>
</bean>
<?xml version="1.0" encoding="UTF-8" ?>
<beans xmlns="http://www.springframework.org/schema/beans"
xmlns:xsi="http://www.w3.org/2001/XMLSchema-instance"
xsi:schemaLocation="
http://www.springframework.org/schema/beans
http://www.springframework.org/schema/beans/spring-beans.xsd">
<bean id="dataSource" class="com.alibaba.druid.pool.DruidDataSource">
<property name="driverClassName" value="com.mysql.jdbc.Driver"/>
<property name="url" value="jdbc:mysql://192.168.11.128:3306/security"/>
<property name="username" value="root"/>
<property name="password" value="redhat"/>
</bean>
</beans>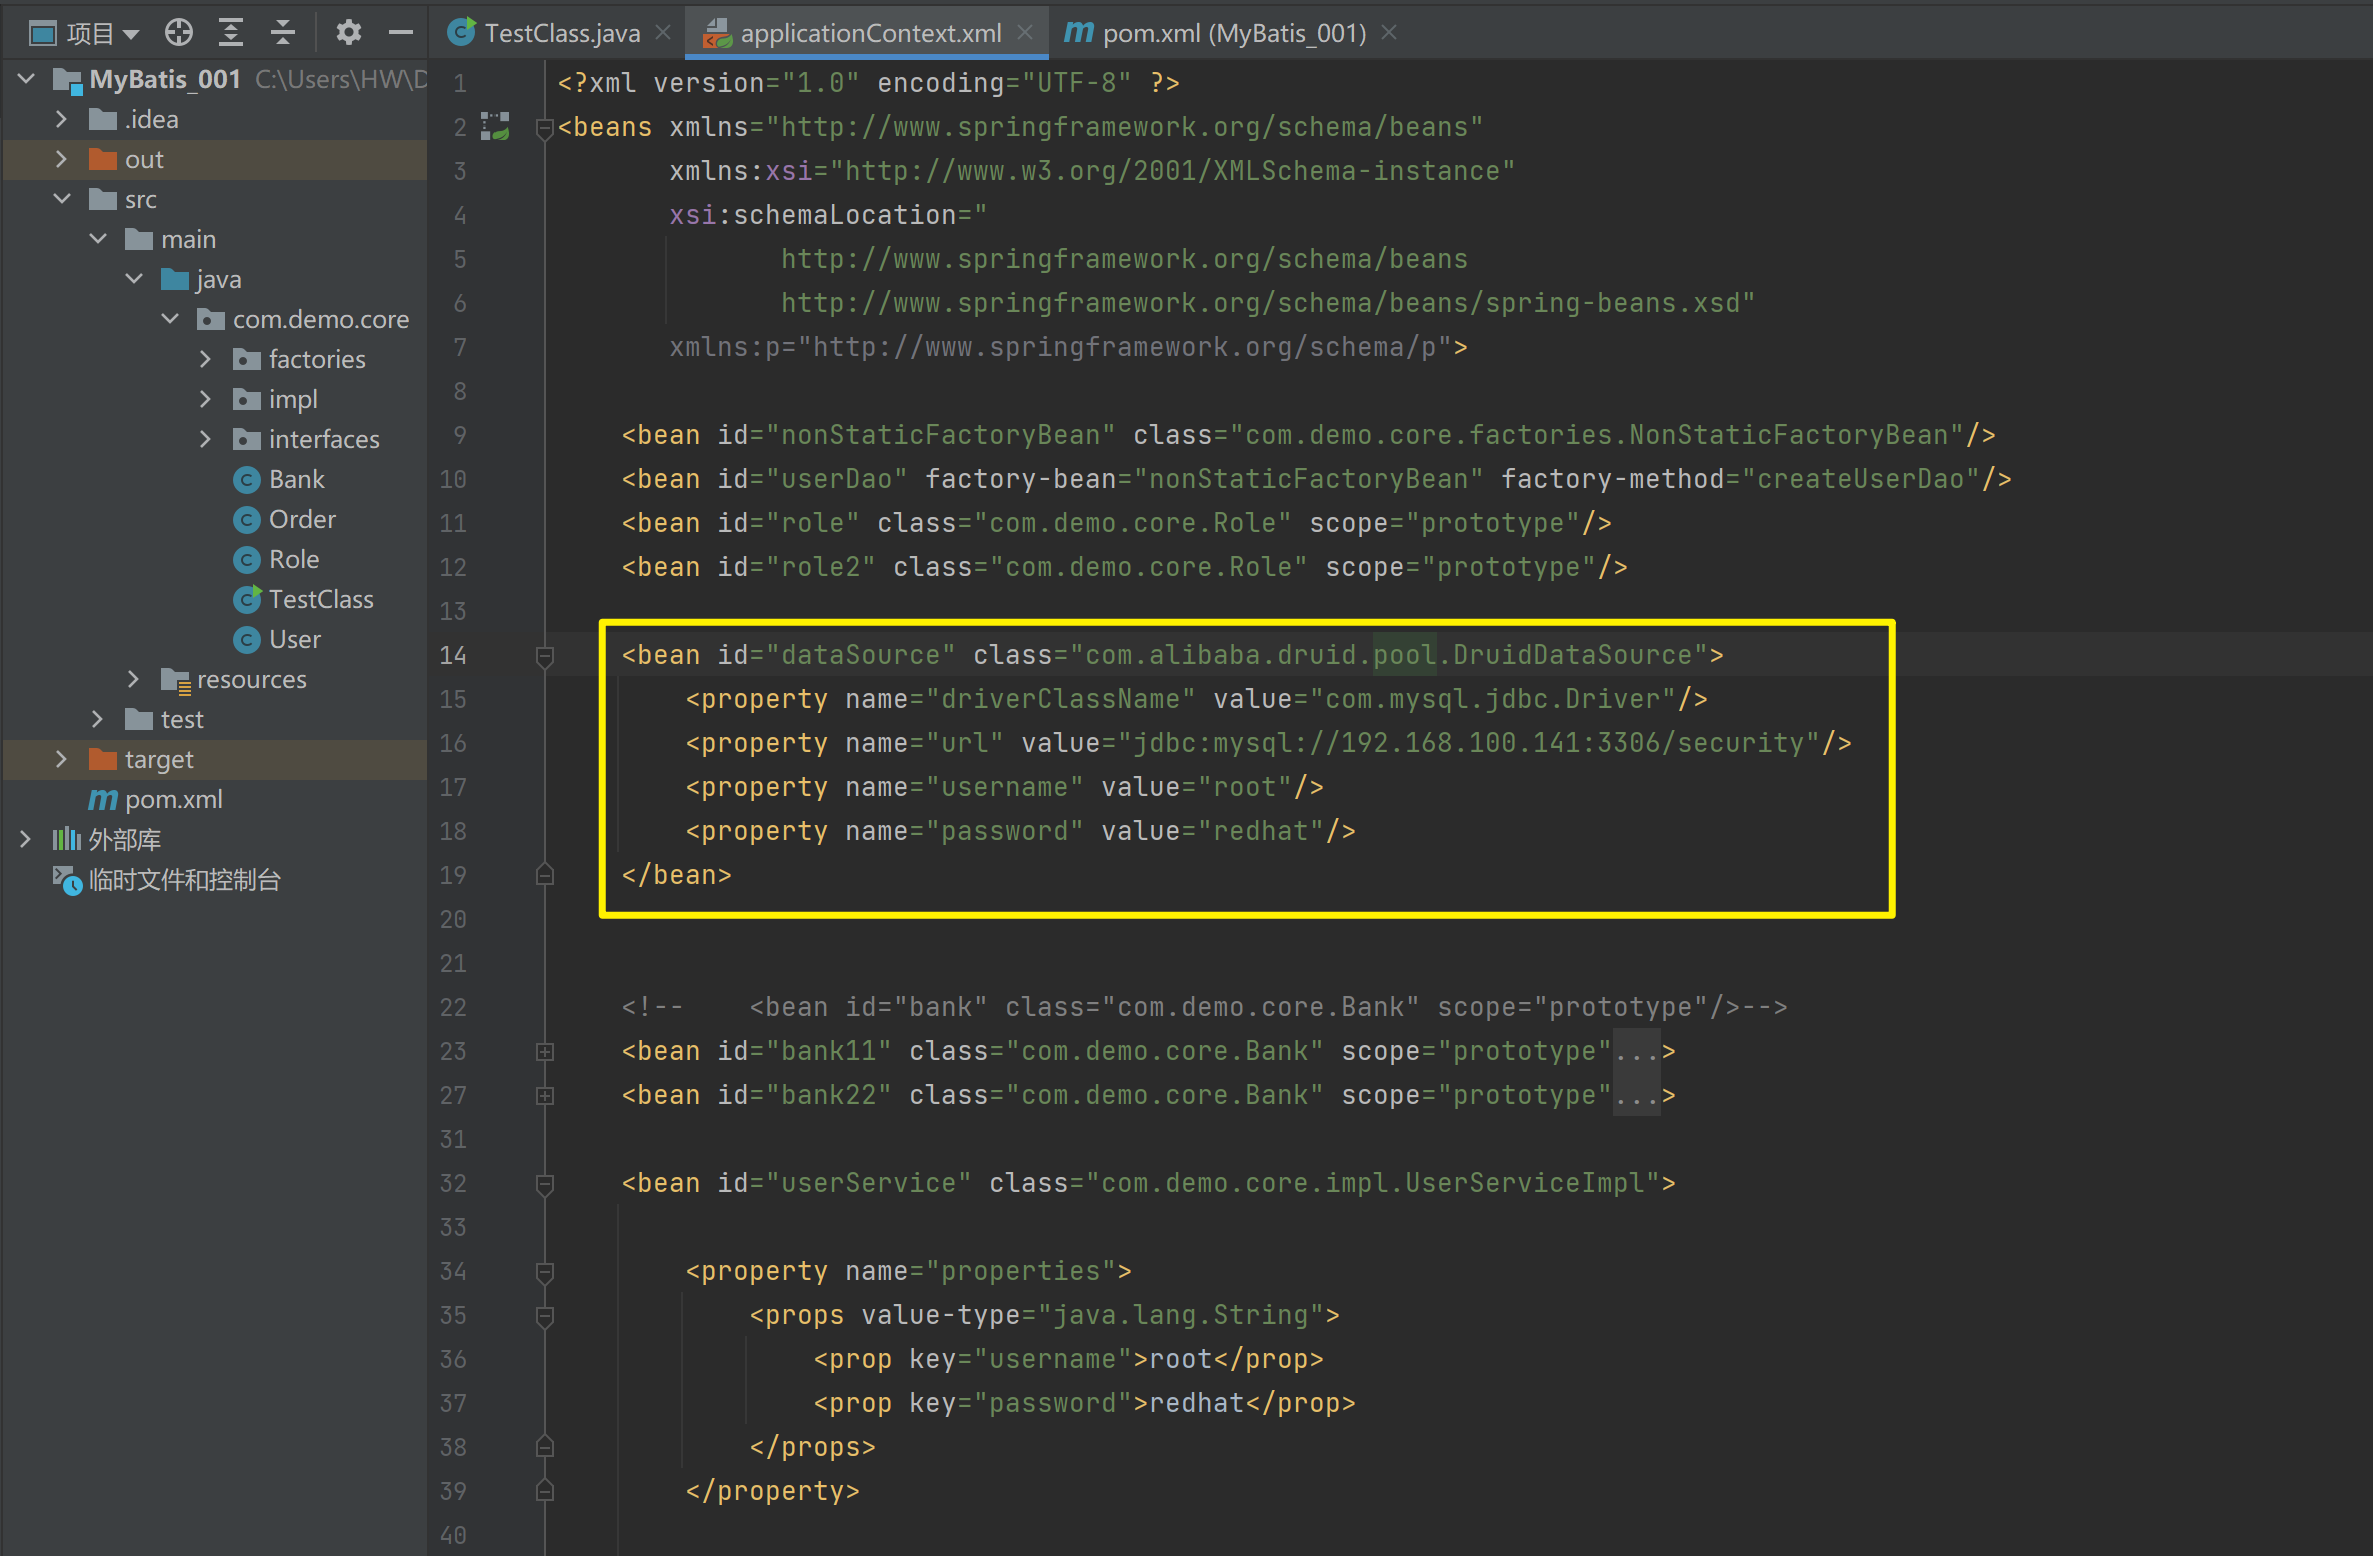
测试从容器当中获取数据源
package com.demo.core;
import org.springframework.context.ApplicationContext;
import org.springframework.context.support.ClassPathXmlApplicationContext;
import javax.sql.DataSource;
import java.sql.Connection;
import java.sql.PreparedStatement;
import java.sql.ResultSet;
import java.sql.SQLException;
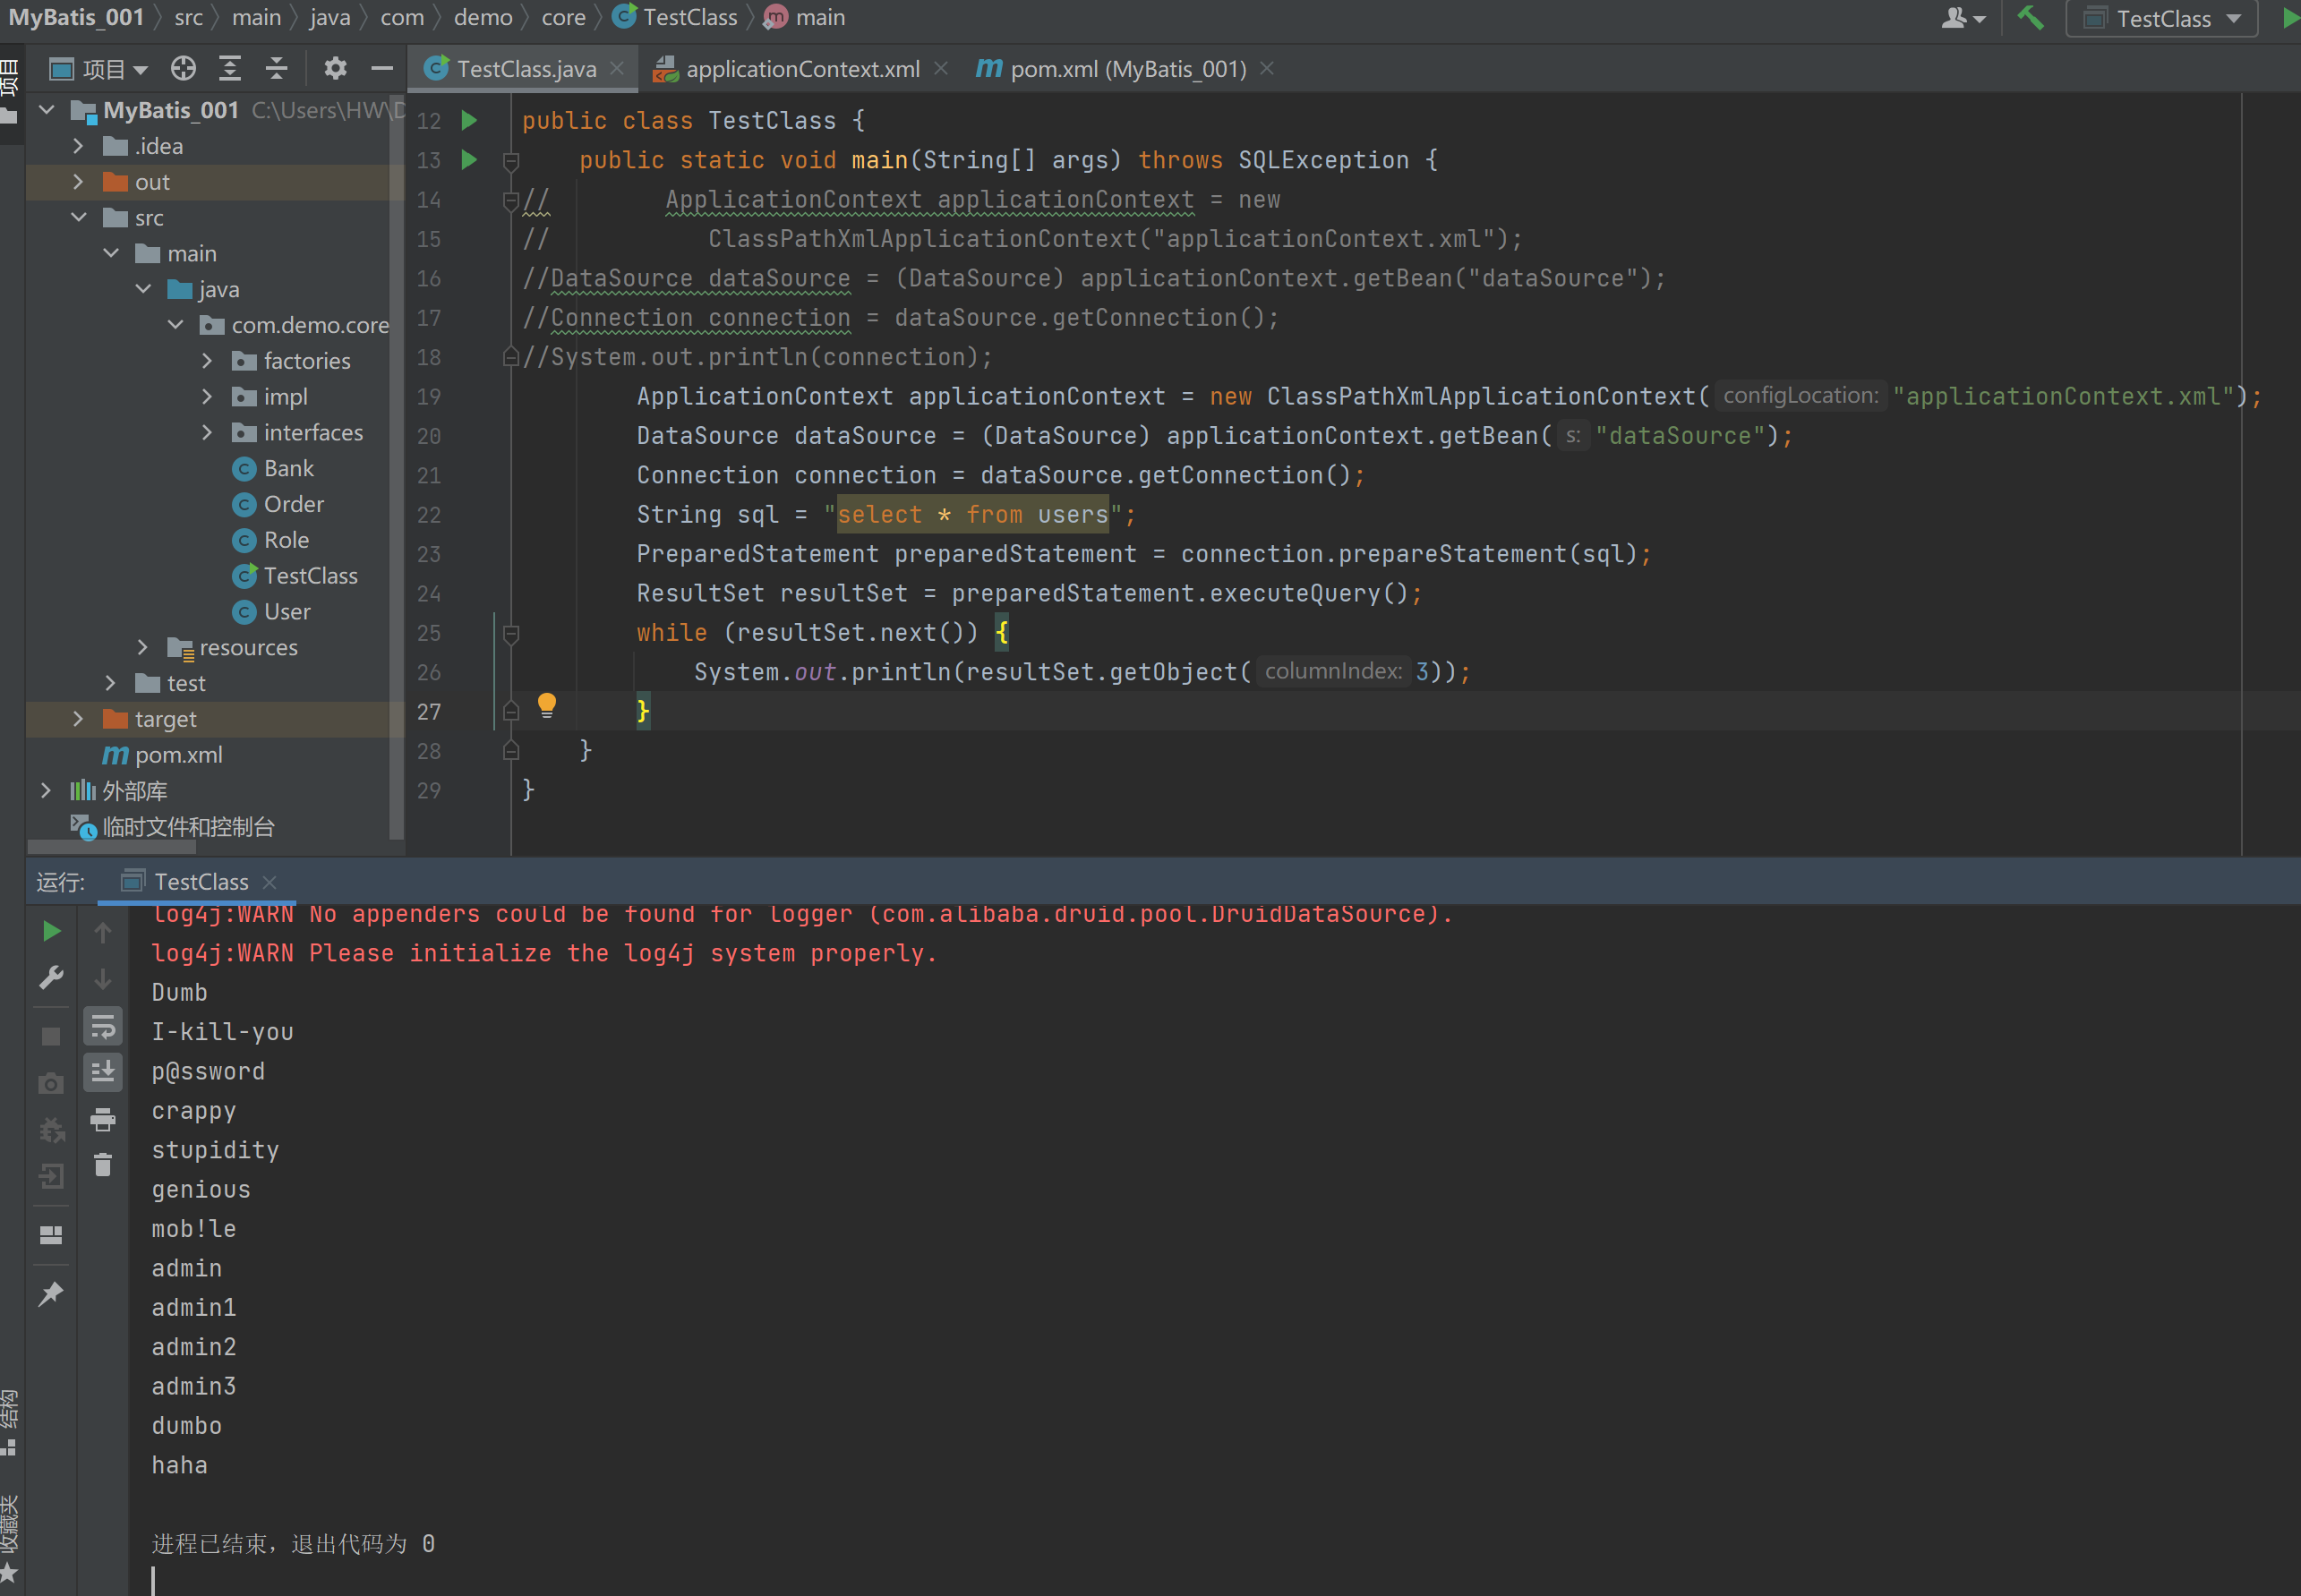
public class TestClass {
public static void main(String[] args) throws SQLException {
ApplicationContext applicationContext = new ClassPathXmlApplicationContext("applicationContext.xml");
DataSource dataSource = (DataSource) applicationContext.getBean("dataSource");
Connection connection = dataSource.getConnection();
String sql = "select * from users";
PreparedStatement preparedStatement = connection.prepareStatement(sql);
ResultSet resultSet = preparedStatement.executeQuery();
while (resultSet.next()) {
System.out.println(resultSet.getObject(3));
}
}
}
1.5.1.5. 抽取jdbc配置文件
applicationContext.xml加载jdbc.properties配置文件获得连接信息。
首先,需要引入context命名空间和约束路径:
命名空间:
xmlns:context="http://www.springframework.org/schema/context"
约束路径:
http://www.springframework.org/schema/context
http://www.springframework.org/schema/context/spring-context.xsd
<?xml version="1.0" encoding="UTF-8" ?>
<beans xmlns="http://www.springframework.org/schema/beans"
       xmlns:xsi="http://www.w3.org/2001/XMLSchema-instance"
       xsi:schemaLocation="
              http://www.springframework.org/schema/beans
              http://www.springframework.org/schema/beans/spring-beans.xsd
              http://www.springframework.org/schema/context
              http://www.springframework.org/schema/context/spring-context.xsd"
       xmlns:context="http://www.springframework.org/schema/context">

    <context:property-placeholder location="classpath*:jdbc.properties"/>

    <bean id="dataSource" class="com.alibaba.druid.pool.DruidDataSource">
        <property name="driverClassName" value="${jdbc.driver}"/>
        <property name="url" value="${jdbc.url}"/>
        <property name="username" value="${jdbc.username}"/>
        <property name="password" value="${jdbc.password}"/>
    </bean>
</beans>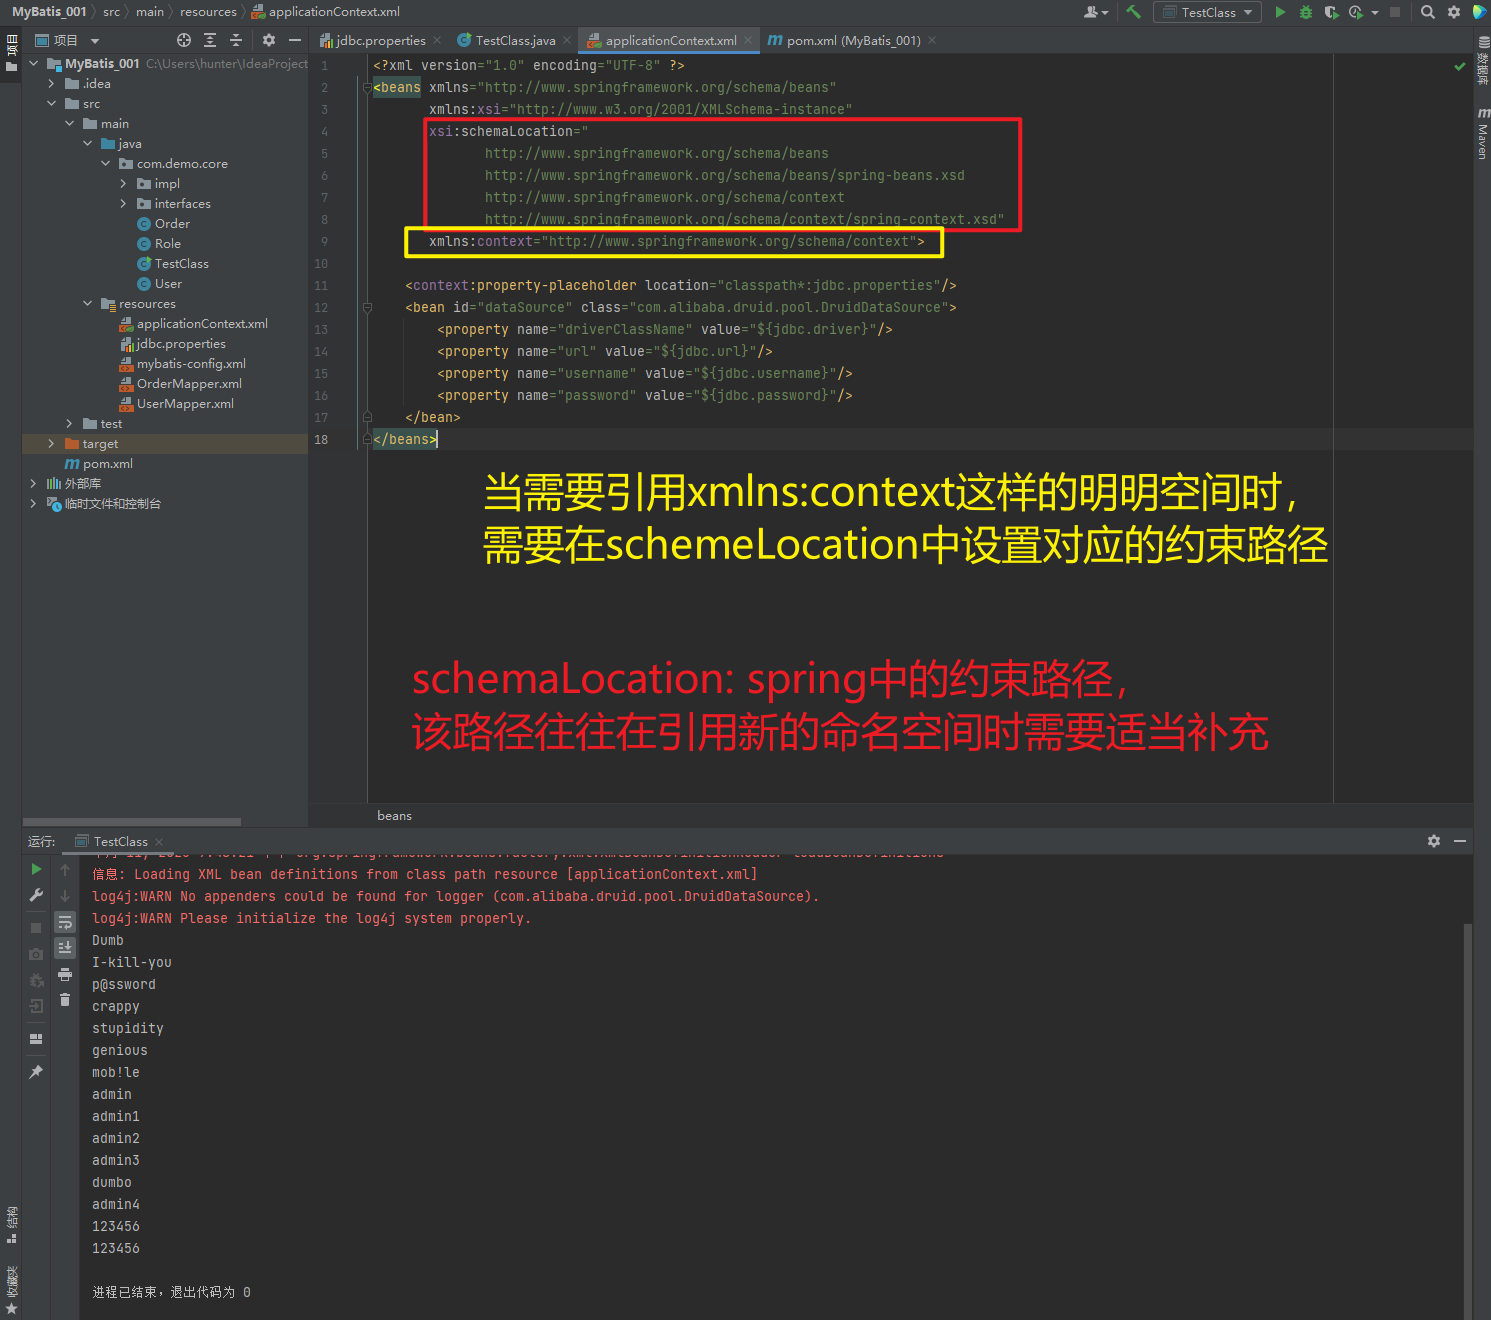
1.5.1.6. 知识要点
Spring容器加载properties文件
<context:property-placeholder location="xx.properties"/>
<property name="" value="${key}"/>
1.5.2. Spring注解开发
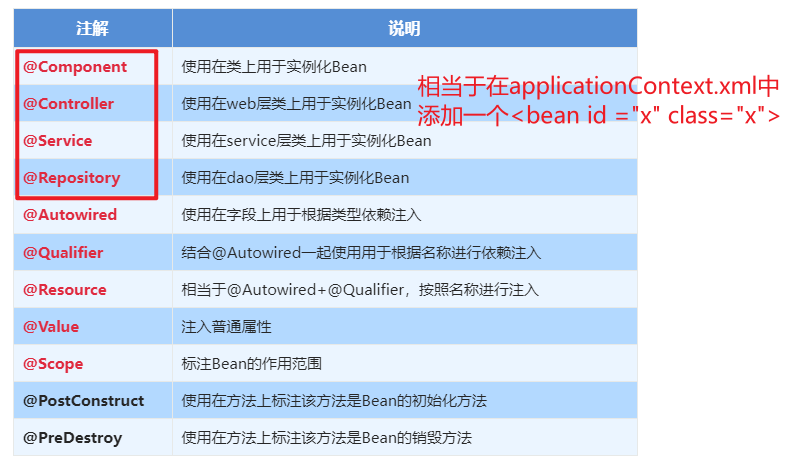
1.5.2.1. Spring原始注解
Spring是轻代码而重配置的框架,配置比较繁重,影响开发效率,所以注解开发是一种趋势,注解代替xml配置文件可以简化配置,提高开发效率
Spring原始注解主要是替代<Bean>的配置
| 注解 | 说明 |
| @Component | 使用在类上用于实例化Bean |
| @Controller | 使用在web层类上用于实例化Bean |
| @Service | 使用在service层类上用于实例化Bean |
| @Repository | 使用在dao层类上用于实例化Bean |
| @Autowired | 使用在字段上用于根据类型依赖注入 |
| @Qualifier | 结合@Autowired一起使用用于根据名称进行依赖注入 |
| @Resource | 相当于@Autowired+@Qualifier,按照名称进行注入 |
| @Value | 注入普通属性 |
| @Scope | 标注Bean的作用范围 |
| @PostConstruct | 使用在方法上标注该方法是Bean的初始化方法 |
| @PreDestroy | 使用在方法上标注该方法是Bean的销毁方法 |
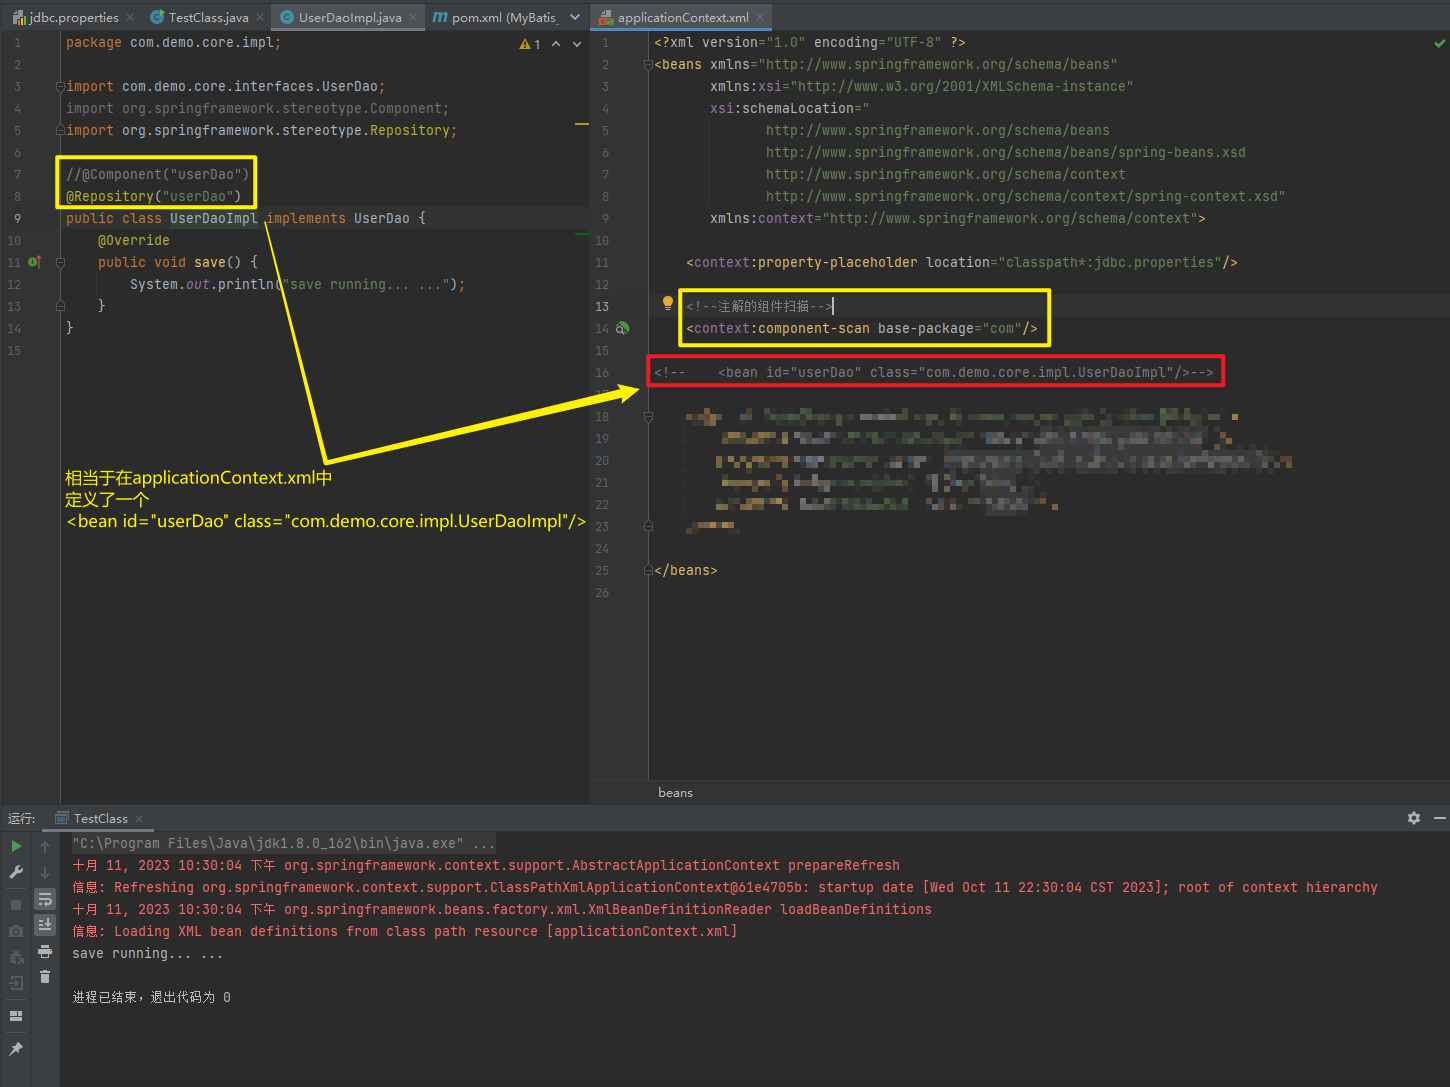
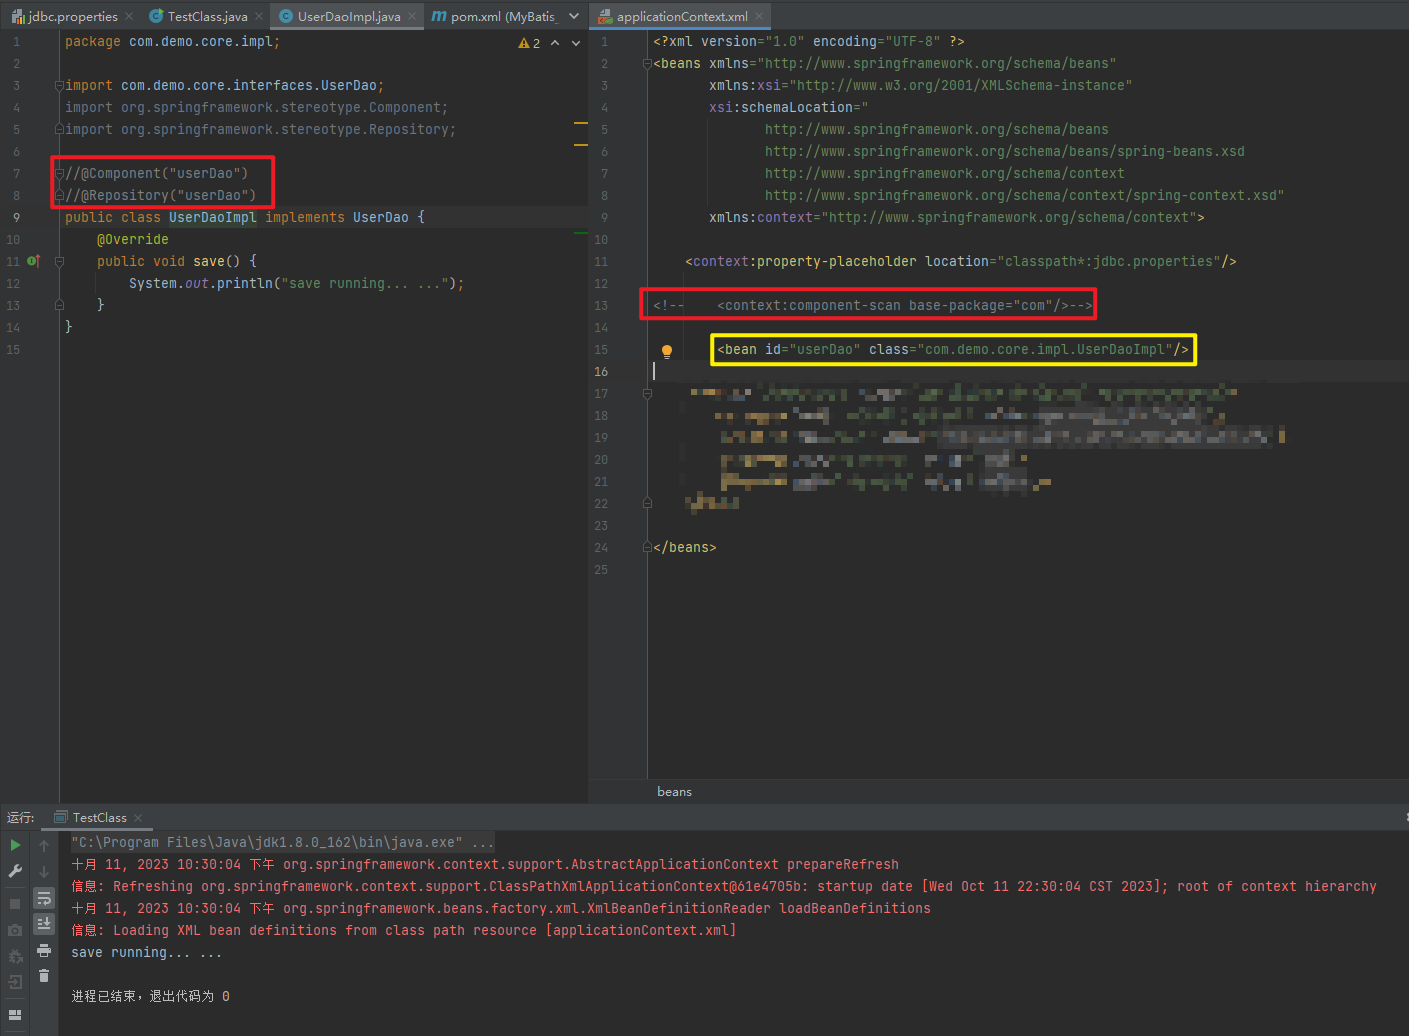
注意:
使用注解进行开发时,需要在applicationContext.xml中配置组件扫描,作用是指定哪个包及其子包下的Bean需要进行扫描以便识别使用注解配置的类、字段和方法。
<!--注解的组件扫描-->
<context:component-scan base-package="com"/>
1.5.2.1.1. @Component、@Controller、@Service、@Repository
使用@Compont或@Repository标识UserDaoImpl需要Spring进行实例化
package com.demo.core;

import com.demo.core.interfaces.UserDao;
import org.springframework.context.ApplicationContext;
import org.springframework.context.support.ClassPathXmlApplicationContext;

import java.sql.SQLException;

public class TestClass {
    public static void main(String[] args) throws SQLException {
        ApplicationContext applicationContext = new ClassPathXmlApplicationContext("applicationContext.xml");
        UserDao userDao = (UserDao) applicationContext.getBean("userDao");
        userDao.save();
    }
}
package com.demo.core.impl;
import com.demo.core.interfaces.UserDao;
import org.springframework.stereotype.Component;
import org.springframework.stereotype.Repository;
//@Component("userDao")
@Repository("userDao")
public class UserDaoImpl implements UserDao {
@Override
public void save() {
System.out.println("save running... ...");
}
}<?xml version="1.0" encoding="UTF-8" ?>
<beans xmlns="http://www.springframework.org/schema/beans"
xmlns:xsi="http://www.w3.org/2001/XMLSchema-instance"
xsi:schemaLocation="
http://www.springframework.org/schema/beans
http://www.springframework.org/schema/beans/spring-beans.xsd
http://www.springframework.org/schema/context
http://www.springframework.org/schema/context/spring-context.xsd"
xmlns:context="http://www.springframework.org/schema/context">
<context:property-placeholder location="classpath*:jdbc.properties"/>
<!--注解的组件扫描-->
<context:component-scan base-package="com"/>
<!-- <bean id="userDao" class="com.demo.core.impl.UserDaoImpl"/>-->
</beans>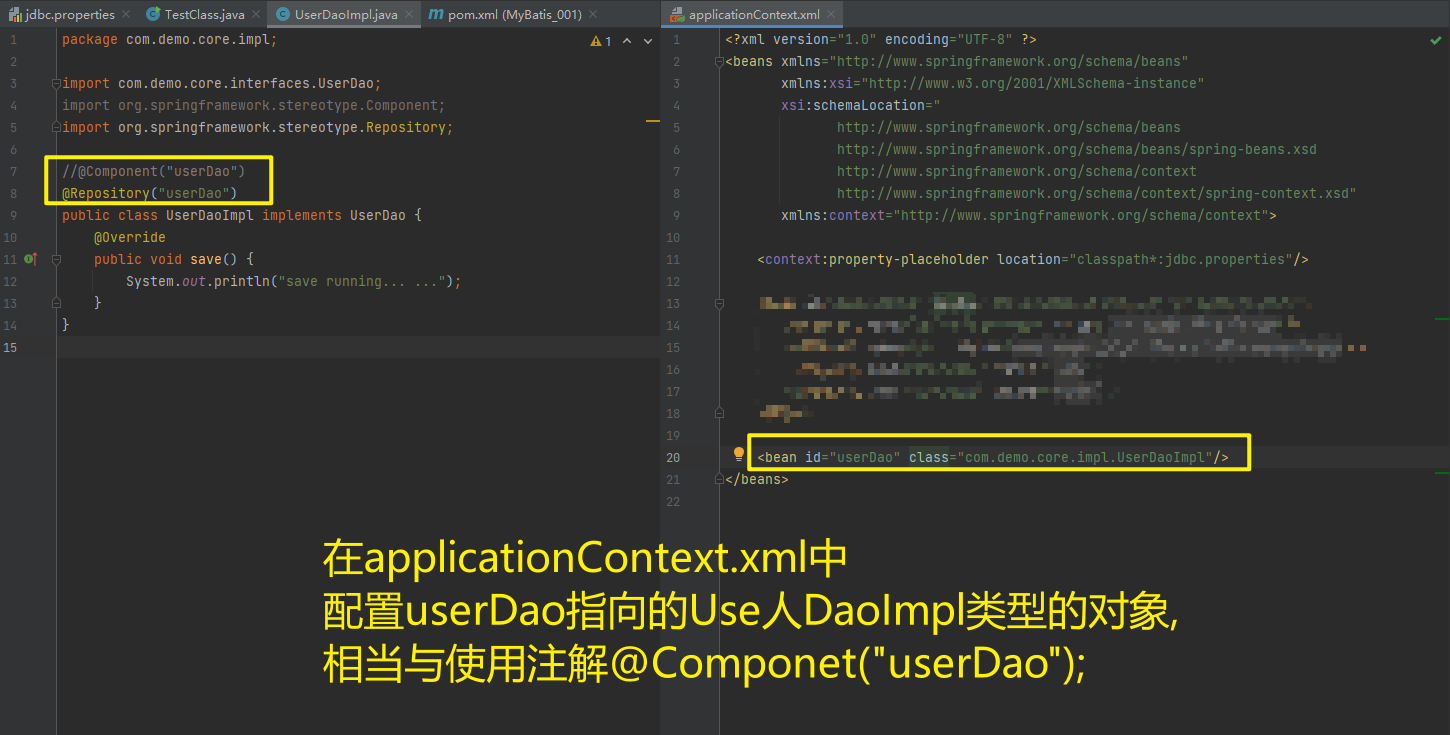

1.5.2.1.2. @Autowired与@Autowired+@Qulifier
使用@Compont或@Service标识UserServiceImpl需要Spring进行实例化
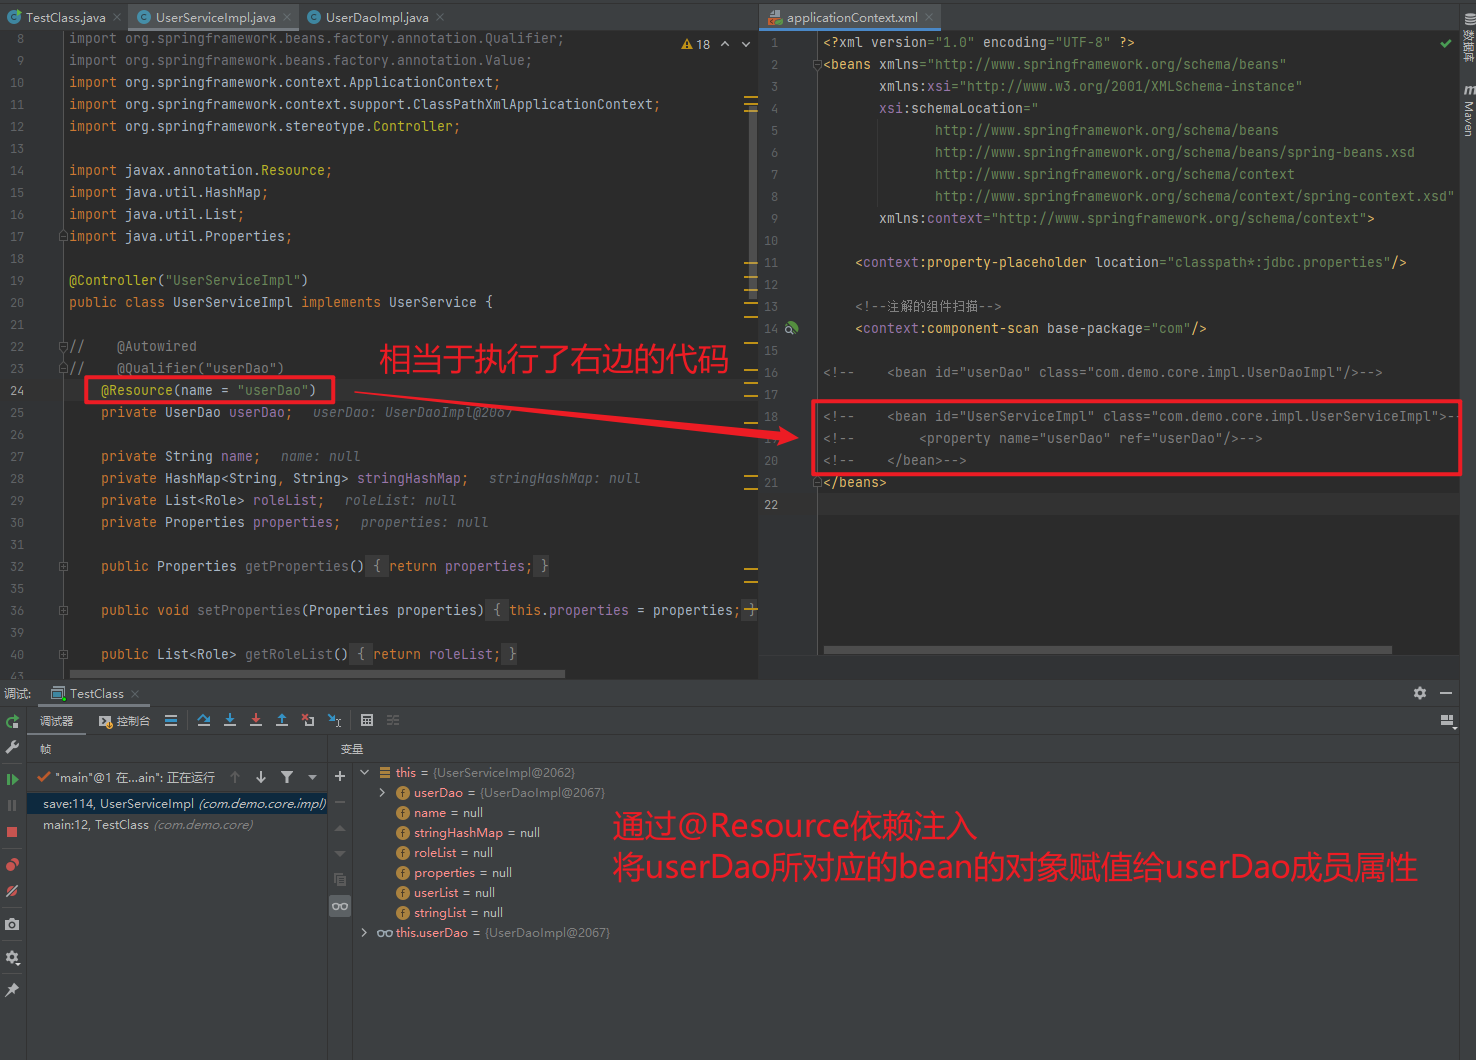
使用@Autowired或者@Autowired+@Qulifier或者@Resource进行userDao的注入

package com.demo.core;

import com.demo.core.impl.UserServiceImpl;
import org.springframework.context.ApplicationContext;
import org.springframework.context.support.ClassPathXmlApplicationContext;

public class TestClass {
    public static void main(String[] args) {

        ApplicationContext applicationContext = new ClassPathXmlApplicationContext("applicationContext.xml");
        UserServiceImpl userDao = (UserServiceImpl) applicationContext.getBean("UserServiceImpl");
        userDao.save();
    }
}
<?xml version="1.0" encoding="UTF-8" ?>
<beans xmlns="http://www.springframework.org/schema/beans"
xmlns:xsi="http://www.w3.org/2001/XMLSchema-instance"
xsi:schemaLocation="
http://www.springframework.org/schema/beans
http://www.springframework.org/schema/beans/spring-beans.xsd
http://www.springframework.org/schema/context
http://www.springframework.org/schema/context/spring-context.xsd"
xmlns:context="http://www.springframework.org/schema/context">
<context:property-placeholder location="classpath*:jdbc.properties"/>
<!--注解的组件扫描-->
<context:component-scan base-package="com"/>
<!-- <bean id="userDao" class="com.demo.core.impl.UserDaoImpl"/>-->
<!-- <bean id="UserServiceImpl" class="com.demo.core.impl.UserServiceImpl">-->
<!-- <property name="userDao" ref="userDao"/>-->
<!-- </bean>-->
</beans>package com.demo.core.impl;
import com.demo.core.Role;
import com.demo.core.User;
import com.demo.core.interfaces.UserDao;
import com.demo.core.interfaces.UserService;
import org.springframework.beans.factory.annotation.Autowired;
import org.springframework.beans.factory.annotation.Qualifier;
import org.springframework.context.ApplicationContext;
import org.springframework.context.support.ClassPathXmlApplicationContext;
import org.springframework.stereotype.Controller;
import javax.annotation.Resource;
import java.util.HashMap;
import java.util.List;
import java.util.Properties;
@Controller("UserServiceImpl")
public class UserServiceImpl implements UserService {
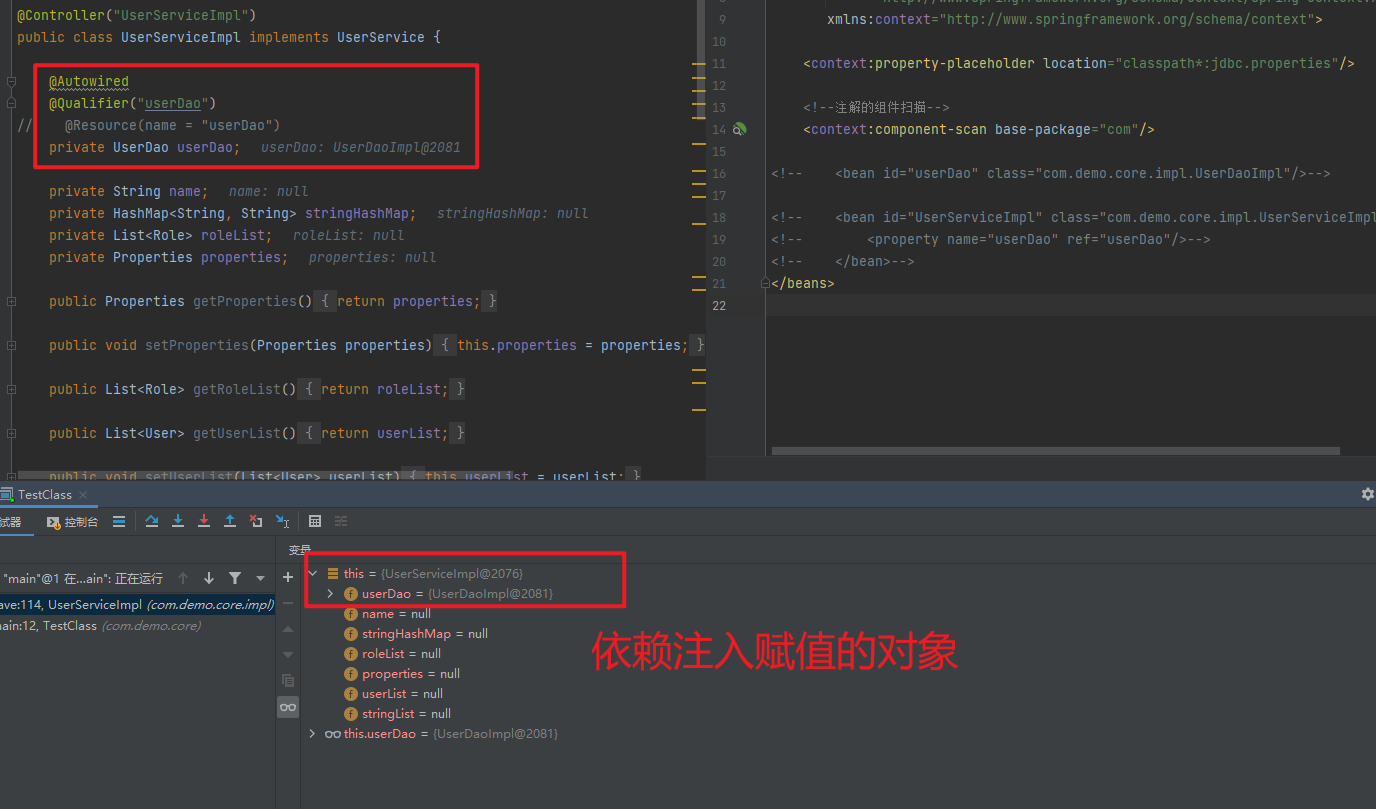
// @Autowired
// @Qualifier("userDao")
@Resource(name = "userDao")
private UserDao userDao;
private String name;
private HashMap<String, String> stringHashMap;
private List<Role> roleList;
private Properties properties;
public Properties getProperties() {
return properties;
}
public void setProperties(Properties properties) {
this.properties = properties;
}
public List<Role> getRoleList() {
return roleList;
}
public List<User> getUserList() {
return userList;
}
public void setUserList(List<User> userList) {
this.userList = userList;
}
private List<User> userList;
public void setRoleList(List<Role> roleList) {
this.roleList = roleList;
}
public UserServiceImpl(HashMap<String, String> stringHashMap) {
this.stringHashMap = stringHashMap;
}
public HashMap<String, String> getStringHashMap() {
return stringHashMap;
}
public void setStringHashMap(HashMap<String, String> stringHashMap) {
this.stringHashMap = stringHashMap;
}
public List<String> getStringList() {
return stringList;
}
public List<String> stringList;
public void setStringList(List<String> stringList) {
this.stringList = stringList;
}
public UserServiceImpl(List<String> stringList) {
this.stringList = stringList;
}
public String getName() {
return name;
}
public void setName(String name) {
this.name = name;
}
public UserServiceImpl(UserDao userDao, String name) {
this.userDao = userDao;
this.name = name;
}
public UserServiceImpl() {
}
public UserServiceImpl(UserDao userDao) {
this.userDao = userDao;
}
public UserDao getUserDao() {
return userDao;
}
public void setUserDao(UserDao userDao) {
this.userDao = userDao;
}
@Override
public void save() {
ApplicationContext applicationContext = new
ClassPathXmlApplicationContext("applicationContext.xml");
System.out.println(this.userDao);
}
}
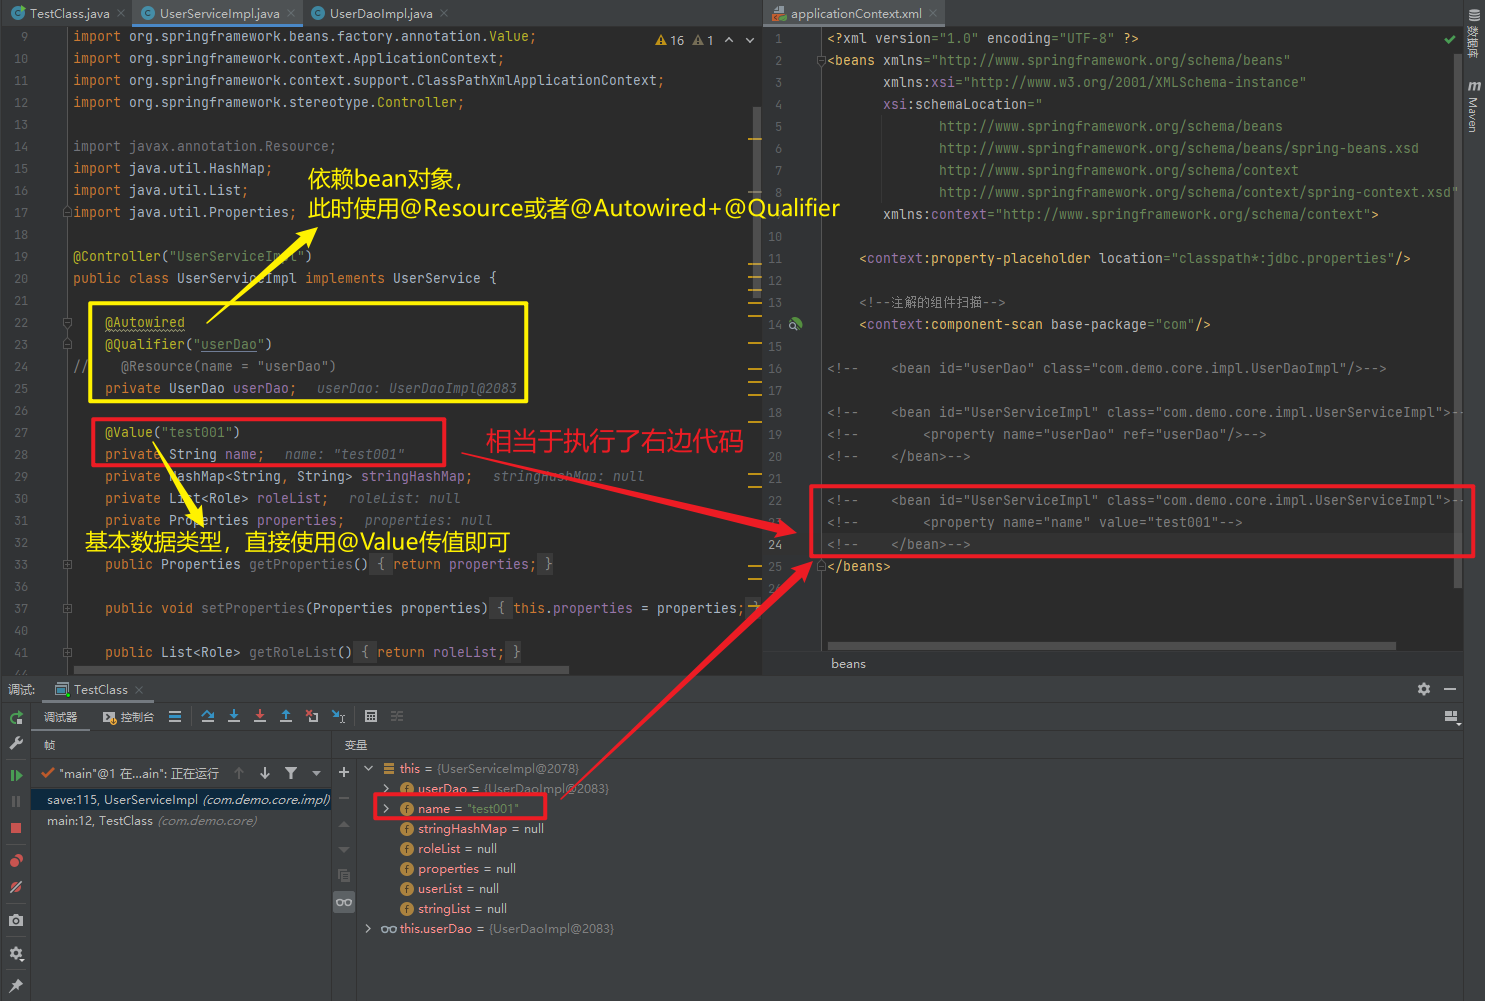
1.5.2.1.3. @Value
package com.demo.core;

import com.demo.core.impl.UserServiceImpl;
import org.springframework.context.ApplicationContext;
import org.springframework.context.support.ClassPathXmlApplicationContext;

public class TestClass {
    public static void main(String[] args) {

        ApplicationContext applicationContext = new ClassPathXmlApplicationContext("applicationContext.xml");
        UserServiceImpl userDao = (UserServiceImpl) applicationContext.getBean("UserServiceImpl");
        userDao.save();
    }
}
<?xml version="1.0" encoding="UTF-8" ?>
<beans xmlns="http://www.springframework.org/schema/beans"
xmlns:xsi="http://www.w3.org/2001/XMLSchema-instance"
xsi:schemaLocation="
http://www.springframework.org/schema/beans
http://www.springframework.org/schema/beans/spring-beans.xsd
http://www.springframework.org/schema/context
http://www.springframework.org/schema/context/spring-context.xsd"
xmlns:context="http://www.springframework.org/schema/context">
<context:property-placeholder location="classpath*:jdbc.properties"/>
<!--注解的组件扫描-->
<context:component-scan base-package="com"/>
<!-- <bean id="userDao" class="com.demo.core.impl.UserDaoImpl"/>-->
<!-- <bean id="UserServiceImpl" class="com.demo.core.impl.UserServiceImpl">-->
<!-- <property name="userDao" ref="userDao"/>-->
<!-- </bean>-->
<!-- <bean id="UserServiceImpl" class="com.demo.core.impl.UserServiceImpl">-->
<!-- <property name="name" value="test001"/>-->
<!-- </bean>-->
</beans>package com.demo.core.impl;
import com.demo.core.Role;
import com.demo.core.User;
import com.demo.core.interfaces.UserDao;
import com.demo.core.interfaces.UserService;
import org.springframework.beans.factory.annotation.Autowired;
import org.springframework.beans.factory.annotation.Qualifier;
import org.springframework.beans.factory.annotation.Value;
import org.springframework.context.ApplicationContext;
import org.springframework.context.support.ClassPathXmlApplicationContext;
import org.springframework.stereotype.Controller;
import javax.annotation.Resource;
import java.util.HashMap;
import java.util.List;
import java.util.Properties;
@Controller("UserServiceImpl")
public class UserServiceImpl implements UserService {
@Autowired
@Qualifier("userDao")
// @Resource(name = "userDao")
private UserDao userDao;
@Value("test001")
private String name;
private HashMap<String, String> stringHashMap;
private List<Role> roleList;
private Properties properties;
public Properties getProperties() {
return properties;
}
public void setProperties(Properties properties) {
this.properties = properties;
}
public List<Role> getRoleList() {
return roleList;
}
public List<User> getUserList() {
return userList;
}
public void setUserList(List<User> userList) {
this.userList = userList;
}
private List<User> userList;
public void setRoleList(List<Role> roleList) {
this.roleList = roleList;
}
public UserServiceImpl(HashMap<String, String> stringHashMap) {
this.stringHashMap = stringHashMap;
}
public HashMap<String, String> getStringHashMap() {
return stringHashMap;
}
public void setStringHashMap(HashMap<String, String> stringHashMap) {
this.stringHashMap = stringHashMap;
}
public List<String> getStringList() {
return stringList;
}
public List<String> stringList;
public void setStringList(List<String> stringList) {
this.stringList = stringList;
}
public UserServiceImpl(List<String> stringList) {
this.stringList = stringList;
}
public String getName() {
return name;
}
public void setName(String name) {
this.name = name;
}
public UserServiceImpl(UserDao userDao, String name) {
this.userDao = userDao;
this.name = name;
}
public UserServiceImpl() {
}
public UserServiceImpl(UserDao userDao) {
this.userDao = userDao;
}
public UserDao getUserDao() {
return userDao;
}
public void setUserDao(UserDao userDao) {
this.userDao = userDao;
}
@Override
public void save() {
ApplicationContext applicationContext = new
ClassPathXmlApplicationContext("applicationContext.xml");
System.out.println(this.userDao);
}
}
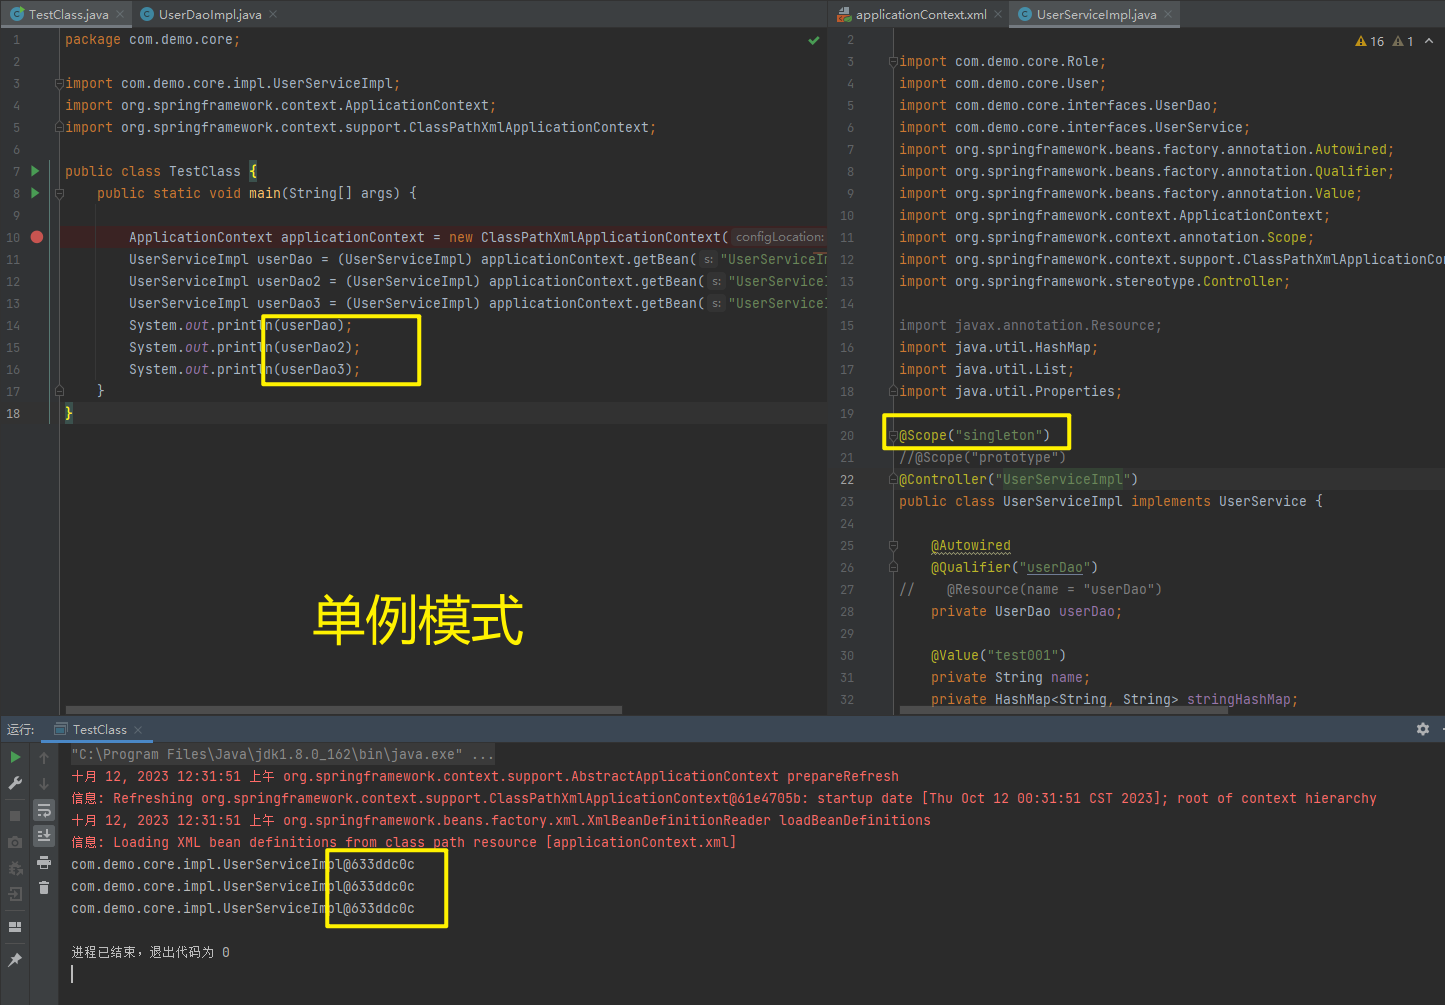
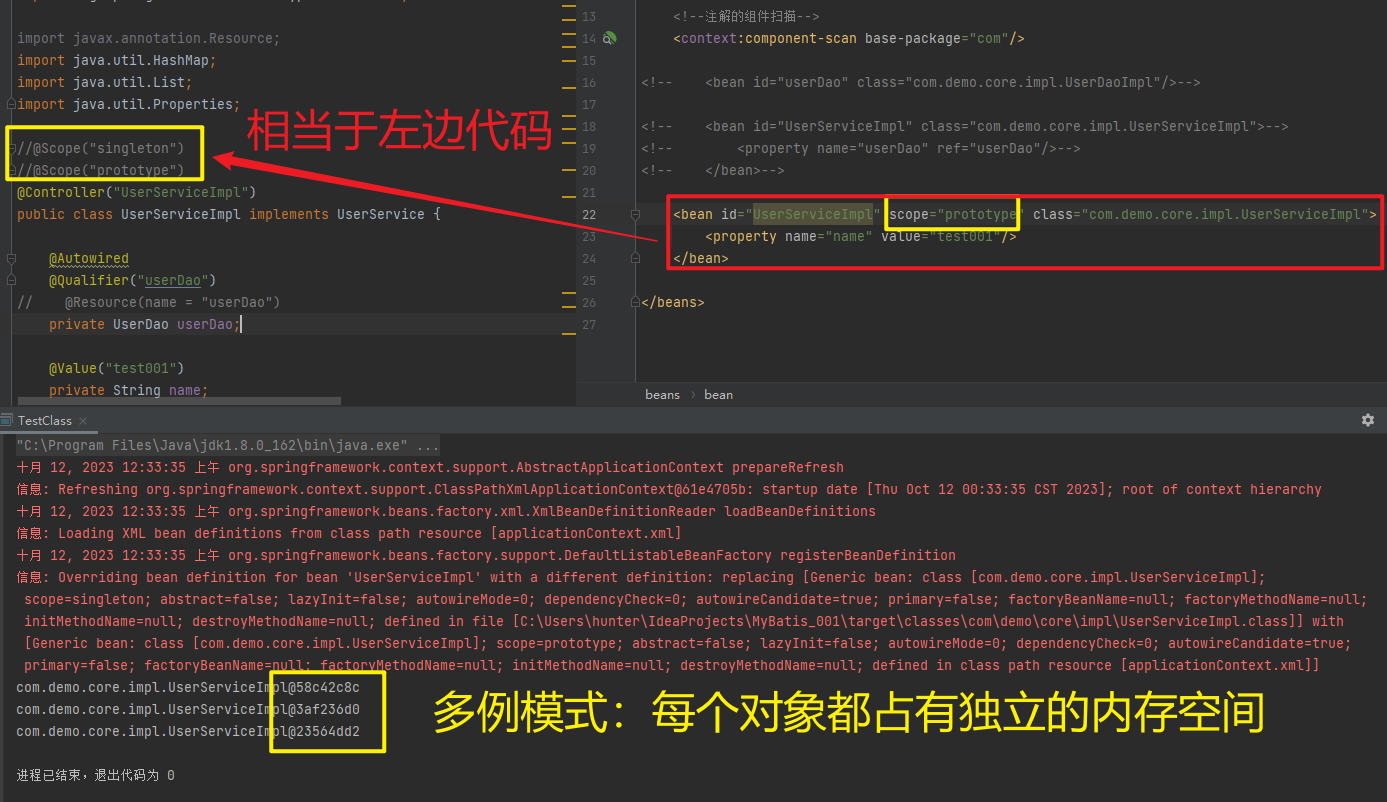
1.5.2.1.4. @Scope
package com.demo.core;

import com.demo.core.impl.UserServiceImpl;
import org.springframework.context.ApplicationContext;
import org.springframework.context.support.ClassPathXmlApplicationContext;

public class TestClass {
    public static void main(String[] args) {

        ApplicationContext applicationContext = new ClassPathXmlApplicationContext("applicationContext.xml");
        UserServiceImpl userDao = (UserServiceImpl) applicationContext.getBean("UserServiceImpl");
        UserServiceImpl userDao2 = (UserServiceImpl) applicationContext.getBean("UserServiceImpl");
        UserServiceImpl userDao3 = (UserServiceImpl) applicationContext.getBean("UserServiceImpl");
        System.out.println(userDao);
        System.out.println(userDao2);
        System.out.println(userDao3);
    }
}
<?xml version="1.0" encoding="UTF-8" ?>
<beans xmlns="http://www.springframework.org/schema/beans"
xmlns:xsi="http://www.w3.org/2001/XMLSchema-instance"
xsi:schemaLocation="
http://www.springframework.org/schema/beans
http://www.springframework.org/schema/beans/spring-beans.xsd
http://www.springframework.org/schema/context
http://www.springframework.org/schema/context/spring-context.xsd"
xmlns:context="http://www.springframework.org/schema/context">
<context:property-placeholder location="classpath*:jdbc.properties"/>
<!--注解的组件扫描-->
<context:component-scan base-package="com"/>
<!-- <bean id="userDao" class="com.demo.core.impl.UserDaoImpl"/>-->
<!-- <bean id="UserServiceImpl" class="com.demo.core.impl.UserServiceImpl">-->
<!-- <property name="userDao" ref="userDao"/>-->
<!-- </bean>-->
<!-- <bean id="UserServiceImpl" scope="prototype" class="com.demo.core.impl.UserServiceImpl">-->
<!-- <property name="name" value="test001"/>-->
<!-- </bean>-->
</beans>package com.demo.core.impl;
import com.demo.core.Role;
import com.demo.core.User;
import com.demo.core.interfaces.UserDao;
import com.demo.core.interfaces.UserService;
import org.springframework.beans.factory.annotation.Autowired;
import org.springframework.beans.factory.annotation.Qualifier;
import org.springframework.beans.factory.annotation.Value;
import org.springframework.context.ApplicationContext;
import org.springframework.context.annotation.Scope;
import org.springframework.context.support.ClassPathXmlApplicationContext;
import org.springframework.stereotype.Controller;
import javax.annotation.Resource;
import java.util.HashMap;
import java.util.List;
import java.util.Properties;
//@Scope("singleton")
@Scope("prototype")
@Controller("UserServiceImpl")
public class UserServiceImpl implements UserService {
@Autowired
@Qualifier("userDao")
// @Resource(name = "userDao")
private UserDao userDao;
@Value("test001")
private String name;
private HashMap<String, String> stringHashMap;
private List<Role> roleList;
private Properties properties;
public Properties getProperties() {
return properties;
}
public void setProperties(Properties properties) {
this.properties = properties;
}
public List<Role> getRoleList() {
return roleList;
}
public List<User> getUserList() {
return userList;
}
public void setUserList(List<User> userList) {
this.userList = userList;
}
private List<User> userList;
public void setRoleList(List<Role> roleList) {
this.roleList = roleList;
}
public UserServiceImpl(HashMap<String, String> stringHashMap) {
this.stringHashMap = stringHashMap;
}
public HashMap<String, String> getStringHashMap() {
return stringHashMap;
}
public void setStringHashMap(HashMap<String, String> stringHashMap) {
this.stringHashMap = stringHashMap;
}
public List<String> getStringList() {
return stringList;
}
public List<String> stringList;
public void setStringList(List<String> stringList) {
this.stringList = stringList;
}
public UserServiceImpl(List<String> stringList) {
this.stringList = stringList;
}
public String getName() {
return name;
}
public void setName(String name) {
this.name = name;
}
public UserServiceImpl(UserDao userDao, String name) {
this.userDao = userDao;
this.name = name;
}
public UserServiceImpl() {
}
public UserServiceImpl(UserDao userDao) {
this.userDao = userDao;
}
public UserDao getUserDao() {
return userDao;
}
public void setUserDao(UserDao userDao) {
this.userDao = userDao;
}
@Override
public void save() {
ApplicationContext applicationContext = new
ClassPathXmlApplicationContext("applicationContext.xml");
System.out.println(this.userDao);
}
}

1.5.2.1.5. @PostConstruct,@PreDestroy
package com.demo.core;

import com.demo.core.impl.UserDaoImpl;
import org.springframework.context.ApplicationContext;
import org.springframework.context.support.AbstractApplicationContext;
import org.springframework.context.support.ClassPathXmlApplicationContext;

public class TestClass {
    public static void main(String[] args) {

        ApplicationContext applicationContext = new
                ClassPathXmlApplicationContext("applicationContext.xml");
        UserDaoImpl userDao = (UserDaoImpl) applicationContext.getBean("userDao");
        ((AbstractApplicationContext) applicationContext).close();
    }
}
<?xml version="1.0" encoding="UTF-8" ?>
<beans xmlns="http://www.springframework.org/schema/beans"
xmlns:xsi="http://www.w3.org/2001/XMLSchema-instance"
xsi:schemaLocation="
http://www.springframework.org/schema/beans
http://www.springframework.org/schema/beans/spring-beans.xsd
http://www.springframework.org/schema/context
http://www.springframework.org/schema/context/spring-context.xsd"
xmlns:context="http://www.springframework.org/schema/context">
<context:property-placeholder location="classpath*:jdbc.properties"/>
<!--注解的组件扫描-->
<context:component-scan base-package="com"/>
<!-- <bean id="userDao" class="com.demo.core.impl.UserDaoImpl"/>-->
<!-- <bean id="UserServiceImpl" class="com.demo.core.impl.UserServiceImpl">-->
<!-- <property name="userDao" ref="userDao"/>-->
<!-- </bean>-->
<!-- <bean id="UserServiceImpl" scope="prototype" class="com.demo.core.impl.UserServiceImpl">-->
<!-- <property name="name" value="test001"/>-->
<!-- </bean>-->
<!-- <bean id="userDao" class="com.demo.core.impl.UserDaoImpl"-->
<!-- init-method="initMethod"-->
<!-- destroy-method="destroymethod"/>-->
</beans>package com.demo.core.impl;
import com.demo.core.interfaces.UserDao;
import org.springframework.stereotype.Component;
import org.springframework.stereotype.Repository;
import javax.annotation.PostConstruct;
import javax.annotation.PreDestroy;
//@Component("userDao")
@Repository("userDao")
public class UserDaoImpl implements UserDao {
public UserDaoImpl() {
System.out.println("now UserDaoImpl");
}
@Override
public void save() {
System.out.println("save running... ...");
}
// 相当于init-method="initMethod"
@PostConstruct
public void initMethod() {
System.out.println("UserDaoImpl initMethod called");
}
// 相当于destroy-method="destroymethod"
@PreDestroy
public void destroymethod() {
System.out.println("UserDaoImpl destroymethod called");
}
}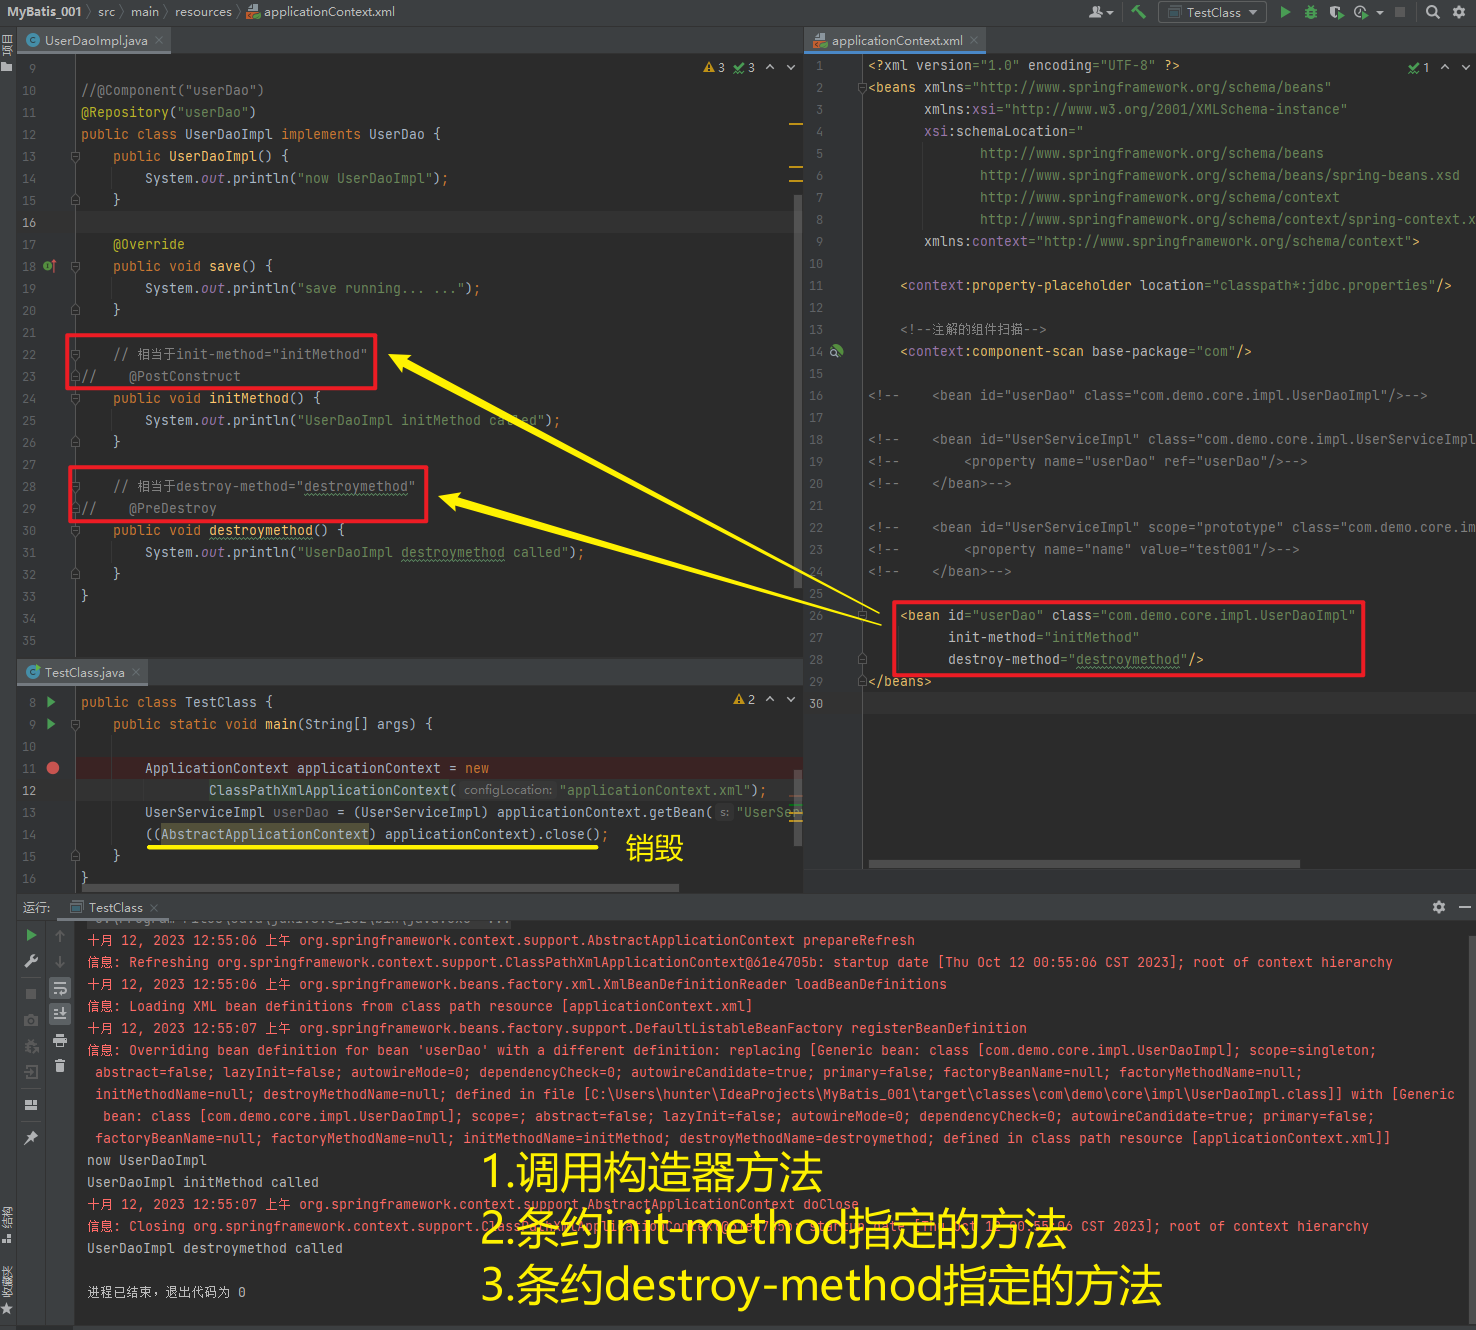
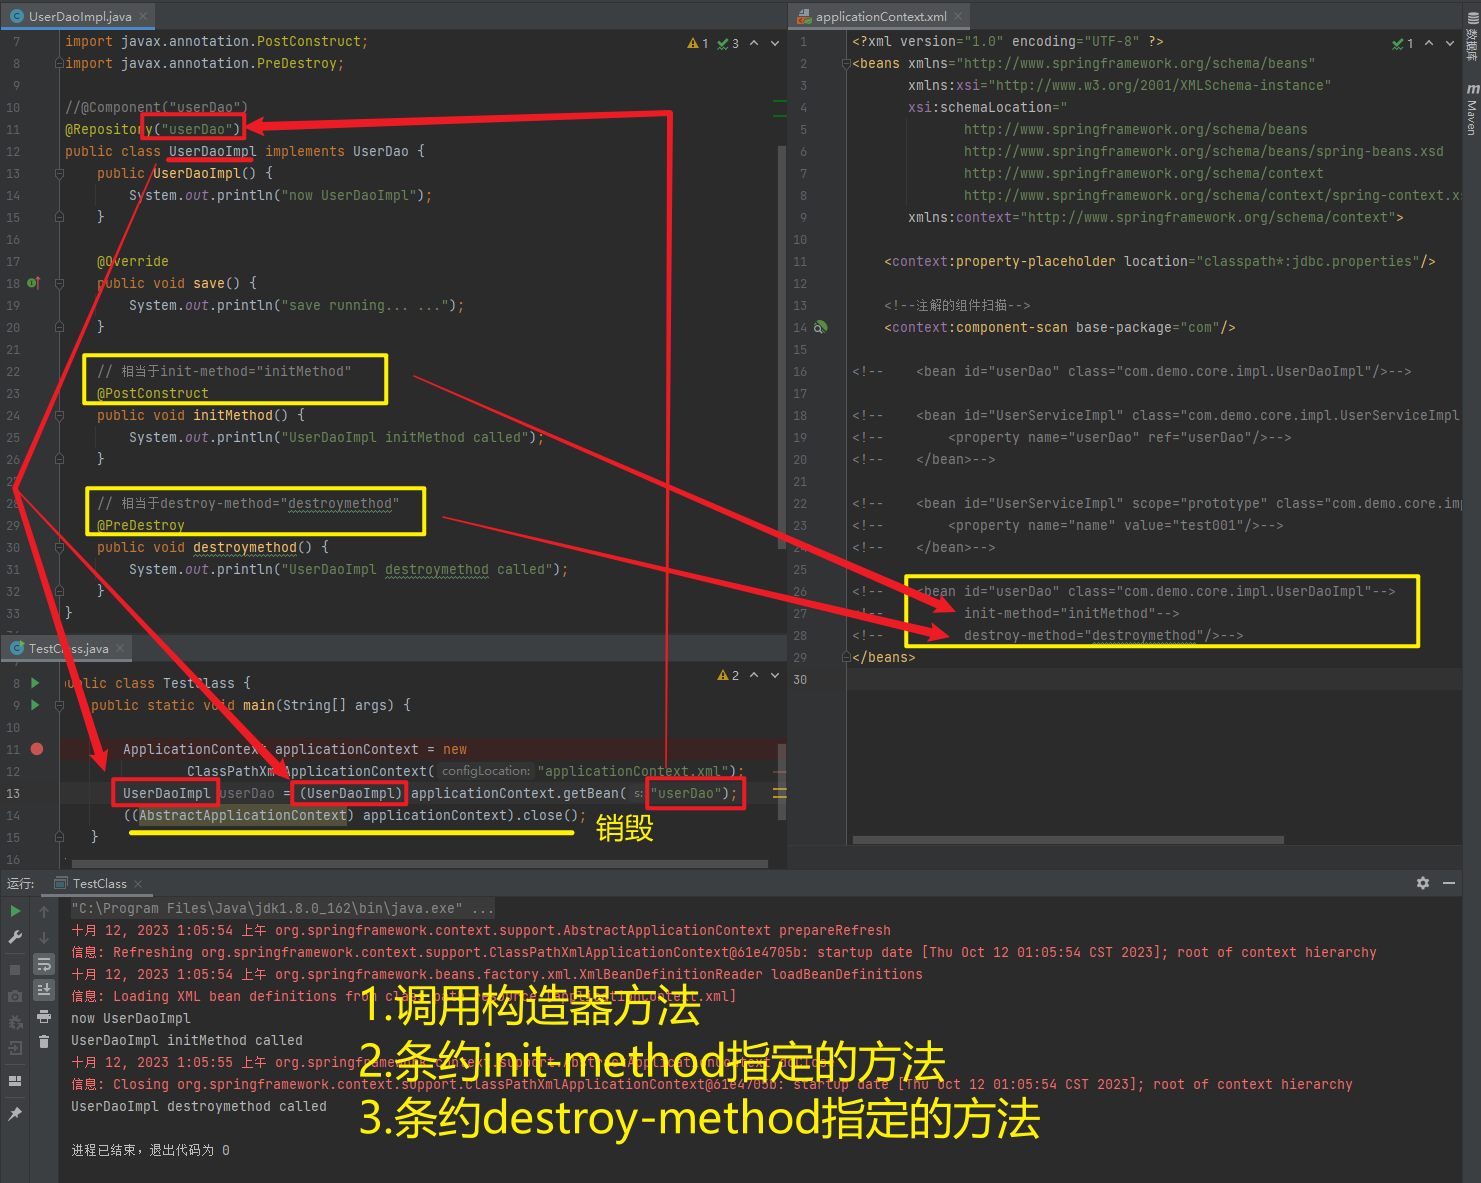
1.5.2.2. spring新注解
使用上面的注解还不能全部替代xml配置文件,还需要使用注解替代的配置如下:
非自定义的Bean的配置:<bean>
加载properties文件的配置:<context:property-placeholder>
组件扫描的配置:<context:component-scan>
引入其他文件:<import>
| 注解 | 说明 |
| @Configuration | 用于指定当前类是一个 Spring 配置类,当创建容器时会从该类上加载注解 |
| @ComponentScan | 用于指定 Spring 在初始化容器时要扫描的包。作用和在 Spring 的 xml 配置文件中的<context:component-scan base-package="com.itbihuo"/>一样 |
| @Bean | 使用在方法上,标注将该方法的返回值存储到 Spring 容器中 |
| @PropertySource | 用于加载.properties文件中的配置 |
| @Import | 用于导入其他配置类 |
1.5.2.2.1. @Configuration、@ComponentScan、@Import
package com.demo.core;

import org.springframework.context.annotation.ComponentScan;
import org.springframework.context.annotation.Configuration;
import org.springframework.context.annotation.Import;

@Configuration
@ComponentScan("com")
@Import({DataSourceConfiguration.class})
public class SpringConfiguration {

}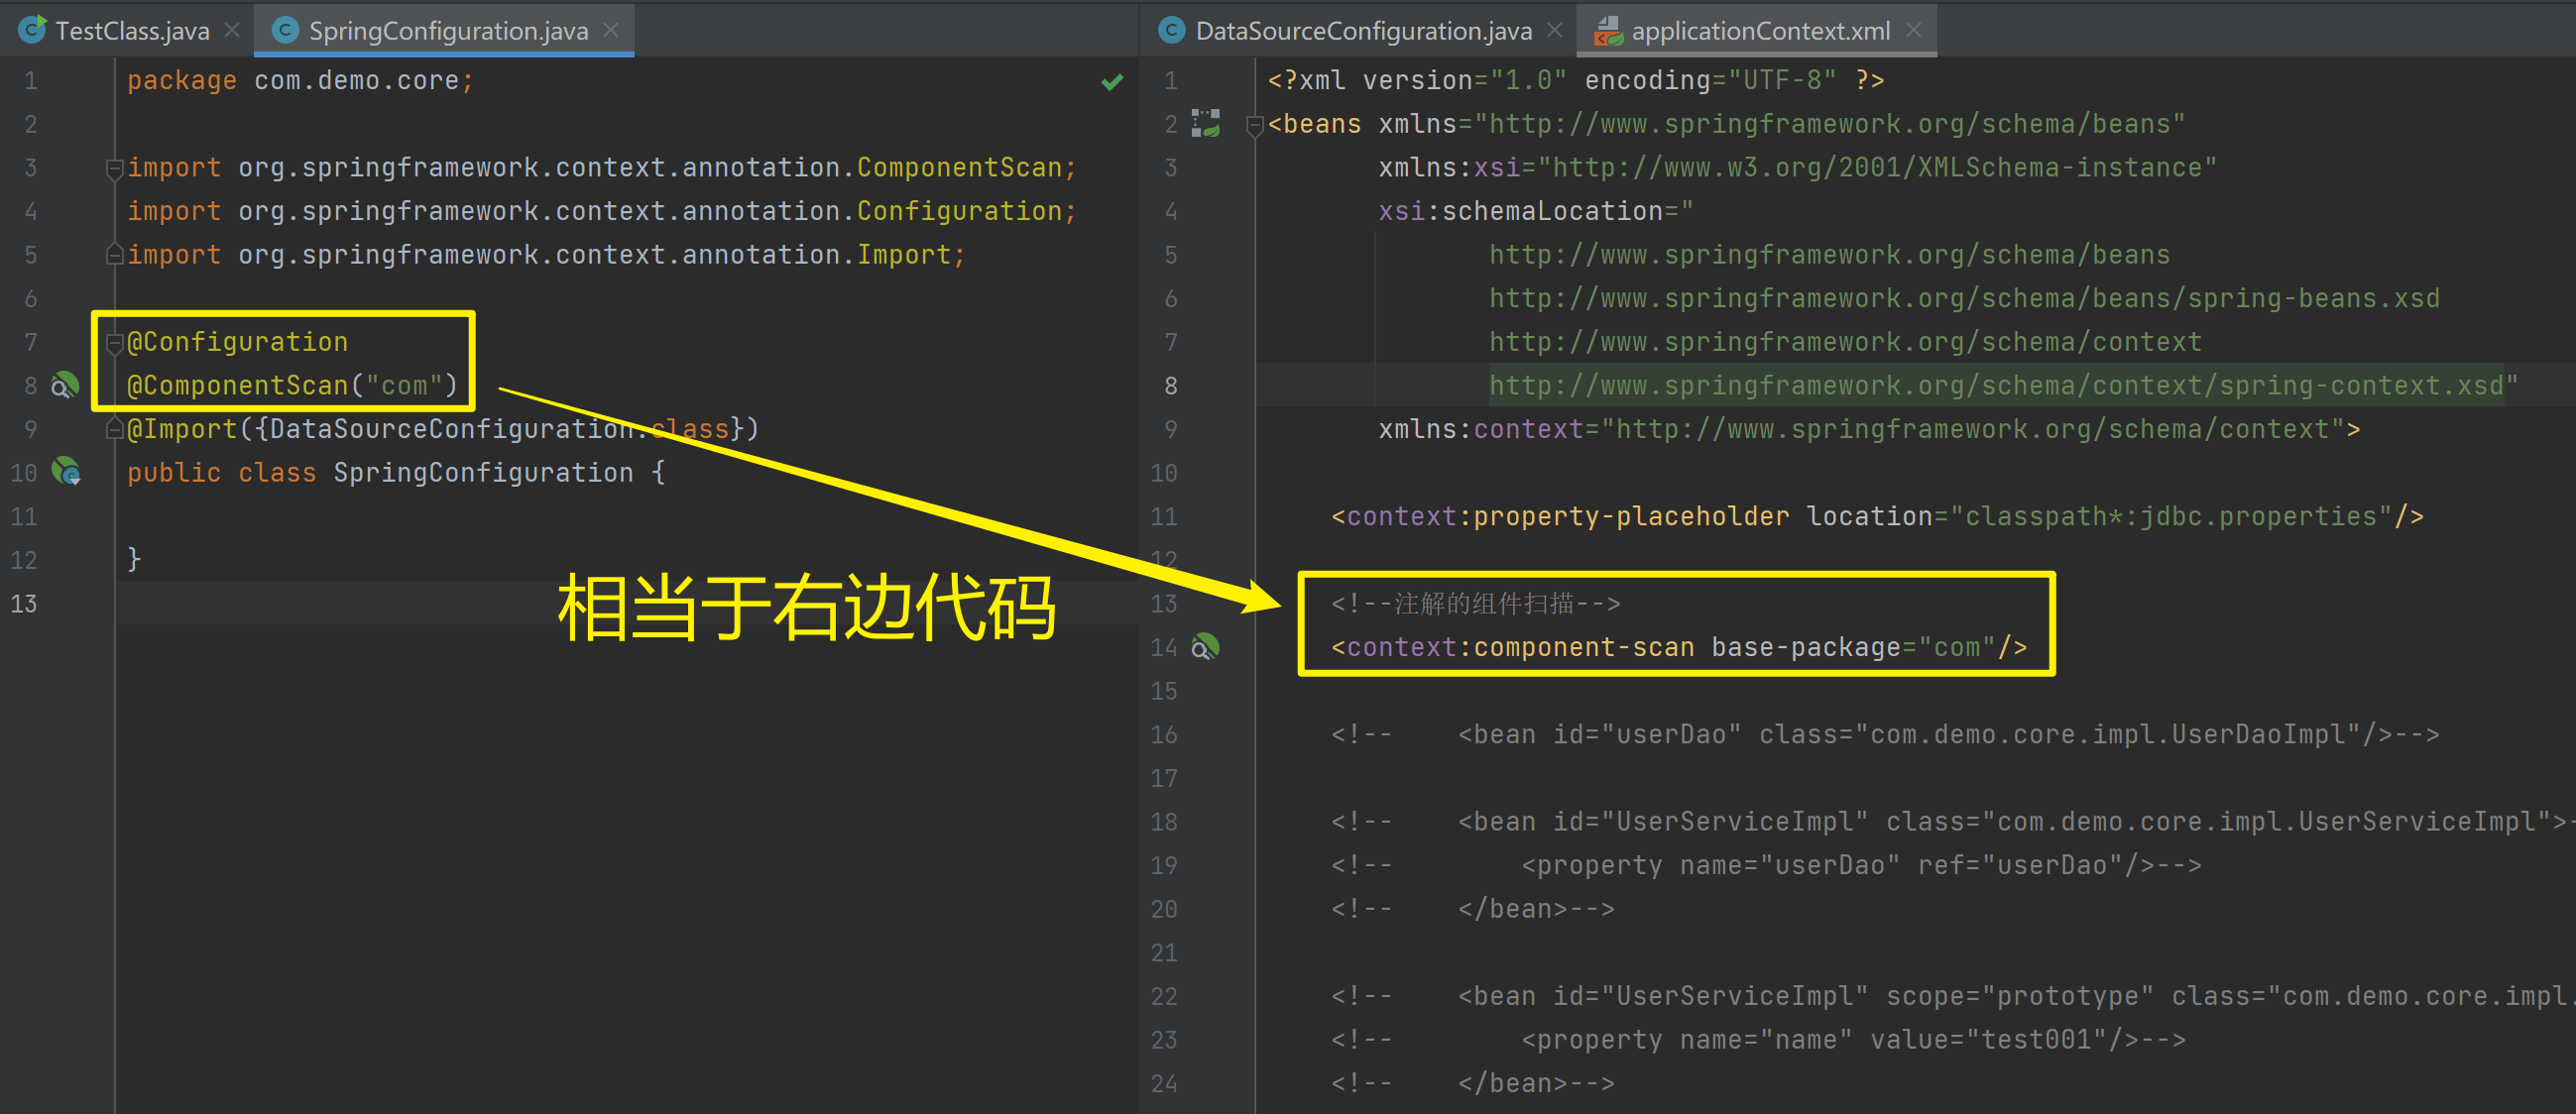
1.5.2.2.2. @PropertySource、@value、@Bean
package com.demo.core;

import com.mchange.v2.c3p0.ComboPooledDataSource;
import org.springframework.beans.factory.annotation.Value;
import org.springframework.context.annotation.Bean;
import org.springframework.context.annotation.PropertySource;

import javax.sql.DataSource;
import java.beans.PropertyVetoException;

@PropertySource("classpath:jdbc.properties")
public class DataSourceConfiguration {
    @Value("${jdbc.driver}")
    private String driver;
    @Value("${jdbc.url}")
    private String url;
    @Value("${jdbc.username}")
    private String username;
    @Value("${jdbc.password}")
    private String password;

    // 相当于 <bean id=dataSource factory-bean=xxx factory-method=xxx/>
    @Bean(name = "dataSource")
    public DataSource getDataSource() throws PropertyVetoException {
        ComboPooledDataSource dataSource = new ComboPooledDataSource();
        dataSource.setDriverClass(driver);
        dataSource.setJdbcUrl(url);
        dataSource.setUser(username);
        dataSource.setPassword(password);
        return dataSource;
    }
}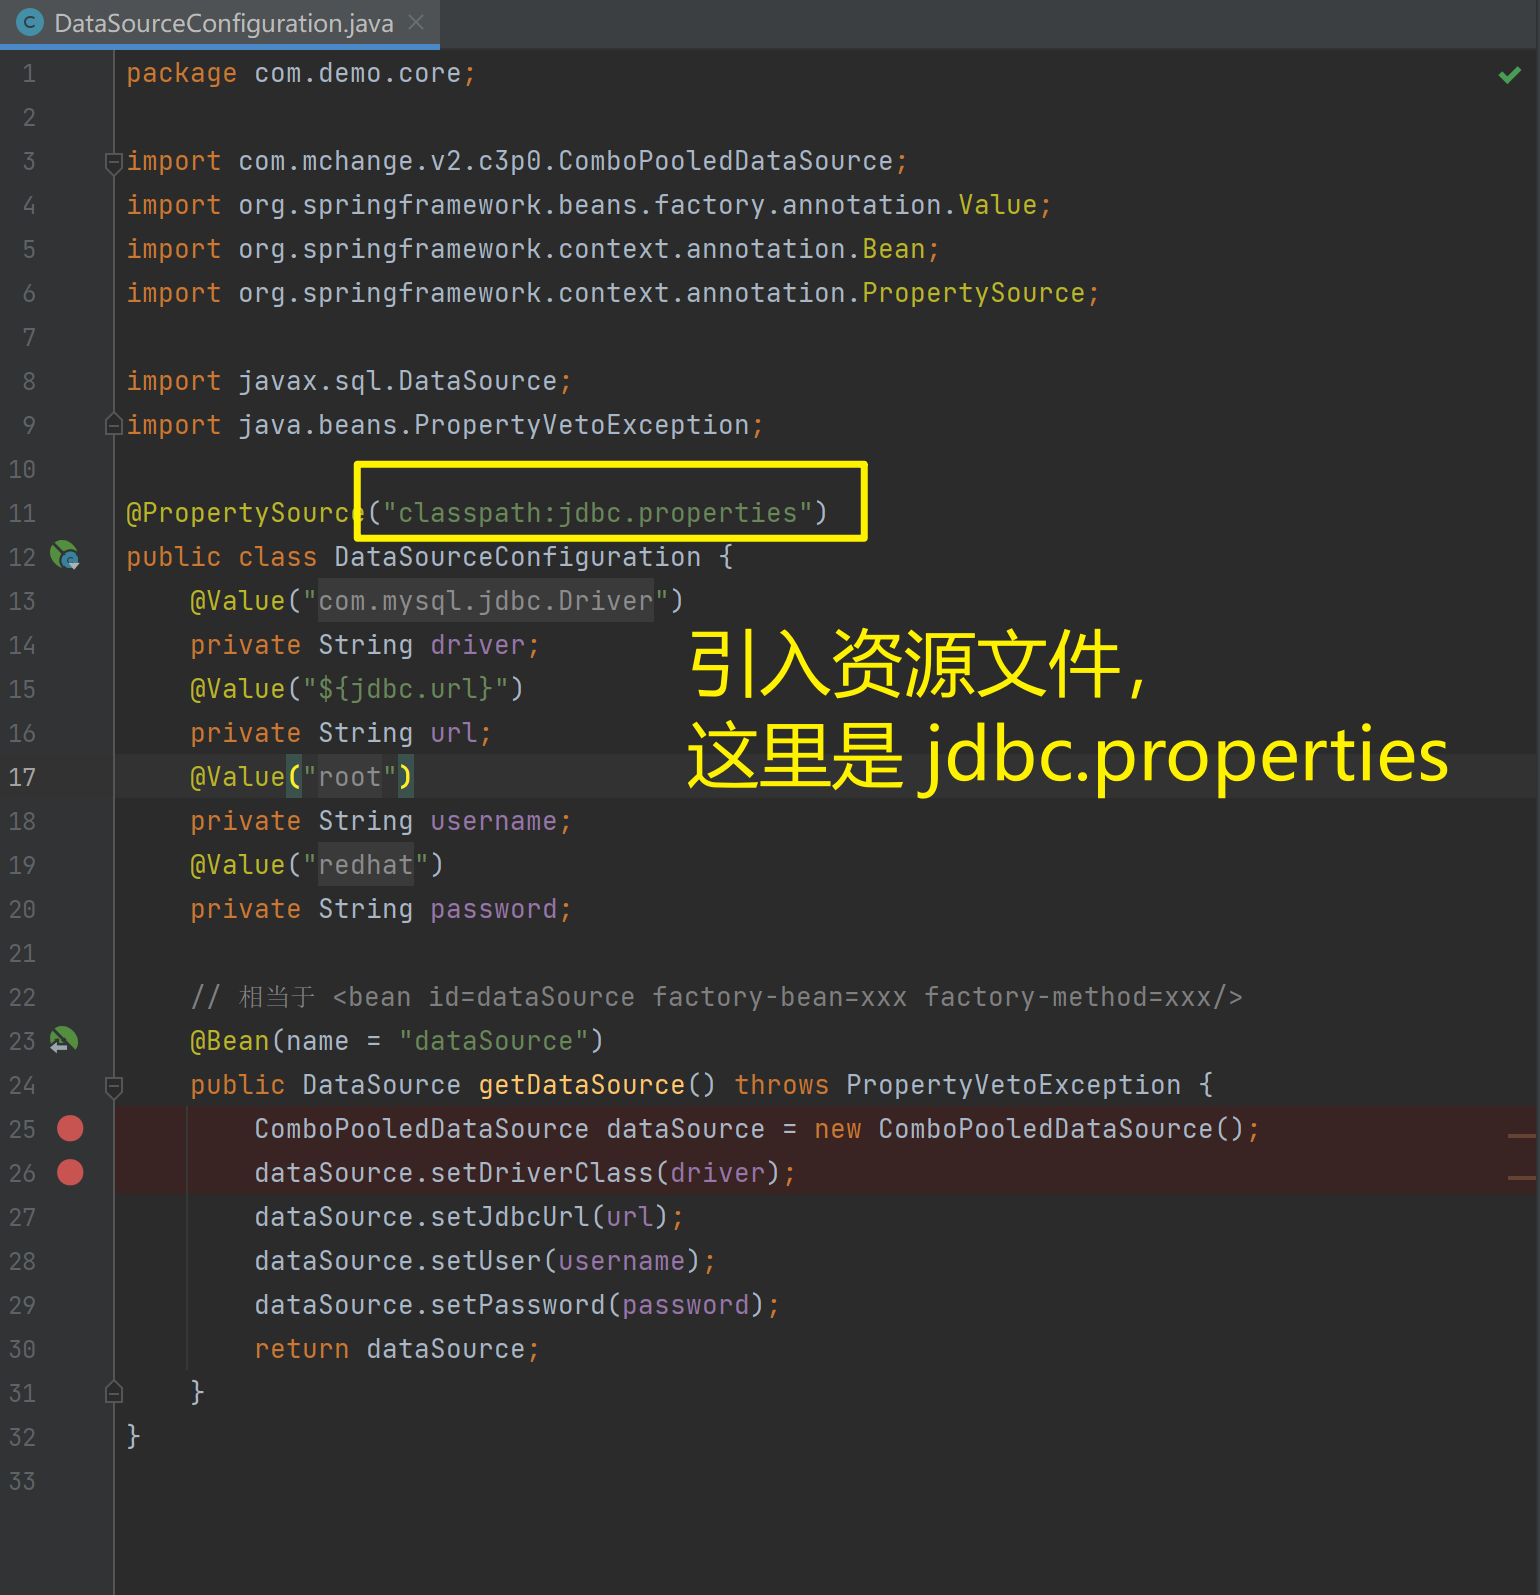
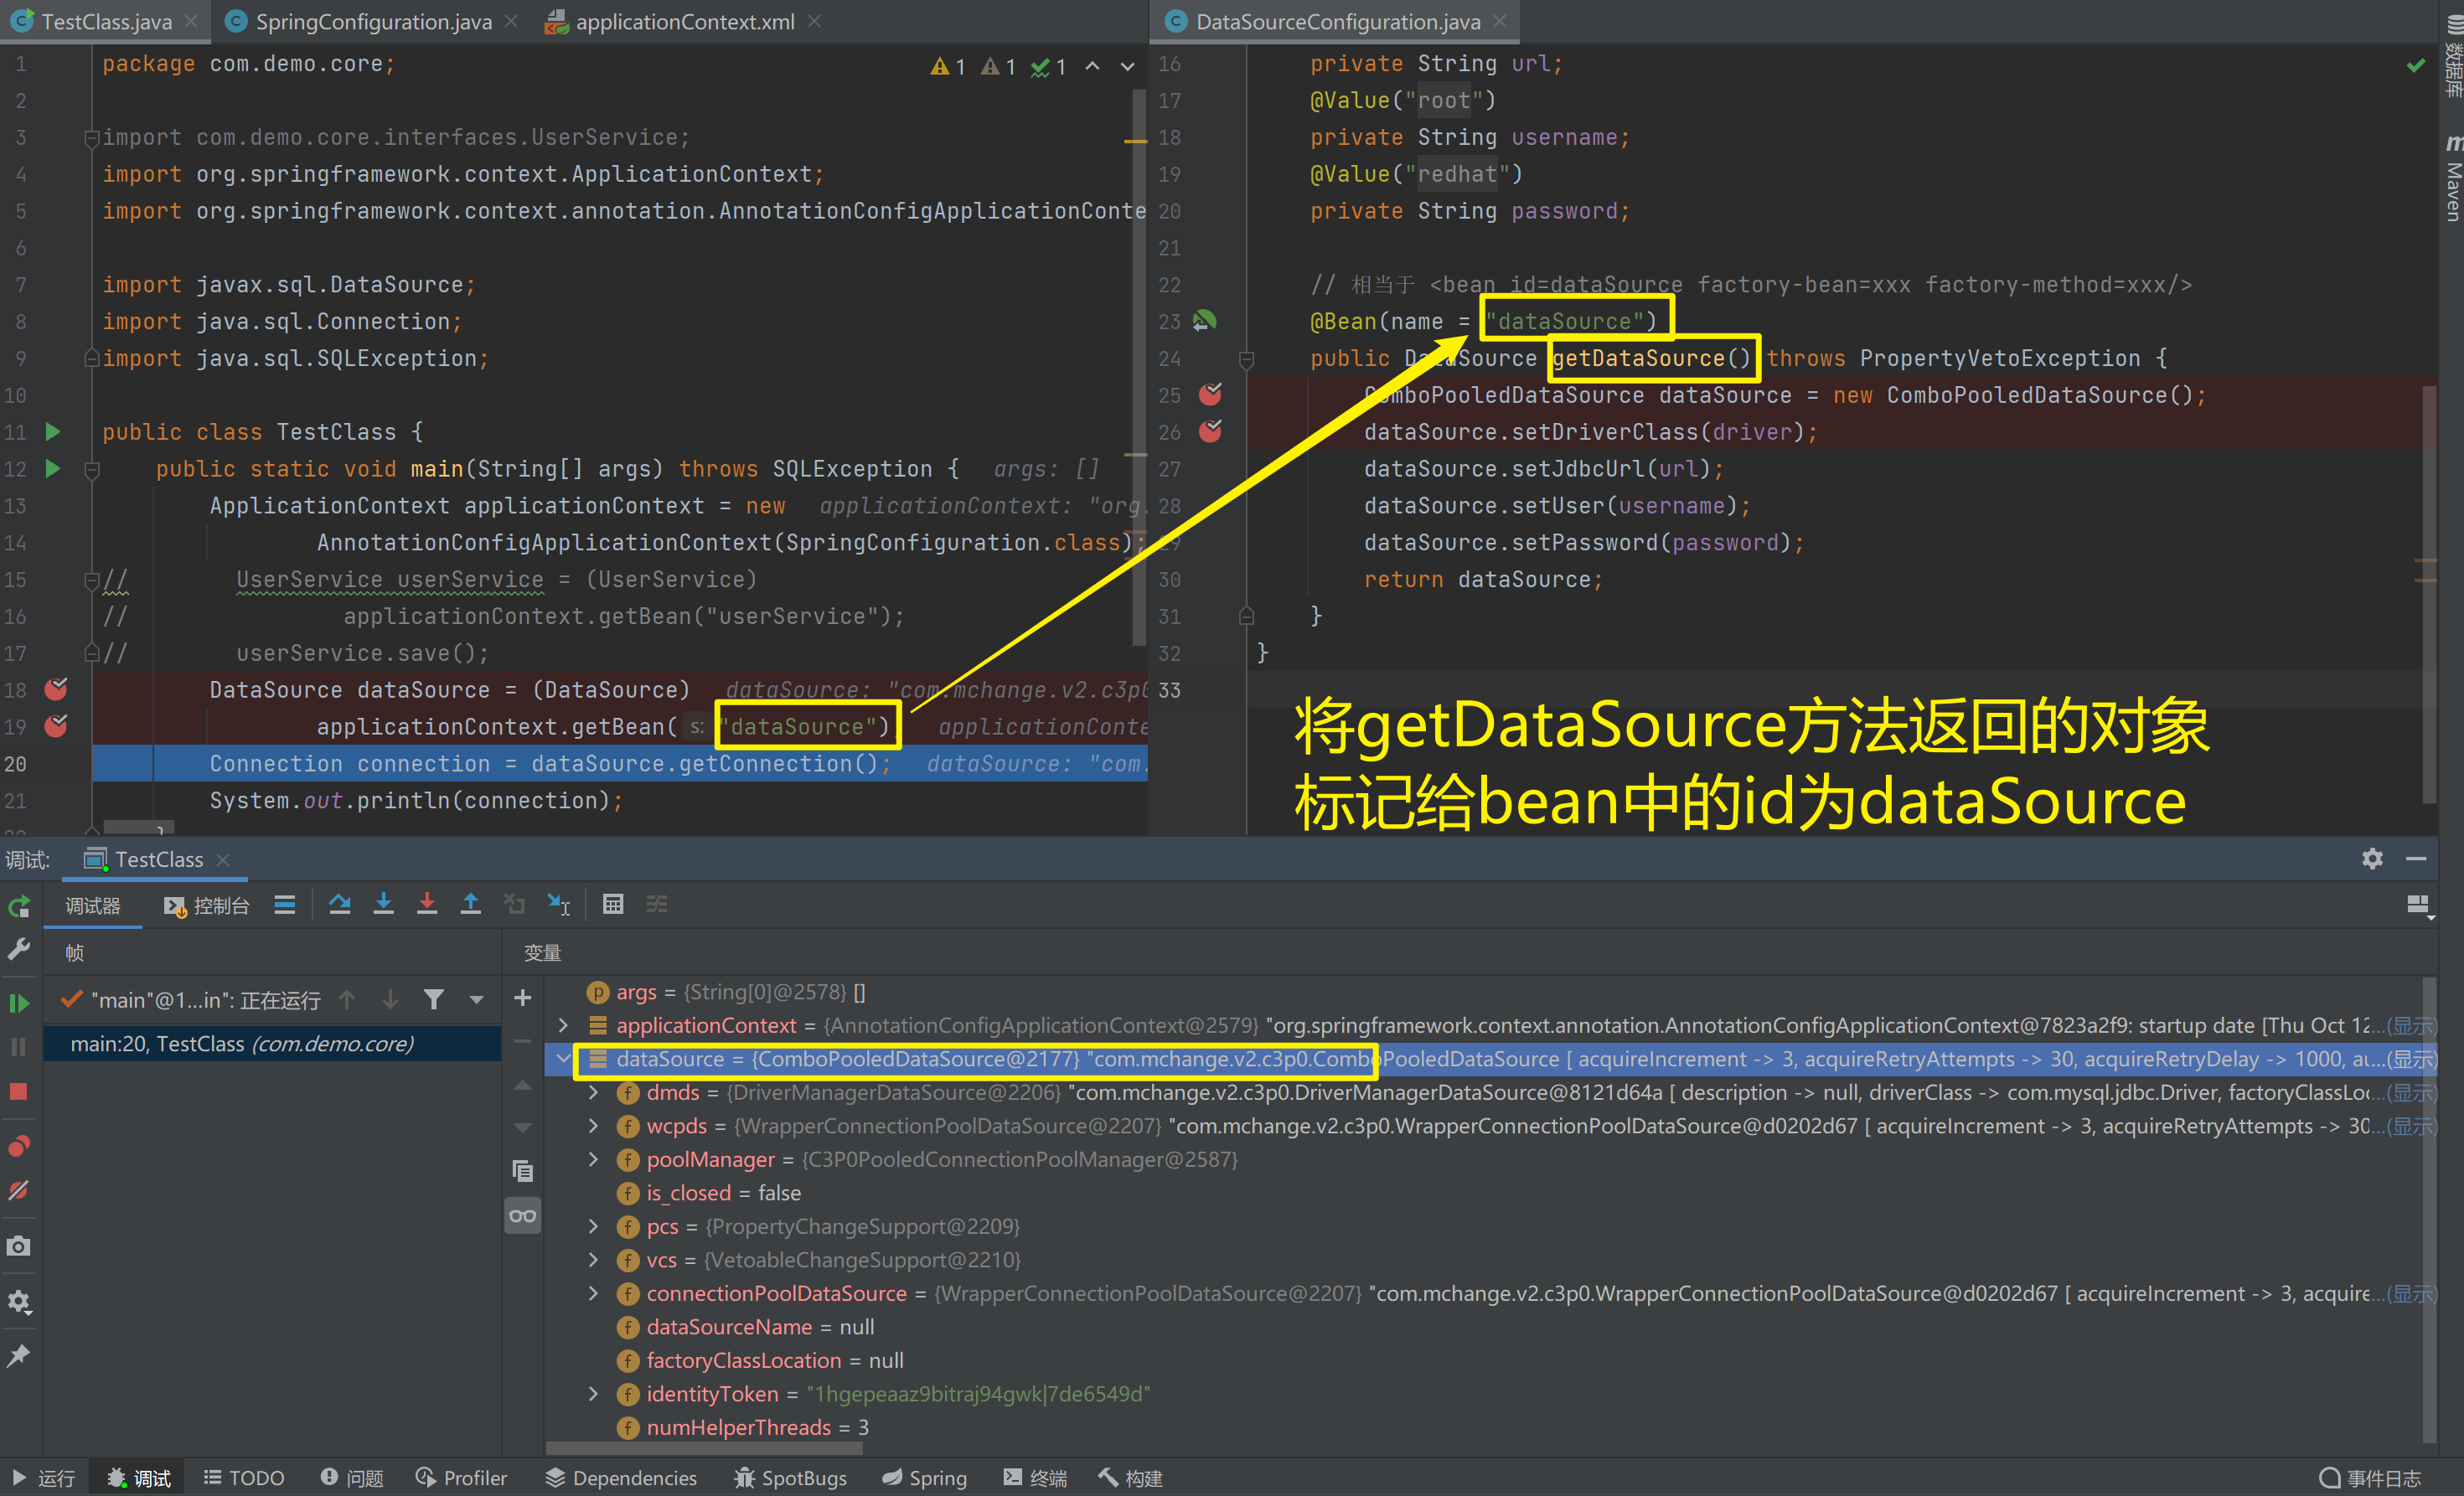
1.5.2.2.3. 测试加载核心配置类创建Spring容器
package com.demo.core;

import org.springframework.context.ApplicationContext;
import org.springframework.context.annotation.AnnotationConfigApplicationContext;

import javax.sql.DataSource;
import java.sql.Connection;
import java.sql.SQLException;

public class TestClass {
    public static void main(String[] args) throws SQLException {
        ApplicationContext applicationContext = new
                AnnotationConfigApplicationContext(SpringConfiguration.class);
//        UserService userService = (UserService)
//                applicationContext.getBean("userService");
//        userService.save();
        DataSource dataSource = (DataSource)
                applicationContext.getBean("dataSource");
        Connection connection = dataSource.getConnection();
        System.out.println(connection);
    }
}
1.5.3. Spring整合Junit
1.5.3.1. 原始Junit测试Spring的问题
在测试类中,每个测试方法都有以下两行代码:
ApplicationContext ac = new ClassPathXmlApplicationContext("bean.xml");
IAccountService as = ac.getBean("accountService",IAccountService.class);
这两行代码的作用是获取容器,如果不写的话,直接会提示空指针异常。所以又不能轻易删掉。
1.5.3.2. 上述问题解决思路
让SpringJunit负责创建Spring容器,但是需要将配置文件的名称告诉它
将需要进行测试Bean直接在测试类中进行注入
1.5.3.3. Spring集成Junit步骤
① 导入spring集成Junit的坐标
② 使用@Runwith注解替换原来的运行期
③ 使用@ContextConfiguration指定配置文件或配置类
④ 使用@Autowired注入需要测试的对象
⑤ 创建测试方法进行测试
1.5.3.4. Spring集成Junit代码实现
① 导入spring集成Junit的坐标
<!--此处需要注意的是,spring5 及以上版本要求 junit 的版本必须是 4.12 及以上-->
<dependency>
	<groupId>org.springframework</groupId>
	<artifactId>spring-test</artifactId>
	<version>5.0.2.RELEASE</version>
</dependency>
<dependency>
	<groupId>junit</groupId>
	<artifactId>junit</artifactId>
	<version>4.12</version>
	<scope>test</scope>
</dependency>
<?xml version="1.0" encoding="UTF-8"?>
<project xmlns="http://maven.apache.org/POM/4.0.0"
xmlns:xsi="http://www.w3.org/2001/XMLSchema-instance"
xsi:schemaLocation="http://maven.apache.org/POM/4.0.0 http://maven.apache.org/xsd/maven-4.0.0.xsd">
<modelVersion>4.0.0</modelVersion>
<groupId>org.example</groupId>
<artifactId>MyBatis_001</artifactId>
<version>1.0-SNAPSHOT</version>
<properties>
<maven.compiler.source>8</maven.compiler.source>
<maven.compiler.target>8</maven.compiler.target>
<project.build.sourceEncoding>UTF-8</project.build.sourceEncoding>
</properties>
<!--dependencies 依赖包的意思-->
<dependencies>
<!--mybatis坐标-->
<dependency>
<groupId>org.mybatis</groupId>
<artifactId>mybatis</artifactId>
<version>3.5.4</version>
</dependency>
<!--mysql驱动坐标-->
<!-- <dependency>-->
<!-- <groupId>mysql</groupId>-->
<!-- <artifactId>mysql-connector-java</artifactId>-->
<!-- <version>5.1.6</version>-->
<!-- <scope>runtime</scope>-->
<!-- </dependency>-->
<!--单元测试坐标-->
<dependency>
<groupId>junit</groupId>
<artifactId>junit</artifactId>
<version>4.12</version>
<scope>
test
</scope>
</dependency>
<!--日志坐标-->
<dependency>
<groupId>log4j</groupId>
<artifactId>log4j</artifactId>
<version>1.2.12</version>
</dependency>
<dependency>
<groupId>org.junit.jupiter</groupId>
<artifactId>junit-jupiter</artifactId>
<version>5.10.0</version>
<scope>compile</scope>
</dependency>
<!-- 分页助手 -->
<dependency>
<groupId>com.github.pagehelper</groupId>
<artifactId>pagehelper</artifactId>
<version>3.7.5</version>
</dependency>
<dependency>
<groupId>com.github.jsqlparser</groupId>
<artifactId>jsqlparser</artifactId>
<version>0.9.1</version>
</dependency>
<dependency>
<groupId>org.springframework</groupId>
<artifactId>spring-context</artifactId>
<version>5.0.5.RELEASE</version>
</dependency>
<!-- C3P0连接池 -->
<dependency>
<groupId>c3p0</groupId>
<artifactId>c3p0</artifactId>
<version>0.9.1.2</version>
</dependency><!-- Druid连接池 -->
<dependency>
<groupId>com.alibaba</groupId>
<artifactId>druid</artifactId>
<version>1.1.10</version>
</dependency>
<!-- mysql驱动 -->
<dependency>
<groupId>mysql</groupId>
<artifactId>mysql-connector-java</artifactId>
<version>5.1.39</version>
</dependency>
<!--此处需要注意的是,spring5 及以上版本要求 junit 的版本必须是 4.12 及以上-->
<dependency>
<groupId>org.springframework</groupId>
<artifactId>spring-test</artifactId>
<version>5.0.2.RELEASE</version>
</dependency>
<dependency>
<groupId>junit</groupId>
<artifactId>junit</artifactId>
<version>4.12</version>
<scope>test</scope>
</dependency>
</dependencies>
</project>② 使用@Runwith注解替换原来的运行期
@RunWith(SpringJUnit4ClassRunner.class)
public class SpringJunitTest {

}
③ 使用@ContextConfiguration指定配置文件或配置类
@RunWith(SpringJUnit4ClassRunner.class)
//加载spring核心配置文件
@ContextConfiguration(value = {"classpath:applicationContext.xml"})
//加载spring核心配置类
// @ContextConfiguration(classes = {SpringConfiguration.class})
public class SpringJunitTest {

}
④ 使用@Autowired注入需要测试的对象
package com.demo.core;

import com.demo.core.interfaces.UserService;
import org.junit.runner.RunWith;
import org.springframework.beans.factory.annotation.Autowired;
import org.springframework.beans.factory.annotation.Qualifier;
import org.springframework.test.context.ContextConfiguration;
import org.springframework.test.context.junit4.SpringJUnit4ClassRunner;

@RunWith(SpringJUnit4ClassRunner.class)
//加载spring核心配置文件
@ContextConfiguration(value = {"classpath:applicationContext.xml"})
//加载spring核心配置类
// @ContextConfiguration(classes = {SpringConfiguration.class})
public class SpringJunitTest {

    @Autowired
    @Qualifier("UserServiceImpl")
    UserService userService;
}
⑤ 创建测试方法进行测试
package com.demo.core;

import com.demo.core.interfaces.UserService;
import org.junit.Test;
import org.junit.runner.RunWith;
import org.springframework.beans.factory.annotation.Autowired;
import org.springframework.beans.factory.annotation.Qualifier;
import org.springframework.test.context.ContextConfiguration;
import org.springframework.test.context.junit4.SpringJUnit4ClassRunner;

@RunWith(SpringJUnit4ClassRunner.class)
//加载spring核心配置文件
@ContextConfiguration(value = {"classpath:applicationContext.xml"})
//加载spring核心配置类
// @ContextConfiguration(classes = {SpringConfiguration.class})
public class SpringJunitTest {

    @Autowired
    @Qualifier("UserServiceImpl")
    UserService userService;

    @Test
    public void testUserService() {
        userService.save();
    }
}
1.5.3.5. 知识要点
1.5.3.5.1. Spring集成Junit步骤
① 导入spring集成Junit的坐标
② 使用@Runwith注解替换原来的运行期
③ 使用@ContextConfiguration指定配置文件或配置类
④ 使用@Autowired注入需要测试的对象
⑤ 创建测试方法进行测试
1.6. 面向切面编程AOP
1.6.1. Spring 的 AOP 简介
1.6.1.1. 什么是 AOP
实现前置方法以及后置方法
AOP 为 Aspect Oriented Programming 的缩写,意思为面向切面编程,是通过预编译方式和运行期动态代理实现程序功能的统一维护的一种技术。
AOP 是 OOP 的延续,是软件开发中的一个热点,也是Spring框架中的一个重要内容,是函数式编程的一种衍生范型。利用AOP可以对业务逻辑的各个部分进行隔离,从而使得业务逻辑各部分之间的耦合度降低,提高程序的可重用性,同时提高了开发的效率。
1.6.1.2. AOP 的作用及其优势
作用:在程序运行期间,在不修改源码的情况下对方法进行功能增强
优势:减少重复代码,提高开发效率,并且便于维护
1.6.1.3. AOP 的底层实现
实际上,AOP 的底层是通过 Spring 提供的的动态代理技术实现的。在运行期间,Spring通过动态代理技术动态的生成代理对象,代理对象方法执行时进行增强功能的介入,在去调用目标对象的方法,从而完成功能的增强。
1.6.1.4. AOP 的动态代理技术
常用的动态代理技术
JDK代理 : 基于接口的动态代理技术
cglib 代理:基于父类的动态代理技术
1.6.1.5. JDK 的动态代理
① 目标类接口
package com.demo.core.interfaces;

public interface TargetInterface {
    public void method();
}
② 目标类
package com.demo.core;

import com.demo.core.interfaces.TargetInterface;

public class Target implements TargetInterface {

    @Override
    public void method() {
        System.out.println("taget class method called");
    }
}
③ 动态代理代码
package com.demo.core;

import com.demo.core.interfaces.TargetInterface;

import java.lang.reflect.InvocationHandler;
import java.lang.reflect.Method;
import java.lang.reflect.Proxy;

public class TestClass {

    public static void test() {
        System.out.println("in TestClass test functino called");
    }

    public static void main(String[] args) throws ClassNotFoundException {

        // 创建目标对象
        Target target = new Target();
        ClassLoader classLoader = target.getClass().getClassLoader();
        Class<?>[] interfaces = target.getClass().getInterfaces();
        // 创建代理对象
        TargetInterface proxy = (TargetInterface) Proxy.newProxyInstance(classLoader, interfaces, new InvocationHandler() {
            @Override
            public Object invoke(Object proxy, Method method, Object[] args) throws Throwable {
                System.out.println("前置增强代码...");
                Object invoke = method.invoke(target, args);
                System.out.println("后置增强代码...");
                return invoke;
            }
        });
        proxy.method();
    }
}
④ 调用代理对象的方法测试
// 测试,当调用接口的任何方法时,代理对象的代码都无序修改
proxy.method();
1.6.1.6. cglib 的动态代理
① 目标类接口和目标类
package com.demo.core.interfaces;

public interface TargetInterface {
    public void method();
}
package com.demo.core;
import com.demo.core.interfaces.TargetInterface;
public class Target implements TargetInterface {
@Override
public void method() {
System.out.println("taget class method called");
}
}② 动态代理代码
package com.demo.core;

import com.demo.core.interfaces.TargetInterface;
import org.springframework.cglib.proxy.Enhancer;
import org.springframework.cglib.proxy.MethodInterceptor;
import org.springframework.cglib.proxy.MethodProxy;

import java.lang.reflect.Method;

public class TestClass {

    public static void test() {
        System.out.println("in TestClass test functino called");
    }

    public static void main(String[] args) throws ClassNotFoundException {

        // 创建目标对象
        Target target = new Target();
        // 创建增强其
        Enhancer enhancer = new Enhancer();
        // 设置父类
        enhancer.setSuperclass(Target.class);
        // 设置回调
        enhancer.setCallback(new MethodInterceptor() {
            @Override
            public Object intercept(Object o, Method method, Object[] objects, MethodProxy methodProxy) throws Throwable {
                System.out.println("前置代码增强....");
                Object invoke = method.invoke(target, objects);
                System.out.println("后置代码增强....");
                return invoke;
            }
        });
        TargetInterface targetInterface = (TargetInterface) enhancer.create();
        targetInterface.method();
    }
}
③ 调用代理对象的方法测试
// 测试,当调用接口的任何方法时,代理对象的代码都无序修改
TargetInterface targetInterface = (TargetInterface) enhancer.create();
targetInterface.method();
1.6.1.7. AOP 相关概念
Spring 的 AOP 实现底层就是对上面的动态代理的代码进行了封装,封装后我们只需要对需要关注的部分进行代码编写,并通过配置的方式完成指定目标的方法增强。
在正式讲解 AOP 的操作之前,我们必须理解 AOP 的相关术语,常用的术语如下:
Target(目标对象):代理的目标对象
Proxy(代理):一个类被 AOP 织入增强后,就产生一个结果代理类
Joinpoint(连接点):所谓连接点是指那些被拦截到的点。在spring中,这些点指的是方法,因为spring只支持方法类型的连接点
Pointcut(切入点):所谓切入点是指我们要对哪些 Joinpoint 进行拦截的定义
Advice(通知/ 增强):所谓通知是指拦截到 Joinpoint 之后所要做的事情就是通知
Aspect(切面):是切入点和通知(引介)的结合
Weaving(织入):是指把增强应用到目标对象来创建新的代理对象的过程。spring采用动态代理织入,而AspectJ采用编译期织入和类装载期织入
1.6.1.8. AOP 开发明确的事项
- 需要编写的内容
编写核心业务代码(目标类的目标方法)
编写切面类,切面类中有通知(增强功能方法)
在配置文件中,配置织入关系,即将哪些通知与哪些连接点进行结合
AOP技术实现的内容
Spring 框架监控切入点方法的执行。一旦监控到切入点方法被运行,使用代理机制,动态创建目标对象的代理对象,根据通知类别,在代理对象的对应位置,将通知对应的功能织入,完成完整的代码逻辑运行。
AOP底层使用哪种代理方式
在 spring 中,框架会根据目标类是否实现了接口来决定采用哪种动态代理的方式。
1.6.1.9. 知识要点
aop:面向切面编程
aop底层实现:基于JDK的动态代理 和 基于Cglib的动态代理
aop的重点概念:
Pointcut(切入点):被增强的方法
Advice(通知/ 增强):封装增强业务逻辑的方法
Aspect(切面):切点+通知
Weaving(织入):将切点与通知结合的过程
开发明确事项:
谁是切点(切点表达式配置)
谁是通知(切面类中的增强方法)
将切点和通知进行织入配置
1.6.2. 基于 XML 的 AOP 开发
1.6.2.1. 快速入门
1.6.2.1.1. 前置通知
① 导入 AOP 相关坐标
<!--导入spring的context坐标,context依赖aop-->
<dependency>
    <groupId>org.springframework</groupId>
    <artifactId>spring-context</artifactId>
    <version>5.0.5.RELEASE</version>
</dependency>
<!-- aspectj的织入 -->
<dependency>
    <groupId>org.aspectj</groupId>
    <artifactId>aspectjweaver</artifactId>
    <version>1.8.13</version>
</dependency>
② 创建目标接口和目标类(内部有切点)
package com.demo.core.interfaces;

public interface TargetInterface {
    public void method();
    public void method2();
    public void method3(String test);
}
package com.demo.core;
import com.demo.core.interfaces.TargetInterface;
public class Target implements TargetInterface {
@Override
public void method() {
System.out.println("taget class method called");
}
@Override
public void method2() {
System.out.println("taget class method2 called");
}
@Override
public void method3(String test) {
System.out.println(test);
}
}③ 创建切面类(内部有增强方法)
package com.demo.core;

public class MyAspect {
    //前置增强方法
    public void before(){
        System.out.println("前置代码增强.....");
    }
}
④ 将目标类和切面类的对象创建权交给 spring
<!--配置目标类-->
<bean id="target" class="com.demo.core.Target"/>
<!--配置切面类-->
<bean id="myAspect" class="com.demo.core.MyAspect"/>
<?xml version="1.0" encoding="UTF-8" ?>
<beans xmlns="http://www.springframework.org/schema/beans"
xmlns:xsi="http://www.w3.org/2001/XMLSchema-instance"
xsi:schemaLocation="
http://www.springframework.org/schema/beans
http://www.springframework.org/schema/beans/spring-beans.xsd
http://www.springframework.org/schema/context
http://www.springframework.org/schema/context/spring-context.xsd"
xmlns:context="http://www.springframework.org/schema/context">
<context:property-placeholder location="classpath*:jdbc.properties"/>
<!--配置目标类-->
<bean id="target" class="com.demo.core.Target"/>
<!--配置切面类-->
<bean id="myAspect" class="com.demo.core.MyAspect"/>
</beans>⑤ 在 applicationContext.xml 中配置织入关系
导入aop命名空间
<?xml version="1.0" encoding="UTF-8" ?>
<beans xmlns="http://www.springframework.org/schema/beans"
       xmlns:xsi="http://www.w3.org/2001/XMLSchema-instance"
       xmlns:context="http://www.springframework.org/schema/context"
       xmlns:aop="http://www.springframework.org/schema/aop"
       xsi:schemaLocation="
        http://www.springframework.org/schema/context
        http://www.springframework.org/schema/context/spring-context.xsd
        http://www.springframework.org/schema/aop
        http://www.springframework.org/schema/aop/spring-aop.xsd
        http://www.springframework.org/schema/beans
        http://www.springframework.org/schema/beans/spring-beans.xsd">

    <context:property-placeholder location="classpath*:jdbc.properties"/>

    <!--配置目标类-->
    <bean id="target" class="com.demo.core.Target"/>
    <!--配置切面类-->
    <bean id="myAspect" class="com.demo.core.MyAspect"/>
</beans>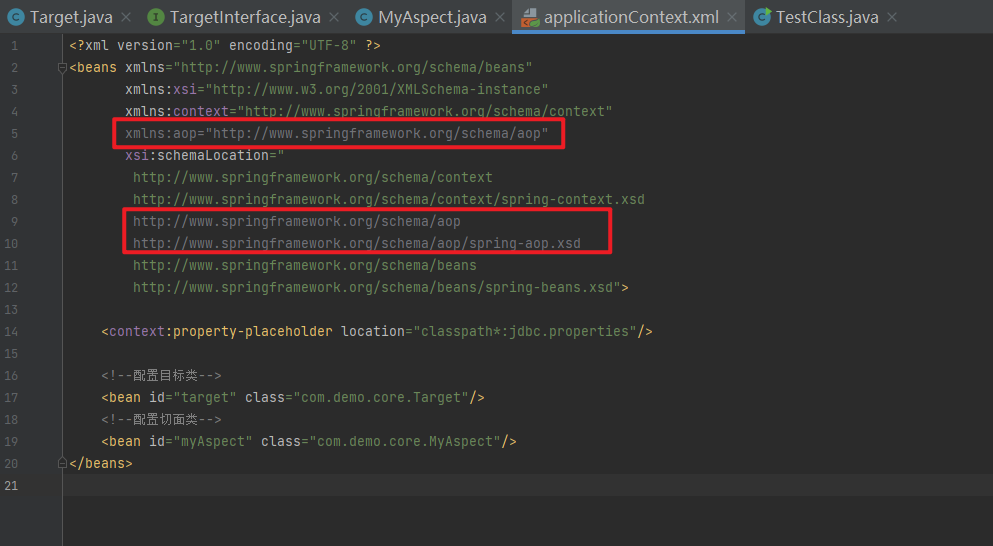
配置切点表达式和前置增强的织入关系
<?xml version="1.0" encoding="UTF-8" ?>
<beans xmlns="http://www.springframework.org/schema/beans"
       xmlns:xsi="http://www.w3.org/2001/XMLSchema-instance"
       xmlns:context="http://www.springframework.org/schema/context"
       xmlns:aop="http://www.springframework.org/schema/aop"
       xsi:schemaLocation="
        http://www.springframework.org/schema/context
        http://www.springframework.org/schema/context/spring-context.xsd
        http://www.springframework.org/schema/aop
        http://www.springframework.org/schema/aop/spring-aop.xsd
        http://www.springframework.org/schema/beans
        http://www.springframework.org/schema/beans/spring-beans.xsd">

    <context:property-placeholder location="classpath*:jdbc.properties"/>

    <!--配置目标类-->
    <bean id="target" class="com.demo.core.Target"/>
    <!--配置切面类-->
    <bean id="myAspect" class="com.demo.core.MyAspect"/>

    <aop:config>
        <!--引用myAspect的Bean为切面对象-->
        <aop:aspect ref="myAspect">
            <!--配置Target的method方法执行时要进行myAspect的before方法前置增强-->
<!--            <aop:before method="before" pointcut="execution(public void com.demo.core.Target.method())"/>-->
<!--            <aop:before method="before" pointcut="execution(public void com.demo.core.Target.*())"/>-->
<!--            <aop:before method="before" pointcut="execution(public void com.demo.core.Target.*(*))"/>-->
            <aop:before method="before" pointcut="execution(public void com.demo.core.Target.*(..))"/>
        </aop:aspect>
    </aop:config>
</beans>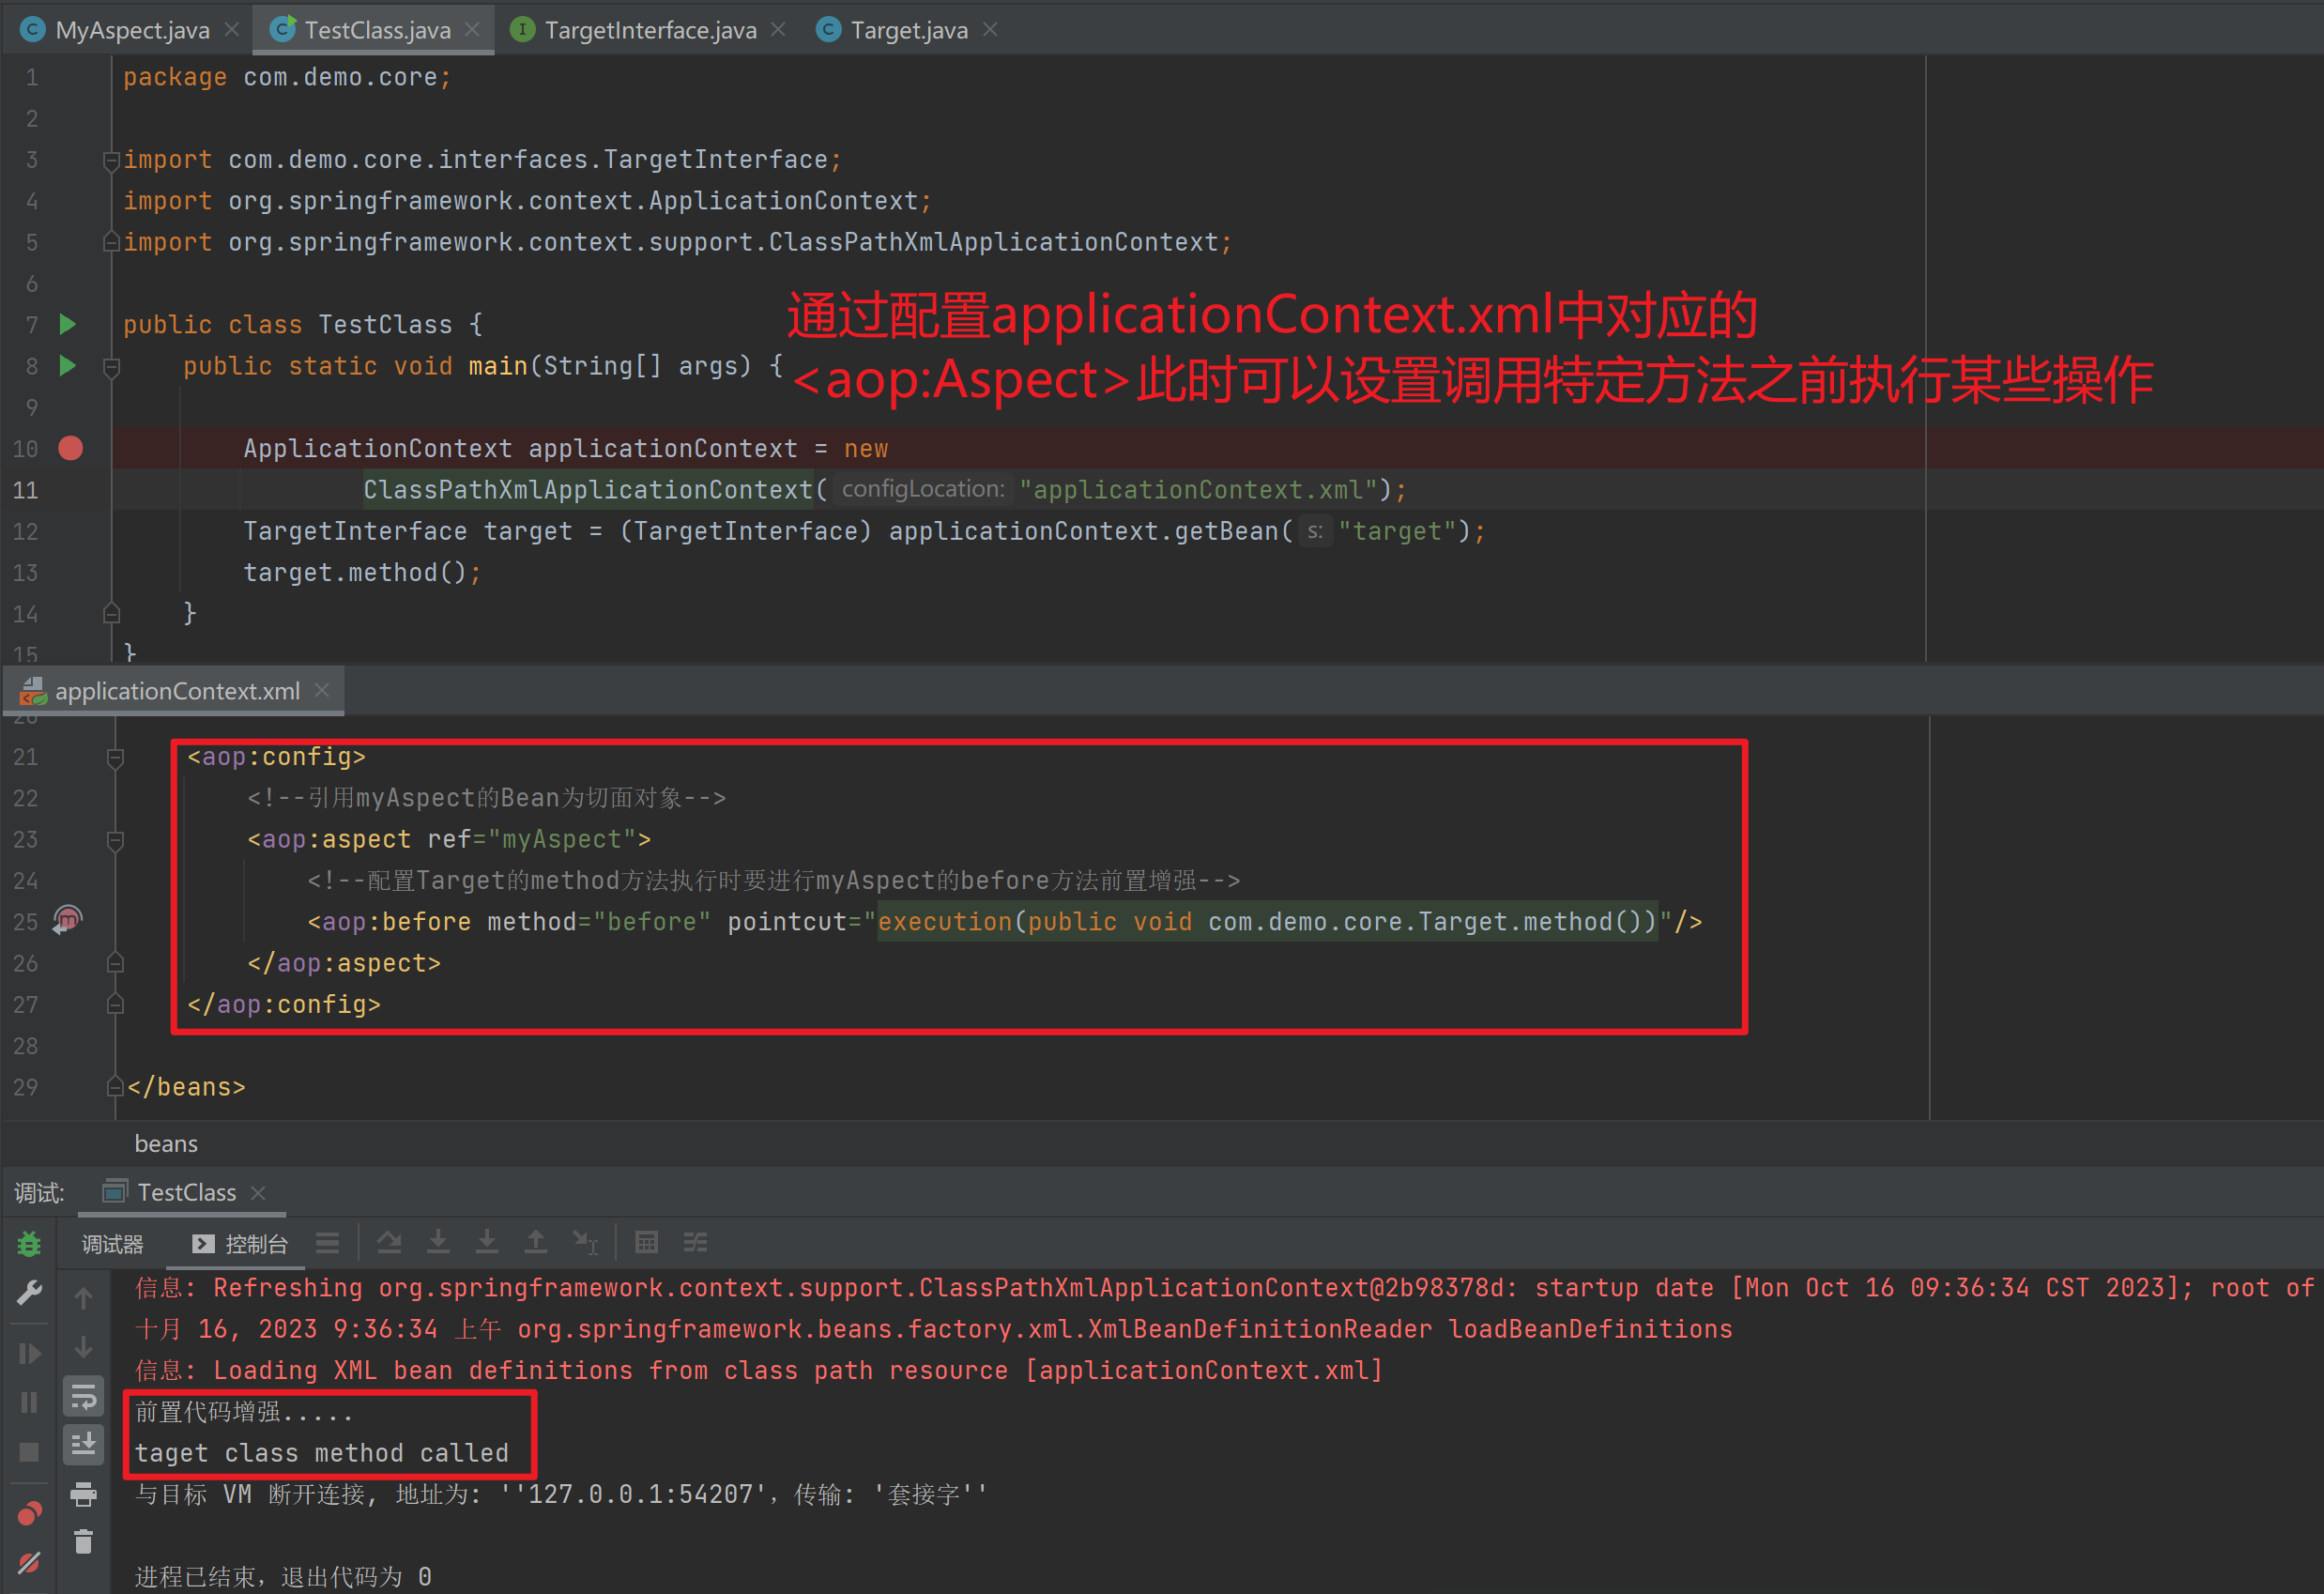
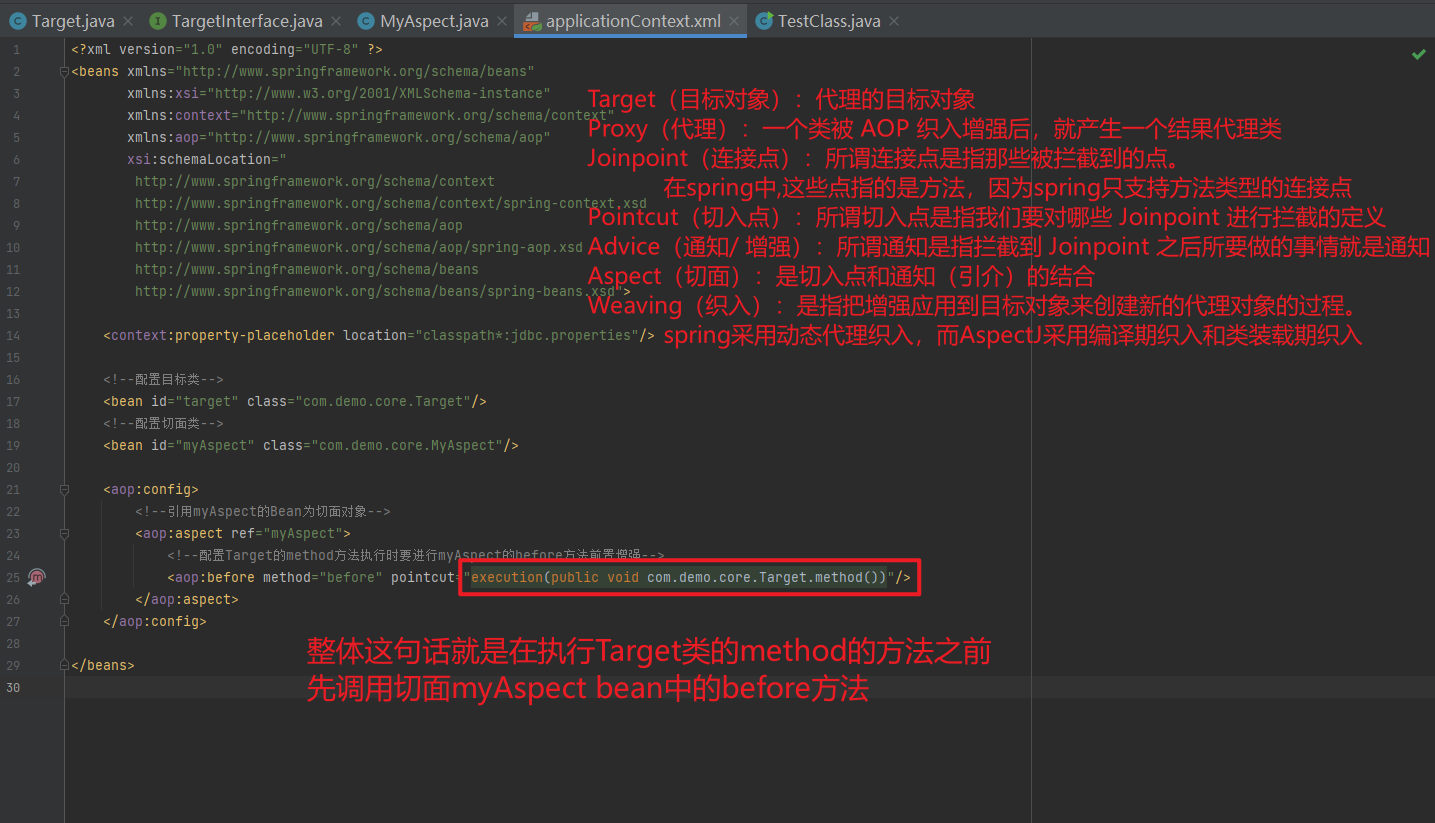
()代表必须是无参数
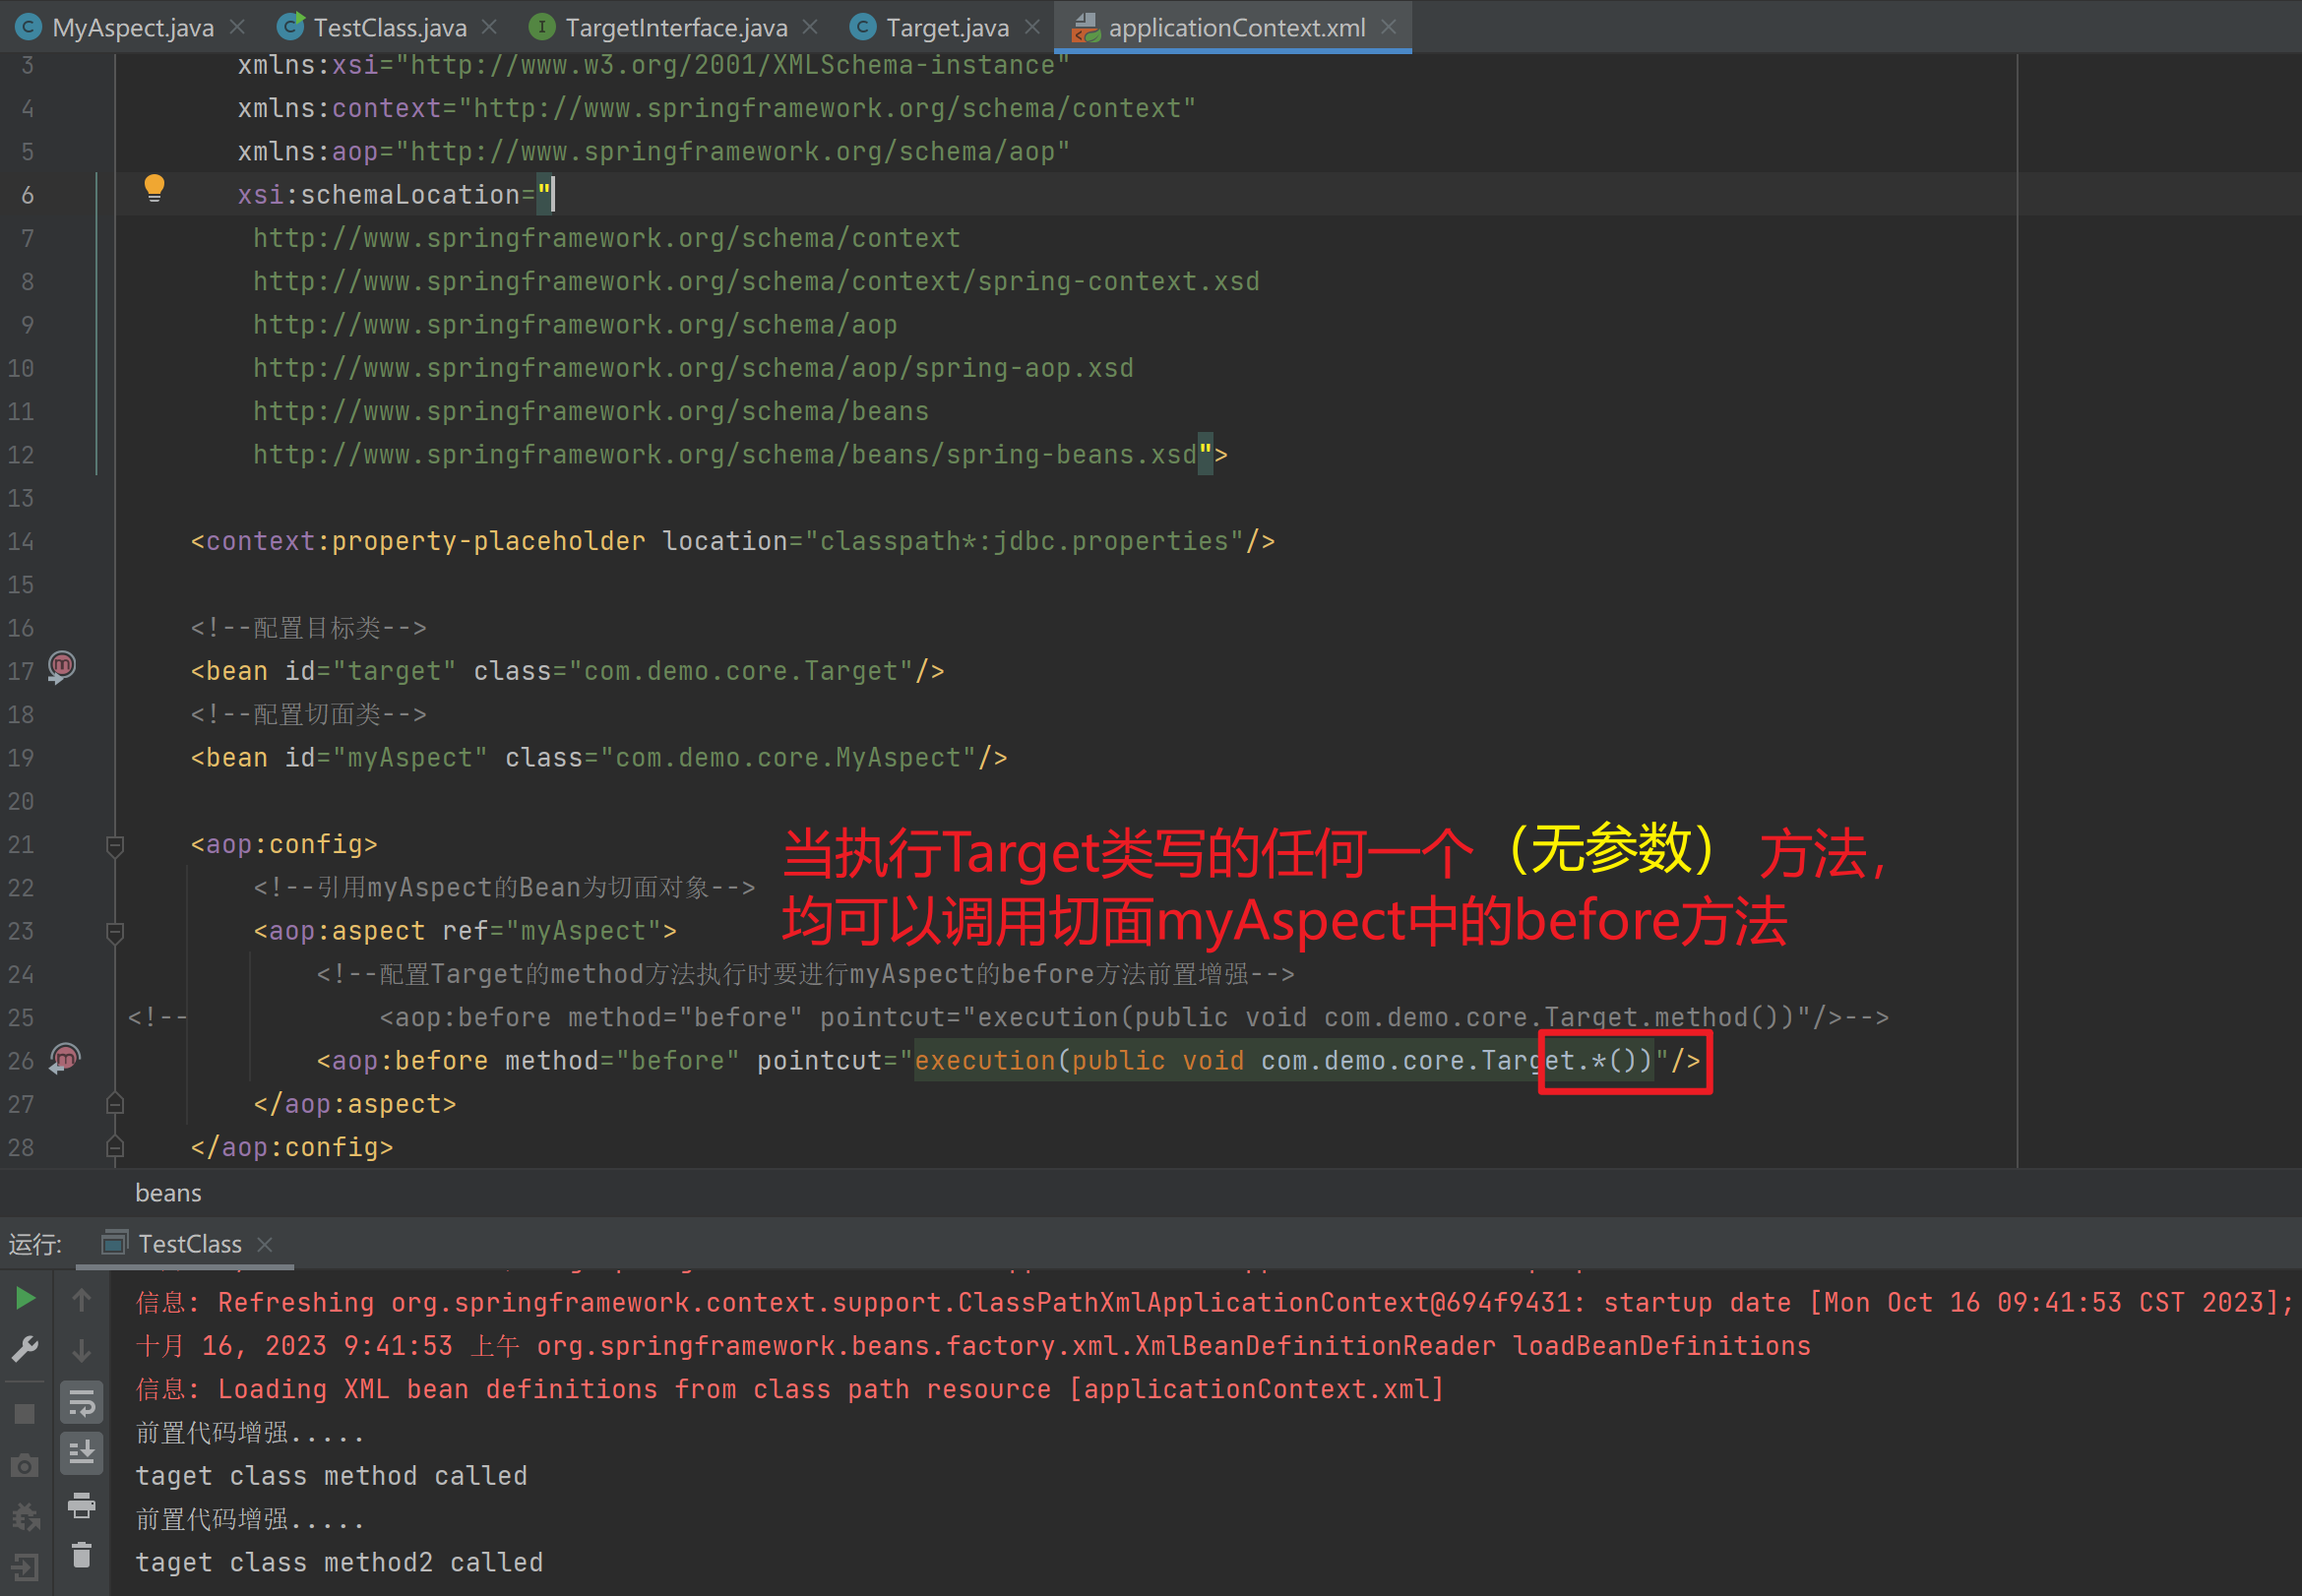
(*)代表必须是有参数
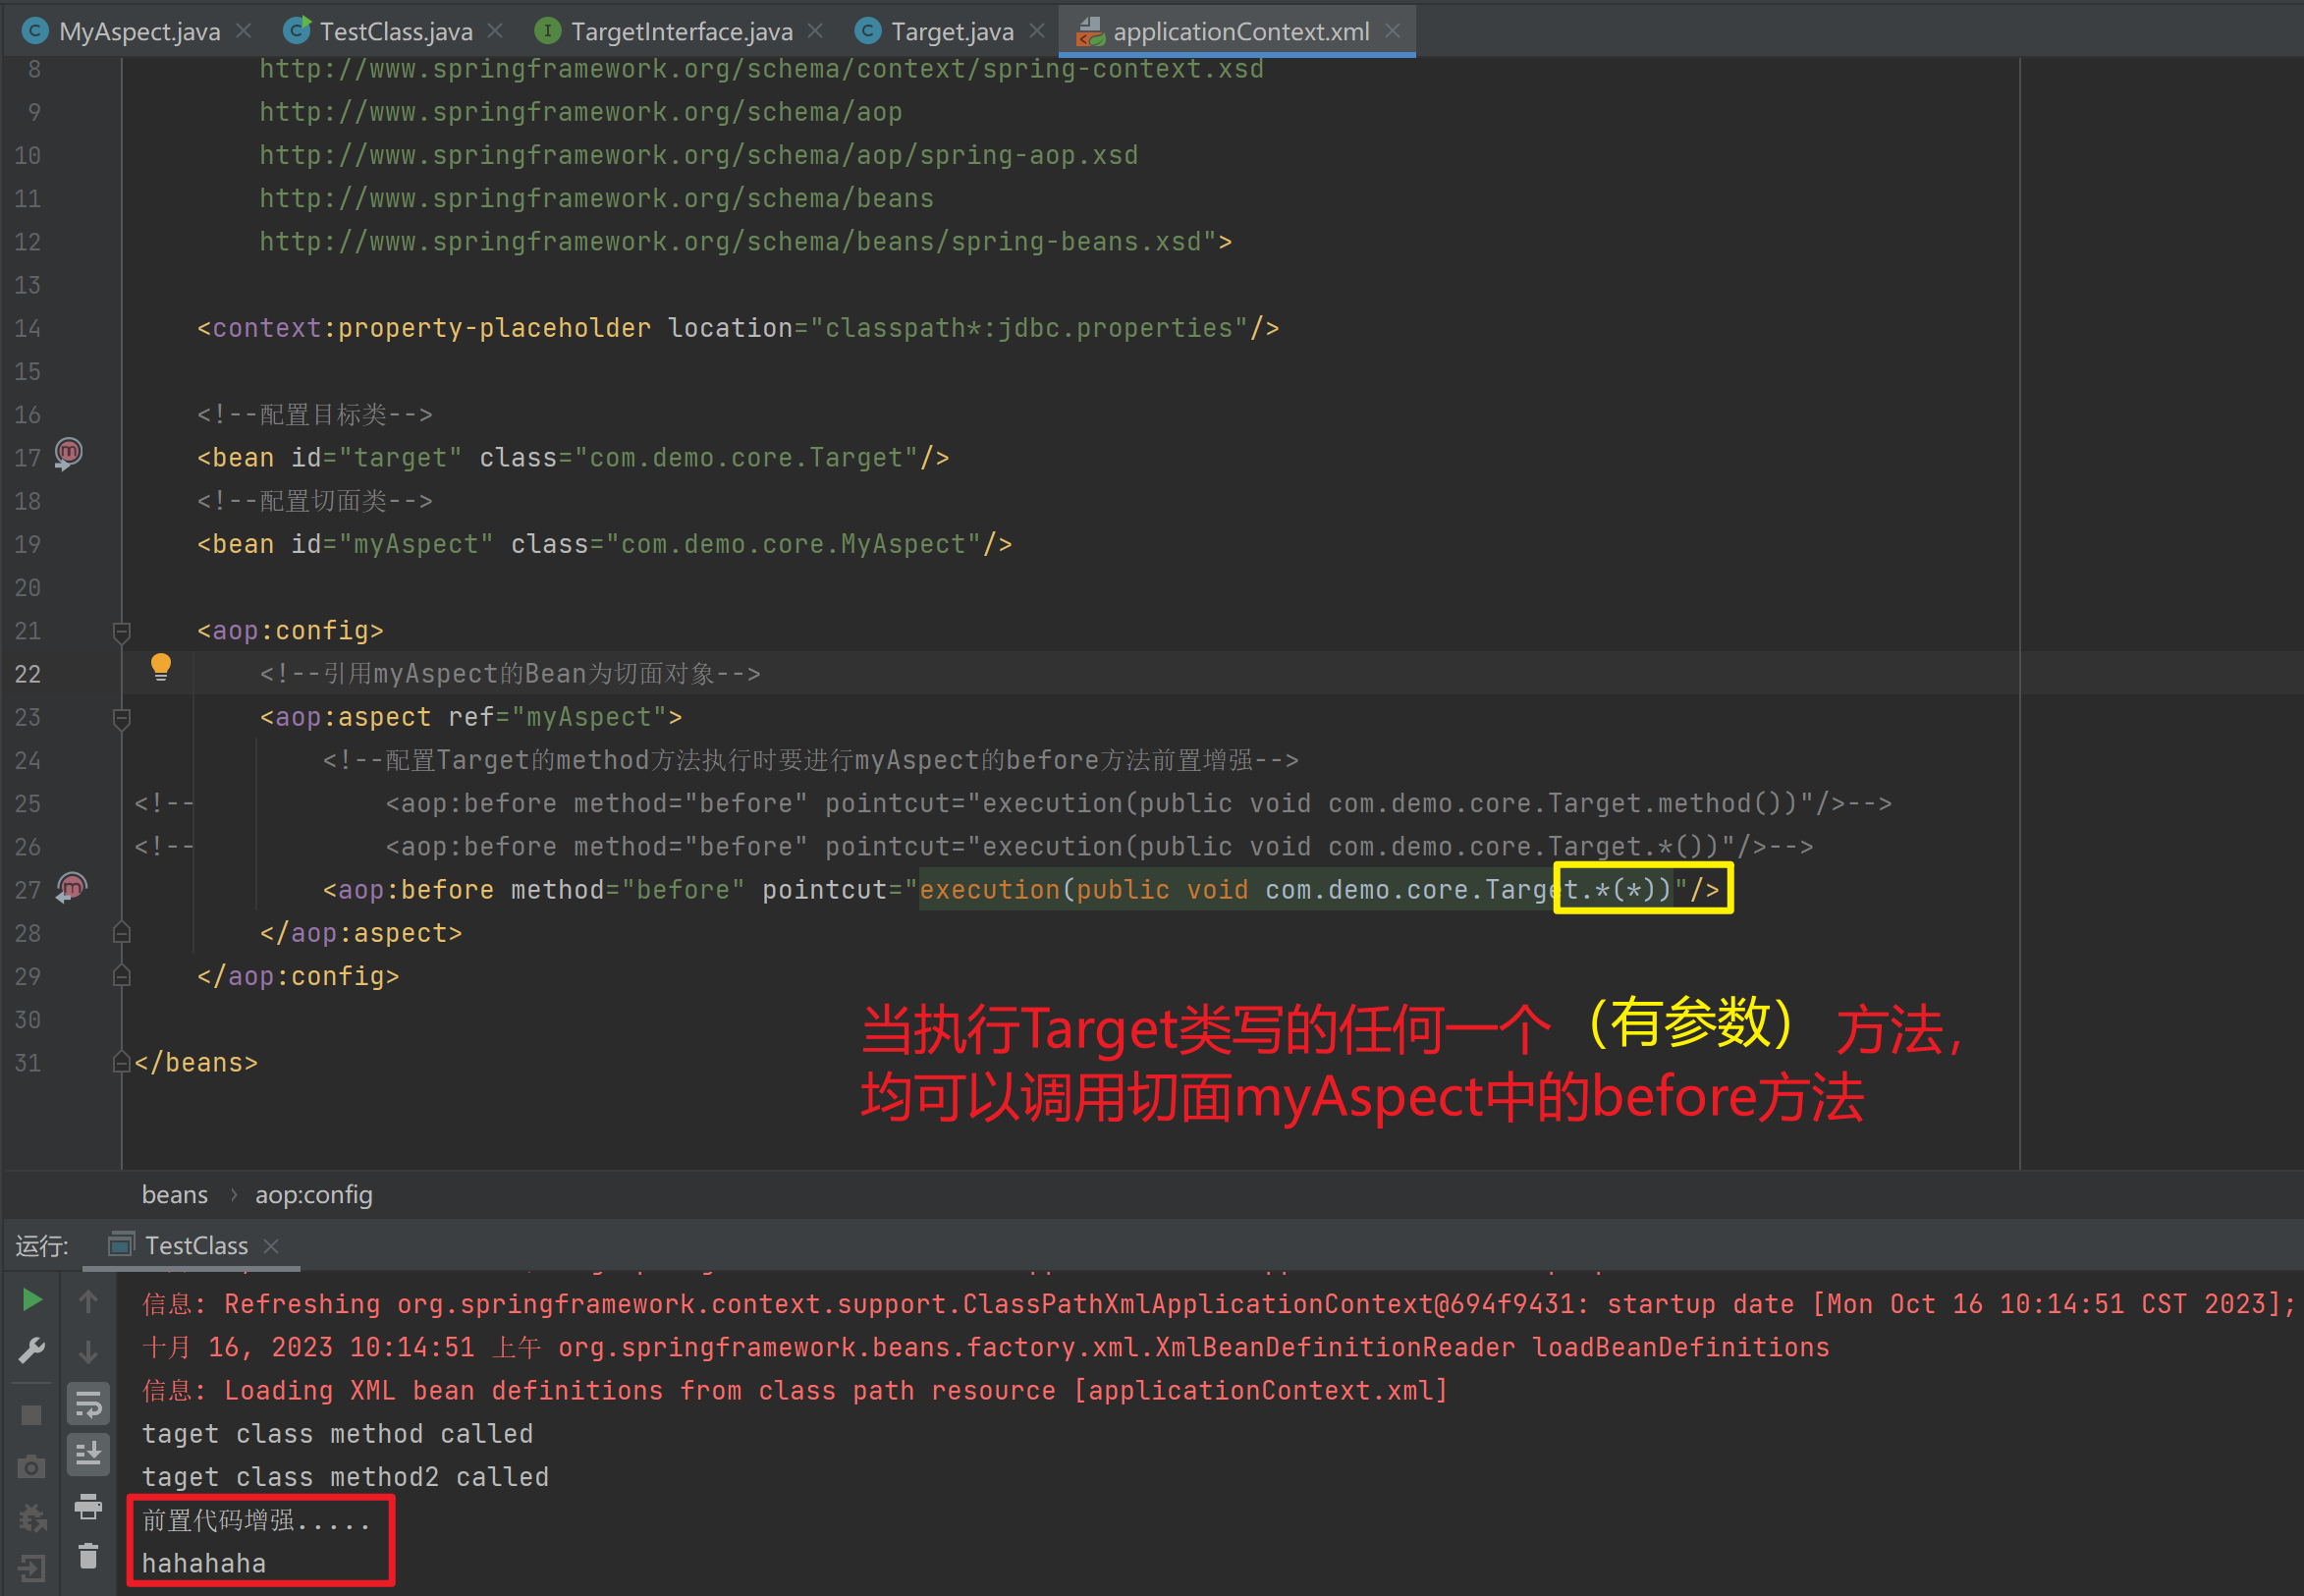
(..)代表可以是任意个数的参数
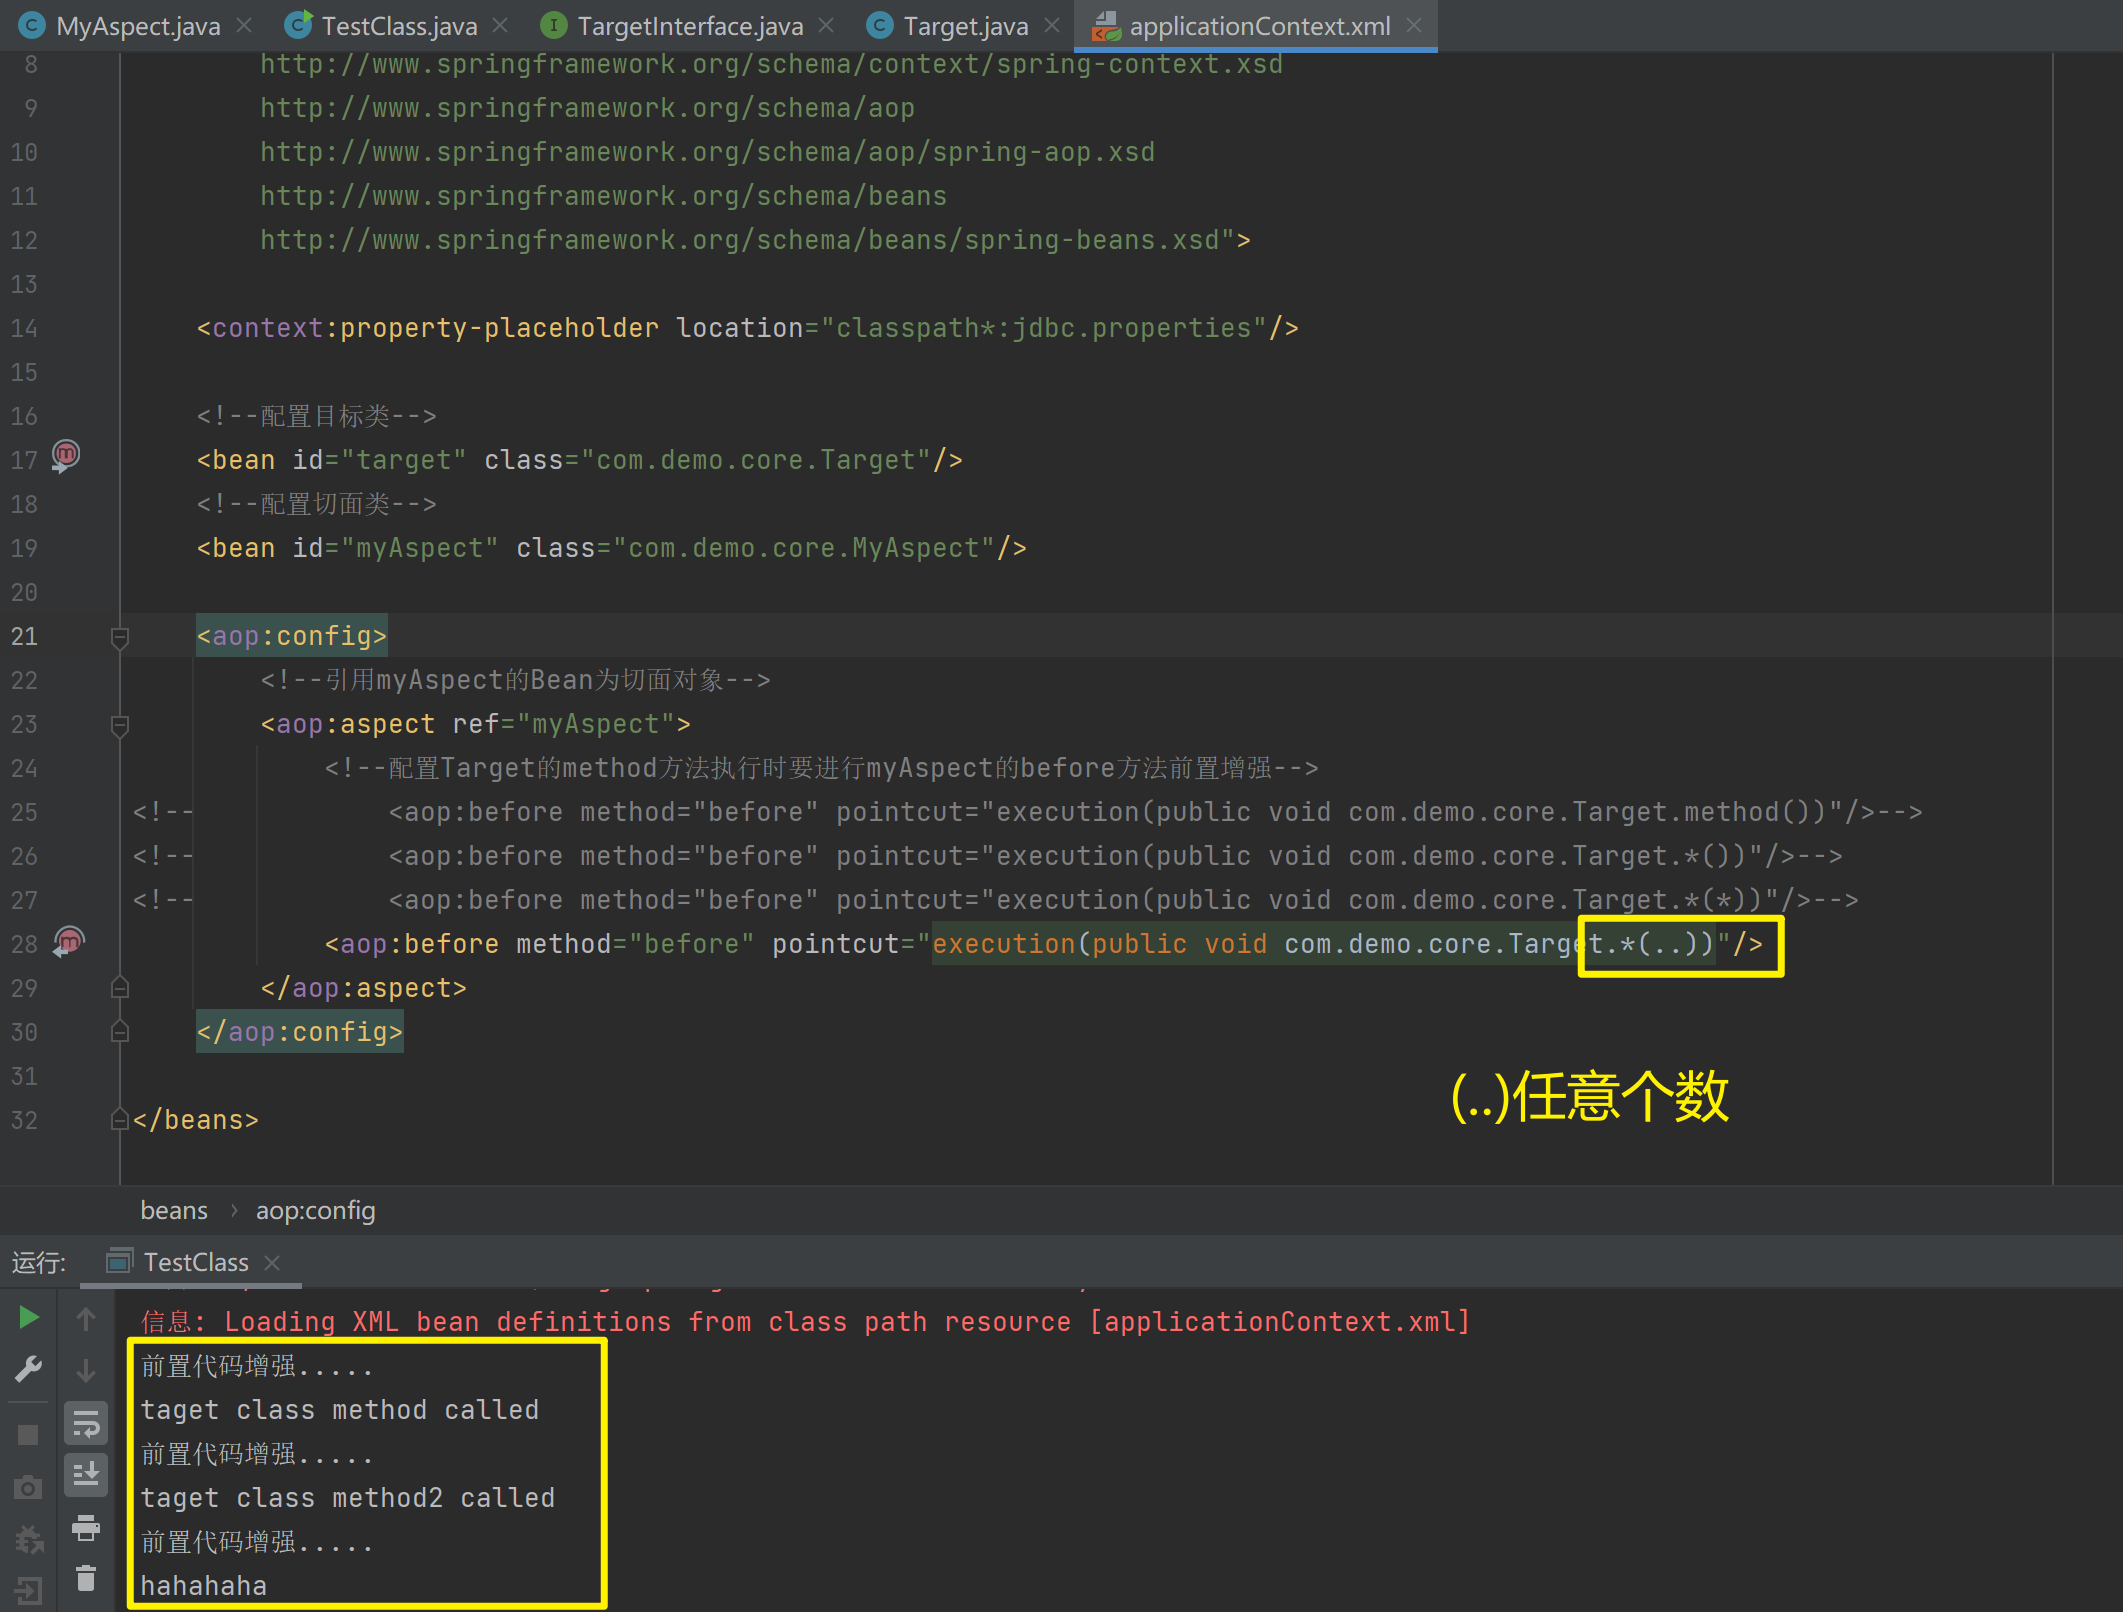
⑥ 测试代码
package com.demo.core;

import com.demo.core.interfaces.TargetInterface;
import org.springframework.context.ApplicationContext;
import org.springframework.context.support.ClassPathXmlApplicationContext;

public class TestClass {
    public static void main(String[] args) {

        ApplicationContext applicationContext = new
                ClassPathXmlApplicationContext("applicationContext.xml");
        TargetInterface target = (TargetInterface) applicationContext.getBean("target");
        target.method();
        target.method2();
        target.method3("hahahaha");
    }
}测试:execution(* com.demo.core.*.*(..))
package com.demo.core;

import org.springframework.context.ApplicationContext;
import org.springframework.context.support.ClassPathXmlApplicationContext;

public class TestClass {
    public static void main(String[] args) {

        ApplicationContext applicationContext = new
                ClassPathXmlApplicationContext("applicationContext.xml");
        User user = (User) applicationContext.getBean("user");
//        user.setPassword("pass");
//        user.setUsername("user");
//        user.setId(999);
        System.out.println(user.toString());
    }
}
<?xml version="1.0" encoding="UTF-8" ?>
<beans xmlns="http://www.springframework.org/schema/beans"
xmlns:xsi="http://www.w3.org/2001/XMLSchema-instance"
xmlns:context="http://www.springframework.org/schema/context"
xmlns:aop="http://www.springframework.org/schema/aop"
xsi:schemaLocation="
http://www.springframework.org/schema/context
http://www.springframework.org/schema/context/spring-context.xsd
http://www.springframework.org/schema/aop
http://www.springframework.org/schema/aop/spring-aop.xsd
http://www.springframework.org/schema/beans
http://www.springframework.org/schema/beans/spring-beans.xsd">
<context:property-placeholder location="classpath*:jdbc.properties"/>
<context:component-scan base-package="com"/>
<!--配置目标类-->
<bean id="target" class="com.demo.core.Target"/>
<!-- <bean id="user" class="com.demo.core.User"/>-->
<!--配置切面类-->
<bean id="myAspect" class="com.demo.core.MyAspect"/>
<aop:config>
<!--引用myAspect的Bean为切面对象-->
<aop:aspect ref="myAspect">
<!--配置Target的method方法执行时要进行myAspect的before方法前置增强-->
<aop:before method="before" pointcut="execution(* com.demo.core.*.*(..))"/>
</aop:aspect>
</aop:config>
</beans>package com.demo.core;
import org.springframework.context.annotation.Configuration;
import org.springframework.stereotype.Controller;
import java.util.Date;
import java.util.List;
// @Configuration
@Controller("user")
public class User {
private int id;
public User(int id, String username, String password) {
this.id = id;
this.username = username;
this.password = password;
}
public User(int id, String username, String password, Date birthday) {
this.id = id;
this.username = username;
this.password = password;
this.birthday = birthday;
}
private String username;
private String password;
private Date birthday;
//代表当前用户具备哪些订单
private List<Order> orderList;
//代表当前用户具备哪些角色
private List<Role> roleList;
@Override
public String toString() {
return "User{" +
"id=" + id +
", username='" + username + '\'' +
", password='" + password + '\'' +
", birthday=" + birthday +
", orderList=" + orderList +
", roleList=" + roleList +
'}';
}
public int getId() {
return id;
}
public void setId(int id) {
this.id = id;
}
public String getUsername() {
return username;
}
public void setUsername(String username) {
this.username = username;
}
public String getPassword() {
return password;
}
public void setPassword(String password) {
this.password = password;
}
public Date getBirthday() {
return birthday;
}
public void setBirthday(Date birthday) {
this.birthday = birthday;
}
public List<Order> getOrderList() {
return orderList;
}
public void setOrderList(List<Order> orderList) {
this.orderList = orderList;
}
public List<Role> getRoleList() {
return roleList;
}
public void setRoleList(List<Role> roleList) {
this.roleList = roleList;
}
public User() {
}
public User(int id, String username, String password, Date birthday, List<Order> orderList, List<Role> roleList) {
this.id = id;
this.username = username;
this.password = password;
this.birthday = birthday;
this.orderList = orderList;
this.roleList = roleList;
}
}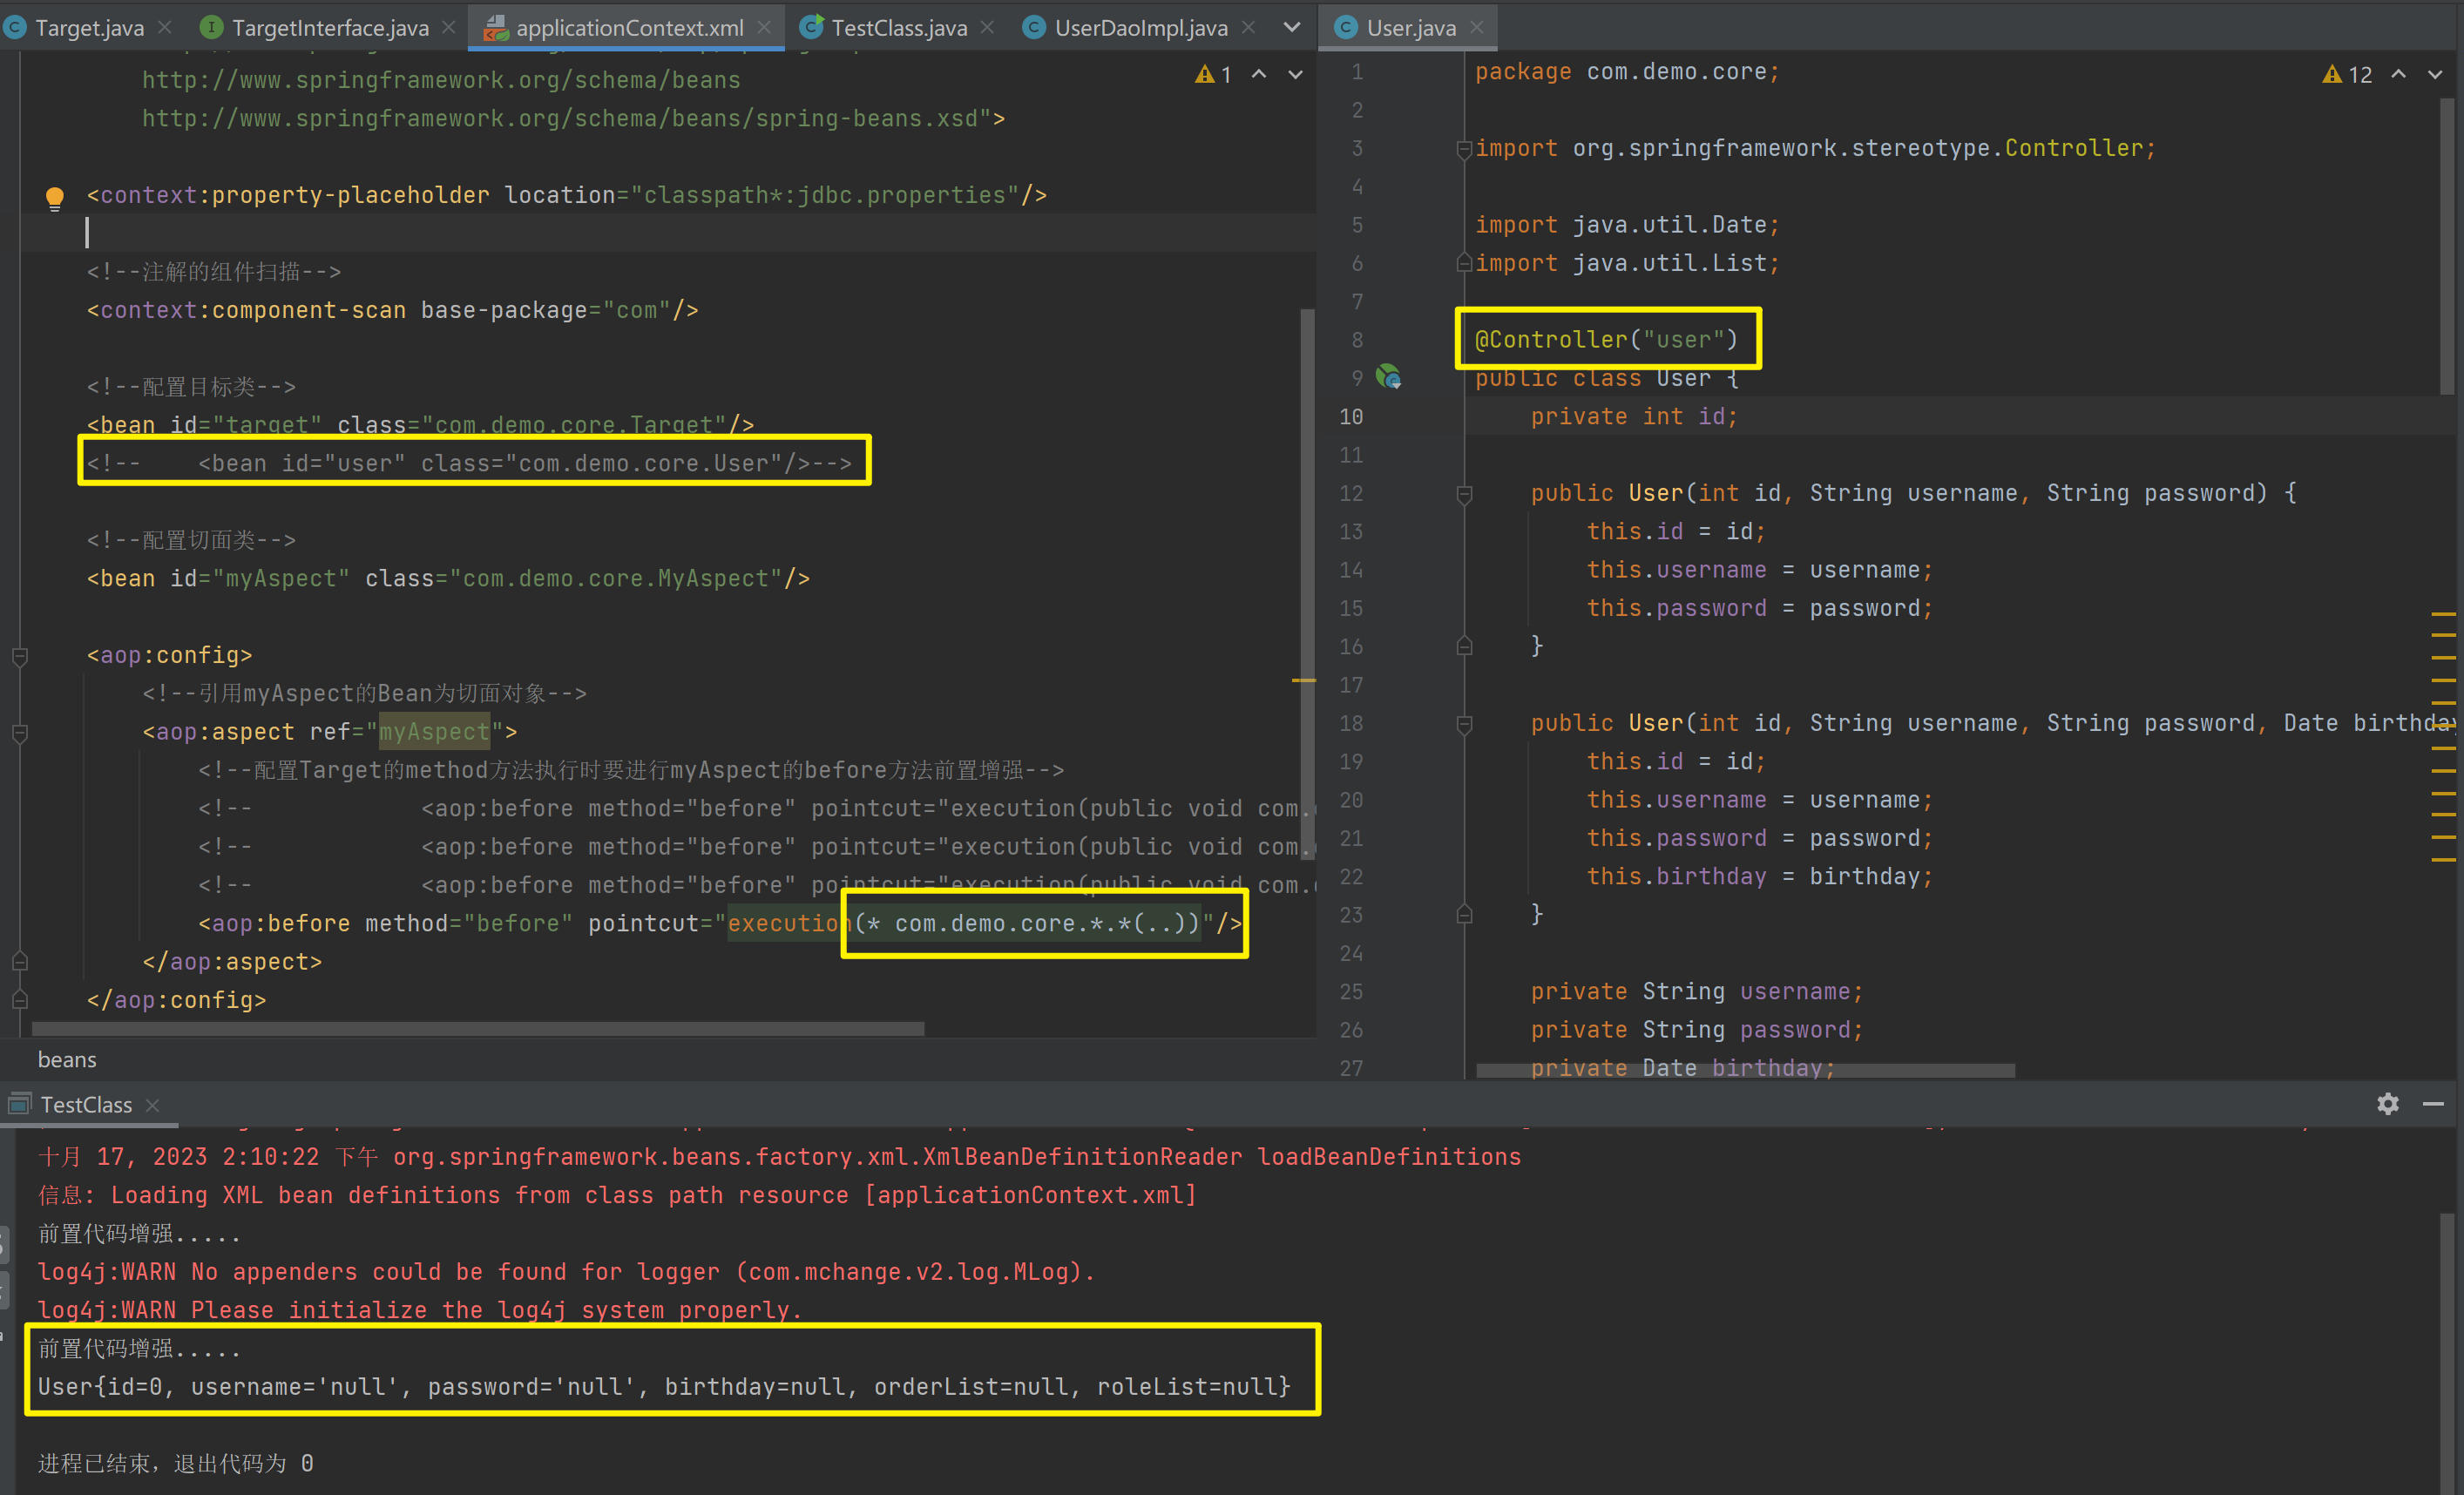
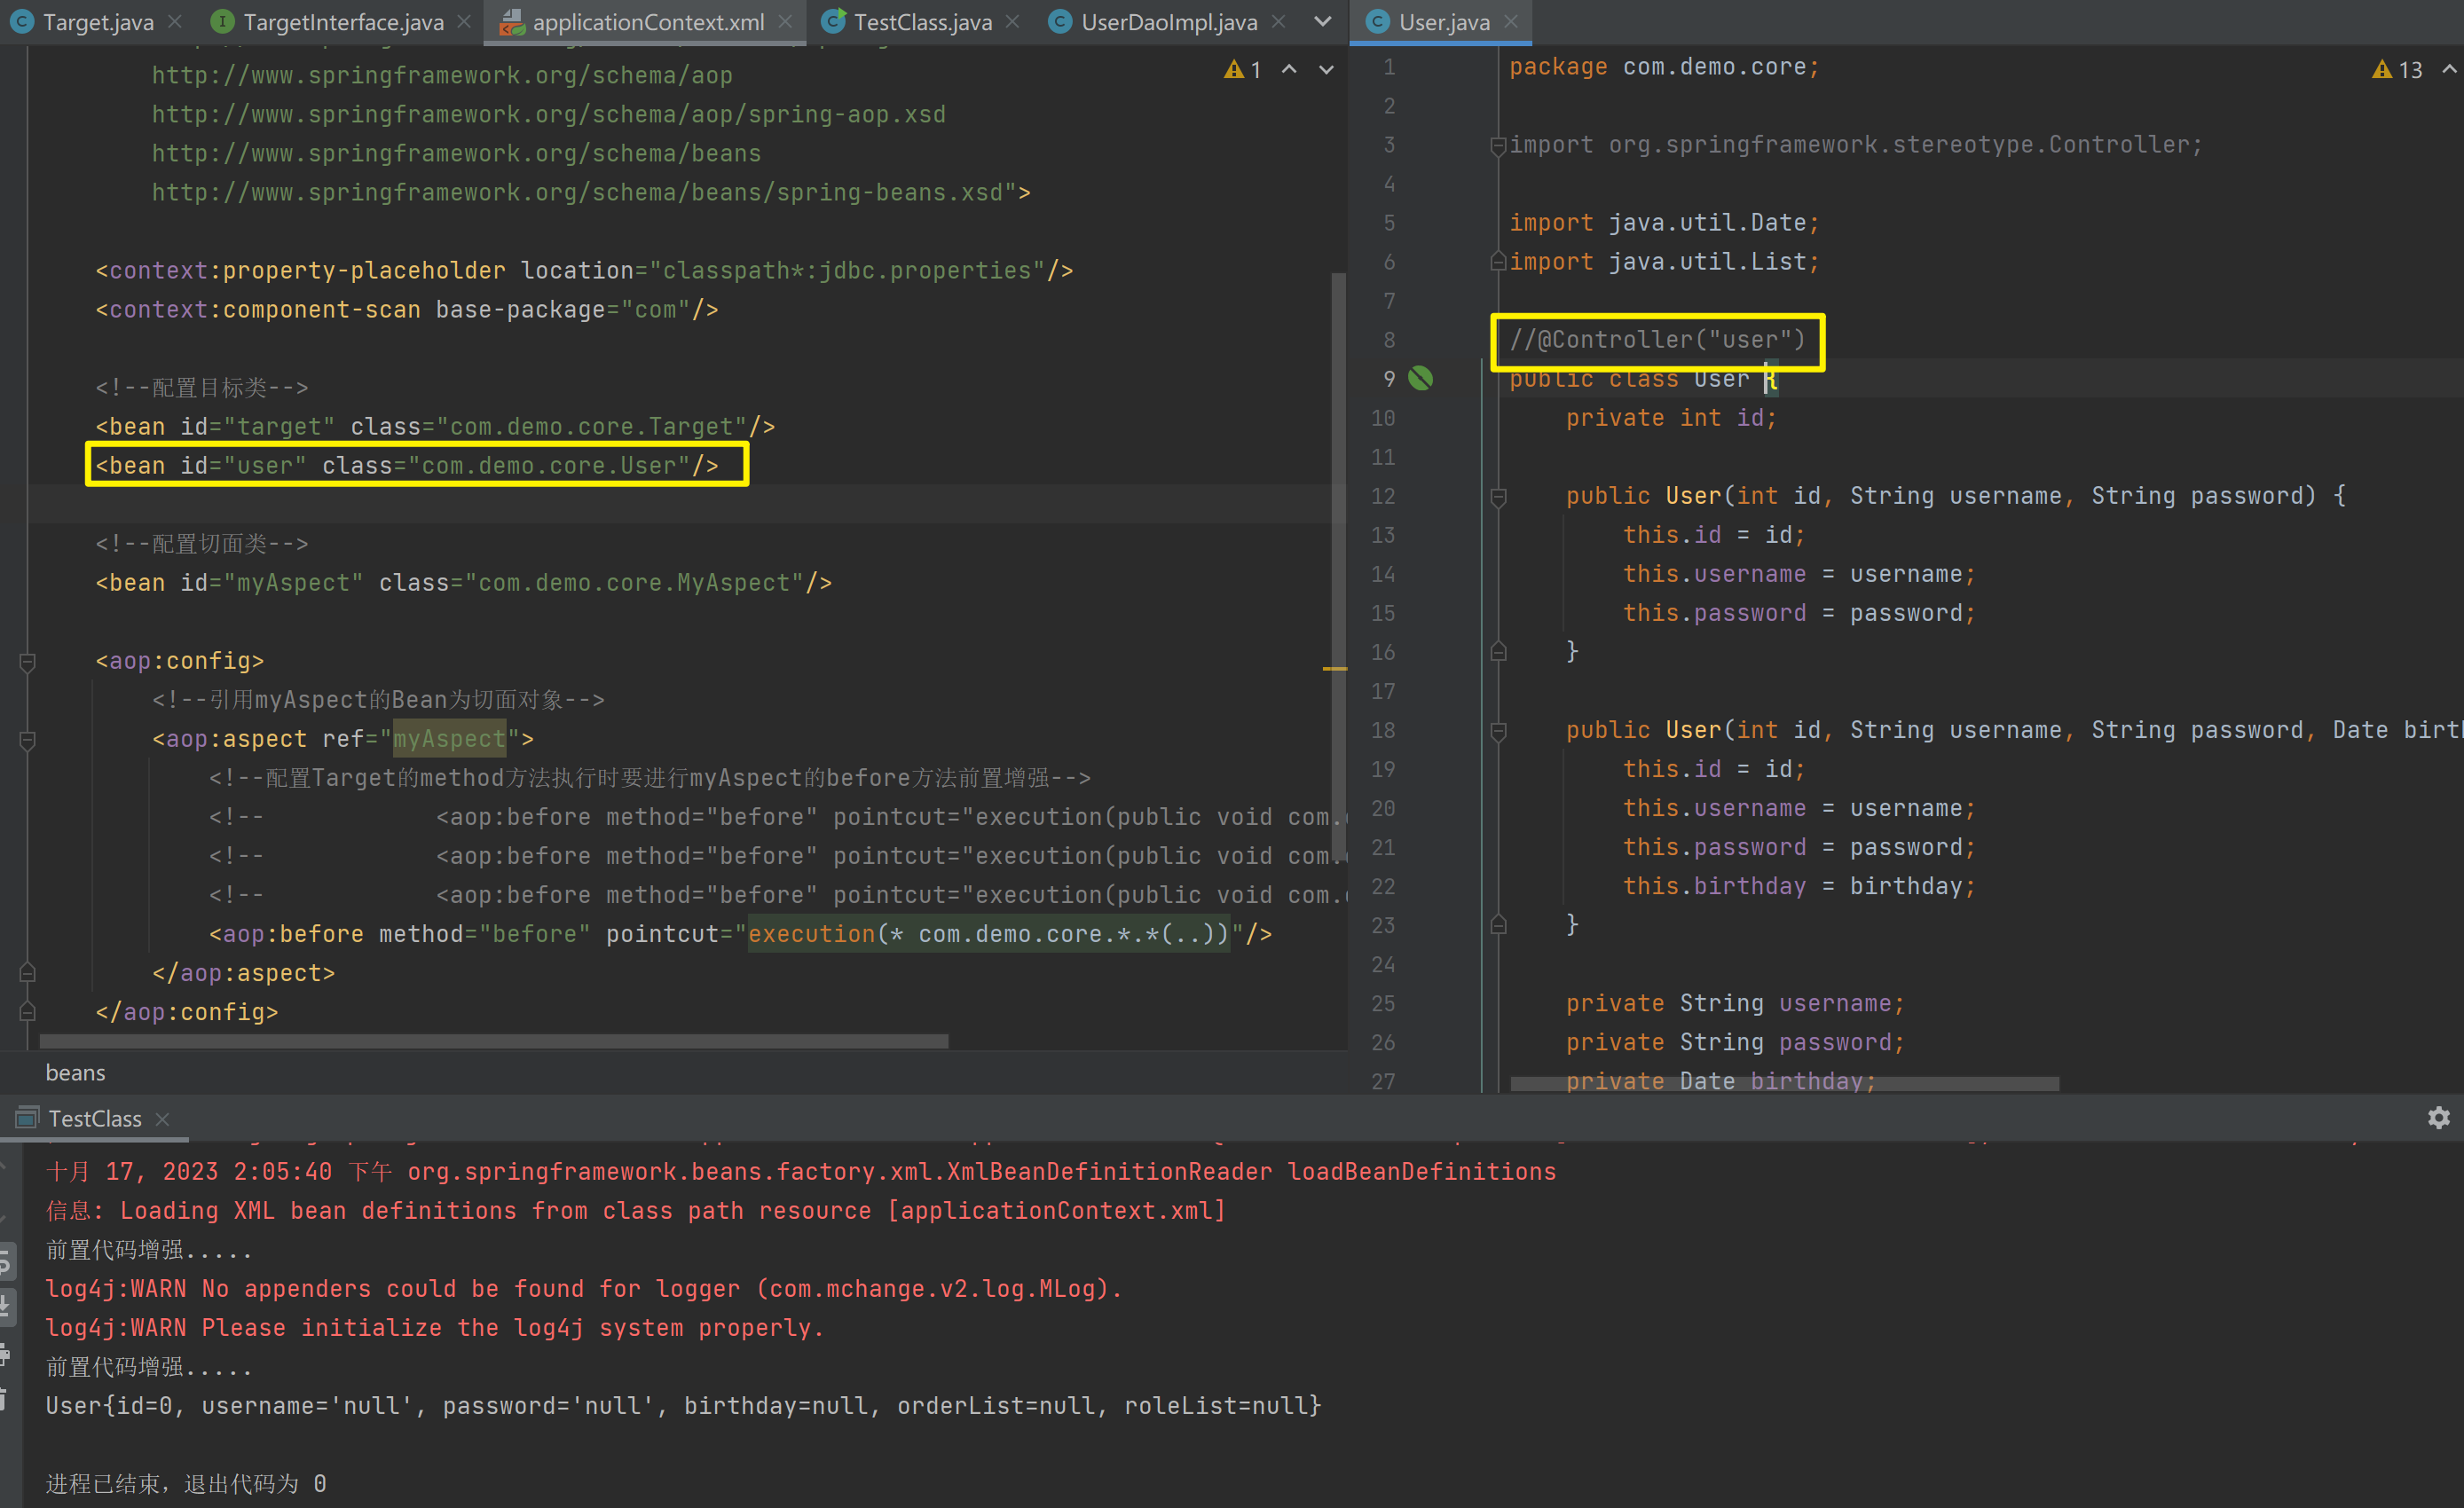
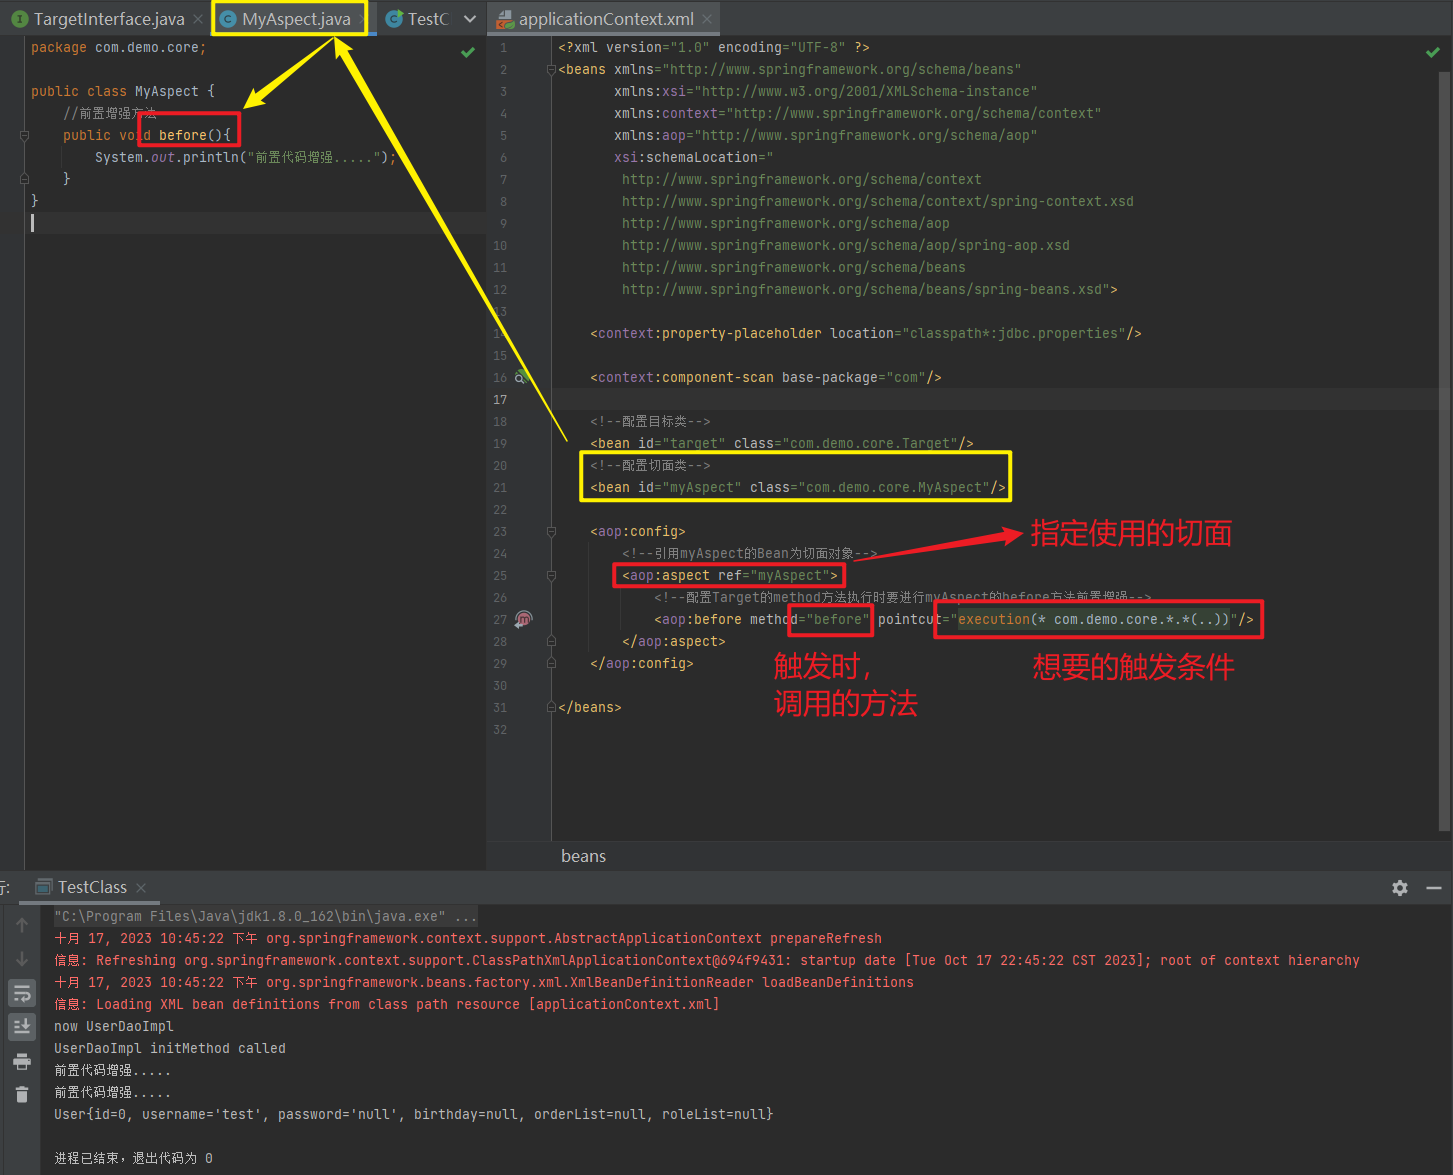
1.6.2.1.2. 后置通知
<?xml version="1.0" encoding="UTF-8" ?>
<beans xmlns="http://www.springframework.org/schema/beans"
       xmlns:xsi="http://www.w3.org/2001/XMLSchema-instance"
       xmlns:context="http://www.springframework.org/schema/context"
       xmlns:aop="http://www.springframework.org/schema/aop"
       xsi:schemaLocation="
        http://www.springframework.org/schema/context
        http://www.springframework.org/schema/context/spring-context.xsd
        http://www.springframework.org/schema/aop
        http://www.springframework.org/schema/aop/spring-aop.xsd
        http://www.springframework.org/schema/beans
        http://www.springframework.org/schema/beans/spring-beans.xsd">

    <context:property-placeholder location="classpath*:jdbc.properties"/>

    <context:component-scan base-package="com"/>

    <!--配置目标类-->
    <bean id="target" class="com.demo.core.Target"/>
    <!--配置切面类-->
    <bean id="myAspect" class="com.demo.core.MyAspect"/>

    <aop:config>
        <!--引用myAspect的Bean为切面对象-->
        <aop:aspect ref="myAspect">
            <!--配置Target的method方法执行时要进行myAspect的before方法前置增强-->
            <aop:before method="before" pointcut="execution(* com.demo.core..*.*(..))"/>
            <aop:after-returning method="after" pointcut="execution(* *..*.*(..))"/>
        </aop:aspect>
    </aop:config>
</beans>
1.6.2.2. XML 配置 AOP 详解
1.6.2.2.1. 切点表达式的写法
表达式语法:
execution([修饰符] 返回值类型 包名.类名.方法名(参数))
- 访问修饰符可以省略
- 返回值类型、包名、类名、方法名可以使用星号
*代表任意 - 包名与类名之间一个点
.代表当前包下的类,两个点..表示当前包及其子包下的类 - 参数列表可以使用两个点
..表示任意个数,任意类型的参数列表
execution(public void com.demo.core.Target.method())

execution(void com.demo.core.Target.*(..))

// 调用com.demo.core包下的任意一个类的任意一个方法且返回值为任意
// 此时都会先执行前置方法
execution(* com.demo.core.*.*(..))
execution:
	相当于是执行
com.demo.core.*.*
	第一个*代表包下的所有的类
	第二个*代表任何的一个方法
(..):
	代表任意个数的参数

execution(* com.demo.core..*.*(..))

execution(* *..*.*(..))
第一个*: 任意返回值
第二个*: 任意一个包名
..: 包以及子包
第三个*: 任意类名
第四个*: 任意方法
(..): 任意参数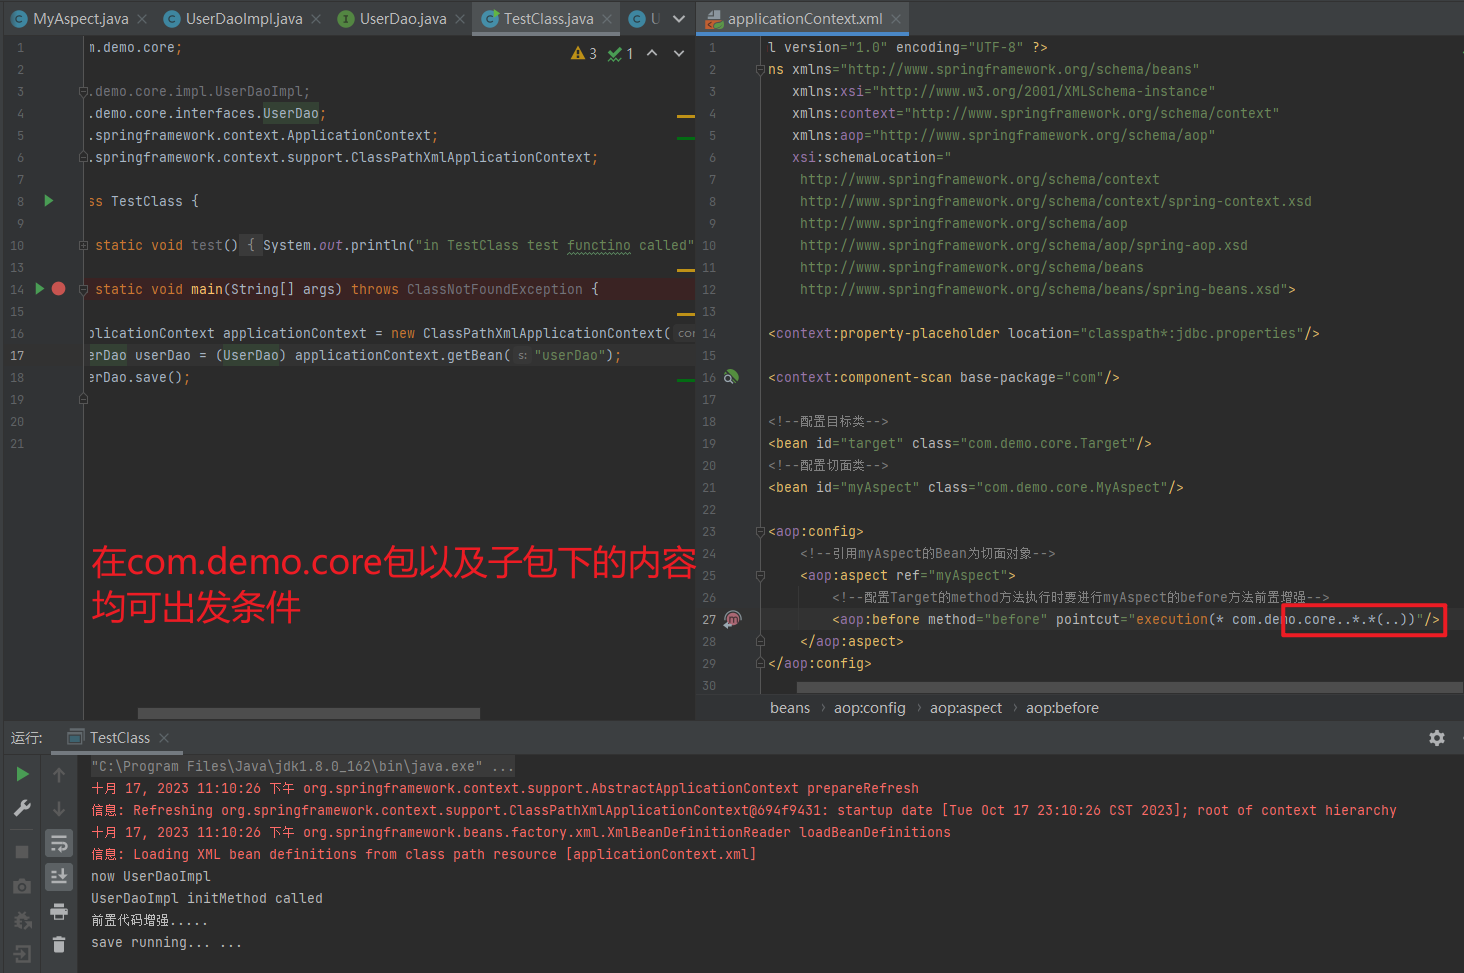
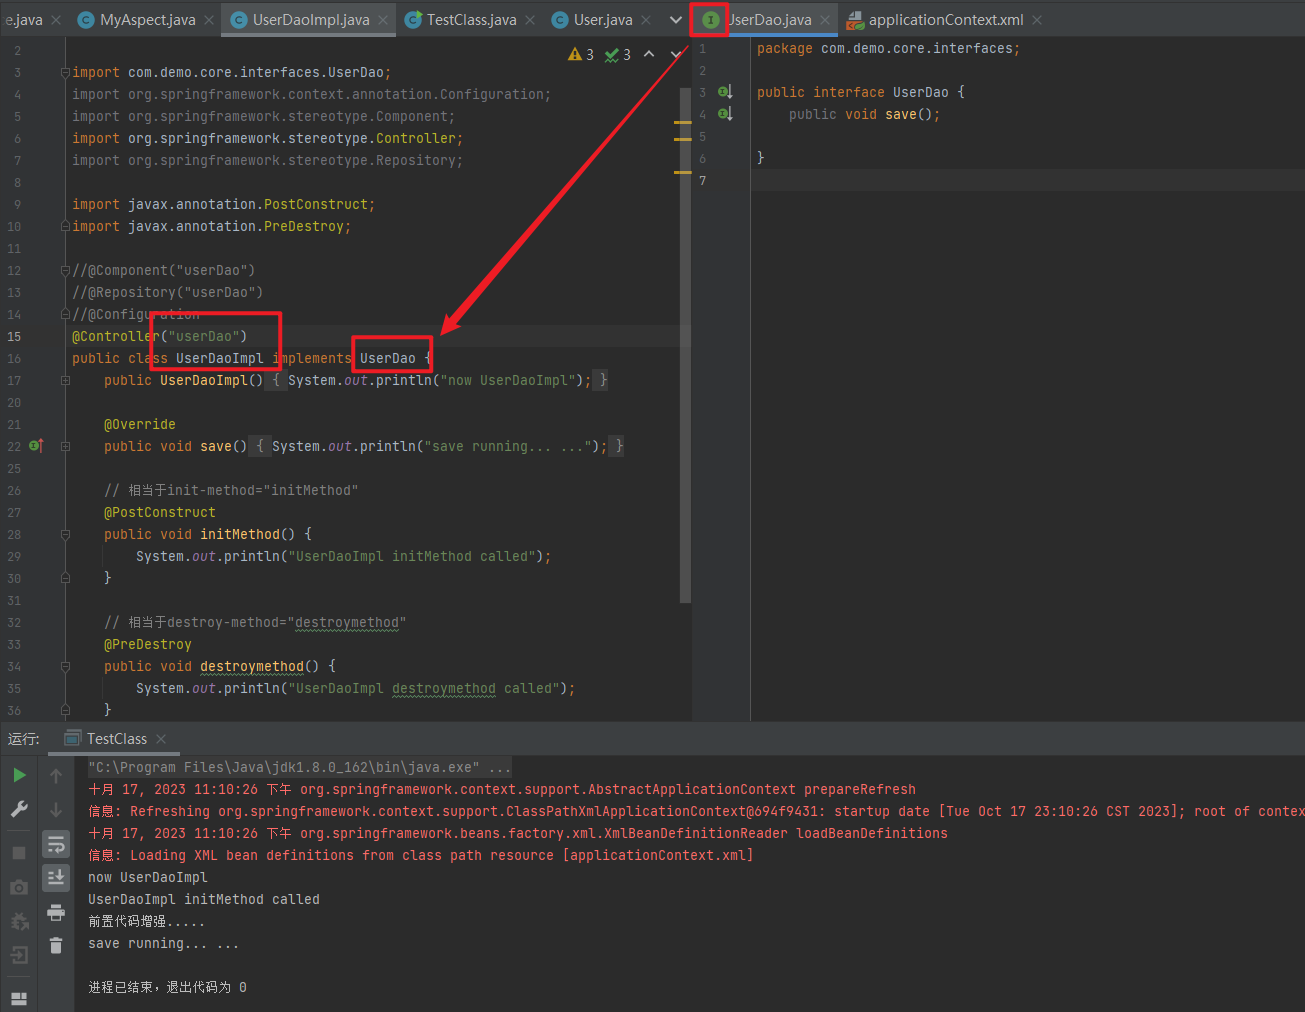
1.6.2.2.2. 通知的类型
通知的配置语法:
<aop:通知类型 method="切面类中方法名" pointcut="切点表达式"></aop:通知类型>
| 名称 | 标签 | 说明 |
| 前置通知 | <aop:before> | 用于配置前置通知。指定增强的方法在切入点方法之前执行 |
| 后置通知 | <aop:after-returning> | 用于配置后置通知。指定增强的方法在切入点方法之后执行 |
| 环绕通知 | <aop:around> | 用于配置环绕通知。指定增强的方法在切入点方法之前和之后都执行 |
| 异常抛出通知 | <aop:throwing> | 用于配置异常抛出通知。指定增强的方法在出现异常时执行 |
| 最终通知 | <aop:after> | 用于配置最终通知。无论增强方式执行是否有异常都会执行 |
1.6.2.2.3. 切点表达式的抽取
当多个增强的切点表达式相同时,可以将切点表达式进行抽取,在增强中使用 pointcut-ref 属性代替 pointcut 属性来引用抽取后的切点表达式。
<aop:config>
    <!--引用myAspect的Bean为切面对象-->
    <aop:aspect ref="myAspect">
        <!--配置Target的method方法执行时要进行myAspect的before方法前置增强-->
        <!-- <aop:before method="before" pointcut="execution(* *..*.*(..))"/>-->
        <!-- <aop:after-returning method="after" pointcut="execution(* *..*.*(..))"/>-->
        <aop:pointcut id="tiqu" expression="execution(* *..*.*(..))"/>
        <aop:before method="before" pointcut-ref="tiqu"/>
        <aop:after-returning method="after" pointcut-ref="tiqu"/>
    </aop:aspect>
</aop:config>
<?xml version="1.0" encoding="UTF-8" ?>
<beans xmlns="http://www.springframework.org/schema/beans"
xmlns:xsi="http://www.w3.org/2001/XMLSchema-instance"
xmlns:context="http://www.springframework.org/schema/context"
xmlns:aop="http://www.springframework.org/schema/aop"
xsi:schemaLocation="
http://www.springframework.org/schema/context
http://www.springframework.org/schema/context/spring-context.xsd
http://www.springframework.org/schema/aop
http://www.springframework.org/schema/aop/spring-aop.xsd
http://www.springframework.org/schema/beans
http://www.springframework.org/schema/beans/spring-beans.xsd">
<context:property-placeholder location="classpath*:jdbc.properties"/>
<context:component-scan base-package="com"/>
<!--配置目标类-->
<bean id="target" class="com.demo.core.Target"/>
<!--配置切面类-->
<bean id="myAspect" class="com.demo.core.MyAspect"/>
<aop:config>
<!--引用myAspect的Bean为切面对象-->
<aop:aspect ref="myAspect">
<!--配置Target的method方法执行时要进行myAspect的before方法前置增强-->
<!-- <aop:before method="before" pointcut="execution(* *..*.*(..))"/>-->
<!-- <aop:after-returning method="after" pointcut="execution(* *..*.*(..))"/>-->
<aop:pointcut id="tiqu" expression="execution(* *..*.*(..))"/>
<aop:before method="before" pointcut-ref="tiqu"/>
<aop:after-returning method="after" pointcut-ref="tiqu"/>
</aop:aspect>
</aop:config>
</beans>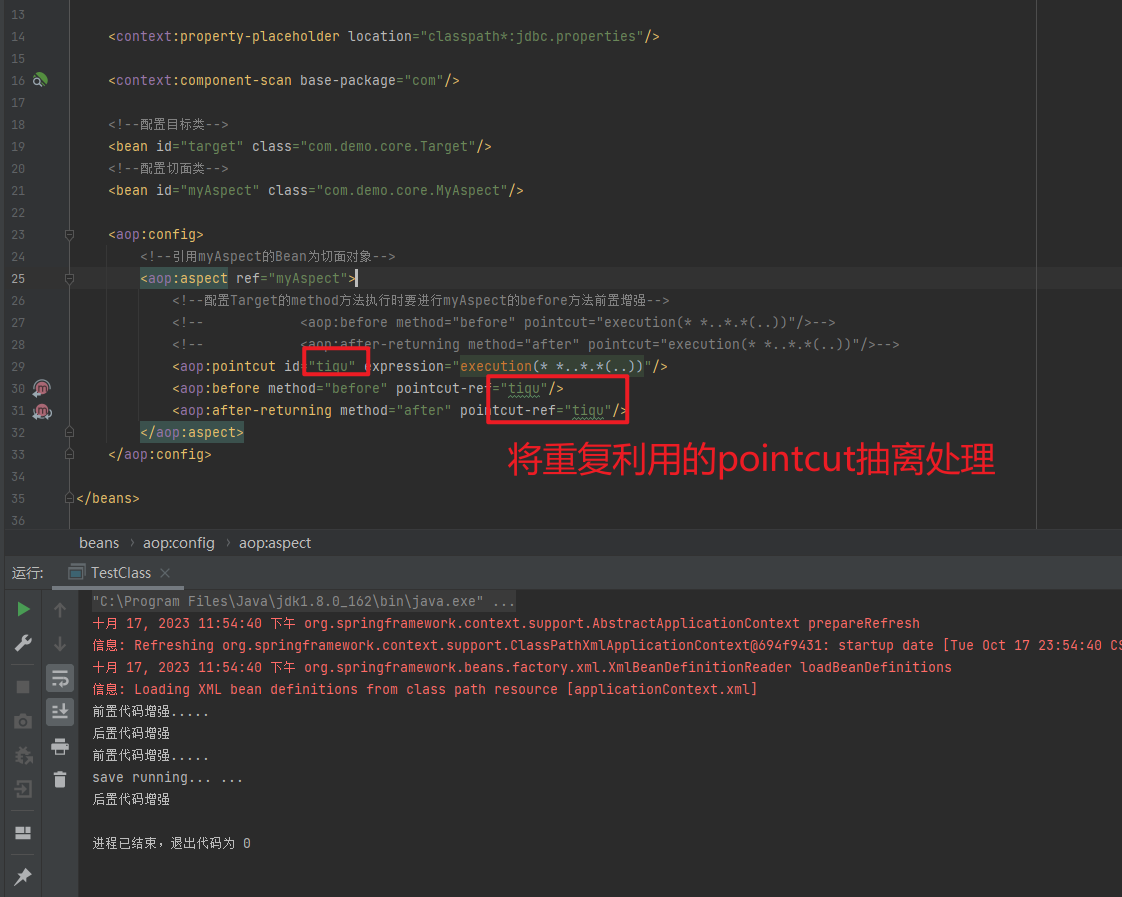
1.6.3. 基于注解的 AOP 开发
1.6.3.1. 快速入门
1.6.3.1.1. 基于注解的aop开发步骤
① 创建目标接口和目标类(内部有切点)
package com.demo.core.interfaces;

public interface TargetInterface {
    public void method();
    public void method2();
}
package com.demo.core;
import com.demo.core.interfaces.TargetInterface;
public class Target implements TargetInterface {
@Override
public void method() {
System.out.println("taget class method called");
}
@Override
public void method2() {
System.out.println("taget class method2 called");
}
}② 创建切面类(内部有增强方法)
package com.demo.core;

public class MyAspect {
    //前置增强方法
    public void before() {
        System.out.println("前置代码增强.....");
    }

    public void after() {
        System.out.println("后置代码增强");
    }
}
③ 将目标类和切面类的对象创建权交给 spring
package com.demo.core;

import com.demo.core.interfaces.TargetInterface;
import org.springframework.stereotype.Component;

@Component("target")
public class Target implements TargetInterface {

    @Override
    public void method() {
        System.out.println("taget class method called");
    }

    @Override
    public void method2() {
        System.out.println("taget class method2 called");
    }
}
package com.demo.core;
import org.aspectj.lang.annotation.Aspect;
import org.springframework.stereotype.Component;
@Component("myAspect")
@Aspect
public class MyAspect {
// 前置增强方法
public void before() {
System.out.println("前置代码增强.....");
}
// 后置增强方法
public void after() {
System.out.println("后置代码增强");
}
}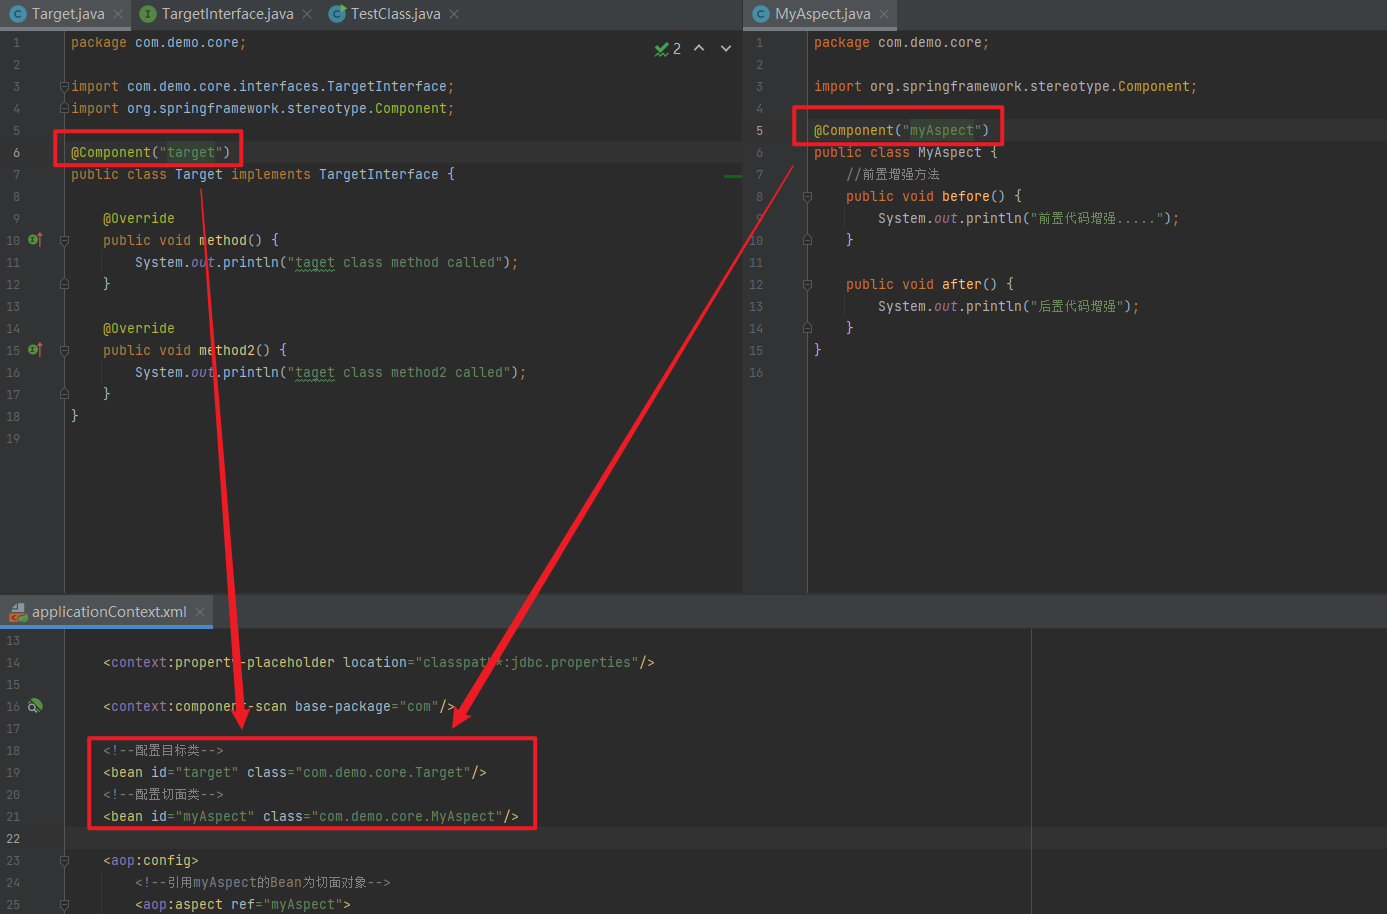
④ 在切面类中使用注解配置织入关系
package com.demo.core;

import org.aspectj.lang.annotation.After;
import org.aspectj.lang.annotation.Aspect;
import org.aspectj.lang.annotation.Before;
import org.springframework.stereotype.Component;

@Component("myAspect")
@Aspect
public class MyAspect {

    // 前置增强方法
    @Before("execution(* *..*.*(..))")
    public void before() {
        System.out.println("前置代码增强.....");
    }

    // 最终增强方法
    @After("execution(* *..*.*(..))")
    public void after() {
        System.out.println("后置代码增强");
    }
}
⑤ 在配置文件中开启组件扫描和 AOP 的自动代理
<!--组件扫描-->
<context:component-scan base-package="com"/>

<!--aop的自动代理-->
<!-- <aop:aspectj-autoproxy></aop:aspectj-autoproxy>-->
<aop:aspectj-autoproxy/>
<?xml version="1.0" encoding="UTF-8" ?>
<beans xmlns="http://www.springframework.org/schema/beans"
xmlns:xsi="http://www.w3.org/2001/XMLSchema-instance"
xmlns:context="http://www.springframework.org/schema/context"
xmlns:aop="http://www.springframework.org/schema/aop"
xsi:schemaLocation="
http://www.springframework.org/schema/context
http://www.springframework.org/schema/context/spring-context.xsd
http://www.springframework.org/schema/aop
http://www.springframework.org/schema/aop/spring-aop.xsd
http://www.springframework.org/schema/beans
http://www.springframework.org/schema/beans/spring-beans.xsd">
<context:property-placeholder location="classpath*:jdbc.properties"/>
<!--组件扫描-->
<context:component-scan base-package="com"/>
<!--aop的自动代理-->
<!-- <aop:aspectj-autoproxy></aop:aspectj-autoproxy>-->
<aop:aspectj-autoproxy/>
</beans>⑥ 测试
package com.demo.core;

import com.demo.core.interfaces.TargetInterface;
import org.springframework.context.ApplicationContext;
import org.springframework.context.support.ClassPathXmlApplicationContext;

public class TestClass {

    public static void test() {
        System.out.println("in TestClass test functino called");
    }

    public static void main(String[] args) throws ClassNotFoundException {

        ApplicationContext applicationContext = new ClassPathXmlApplicationContext("applicationContext.xml");
        TargetInterface target = (TargetInterface) applicationContext.getBean("target");
        target.method();
        target.method2();
    }
}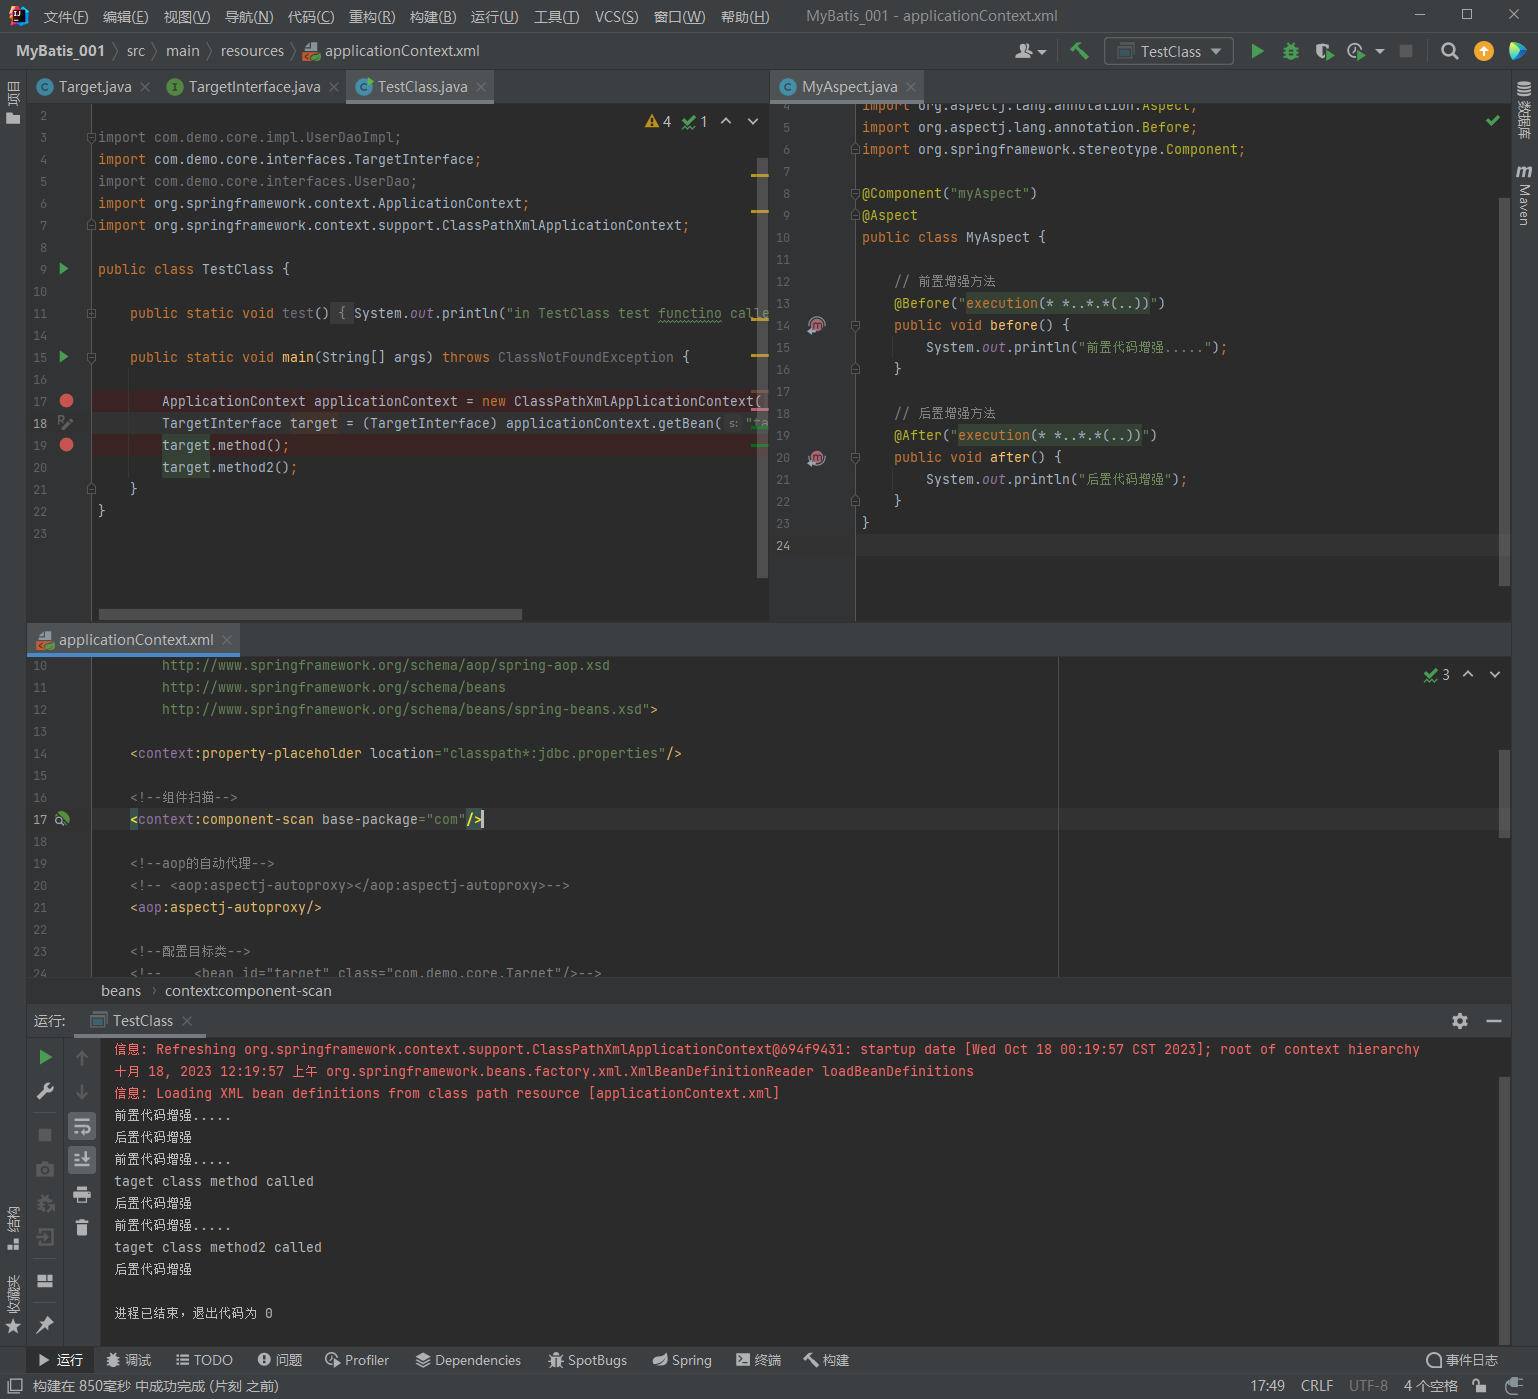
1.6.3.2. 注解配置 AOP 详解
1.6.3.2.1. 注解通知的类型
通知的配置语法:@通知注解(“切点表达式")
| 名称 | 注解 | 说明 |
| 前置通知 | @Before | 用于配置前置通知。指定增强的方法在切入点方法之前执行 |
| 后置通知 | @AfterReturning | 用于配置后置通知。指定增强的方法在切入点方法之后执行 |
| 环绕通知 | @Around | 用于配置环绕通知。指定增强的方法在切入点方法之前和之后都执行 |
| 异常抛出通知 | @AfterThrowing | 用于配置异常抛出通知。指定增强的方法在出现异常时执行 |
| 最终通知 | @After | 用于配置最终通知。无论增强方式执行是否有异常都会执行 |
1.6.3.2.2. 切点表达式的抽取
同xml配置aop一样,我们可以将切点表达式抽取。抽取方式是在切面内定义方法,在该方法上使用@Pointcut注解定义切点表达式,然后在在增强注解中进行引用。具体如下:
1.6.3.2.3. 知识要点
注解aop开发步骤
① 使用@Aspect标注切面类
② 使用@通知注解标注通知方法
③ 在配置文件中配置aop自动代理<aop:aspectj-autoproxy/>
通知注解类型
| 名称 | 注解 | 说明 |
| 前置通知 | @Before | 用于配置前置通知。指定增强的方法在切入点方法之前执行 |
| 后置通知 | @AfterReturning | 用于配置后置通知。指定增强的方法在切入点方法之后执行 |
| 环绕通知 | @Around | 用于配置环绕通知。指定增强的方法在切入点方法之前和之后都执行 |
| 异常抛出通知 | @AfterThrowing | 用于配置异常抛出通知。指定增强的方法在出现异常时执行 |
| 最终通知 | @After | 用于配置最终通知。无论增强方式执行是否有异常都会执行 |
package com.demo.core;

import com.demo.core.interfaces.TargetInterface;
import org.springframework.context.ApplicationContext;
import org.springframework.context.support.ClassPathXmlApplicationContext;

public class TestClass {

    public static void test() {
        System.out.println("in TestClass test functino called");
    }

    public static void main(String[] args) throws ClassNotFoundException {

        ApplicationContext applicationContext = new ClassPathXmlApplicationContext("applicationContext.xml");
        TargetInterface target = (TargetInterface) applicationContext.getBean("target");
        target.method();
        target.method2();
    }
}
package com.demo.core.interfaces;
public interface TargetInterface {
public void method();
public void method2();
}package com.demo.core;
import com.demo.core.interfaces.TargetInterface;
import org.springframework.stereotype.Component;
@Component("target")
public class Target implements TargetInterface {
@Override
public void method() {
System.out.println("taget class method called");
}
@Override
public void method2() {
System.out.println("taget class method2 called");
}
}package com.demo.core;
import org.aspectj.lang.annotation.*;
import org.springframework.stereotype.Component;
@Component("myAspect")
@Aspect
public class MyAspect {
// 前置增强方法
@Before("execution(* *..*.*(..))")
public void before() {
System.out.println("前置代码增强.....");
}
// 后置增强方法
@AfterReturning("execution(* *..*.*(..))")
public void afterReturning() {
System.out.println("后置代码增强");
}
// 环绕增强方法
@Around("execution(* *..*.*(..))")
public void around() {
System.out.println("环绕增强方法");
}
// 异常抛出增强方法
@AfterThrowing("execution(* *..*.*(..))")
public void afterThrowing() {
System.out.println("异常抛出增强方法");
}
// 最终增强方法
@After("execution(* *..*.*(..))")
public void after() {
System.out.println("最终增强方法");
}
}<?xml version="1.0" encoding="UTF-8" ?>
<beans xmlns="http://www.springframework.org/schema/beans"
xmlns:xsi="http://www.w3.org/2001/XMLSchema-instance"
xmlns:context="http://www.springframework.org/schema/context"
xmlns:aop="http://www.springframework.org/schema/aop"
xsi:schemaLocation="
http://www.springframework.org/schema/context
http://www.springframework.org/schema/context/spring-context.xsd
http://www.springframework.org/schema/aop
http://www.springframework.org/schema/aop/spring-aop.xsd
http://www.springframework.org/schema/beans
http://www.springframework.org/schema/beans/spring-beans.xsd">
<context:property-placeholder location="classpath*:jdbc.properties"/>
<!--组件扫描-->
<context:component-scan base-package="com"/>
<!--aop的自动代理-->
<!-- <aop:aspectj-autoproxy></aop:aspectj-autoproxy>-->
<aop:aspectj-autoproxy/>
</beans>1.7. 声明式事务控制
1.7.1. 编程式事务控制相关对象
1.7.2. 基于 XML 的声明式事务控制
1.7.3. 基于注解的声明式事务控制
1.8. Spring复习
spring框架
通过配置applicationContext.xml使用Bean对象来满足我们对于特定类的需求
AOP面向切面编程
在调用特定的方法前,想要让他执行特定的某些方法
Spring 是分层的 Java SE/EE应用 full-stack 轻量级开源框架
以 IoC(Inverse Of Control:反转控制)和 AOP(Aspect Oriented Programming:面向切面编程)为内核
DI 依赖注入

使用前提条件:
	1.导入坐标
	2.配置对应的applicationContext.xml,编写对应的<bean>
	3.运行 ApplicationContext applicationContext = new
				ClassPathXmlApplicationContext("applicationContext.xml");
			applicationContext.getBean();

<bean id 唯一的标识符 用来确定每一个bean所对应的类
	class 包含包名+类名 执行的期望实例化的对象 该对象必须拥有无参数构造方法
	scope 范围
		singleton 默认值 不管调用几次getBean方法 都只返回一个对象(单例模式)
		prototype 每次调用getBean方法 都会返回一个不同的对象(多例模式)
	init-method 在构造方法调用完成之后调用的方法
	destroy-method 在对象销毁之前调用的方法

通过一个类去返回特定的对象
类的静态方法:
	此时class执行工厂类 而factory-method 指向工厂类中的返回对象的方法
    	<bean id="userDao" class="com.demo.core.factories.StaticFactoryBean" factory-method="createUserDao"/>

类的非静态方法:
	此时需要先将工厂类封装到一个bean成员中
    	<bean id="nonStaticFactoryBean" class="com.demo.core.factories.NonStaticFactoryBean"/>
	然后使用factory-bean以及factory-method来调用具体的非静态方法返回对应的对象
		其中factory-bean指向对应的对象 factory-method指向返回对象的非静态方法
	    <bean id="userDao" factory-bean="nonStaticFactoryBean" factory-method="createUserDao"/>

依赖注入 DI:
	利用bean或者是特定的类型给指定的成员属性自动赋值
1.利用set方法 通过idea generate默认生成
class A {
	private String name;
	// 基本数据类型
	public String getName() {
		return this.name;
	}
	public void setName(String newName) {
		this.name = newName;
	}
}
	a.首先在applicationContext中配置id=A
	<bean id = "a" class = "xxx.xxx.xxx.A">
		<property name = "name" value = "hehe">
	</bean>

class B {
	private A a;
	public String getA() {
		return this.a;
	}
	public void setA(A testA) {
		this.testA = testA;
	}
}
	a.首先在applicationContext中配置id=b
	<bean id = "a" class = "xxx.xxx.xxx.b">
		<property name = "name" ref = "所对应的成员属性所属的bean a">
	</bean>

依赖注入数据类型:
List<String>
	1.TestClass
		public class TestClass {
	    public static void main(String[] args) {
	        ApplicationContext applicationContext = new ClassPathXmlApplicationContext("applicationContext.xml");
	        UserDao userDao = (UserDao)
	                applicationContext.getBean("userDao");
	        userDao.save();
	    }
	}
	2.UserDaoImpl
		public class UserDaoImpl {
			private List<String> stringList;

		    public List<String> getStringList() {
		        return stringList;
		    }
		    public void setStringList(List<String> stringList) {
		        this.stringList = stringList;
		    }
		}
	3.applicationContext
	    <bean id="userDao" class="com.demo.core.impl.UserDaoImpl">
	        <property name="stringList">
	            <list value-type="java.lang.String">
	                <value type="java.lang.String">hehe</value>
	                <value type="java.lang.String">hehe2</value>
	            </list>
	        </property>
	    </bean>
Map<String, String>
	1.TestClass
		public class TestClass {
		    public static void main(String[] args) {
		        ApplicationContext applicationContext = new ClassPathXmlApplicationContext("applicationContext.xml");
		        UserDao userDao = (UserDao)
		                applicationContext.getBean("userDao");
		        userDao.save();
		    }
		}
	2.UserDaoImpl
		public class UserDaoImpl {
		    private Map<String, String> stringMap;

		    public Map<String, String> getStringMap() {
		        return stringMap;
		    }
		    public void setStringMap(Map<String, String> stringMap) {
		        this.stringMap = stringMap;
		    }
		}
	3.applicationContext
		<bean id="userDao" class="com.demo.core.impl.UserDaoImpl">
	       <property name="stringMap">
	            <map key-type="java.lang.String" value-type="java.lang.String">
	                <entry key="hehe" value="hehe"/>
	                <entry key="hihi" value="hihi"/>
	            </map>
	        </property>
	    </bean>
构造方法
	1.TestClass
		public class TestClass {
		    public static void main(String[] args) {
		        ApplicationContext applicationContext = new ClassPathXmlApplicationContext("applicationContext.xml");
		        UserDao userDao = (UserDao)
		                applicationContext.getBean("userDao");
		        userDao.save();
		    }
		}
	2.UserDaoImpl
        public class UserDaoImpl implements UserDao {
            private String address;

        	// 对应的构造方法
            public UserDaoImpl(String address) {
                this.address = address;
            }
        }
	3.applicationContext
    <bean id="userDao" class="com.demo.core.impl.UserDaoImpl">
		// 通过构造方法去传递初始参数时 需要存在对应的构造方法
        <constructor-arg name="address" value="hehe"/>
    </bean>
Spring原始注解
都是将对应的类注册为bean
    @Component
    @Controller
    @Service
    @Repository

依赖注入
    @Autowired+@Qualifier 此时相当于@Resource
    @Resource 注入的bean的id的值
	1.TestClass
        public class TestClass {
            public static void main(String[] args) {
                ApplicationContext applicationContext = new
                	ClassPathXmlApplicationContext("applicationContext.xml");
                UserDao userDao = (UserDao)
                        applicationContext.getBean("userDao");
                userDao.save();
            }
        }
    2.UserDaoImpl
        public class UserDaoImpl implements UserDao {
            @Autowired
    		@Qualifier("bank")
            // @Resource(name = "bank")
            private Bank bank;

            public Bank getBank() {
                return bank;
            }

            public void setBank(Bank bank) {
                this.bank = bank;
            }

            @Override
            public void save() {
                System.out.println("save running... ...");
            }
        }
    3.Bank
        public class Bank {
            private String cardNo;
            private double balance;

            public String getCardNo() {
                return cardNo;
            }

            public void setCardNo(String cardNo) {
                this.cardNo = cardNo;
            }

            public double getBalance() {
                return balance;
            }

            public void setBalance(double balance) {
                this.balance = balance;
            }

            public Bank() {
            }

            public Bank(String cardNo, double balance) {
                this.cardNo = cardNo;
                this.balance = balance;
            }
        }
    4.applicationContext.xml
        <?xml version="1.0" encoding="UTF-8" ?>
        <beans xmlns="http://www.springframework.org/schema/beans"
               xmlns:xsi="http://www.w3.org/2001/XMLSchema-instance"
               xsi:schemaLocation="
                      http://www.springframework.org/schema/beans
                      http://www.springframework.org/schema/beans/spring-beans.xsd
                      http://www.springframework.org/schema/context
                      http://www.springframework.org/schema/context/spring-context.xsd"
               xmlns:context="http://www.springframework.org/schema/context">

            <context:component-scan base-package="com.demo"/>

            <bean id="userDao" class="com.demo.core.impl.UserDaoImpl"/>

            <bean id="bank" class="com.demo.core.Bank">
                <property name="cardNo" value="111"/>
                <property name="balance" value="222"/>
            </bean>
        </beans>

    @Value
    @Scope
    @PostConstruct
    @PreDestroy
2. Spring MVC
2.1. Spring与Web环境集成
2.1.1. ApplicationContext应用上下文获取方式
应用上下文对象是通过new ClasspathXmlApplicationContext(spring配置文件)方式获取的,但是每次从容器中获得Bean时都要编写new ClasspathXmlApplicationContext(spring配置文件),这样的弊端是配置文件加载多次,应用上下文对象创建多次。
在Web项目中,可以使用ServletContextListener监听Web应用的启动,我们可以在Web应用启动时,就加载Spring的配置文件,创建应用上下文对象ApplicationContext,在将其存储到最大的域servletContext域中,这样就可以在任意位置从域中获得应用上下文ApplicationContext对象了。
2.1.2. Spring提供获取应用上下文的工具
上面的分析不用手动实现,Spring提供了一个监听器ContextLoaderListener就是对上述功能的封装,该监听器内部加载Spring配置文件,创建应用上下文对象,并存储到ServletContext域中,提供了一个客户端工具WebApplicationContextUtils供使用者获得应用上下文对象。
所以我们需要做的只有两件事:
①在web.xml中配置ContextLoaderListener监听器(导入spring-web坐标)
②使用WebApplicationContextUtils获得应用上下文对象ApplicationContext
2.1.3. 导入Spring集成web的坐标
<dependency>
    <groupId>org.springframework</groupId>
    <artifactId>spring-web</artifactId>
    <version>5.0.5.RELEASE</version>
</dependency>
<?xml version="1.0" encoding="UTF-8"?>
<project xmlns="http://maven.apache.org/POM/4.0.0"
xmlns:xsi="http://www.w3.org/2001/XMLSchema-instance"
xsi:schemaLocation="http://maven.apache.org/POM/4.0.0 https://maven.apache.org/xsd/maven-4.0.0.xsd">
<modelVersion>4.0.0</modelVersion>
<groupId>com.example</groupId>
<artifactId>springMVC_Test1</artifactId>
<version>1.0-SNAPSHOT</version>
<name>springMVC_Test1</name>
<packaging>war</packaging>
<properties>
<project.build.sourceEncoding>UTF-8</project.build.sourceEncoding>
<maven.compiler.target>1.8</maven.compiler.target>
<maven.compiler.source>1.8</maven.compiler.source>
<junit.version>5.7.1</junit.version>
</properties>
<!--dependencies 依赖包的意思-->
<dependencies>
<dependency>
<groupId>javax.servlet</groupId>
<artifactId>javax.servlet-api</artifactId>
<version>4.0.1</version>
<scope>provided</scope>
</dependency>
<dependency>
<groupId>org.junit.jupiter</groupId>
<artifactId>junit-jupiter-api</artifactId>
<version>${junit.version}</version>
<scope>test</scope>
</dependency>
<dependency>
<groupId>org.junit.jupiter</groupId>
<artifactId>junit-jupiter-engine</artifactId>
<version>${junit.version}</version>
<scope>test</scope>
</dependency>
<!--mybatis坐标-->
<dependency>
<groupId>org.mybatis</groupId>
<artifactId>mybatis</artifactId>
<version>3.5.4</version>
</dependency>
<!--mysql驱动坐标-->
<dependency>
<groupId>mysql</groupId>
<artifactId>mysql-connector-java</artifactId>
<version>5.1.39</version>
<scope>runtime</scope>
</dependency>
<!--单元测试坐标-->
<dependency>
<groupId>junit</groupId>
<artifactId>junit</artifactId>
<version>4.12</version>
<scope>test</scope>
</dependency>
<!--日志坐标-->
<dependency>
<groupId>log4j</groupId>
<artifactId>log4j</artifactId>
<version>1.2.12</version>
</dependency>
<dependency>
<groupId>org.junit.jupiter</groupId>
<artifactId>junit-jupiter</artifactId>
<version>RELEASE</version>
<scope>compile</scope>
</dependency>
<!-- 分页助手 -->
<dependency>
<groupId>com.github.pagehelper</groupId>
<artifactId>pagehelper</artifactId>
<version>3.7.5</version>
</dependency>
<dependency>
<groupId>com.github.jsqlparser</groupId>
<artifactId>jsqlparser</artifactId>
<version>0.9.1</version>
</dependency>
<!--导入spring的context坐标,context依赖core、beans、expression-->
<dependency>
<groupId>org.springframework</groupId>
<artifactId>spring-context</artifactId>
<version>5.0.5.RELEASE</version>
</dependency>
<!-- C3P0连接池 -->
<dependency>
<groupId>c3p0</groupId>
<artifactId>c3p0</artifactId>
<version>0.9.1.2</version>
</dependency><!-- Druid连接池 -->
<dependency>
<groupId>com.alibaba</groupId>
<artifactId>druid</artifactId>
<version>1.1.10</version>
</dependency>
<!-- mysql驱动 -->
<dependency>
<groupId>mysql</groupId>
<artifactId>mysql-connector-java</artifactId>
<version>5.1.39</version>
</dependency>
<!--此处需要注意的是,spring5 及以上版本要求 junit 的版本必须是 4.12 及以上-->
<dependency>
<groupId>org.springframework</groupId>
<artifactId>spring-test</artifactId>
<version>5.0.2.RELEASE</version>
</dependency>
<dependency>
<groupId>junit</groupId>
<artifactId>junit</artifactId>
<version>4.12</version>
<scope>test</scope>
</dependency>
<dependency>
<groupId>junit</groupId>
<artifactId>junit</artifactId>
<version>4.12</version>
<scope>compile</scope>
</dependency>
<!--导入spring的context坐标,context依赖aop-->
<dependency>
<groupId>org.springframework</groupId>
<artifactId>spring-context</artifactId>
<version>5.0.5.RELEASE</version>
</dependency>
<!-- aspectj的织入 -->
<dependency>
<groupId>org.aspectj</groupId>
<artifactId>aspectjweaver</artifactId>
<version>1.8.13</version>
</dependency>
<dependency>
<groupId>org.springframework</groupId>
<artifactId>spring-web</artifactId>
<version>5.0.5.RELEASE</version>
</dependency>
</dependencies>
<build>
<plugins>
<plugin>
<groupId>org.apache.maven.plugins</groupId>
<artifactId>maven-war-plugin</artifactId>
<version>3.3.1</version>
</plugin>
</plugins>
</build>
</project>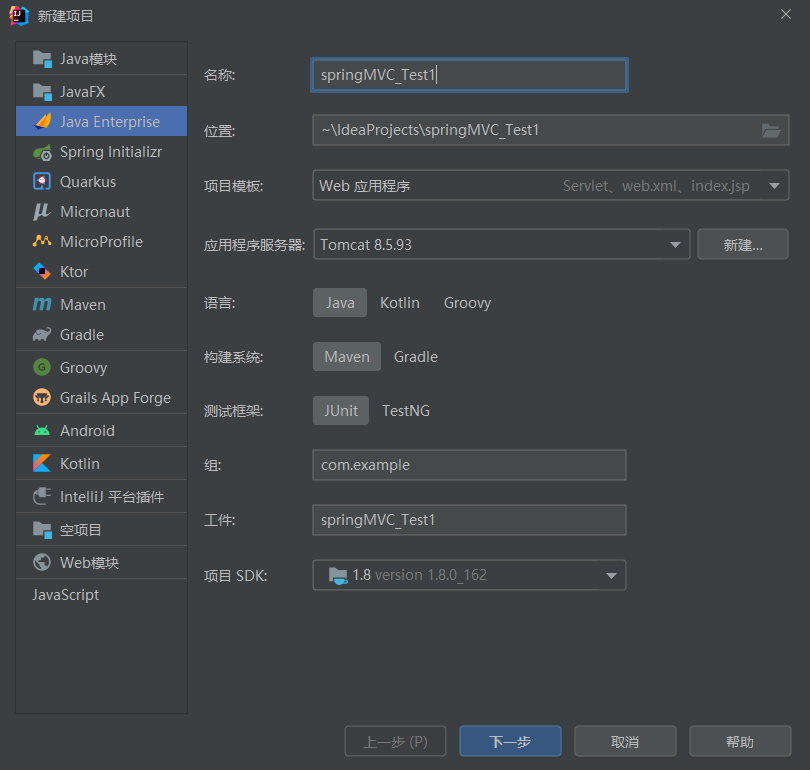
2.1.4. 配置ContextLoaderListener监听器
<?xml version="1.0" encoding="UTF-8"?>
<web-app xmlns="http://xmlns.jcp.org/xml/ns/javaee"
         xmlns:xsi="http://www.w3.org/2001/XMLSchema-instance"
         xsi:schemaLocation="http://xmlns.jcp.org/xml/ns/javaee http://xmlns.jcp.org/xml/ns/javaee/web-app_4_0.xsd"
         version="4.0">

    <!--全局参数-->
    <context-param>
        <param-name>contextConfigLocation</param-name>
        <param-value>classpath:applicationContext.xml</param-value>
    </context-param>

    <!--Spring的监听器-->
    <listener>
        <listener-class>org.springframework.web.context.ContextLoaderListener</listener-class>
    </listener>

</web-app>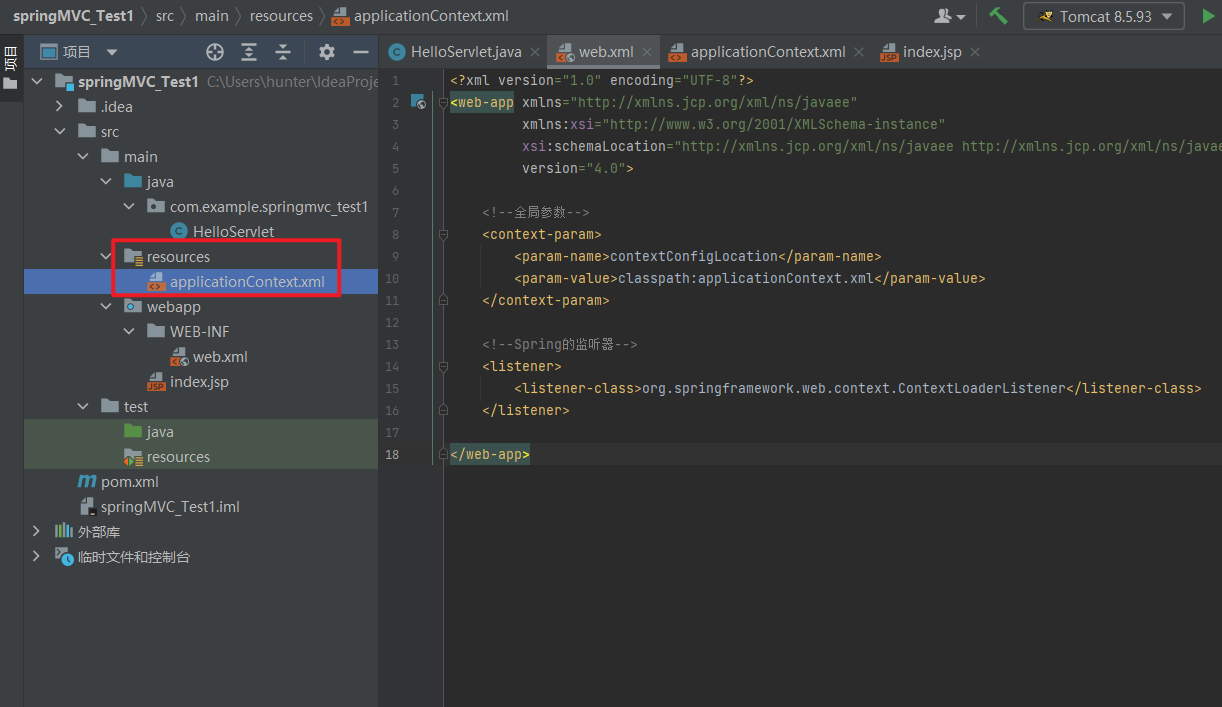
2.1.5. 通过工具获得应用上下文对象
<?xml version="1.0" encoding="UTF-8" ?>
<beans xmlns="http://www.springframework.org/schema/beans"
       xmlns:xsi="http://www.w3.org/2001/XMLSchema-instance"
       xmlns:context="http://www.springframework.org/schema/context"
       xmlns:aop="http://www.springframework.org/schema/aop"
       xsi:schemaLocation="
        http://www.springframework.org/schema/context
        http://www.springframework.org/schema/context/spring-context.xsd
        http://www.springframework.org/schema/aop
        http://www.springframework.org/schema/aop/spring-aop.xsd
        http://www.springframework.org/schema/beans
        http://www.springframework.org/schema/beans/spring-beans.xsd">

<!--    <context:property-placeholder location="classpath*:jdbc.properties"/>-->

    <!--组件扫描-->
    <context:component-scan base-package="com.example.springmvc_test1"/>

</beans>
2.1.6. 测试
package com.example.springmvc_test1;


import org.springframework.context.ApplicationContext;
import org.springframework.web.context.support.WebApplicationContextUtils;

import javax.servlet.ServletContext;
import javax.servlet.ServletException;
import javax.servlet.annotation.WebServlet;
import javax.servlet.http.HttpServlet;
import javax.servlet.http.HttpServletRequest;
import javax.servlet.http.HttpServletResponse;
import java.io.IOException;

@WebServlet(name = "TestServlet", value = "/TestServlet")
public class TestServlet extends HttpServlet {
    @Override
    protected void doGet(HttpServletRequest request, HttpServletResponse response) throws ServletException, IOException {
        ServletContext servletContext = request.getServletContext();
        ApplicationContext applicationContext = WebApplicationContextUtils.getWebApplicationContext(servletContext);
        Object user = applicationContext.getBean("user");
        System.out.println(user);

    }

    @Override
    protected void doPost(HttpServletRequest request, HttpServletResponse response) throws ServletException, IOException {
        this.doGet(request, response);
    }
}
package com.example.springmvc_test1.Dao;
import org.springframework.context.annotation.Configuration;
import org.springframework.stereotype.Component;
@Configuration
@Component("user")
public class User {
// public void sayName(){
// System.out.println("now this is sayName function " +
// "in User class");
// }
}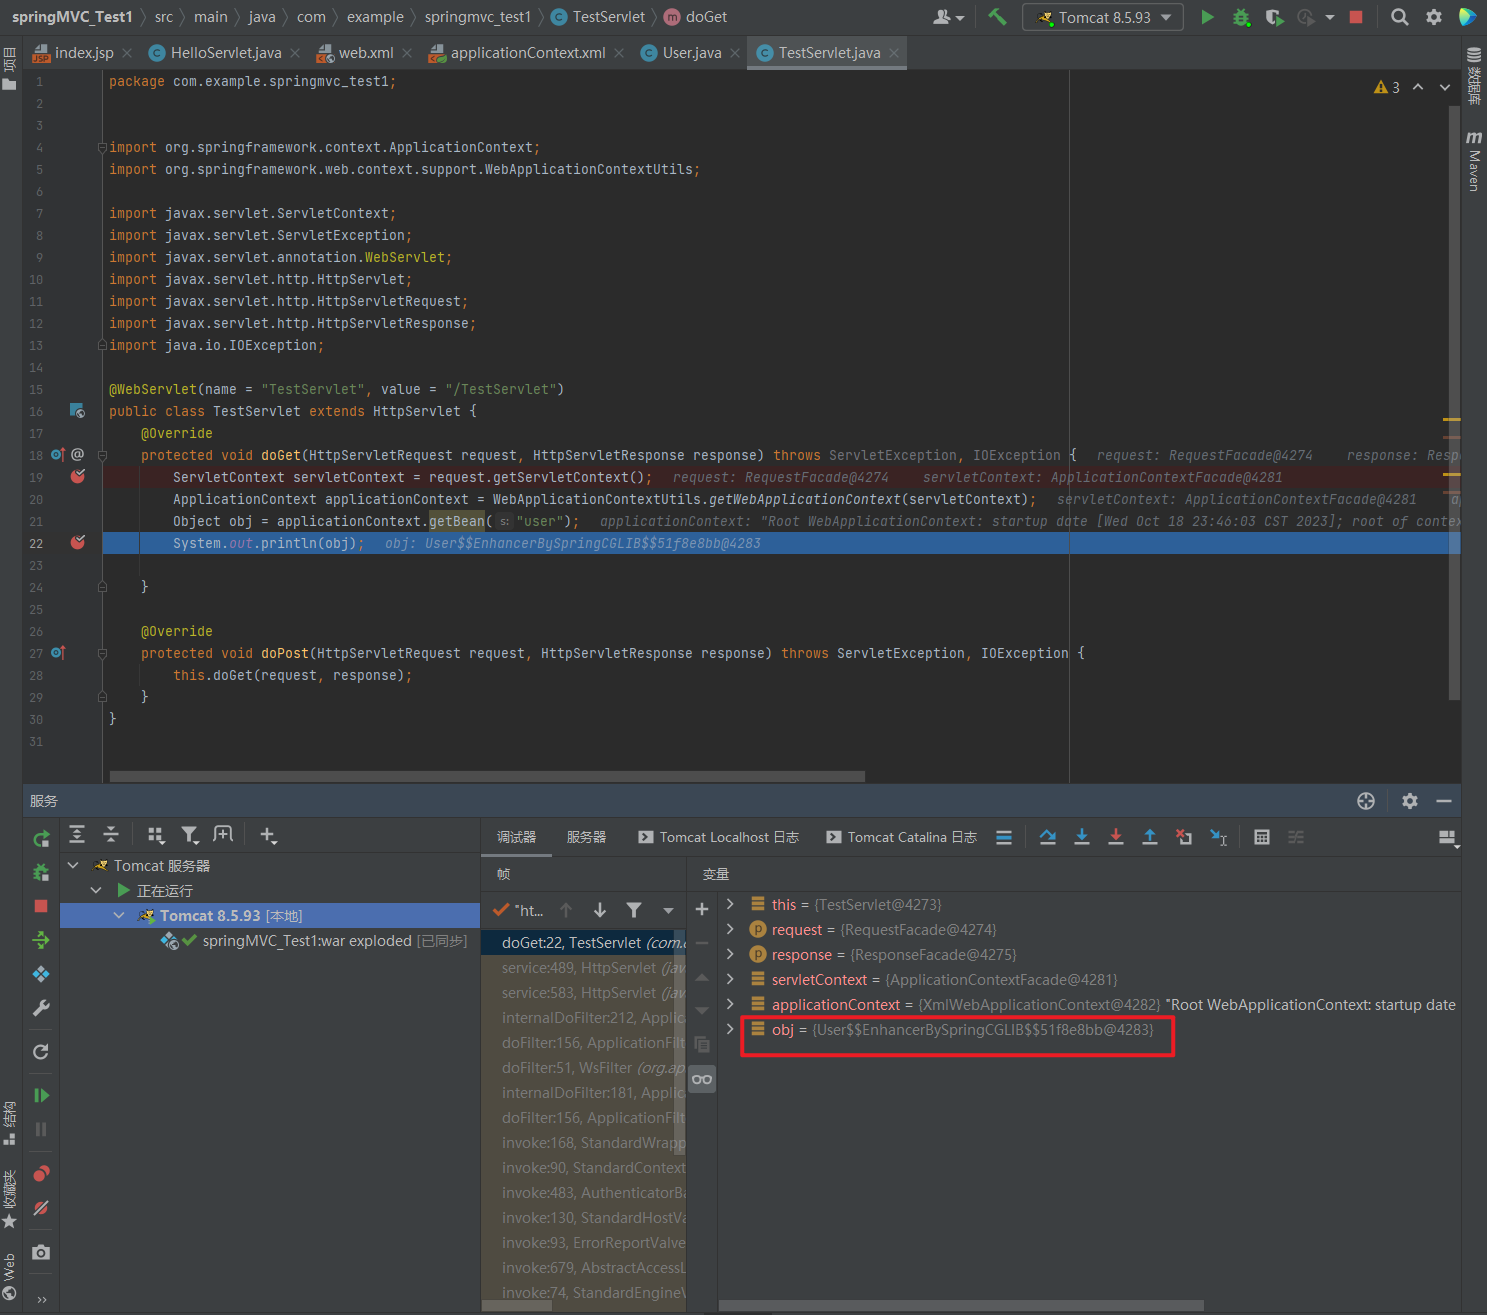
证明是User类型的对象
package com.example.springmvc_test1;


import com.example.springmvc_test1.Dao.User;
import org.springframework.context.ApplicationContext;
import org.springframework.web.context.support.WebApplicationContextUtils;

import javax.servlet.ServletContext;
import javax.servlet.ServletException;
import javax.servlet.annotation.WebServlet;
import javax.servlet.http.HttpServlet;
import javax.servlet.http.HttpServletRequest;
import javax.servlet.http.HttpServletResponse;
import java.io.IOException;

@WebServlet(name = "TestServlet", value = "/TestServlet")
public class TestServlet extends HttpServlet {
    @Override
    protected void doGet(HttpServletRequest request, HttpServletResponse response) throws ServletException, IOException {
        ServletContext servletContext = request.getServletContext();
        ApplicationContext applicationContext = WebApplicationContextUtils.getWebApplicationContext(servletContext);
        User user =(User) applicationContext.getBean("user");
        user.sayName();
    }

    @Override
    protected void doPost(HttpServletRequest request, HttpServletResponse response) throws ServletException, IOException {
        this.doGet(request, response);
    }
}
package com.example.springmvc_test1.Dao;
import org.springframework.context.annotation.Configuration;
import org.springframework.stereotype.Component;
@Configuration
@Component("user")
public class User {
public void sayName(){
System.out.println("now this is sayName function " +
"in User class");
}
}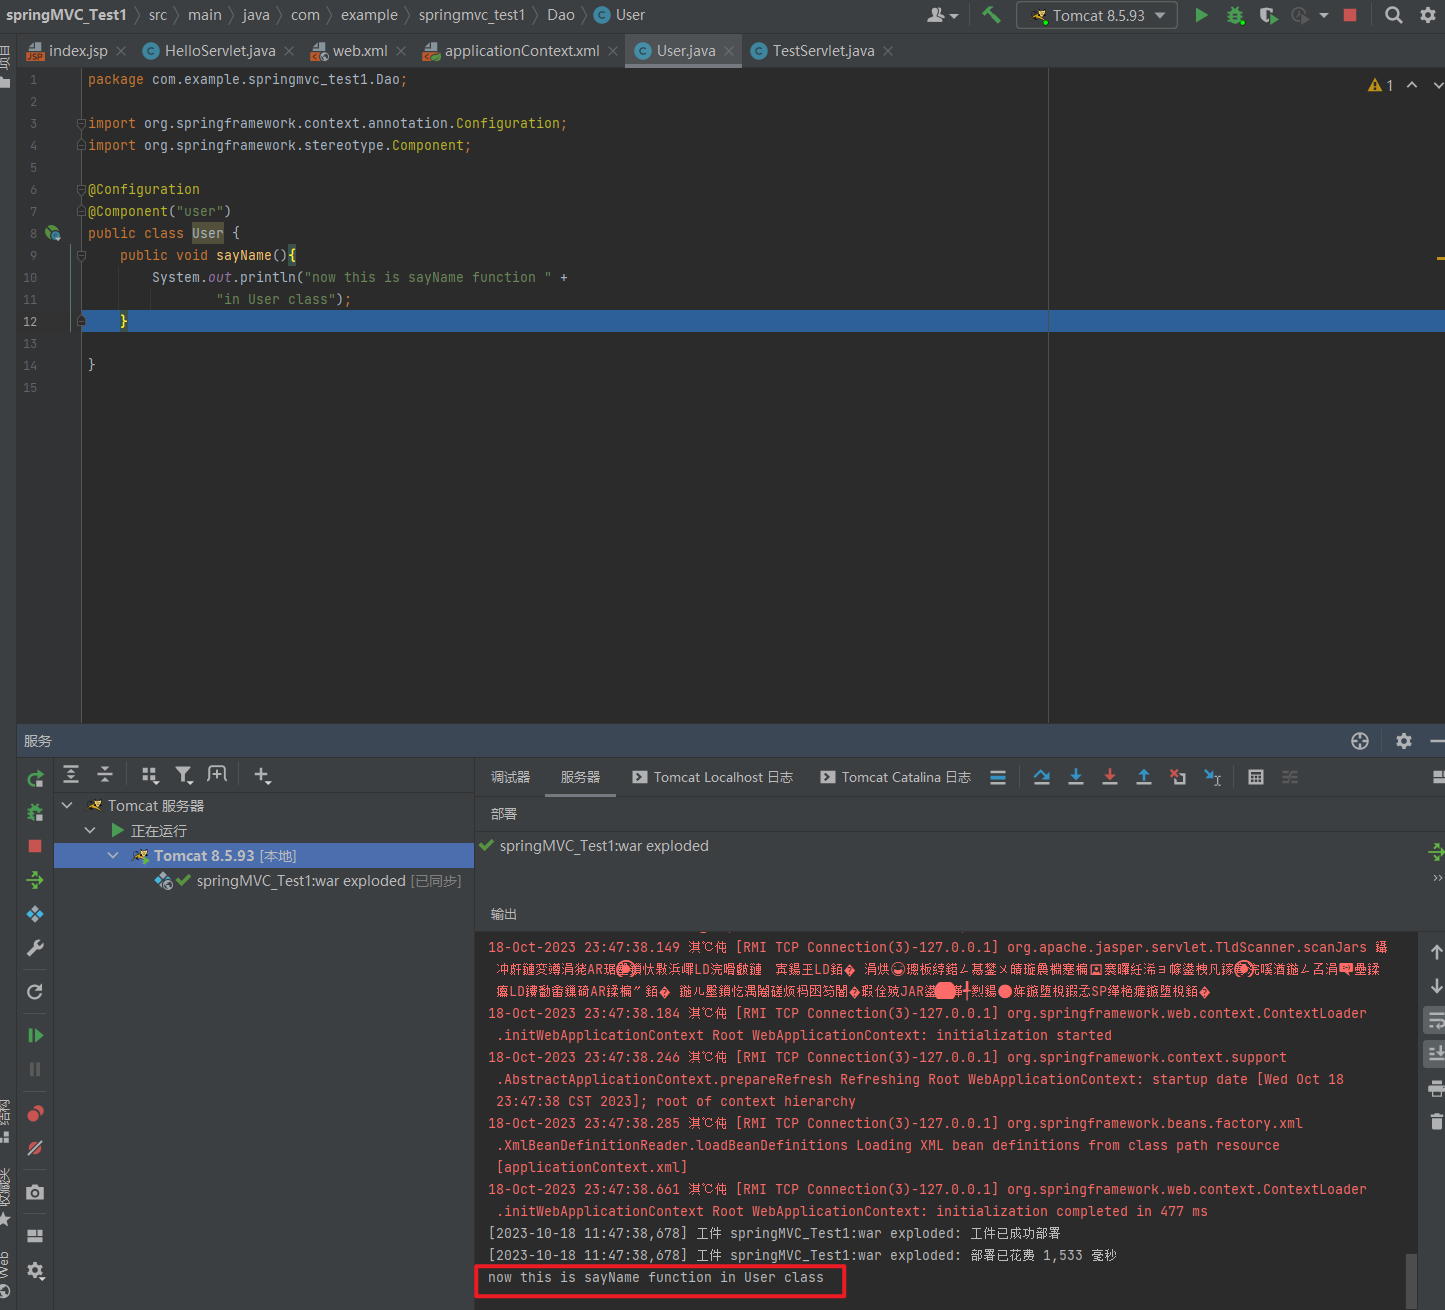
2.1.7. 知识要点
Spring集成web环境步骤
① 配置ContextLoaderListener监听器
② 使用WebApplicationContextUtils获得应用上下文
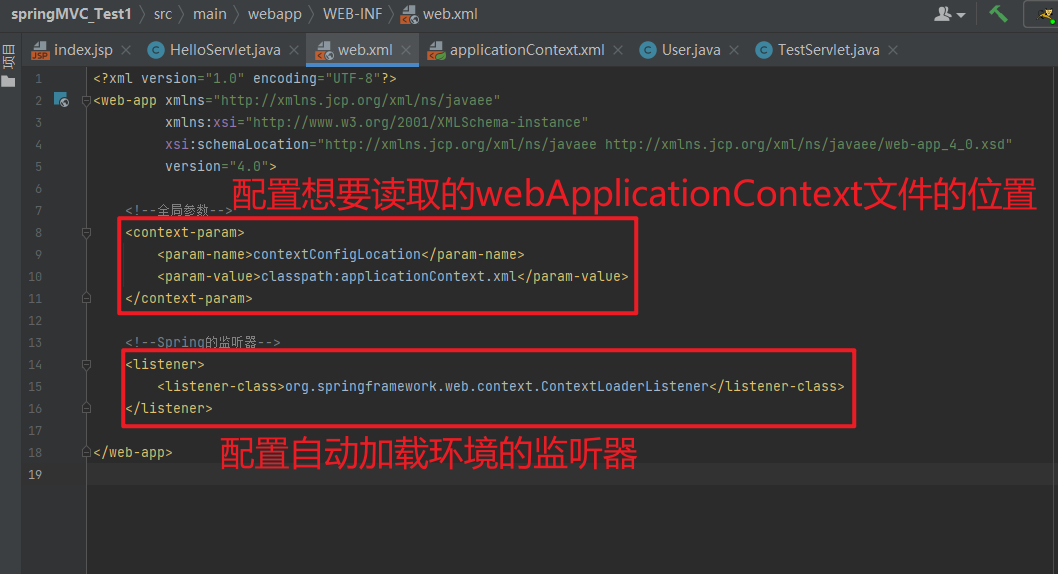
2.2. SpringMVC的简介
2.2.1. SpringMVC概述
SpringMVC是一种基于 Java 的实现 MVC 设计模型的请求驱动类型的轻量级 Web 框架,属于SpringFrameWork的后续产品,已经融合在 Spring Web Flow 中。
SpringMVC已经成为目前最主流的MVC框架之一,并且随着Spring3.0 的发布,全面超越 Struts2,成为最优秀的 MVC 框架。它通过一套注解,让一个简单的 Java 类成为处理请求的控制器,而无须实现任何接口。同时它还支持 RESTful编程风格的请求。
2.2.2. SpringMVC快速入门
需求:客户端发起请求,服务器端接收请求,执行逻辑并进行视图跳转。
开发步骤:
① 导入Spring和SpringMVC的坐标
<!--Spring坐标-->
<dependency>
    <groupId>org.springframework</groupId>
    <artifactId>spring-context</artifactId>
    <version>5.0.5.RELEASE</version>
</dependency>
<!--SpringMVC坐标-->
<dependency>
    <groupId>org.springframework</groupId>
    <artifactId>spring-webmvc</artifactId>
    <version>5.0.5.RELEASE</version>
</dependency>
① 导入Servlet和Jsp的坐标
<!--Servlet坐标-->
<dependency>
    <groupId>javax.servlet</groupId>
	<artifactId>servlet-api</artifactId>
    <version>2.5</version>
</dependency>
<!--Jsp坐标-->
<dependency>
    <groupId>javax.servlet.jsp</groupId>
    <artifactId>jsp-api</artifactId>
    <version>2.0</version>
</dependency>
<?xml version="1.0" encoding="UTF-8"?>
<project xmlns="http://maven.apache.org/POM/4.0.0"
xmlns:xsi="http://www.w3.org/2001/XMLSchema-instance"
xsi:schemaLocation="http://maven.apache.org/POM/4.0.0 https://maven.apache.org/xsd/maven-4.0.0.xsd">
<modelVersion>4.0.0</modelVersion>
<groupId>com.example</groupId>
<artifactId>springMVC_Test1</artifactId>
<version>1.0-SNAPSHOT</version>
<name>springMVC_Test1</name>
<packaging>war</packaging>
<properties>
<project.build.sourceEncoding>UTF-8</project.build.sourceEncoding>
<maven.compiler.target>1.8</maven.compiler.target>
<maven.compiler.source>1.8</maven.compiler.source>
<junit.version>5.7.1</junit.version>
</properties>
<!--dependencies 依赖包的意思-->
<dependencies>
<dependency>
<groupId>javax.servlet</groupId>
<artifactId>javax.servlet-api</artifactId>
<version>4.0.1</version>
<scope>provided</scope>
</dependency>
<dependency>
<groupId>org.junit.jupiter</groupId>
<artifactId>junit-jupiter-api</artifactId>
<version>${junit.version}</version>
<scope>test</scope>
</dependency>
<dependency>
<groupId>org.junit.jupiter</groupId>
<artifactId>junit-jupiter-engine</artifactId>
<version>${junit.version}</version>
<scope>test</scope>
</dependency>
<!--mybatis坐标-->
<dependency>
<groupId>org.mybatis</groupId>
<artifactId>mybatis</artifactId>
<version>3.5.4</version>
</dependency>
<!--mysql驱动坐标-->
<dependency>
<groupId>mysql</groupId>
<artifactId>mysql-connector-java</artifactId>
<version>5.1.39</version>
<scope>runtime</scope>
</dependency>
<!--单元测试坐标-->
<dependency>
<groupId>junit</groupId>
<artifactId>junit</artifactId>
<version>4.12</version>
<scope>test</scope>
</dependency>
<!--日志坐标-->
<dependency>
<groupId>log4j</groupId>
<artifactId>log4j</artifactId>
<version>1.2.12</version>
</dependency>
<dependency>
<groupId>org.junit.jupiter</groupId>
<artifactId>junit-jupiter</artifactId>
<version>RELEASE</version>
<scope>compile</scope>
</dependency>
<!-- 分页助手 -->
<dependency>
<groupId>com.github.pagehelper</groupId>
<artifactId>pagehelper</artifactId>
<version>3.7.5</version>
</dependency>
<dependency>
<groupId>com.github.jsqlparser</groupId>
<artifactId>jsqlparser</artifactId>
<version>0.9.1</version>
</dependency>
<!--导入spring的context坐标,context依赖core、beans、expression-->
<dependency>
<groupId>org.springframework</groupId>
<artifactId>spring-context</artifactId>
<version>5.0.5.RELEASE</version>
</dependency>
<!-- C3P0连接池 -->
<dependency>
<groupId>c3p0</groupId>
<artifactId>c3p0</artifactId>
<version>0.9.1.2</version>
</dependency><!-- Druid连接池 -->
<dependency>
<groupId>com.alibaba</groupId>
<artifactId>druid</artifactId>
<version>1.1.10</version>
</dependency>
<!-- mysql驱动 -->
<dependency>
<groupId>mysql</groupId>
<artifactId>mysql-connector-java</artifactId>
<version>5.1.39</version>
</dependency>
<!--此处需要注意的是,spring5 及以上版本要求 junit 的版本必须是 4.12 及以上-->
<dependency>
<groupId>org.springframework</groupId>
<artifactId>spring-test</artifactId>
<version>5.0.2.RELEASE</version>
</dependency>
<dependency>
<groupId>junit</groupId>
<artifactId>junit</artifactId>
<version>4.12</version>
<scope>test</scope>
</dependency>
<dependency>
<groupId>junit</groupId>
<artifactId>junit</artifactId>
<version>4.12</version>
<scope>compile</scope>
</dependency>
<!--导入spring的context坐标,context依赖aop-->
<dependency>
<groupId>org.springframework</groupId>
<artifactId>spring-context</artifactId>
<version>5.0.5.RELEASE</version>
</dependency>
<!-- aspectj的织入 -->
<dependency>
<groupId>org.aspectj</groupId>
<artifactId>aspectjweaver</artifactId>
<version>1.8.13</version>
</dependency>
<dependency>
<groupId>org.springframework</groupId>
<artifactId>spring-web</artifactId>
<version>5.0.5.RELEASE</version>
</dependency>
<!--Spring坐标-->
<dependency>
<groupId>org.springframework</groupId>
<artifactId>spring-context</artifactId>
<version>5.0.5.RELEASE</version>
</dependency>
<!--SpringMVC坐标-->
<dependency>
<groupId>org.springframework</groupId>
<artifactId>spring-webmvc</artifactId>
<version>5.0.5.RELEASE</version>
</dependency>
<!--Servlet坐标-->
<dependency>
<groupId>javax.servlet</groupId>
<artifactId>servlet-api</artifactId>
<version>2.5</version>
</dependency>
<!--Jsp坐标-->
<dependency>
<groupId>javax.servlet.jsp</groupId>
<artifactId>jsp-api</artifactId>
<version>2.0</version>
</dependency>
</dependencies>
<build>
<plugins>
<plugin>
<groupId>org.apache.maven.plugins</groupId>
<artifactId>maven-war-plugin</artifactId>
<version>3.3.1</version>
</plugin>
</plugins>
</build>
</project>② 在web.xml配置SpringMVC的核心控制器
<?xml version="1.0" encoding="UTF-8"?>
<web-app xmlns="http://xmlns.jcp.org/xml/ns/javaee"
         xmlns:xsi="http://www.w3.org/2001/XMLSchema-instance"
         xsi:schemaLocation="http://xmlns.jcp.org/xml/ns/javaee http://xmlns.jcp.org/xml/ns/javaee/web-app_4_0.xsd"
         version="4.0">

    <!--全局参数-->
<!--    <context-param>-->
<!--        <param-name>contextConfigLocation</param-name>-->
<!--        <param-value>classpath:applicationContext.xml</param-value>-->
<!--    </context-param>-->

    <!--Spring的监听器-->
<!--    <listener>-->
<!--        <listener-class>org.springframework.web.context.ContextLoaderListener</listener-class>-->
<!--    </listener>-->

    <servlet>
        <servlet-name>DispatcherServlet</servlet-name>
        <servlet-class>org.springframework.web.servlet.DispatcherServlet</servlet-class>
        <init-param>
            <param-name>contextConfigLocation</param-name>
            <param-value>classpath:applicationContext.xml</param-value>
        </init-param>
        <load-on-startup>1</load-on-startup>
    </servlet>
    <servlet-mapping>
        <servlet-name>DispatcherServlet</servlet-name>
        <url-pattern>/</url-pattern>
    </servlet-mapping>
</web-app>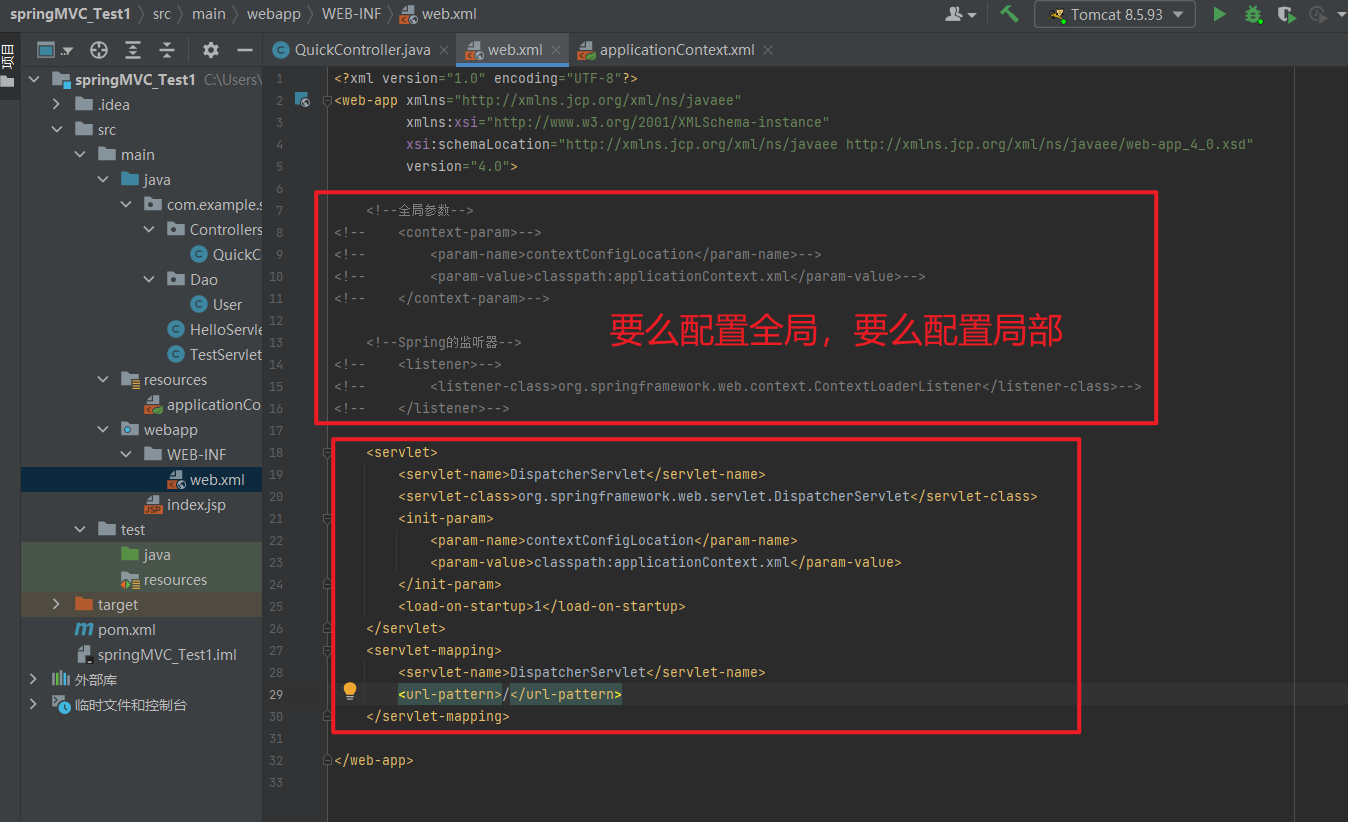
③ 创建Controller和业务方法
package com.example.springmvc_test1.Controllers;

public class QuickController {
    public String quickMethod() {
        System.out.println("quickMethod running.....");
        return "index";
    }
}
③ 创建视图页面index.jsp
<%@ page contentType="text/html; charset=UTF-8" pageEncoding="UTF-8" %>
<!DOCTYPE html>
<html>
<body>
    <h2>Hello SpringMVC!</h2>
</body>
</html>
④ 配置注解
package com.example.springmvc_test1.Controllers;

import org.springframework.stereotype.Controller;
import org.springframework.web.bind.annotation.RequestMapping;

@Controller
public class QuickController {

    // 当发生quick请求时 调用quickMethod()方法
    @RequestMapping("/quick")
    public String quickMethod() {
        System.out.println("quickMethod running.....");
        return "index";
    }
}
⑤ 配置SpringMVC核心文件 applicationContext.xml
<beans xmlns="http://www.springframework.org/schema/beans"
       xmlns:mvc="http://www.springframework.org/schema/mvc"
       xmlns:context="http://www.springframework.org/schema/context"
       xmlns:xsi="http://www.w3.org/2001/XMLSchema-instance"
       xsi:schemaLocation="http://www.springframework.org/schema/beans
       http://www.springframework.org/schema/beans/spring-beans.xsd
       http://www.springframework.org/schema/mvc
       http://www.springframework.org/schema/mvc/spring-mvc.xsd
       http://www.springframework.org/schema/context
       http://www.springframework.org/schema/context/spring-context.xsd">
    <!--配置注解扫描-->
    <context:component-scan base-package="com.example.springmvc_test1"/>
</beans>
⑥ 客户端发起请求测试
访问:http://localhost:8080/springMVC_Test1/quick
控制台打印以及页面显示
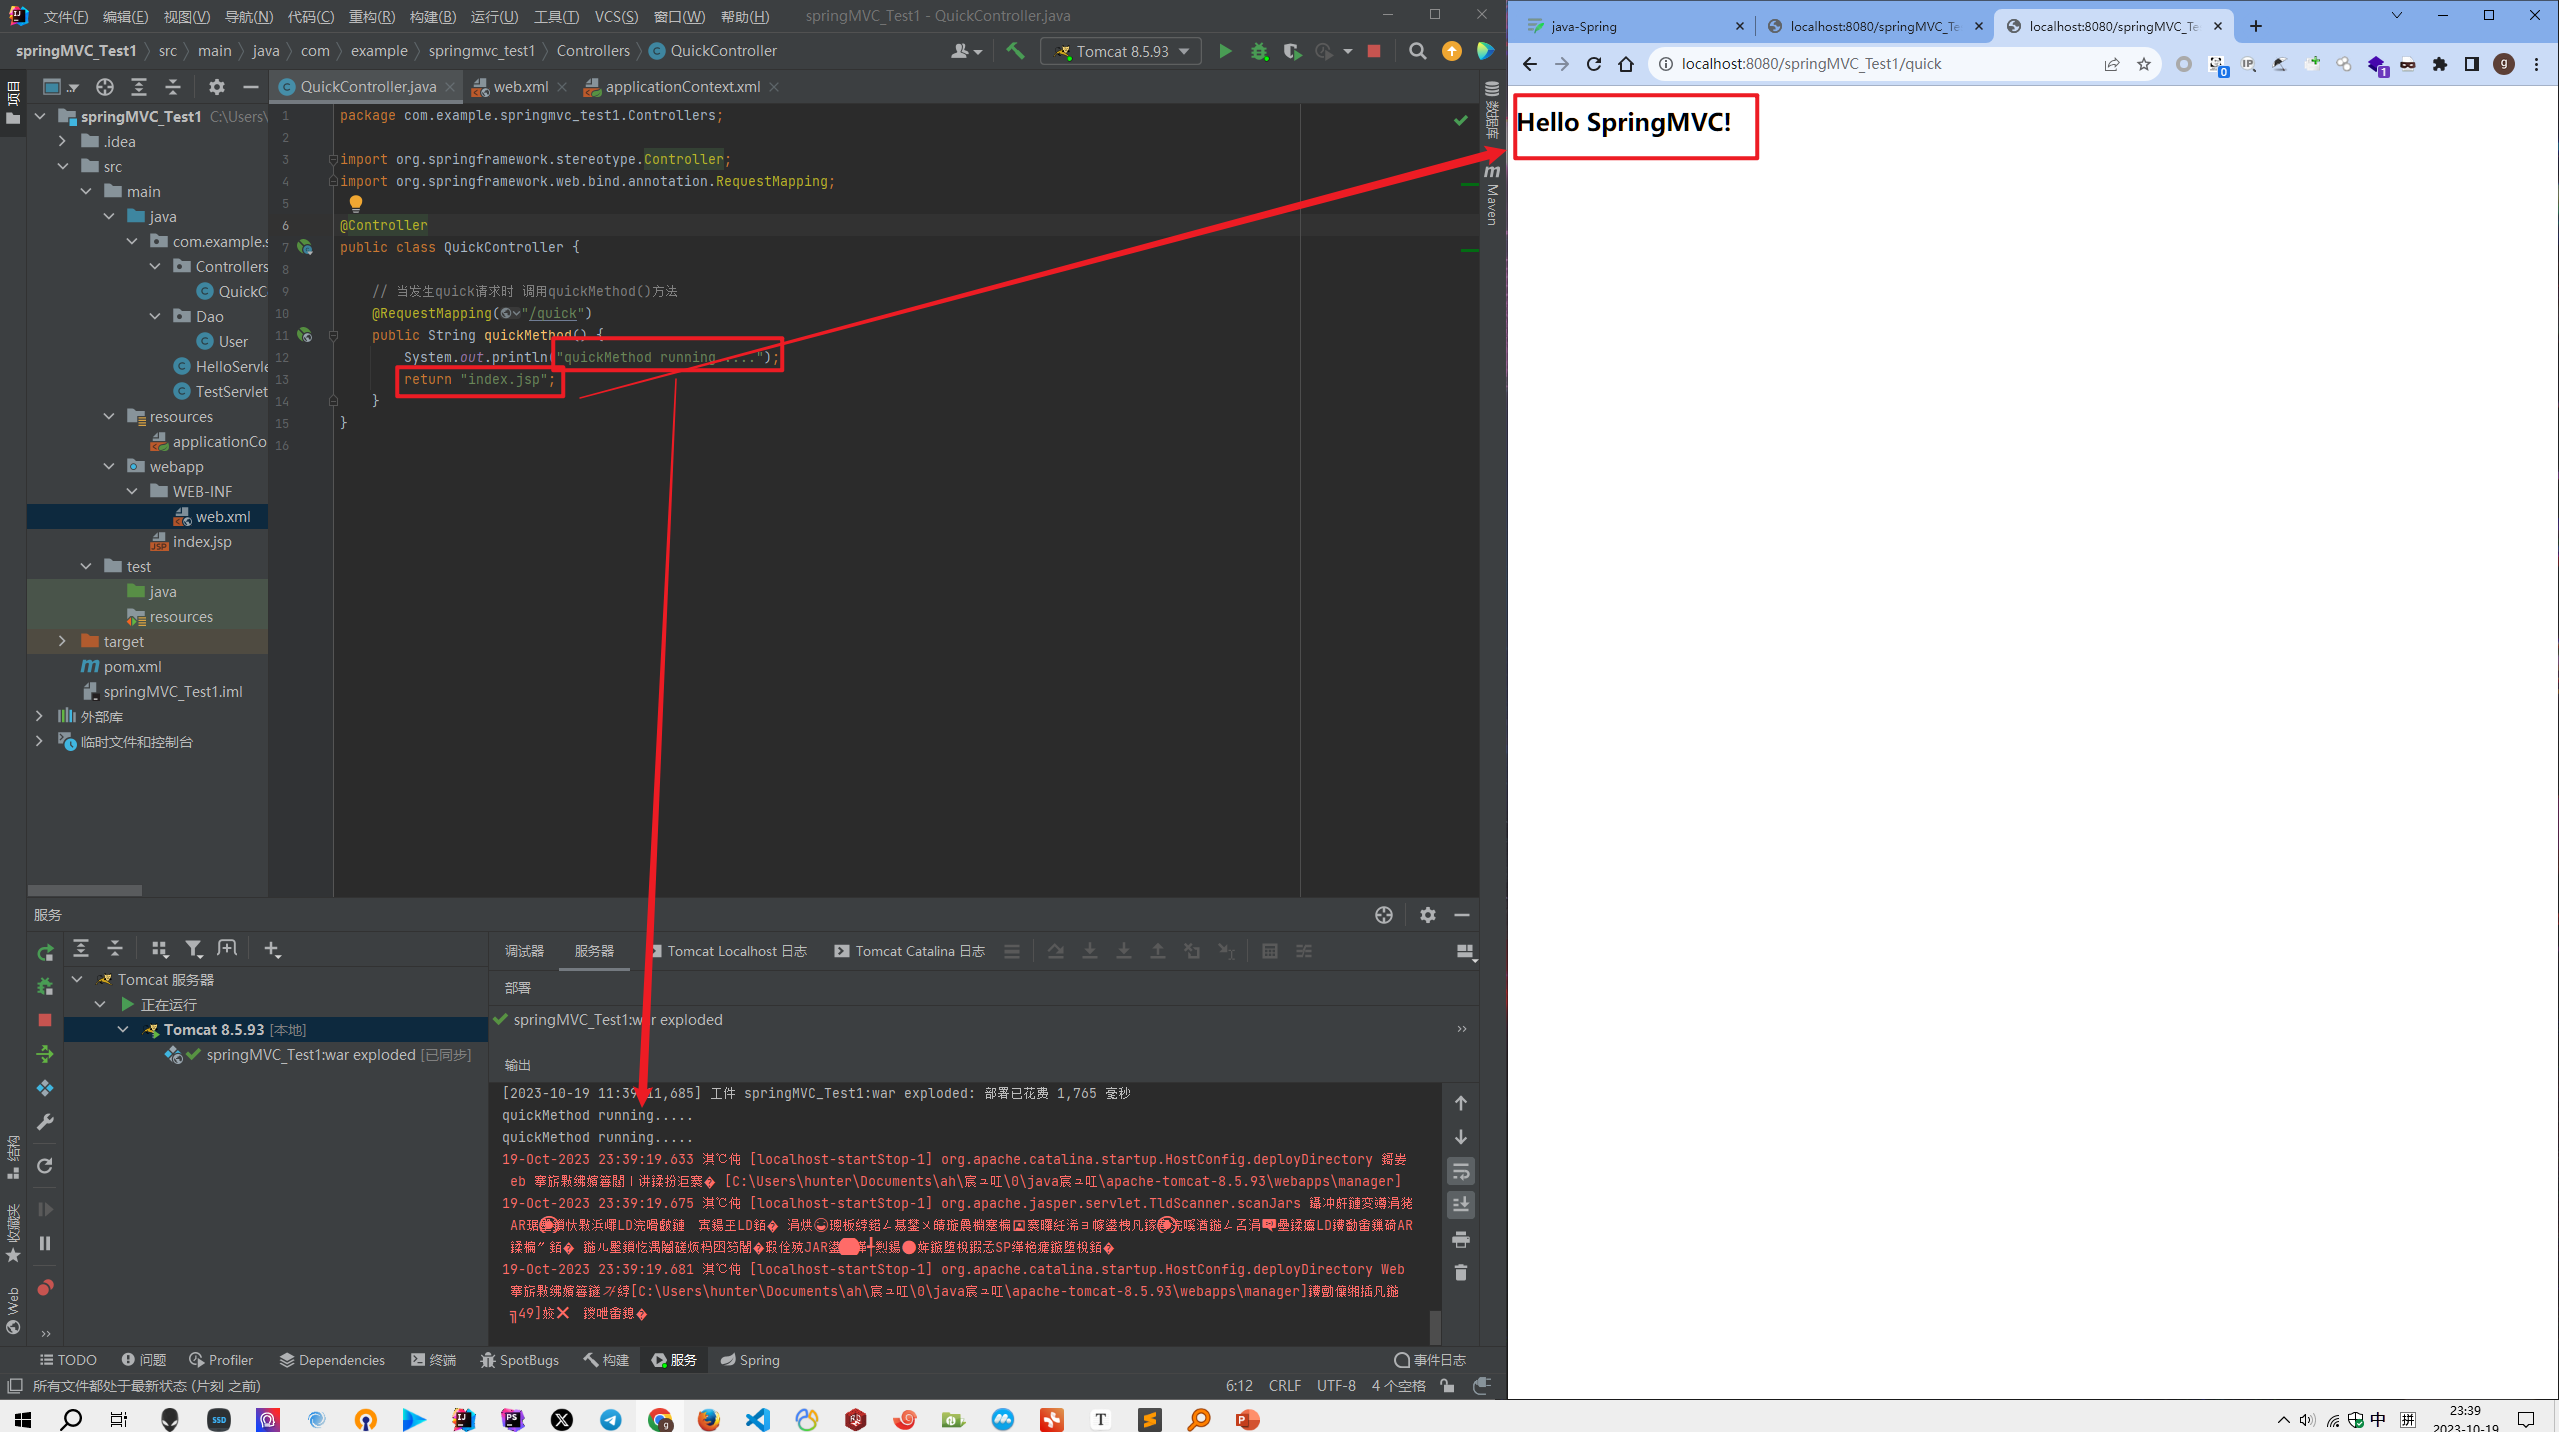
2.2.3. SpringMVC流程图示
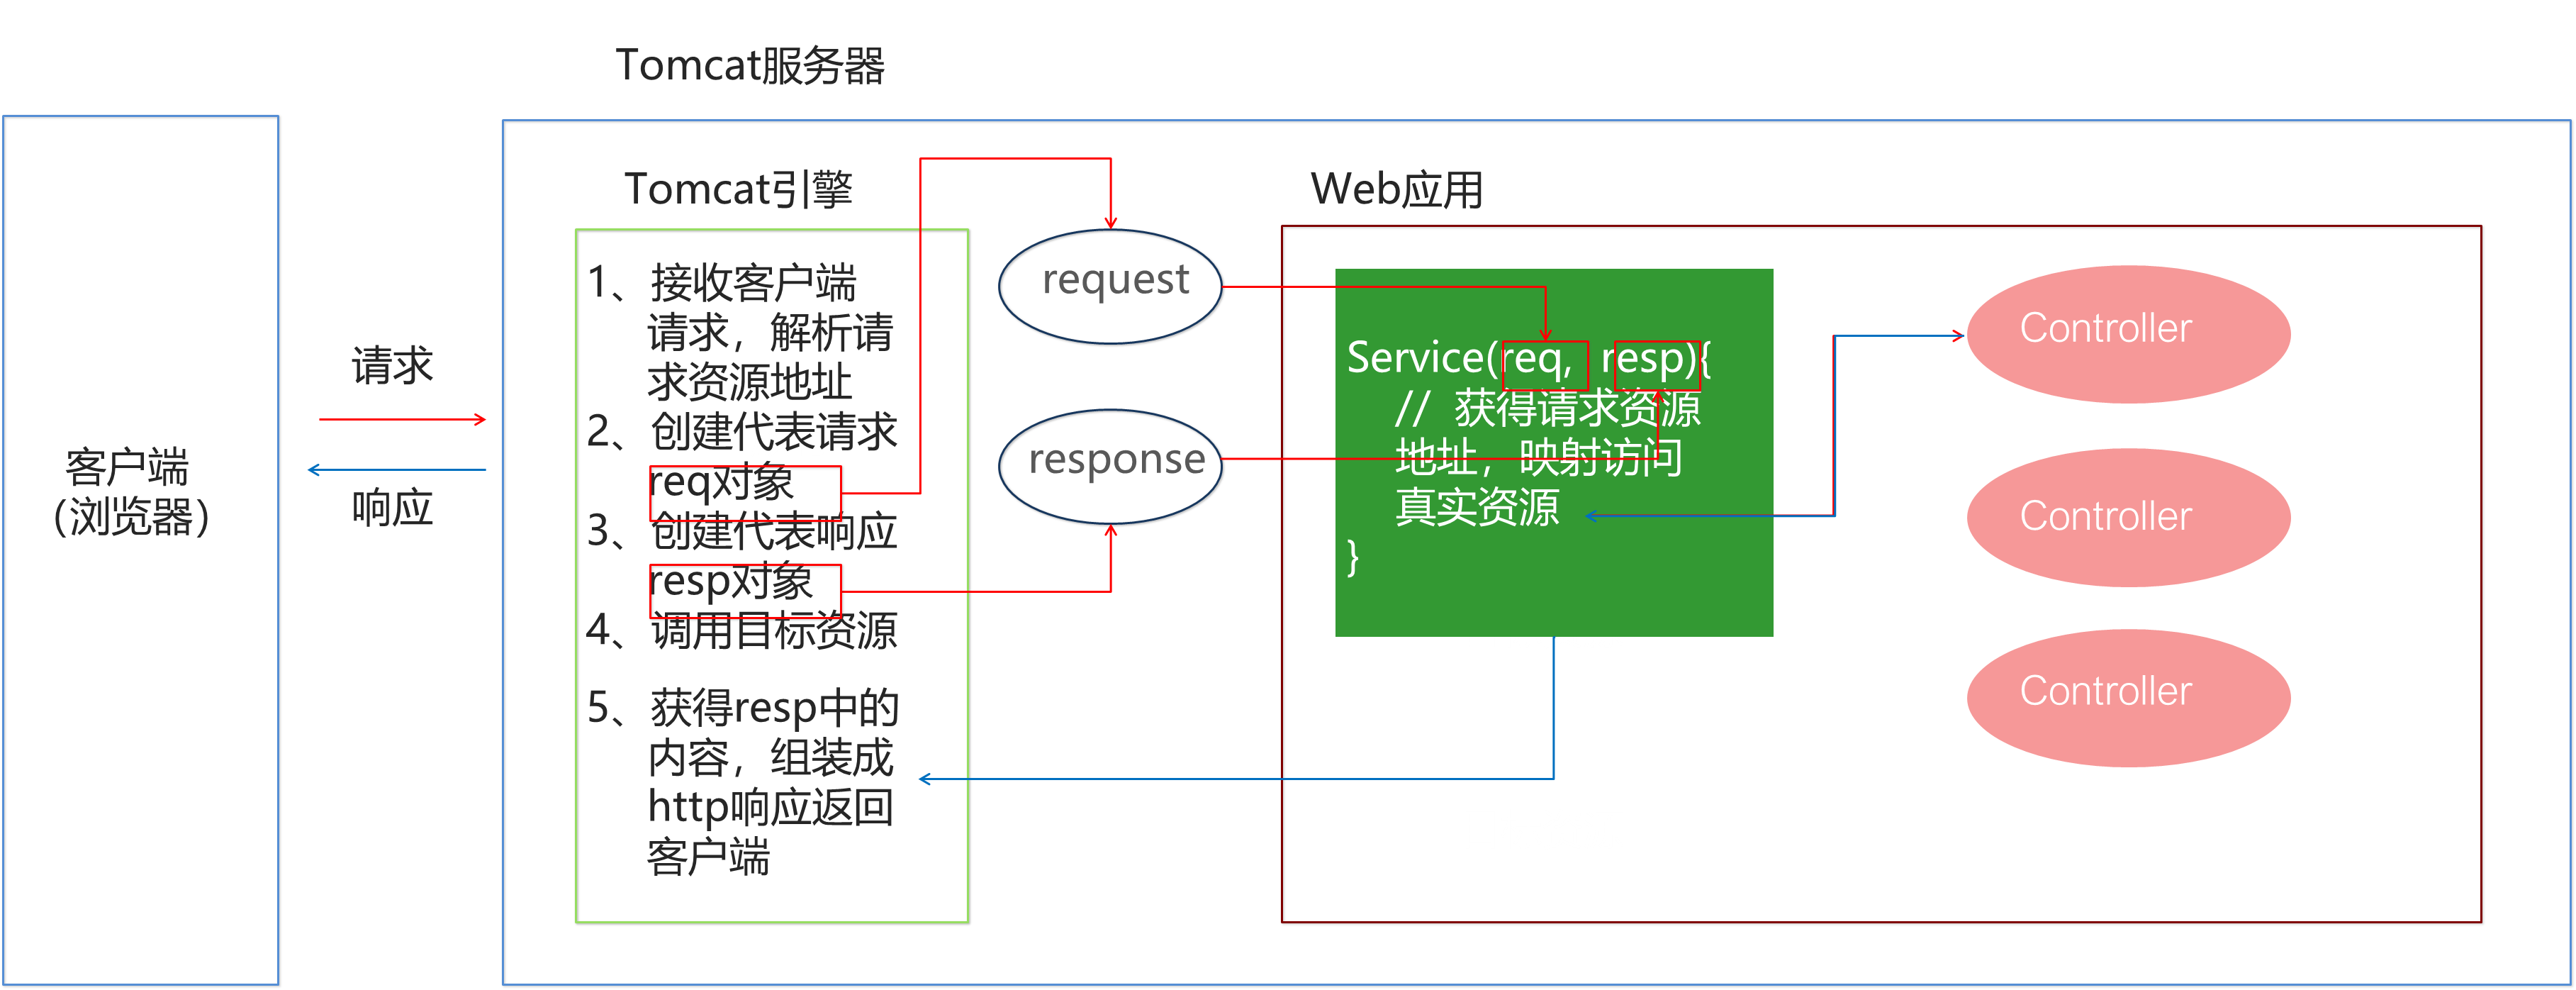
2.2.4. 知识要点
SpringMVC的开发步骤
① 导入SpringMVC相关坐标
② 配置SpringMVC核心控制器DispathcerServlet
③ 创建Controller类和视图页面
④ 使用注解配置Controller类中业务方法的映射地址
⑤ 配置SpringMVC核心文件 spring-mvc.xml
⑥ 客户端发起请求测试
2.3. SpringMVC的组件解析
2.3.1. SpringMVC的执行流程
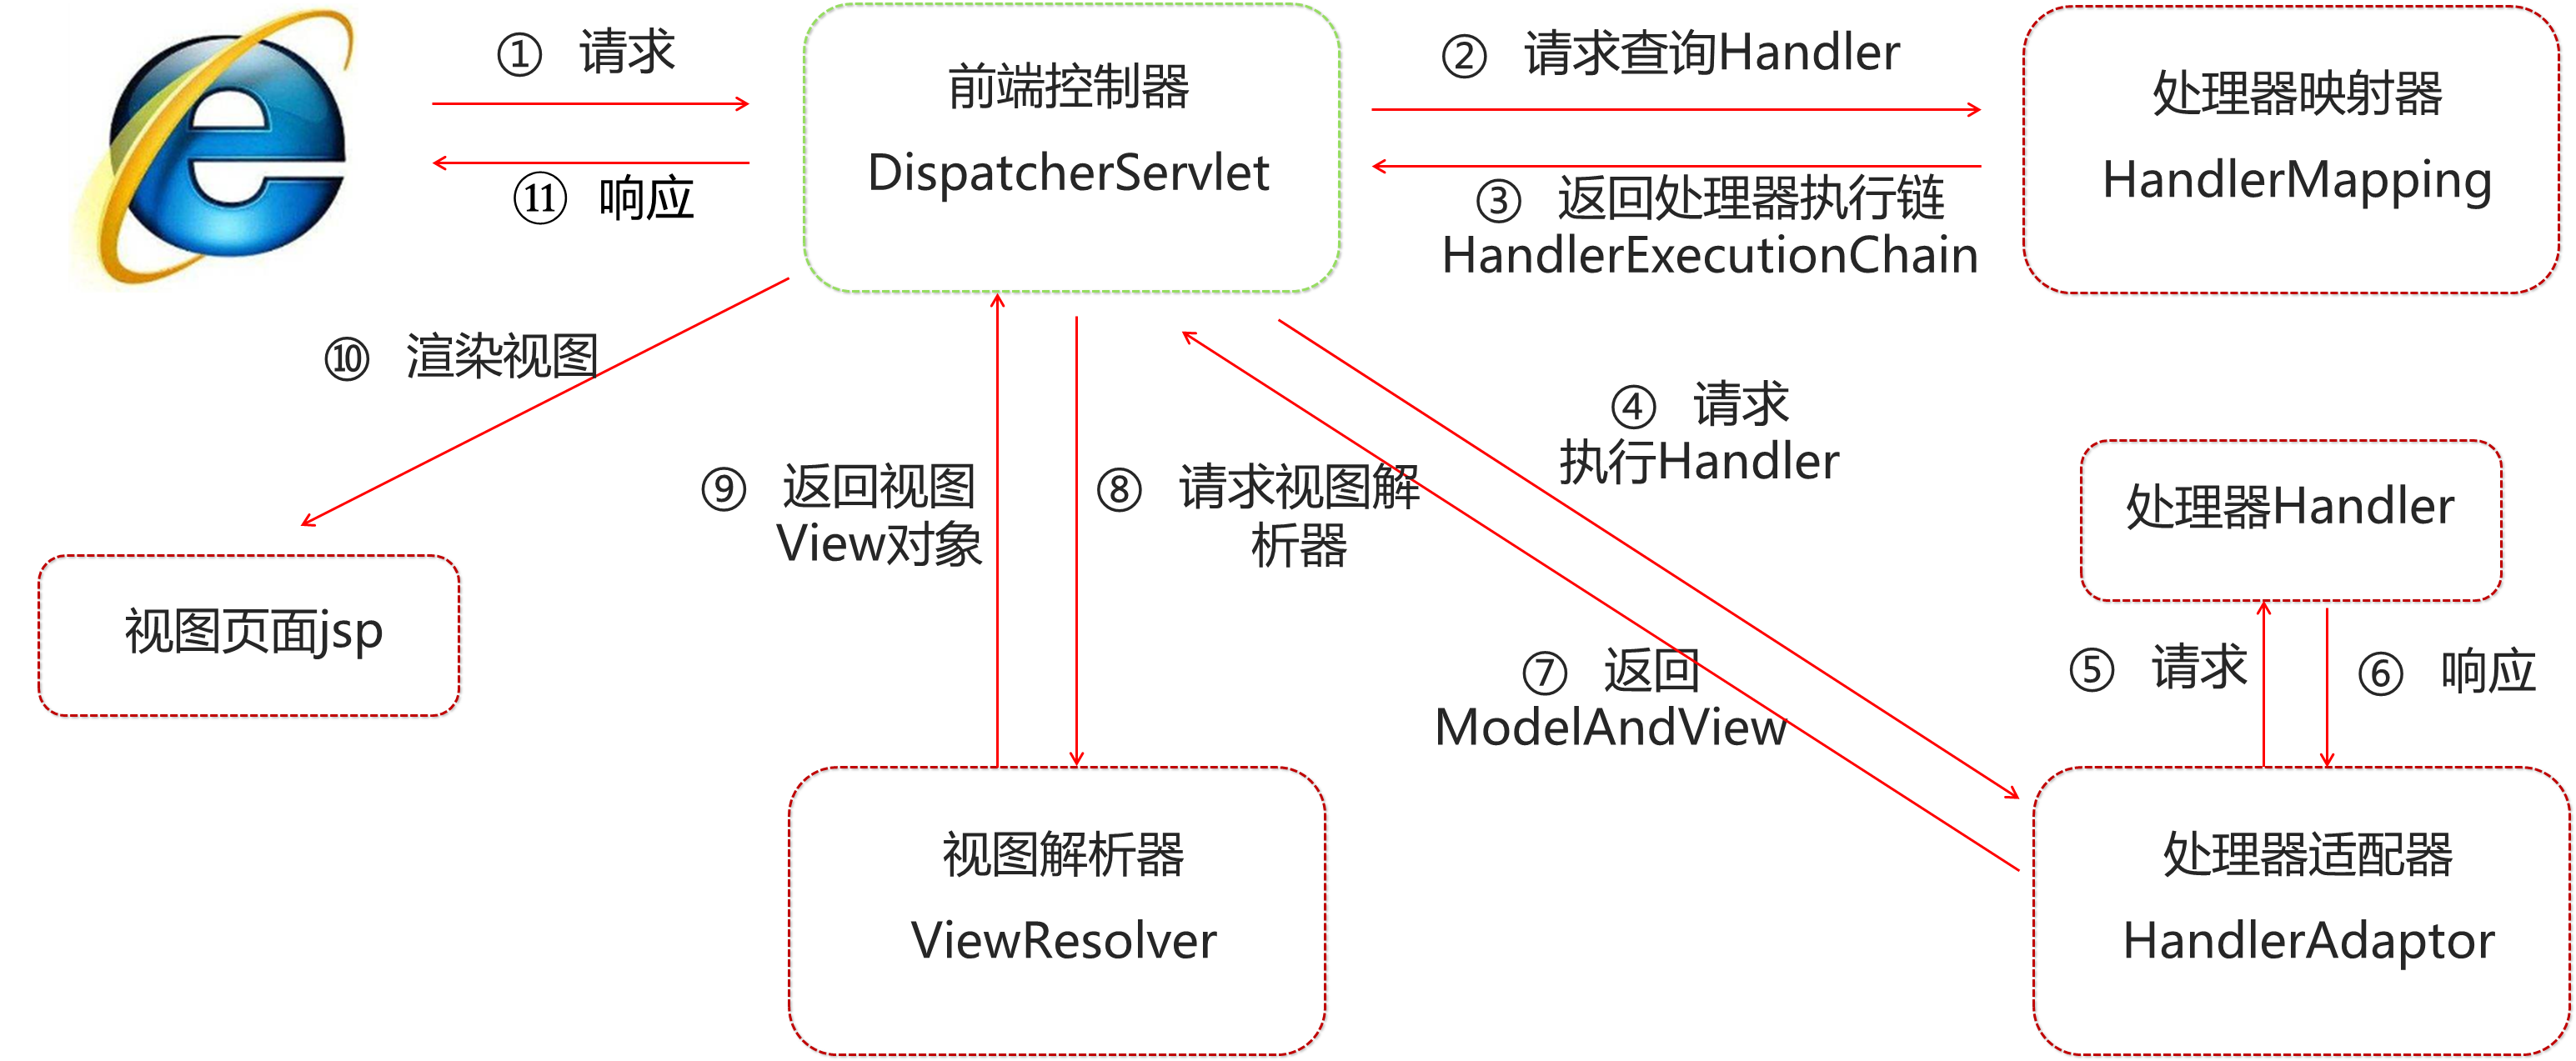
① 用户发送请求至前端控制器DispatcherServlet
② DispatcherServlet收到请求调用HandlerMapping处理器映射器
③ 处理器映射器找到具体的处理器(可以根据xml配置、注解进行查找),生成处理器对象及处理器拦截器(如果有则生成)一并返回给DispatcherServlet
④ DispatcherServlet调用HandlerAdapter处理器适配器
⑤ HandlerAdapter经过适配调用具体的处理器(Controller,也叫后端控制器)
⑥ Controller执行完成返回ModelAndView
⑦ HandlerAdapter将controller执行结果ModelAndView返回给DispatcherServlet
⑧ DispatcherServlet将ModelAndView传给ViewReslover视图解析器
⑨ ViewReslover解析后返回具体View
⑩ DispatcherServlet根据View进行渲染视图(即将模型数据填充至视图中),DispatcherServlet响应用户
2.3.2. SpringMVC组件解析
- 前端控制器:
DispatcherServlet
用户请求到达前端控制器,它就相当于 MVC 模式中的 C,DispatcherServlet是整个流程控制的中心,由它调用其它组件处理用户的请求,DispatcherServlet的存在降低了组件之间的耦合性。
- 处理器映射器:
HandlerMapping
HandlerMapping负责根据用户请求找到 Handler 即处理器,SpringMVC提供了不同的映射器实现不同的映射方式,例如:配置文件方式,实现接口方式,注解方式等。
- 处理器适配器:
HandlerAdapter
通过 HandlerAdapter对处理器进行执行,这是适配器模式的应用,通过扩展适配器可以对更多类型的处理器进行执行。
- 处理器:
Handler
它就是我们开发中要编写的具体业务控制器。由 DispatcherServlet把用户请求转发到 Handler。由
Handler 对具体的用户请求进行处理。
- 视图解析器:
View Resolver
View Resolver 负责将处理结果生成 View 视图,View Resolver 首先根据逻辑视图名解析成物理视图名,即具体的页面地址,再生成 View 视图对象,最后对 View 进行渲染将处理结果通过页面展示给用户。
- 视图:
View
SpringMVC框架提供了很多的 View 视图类型的支持,包括:jstlView、freemarkerView、pdfView等。最常用的视图就是 jsp。一般情况下需要通过页面标签或页面模版技术将模型数据通过页面展示给用户,需要由程序员根据业务需求开发具体的页面。
2.3.3. SpringMVC注解解析
@RequestMapping
作用:用于建立请求 URL 和处理请求方法之间的对应关系
位置:
- 类上,请求URL 的第一级访问目录。此处不写的话,就相当于应用的根目录
- 方法上,请求 URL 的第二级访问目录,与类上的使用@ReqquestMapping标注的一级目录一起组成访问虚拟路径
属性:
- value:用于指定请求的URL。它和path属性的作用是一样的
- method:用于指定请求的方式
- params:用于指定限制请求参数的条件。它支持简单的表达式。要求请求参数的key和value必须和配置的一模一样
例如:
- params = {“accountName”},表示请求参数必须有accountName
- params = {“moeny!100”},表示请求参数中money不能是100
value = "/quick"
告诉DespatchServlet,当访问路径为request.getServletPath()+/quick,此时会自动调用使用该注解修饰的方法
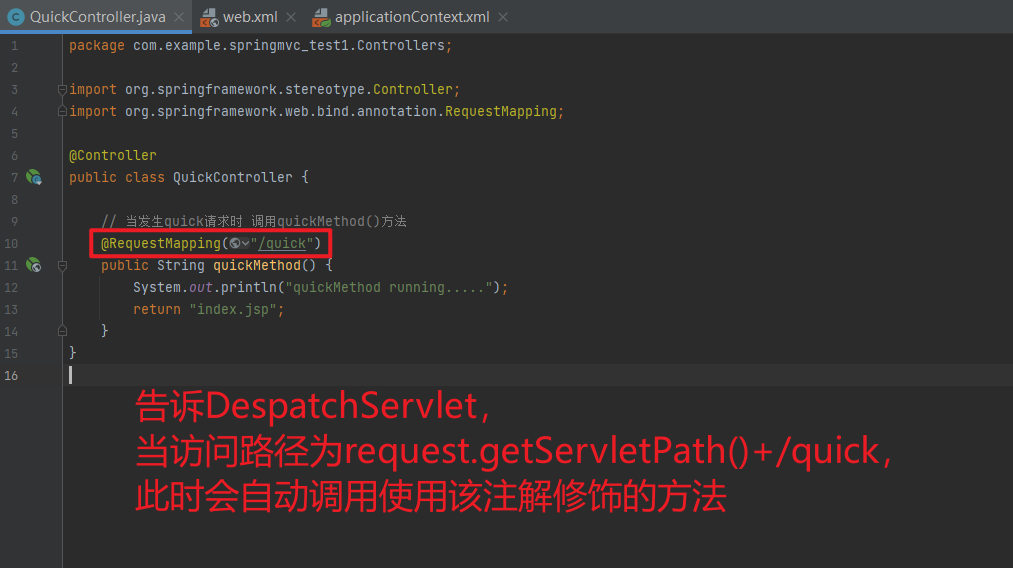
value = "/quick", method = RequestMethod.POST
通过限制method,可以确保只有当请求方式为指定的类型时,此时才会调用特定的方法
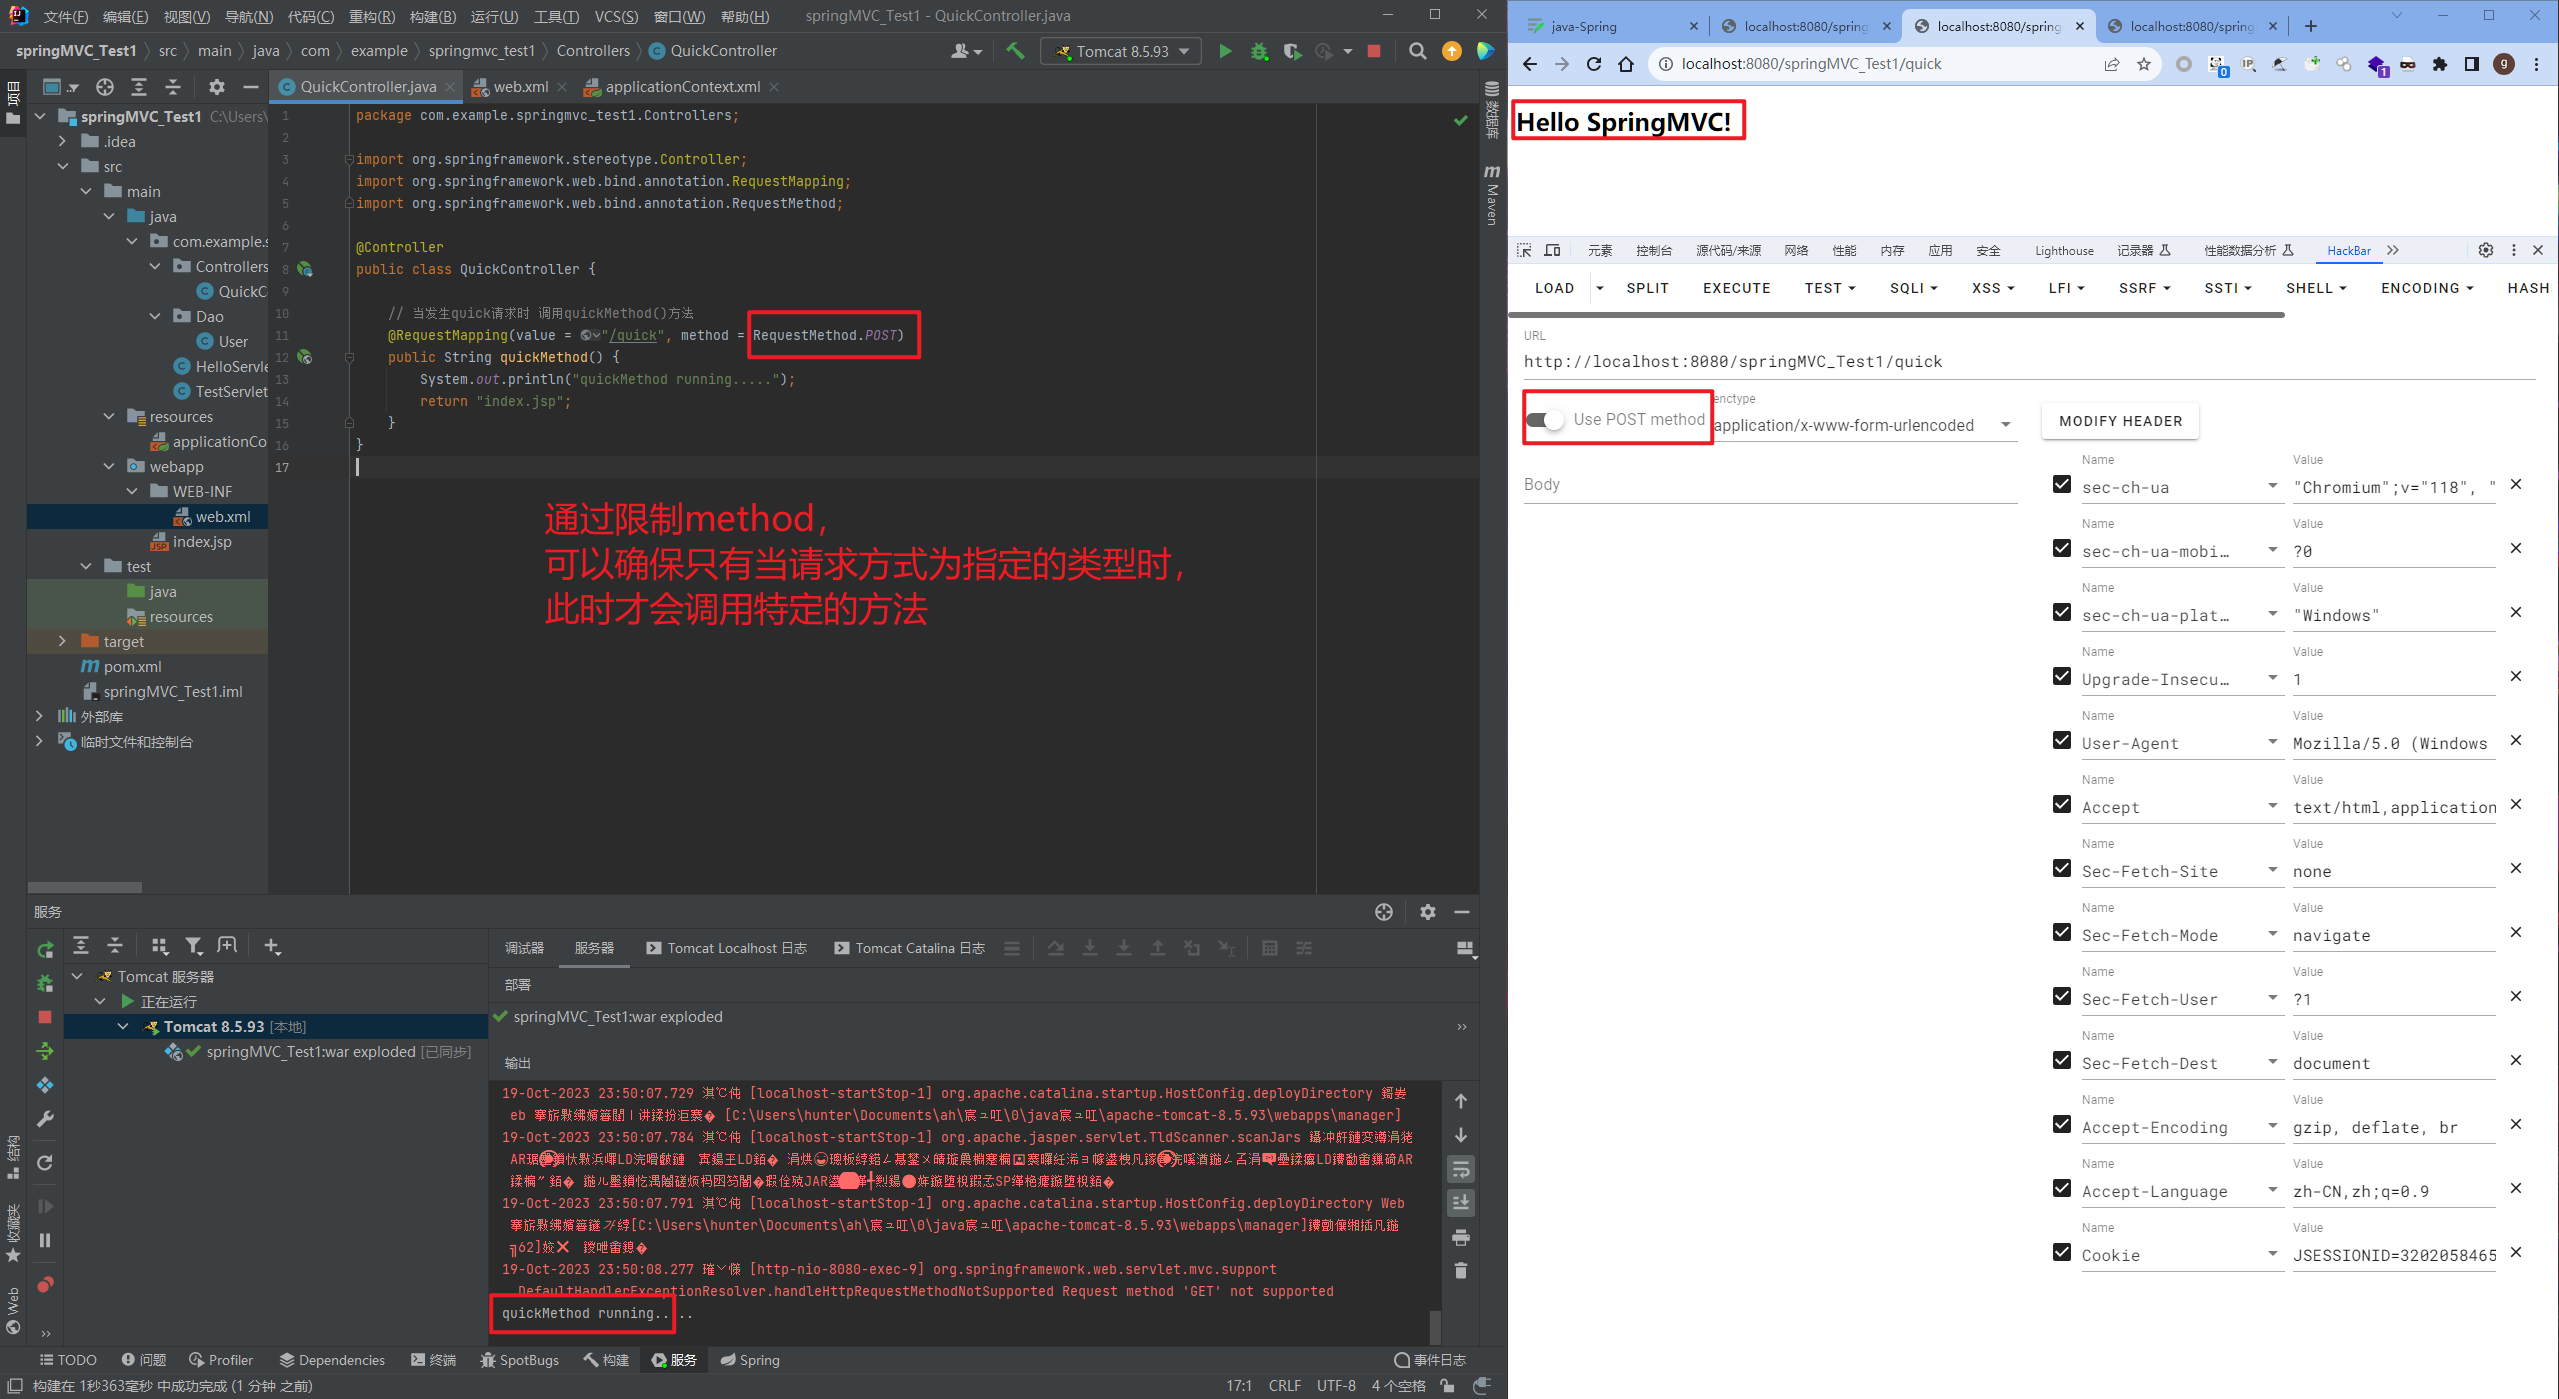
value = "/quick", method = RequestMethod.POST, params = {"accountName", "haha"}
当传递accountName和haha的值,此时对应的请求才能被处理,POST、accountName、haha
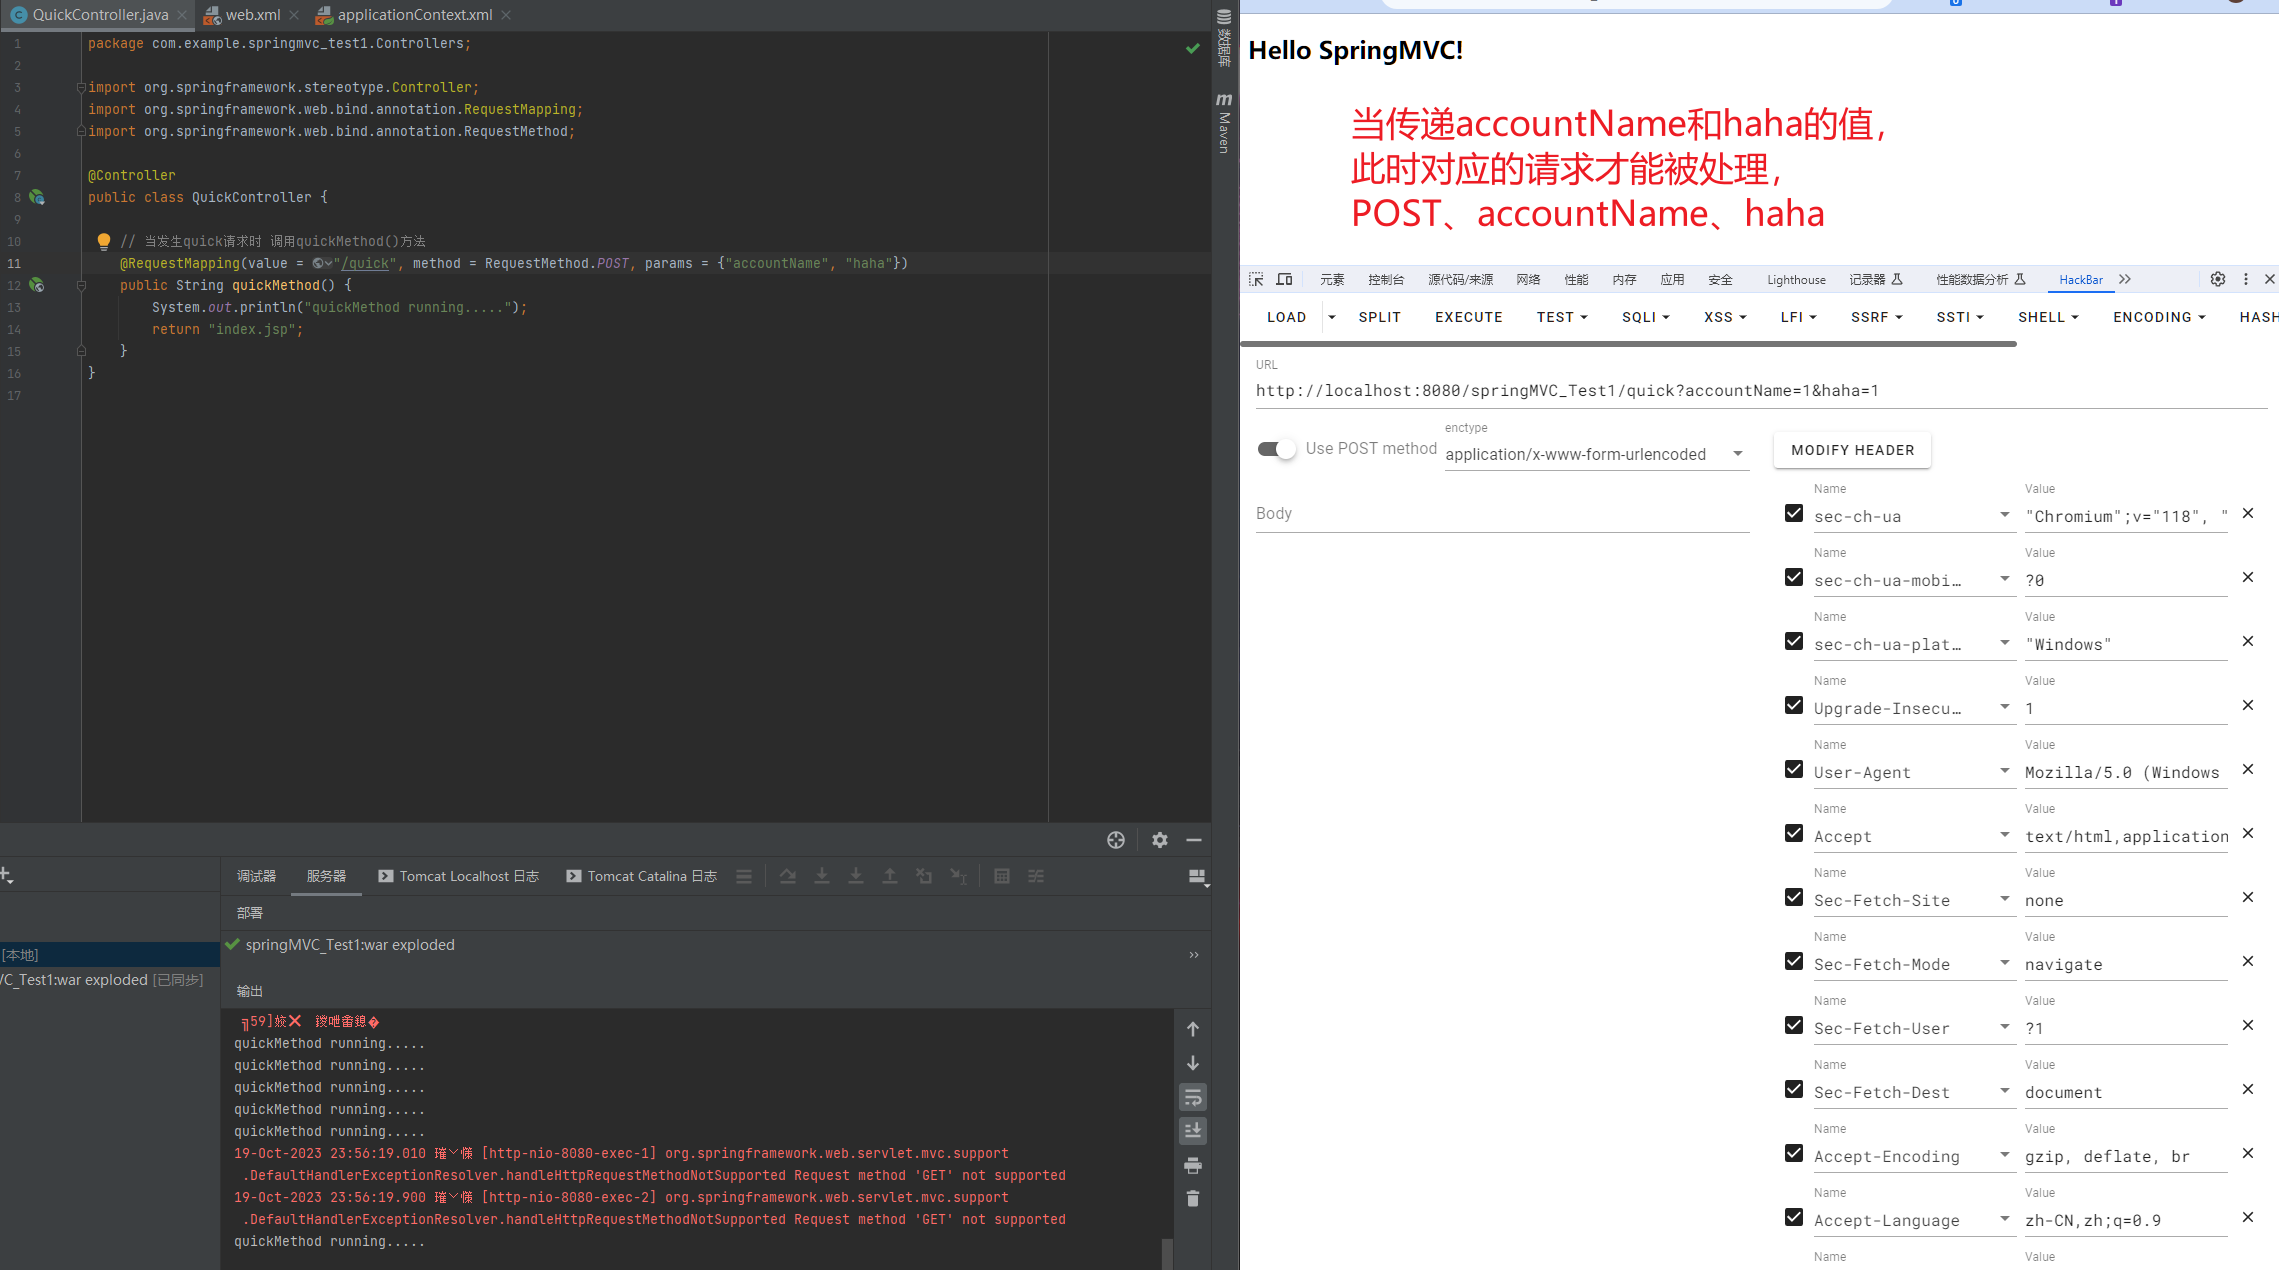
mvc命名空间引入
命名空间:
xmlns:context="http://www.springframework.org/schema/context"
xmlns:mvc="http://www.springframework.org/schema/mvc"
约束地址:
http://www.springframework.org/schema/context
http://www.springframework.org/schema/context/spring-context.xsd
http://www.springframework.org/schema/mvc
http://www.springframework.org/schema/mvc/spring-mvc.xsd
组件扫描
SpringMVC基于Spring容器,所以在进行SpringMVC操作时,需要将Controller存储到Spring容器中,如果使用@Controller注解标注的话,就需要使用<context:component-scanbase-package="com.example.springmvc_test1"/>进行组件扫描。
2.3.4. SpringMVC的XML配置解析
1. 视图解析器
SpringMVC有默认组件配置,默认组件都是DispatcherServlet.properties配置文件中配置的,该配置文件地址org/springframework/web/servlet/DispatcherServlet.properties,该文件中配置了默认的视图解析器,如下:
org.springframework.web.servlet.ViewResolver=org.springframework.web.servlet.view.InternalResourceViewResolver
翻看该解析器源码,可以看到该解析器的默认设置,如下:
REDIRECT_URL_PREFIX = "redirect:"  --重定向前缀
FORWARD_URL_PREFIX = "forward:"    --转发前缀(默认值)
prefix = "";     --视图名称前缀
suffix = ""; --视图名称后缀通过QuickController中,访问quick去返回default.jsp页面,而default.jsp在WEB-INF/view/目录下,此时就需要用到视图解析器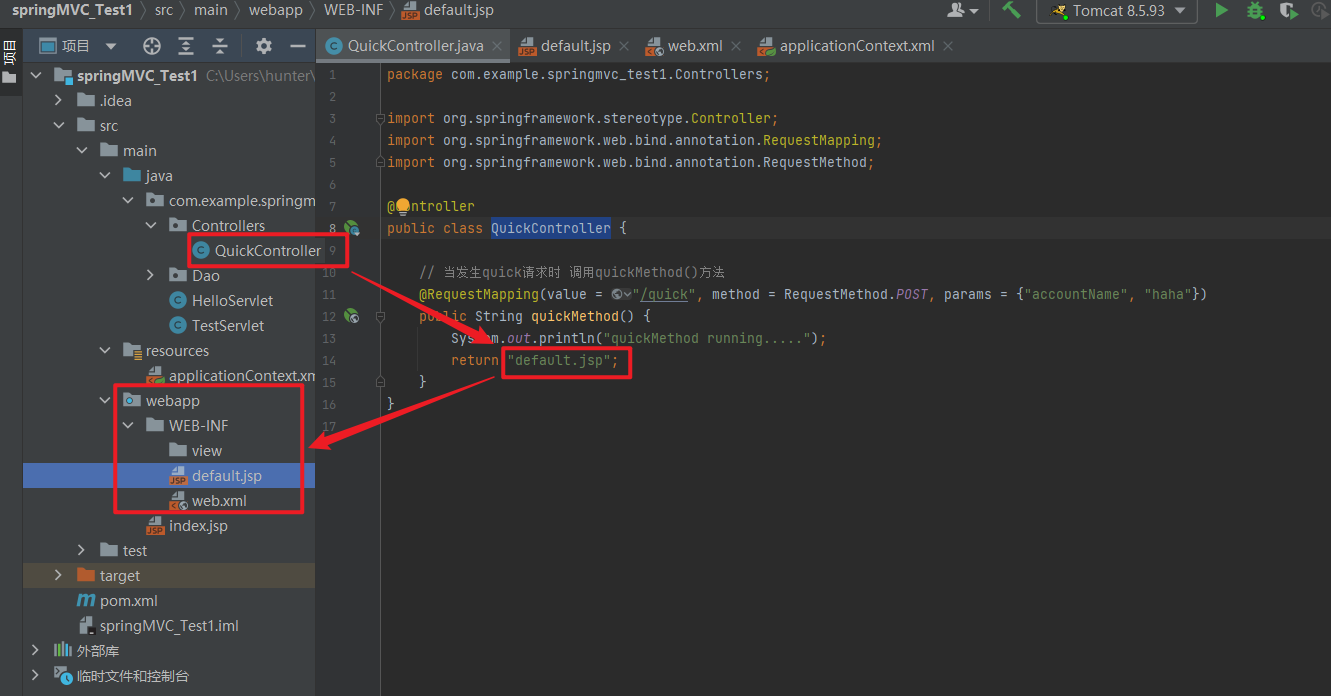
我们可以通过属性注入的方式修改视图的的前后缀
<!--配置内部资源视图解析器-->
<bean class="org.springframework.web.servlet.view.InternalResourceViewResolver">
    <property name="prefix" value="/WEB-INF/views/"/>
    <property name="suffix" value=".jsp"/>
</bean>
<beans xmlns="http://www.springframework.org/schema/beans"
xmlns:mvc="http://www.springframework.org/schema/mvc"
xmlns:context="http://www.springframework.org/schema/context"
xmlns:xsi="http://www.w3.org/2001/XMLSchema-instance"
xsi:schemaLocation="http://www.springframework.org/schema/beans
http://www.springframework.org/schema/beans/spring-beans.xsd
http://www.springframework.org/schema/mvc
http://www.springframework.org/schema/mvc/spring-mvc.xsd
http://www.springframework.org/schema/context
http://www.springframework.org/schema/context/spring-context.xsd">
<!--配置注解扫描-->
<context:component-scan base-package="com.example.springmvc_test1"/>
<!--配置内部资源视图解析器-->
<bean class="org.springframework.web.servlet.view.InternalResourceViewResolver">
<property name="prefix" value="/WEB-INF/views/"/>
<property name="suffix" value=".jsp"/>
</bean>
</beans>package com.example.springmvc_test1.Controllers;
import org.springframework.stereotype.Controller;
import org.springframework.web.bind.annotation.RequestMapping;
import org.springframework.web.bind.annotation.RequestMethod;
@Controller
public class QuickController {
// 当发生quick请求时 调用quickMethod()方法
@RequestMapping(value = "/quick", method = RequestMethod.POST, params = {"accountName", "haha"})
public String quickMethod() {
System.out.println("quickMethod running.....");
return "default";
}
}<?xml version="1.0" encoding="UTF-8"?>
<project xmlns="http://maven.apache.org/POM/4.0.0"
xmlns:xsi="http://www.w3.org/2001/XMLSchema-instance"
xsi:schemaLocation="http://maven.apache.org/POM/4.0.0 https://maven.apache.org/xsd/maven-4.0.0.xsd">
<modelVersion>4.0.0</modelVersion>
<groupId>com.example</groupId>
<artifactId>springMVC_Test1</artifactId>
<version>1.0-SNAPSHOT</version>
<name>springMVC_Test1</name>
<packaging>war</packaging>
<properties>
<project.build.sourceEncoding>UTF-8</project.build.sourceEncoding>
<maven.compiler.target>1.8</maven.compiler.target>
<maven.compiler.source>1.8</maven.compiler.source>
<junit.version>5.7.1</junit.version>
</properties>
<!--dependencies 依赖包的意思-->
<dependencies>
<dependency>
<groupId>javax.servlet</groupId>
<artifactId>javax.servlet-api</artifactId>
<version>4.0.1</version>
<scope>provided</scope>
</dependency>
<dependency>
<groupId>org.junit.jupiter</groupId>
<artifactId>junit-jupiter-api</artifactId>
<version>${junit.version}</version>
<scope>test</scope>
</dependency>
<dependency>
<groupId>org.junit.jupiter</groupId>
<artifactId>junit-jupiter-engine</artifactId>
<version>${junit.version}</version>
<scope>test</scope>
</dependency>
<!--mybatis坐标-->
<dependency>
<groupId>org.mybatis</groupId>
<artifactId>mybatis</artifactId>
<version>3.5.4</version>
</dependency>
<!--mysql驱动坐标-->
<dependency>
<groupId>mysql</groupId>
<artifactId>mysql-connector-java</artifactId>
<version>5.1.39</version>
<scope>runtime</scope>
</dependency>
<!--单元测试坐标-->
<dependency>
<groupId>junit</groupId>
<artifactId>junit</artifactId>
<version>4.12</version>
<scope>test</scope>
</dependency>
<!--日志坐标-->
<dependency>
<groupId>log4j</groupId>
<artifactId>log4j</artifactId>
<version>1.2.12</version>
</dependency>
<dependency>
<groupId>org.junit.jupiter</groupId>
<artifactId>junit-jupiter</artifactId>
<version>RELEASE</version>
<scope>compile</scope>
</dependency>
<!-- 分页助手 -->
<dependency>
<groupId>com.github.pagehelper</groupId>
<artifactId>pagehelper</artifactId>
<version>3.7.5</version>
</dependency>
<dependency>
<groupId>com.github.jsqlparser</groupId>
<artifactId>jsqlparser</artifactId>
<version>0.9.1</version>
</dependency>
<!--导入spring的context坐标,context依赖core、beans、expression-->
<dependency>
<groupId>org.springframework</groupId>
<artifactId>spring-context</artifactId>
<version>5.0.5.RELEASE</version>
</dependency>
<!-- C3P0连接池 -->
<dependency>
<groupId>c3p0</groupId>
<artifactId>c3p0</artifactId>
<version>0.9.1.2</version>
</dependency><!-- Druid连接池 -->
<dependency>
<groupId>com.alibaba</groupId>
<artifactId>druid</artifactId>
<version>1.1.10</version>
</dependency>
<!-- mysql驱动 -->
<dependency>
<groupId>mysql</groupId>
<artifactId>mysql-connector-java</artifactId>
<version>5.1.39</version>
</dependency>
<!--此处需要注意的是,spring5 及以上版本要求 junit 的版本必须是 4.12 及以上-->
<dependency>
<groupId>org.springframework</groupId>
<artifactId>spring-test</artifactId>
<version>5.0.2.RELEASE</version>
</dependency>
<dependency>
<groupId>junit</groupId>
<artifactId>junit</artifactId>
<version>4.12</version>
<scope>test</scope>
</dependency>
<dependency>
<groupId>junit</groupId>
<artifactId>junit</artifactId>
<version>4.12</version>
<scope>compile</scope>
</dependency>
<!--导入spring的context坐标,context依赖aop-->
<dependency>
<groupId>org.springframework</groupId>
<artifactId>spring-context</artifactId>
<version>5.0.5.RELEASE</version>
</dependency>
<!-- aspectj的织入 -->
<dependency>
<groupId>org.aspectj</groupId>
<artifactId>aspectjweaver</artifactId>
<version>1.8.13</version>
</dependency>
<dependency>
<groupId>org.springframework</groupId>
<artifactId>spring-web</artifactId>
<version>5.0.5.RELEASE</version>
</dependency>
<!--Spring坐标-->
<dependency>
<groupId>org.springframework</groupId>
<artifactId>spring-context</artifactId>
<version>5.0.5.RELEASE</version>
</dependency>
<!--SpringMVC坐标-->
<dependency>
<groupId>org.springframework</groupId>
<artifactId>spring-webmvc</artifactId>
<version>5.0.5.RELEASE</version>
</dependency>
<!--Servlet坐标-->
<dependency>
<groupId>javax.servlet</groupId>
<artifactId>servlet-api</artifactId>
<version>2.5</version>
</dependency>
<!--Jsp坐标-->
<dependency>
<groupId>javax.servlet.jsp</groupId>
<artifactId>jsp-api</artifactId>
<version>2.0</version>
</dependency>
</dependencies>
<build>
<plugins>
<plugin>
<groupId>org.apache.maven.plugins</groupId>
<artifactId>maven-war-plugin</artifactId>
<version>3.3.1</version>
</plugin>
</plugins>
</build>
</project>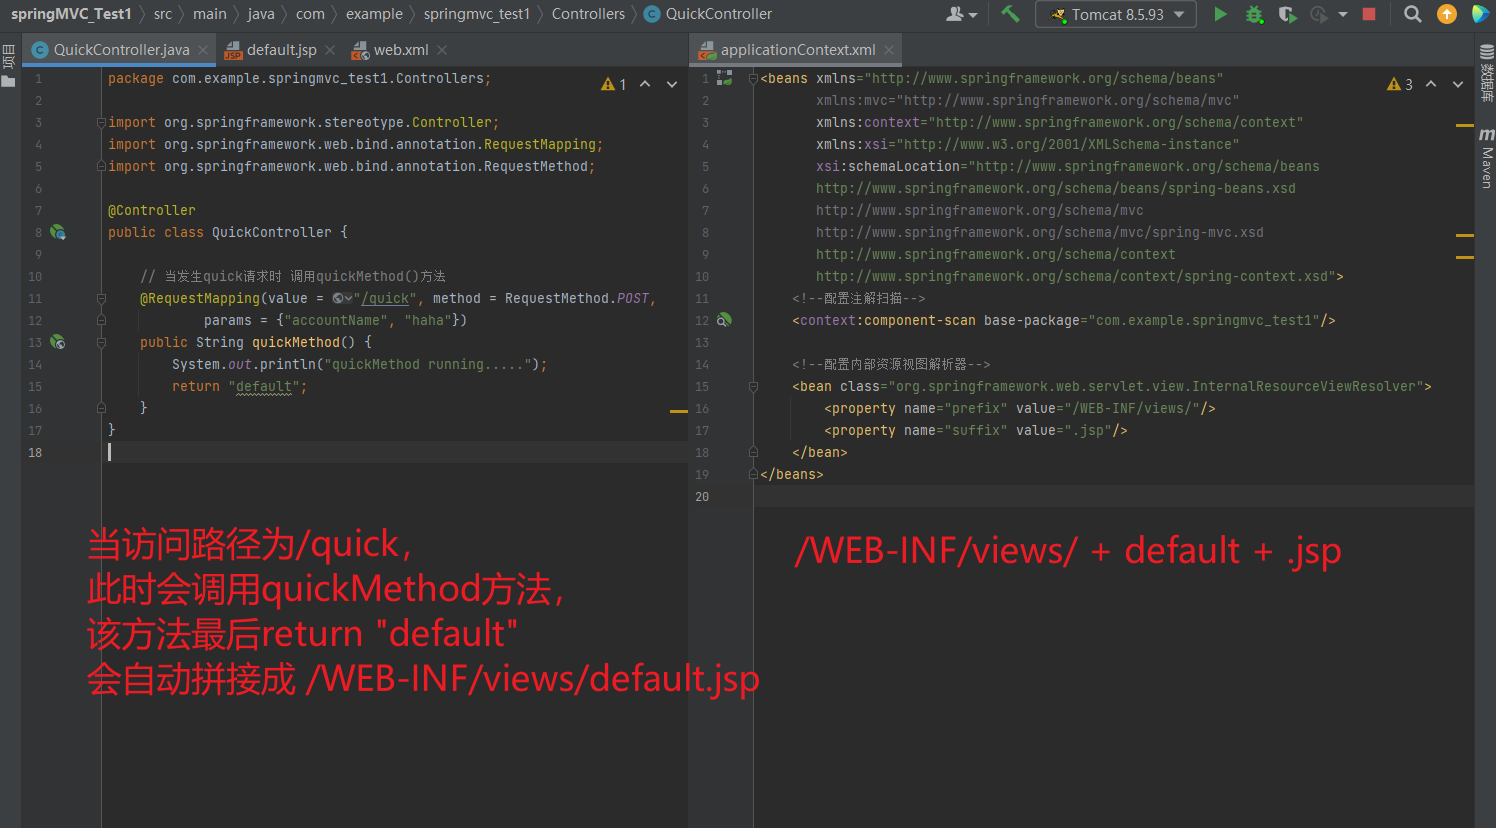
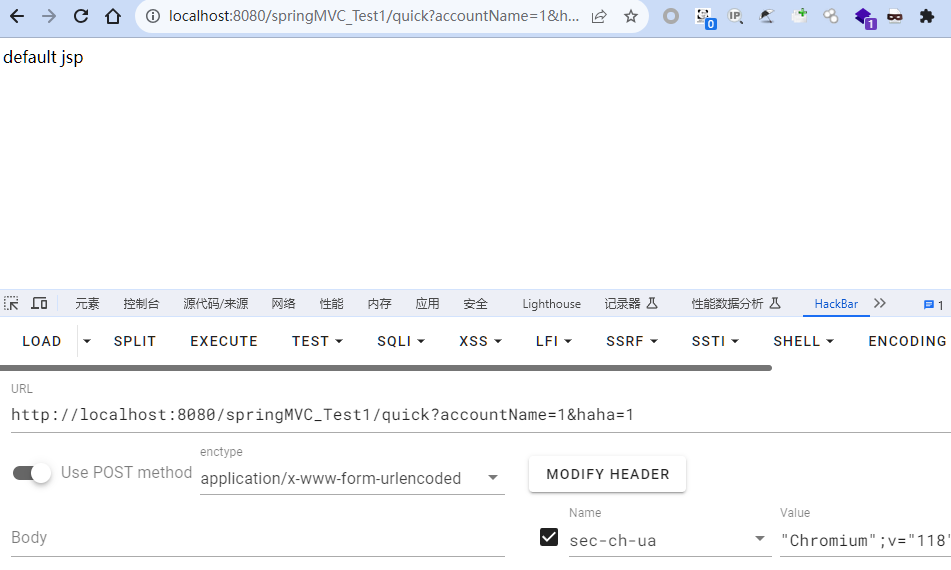
2.3.5. 知识要点
SpringMVC的相关组件
• 前端控制器:DispatcherServlet
• 处理器映射器:HandlerMapping
• 处理器适配器:HandlerAdapter
• 处理器:Handler
• 视图解析器:View Resolver
• 视图:View
SpringMVC的注解和配置
• 请求映射注解:@RequestMapping
• 视图解析器配置:
REDIRECT_URL_PREFIX = "redirect:"
FORWARD_URL_PREFIX = "forward:"
prefix = "";
suffix = "";
2.4. SpringMVC的请求和响应
2.4.1. SpringMVC的数据响应
2.4.1.1. SpringMVC的数据响应方式
- 页面跳转
直接返回字符串
通过ModelAndView对象返回
- 回写数据
直接返回字符串
返回对象或集合
2.4.1.2. 页面跳转
2.4.1.2.1. 返回字符串形式
直接返回字符串:此种方式会将返回的字符串与视图解析器的前后缀拼接后跳转。
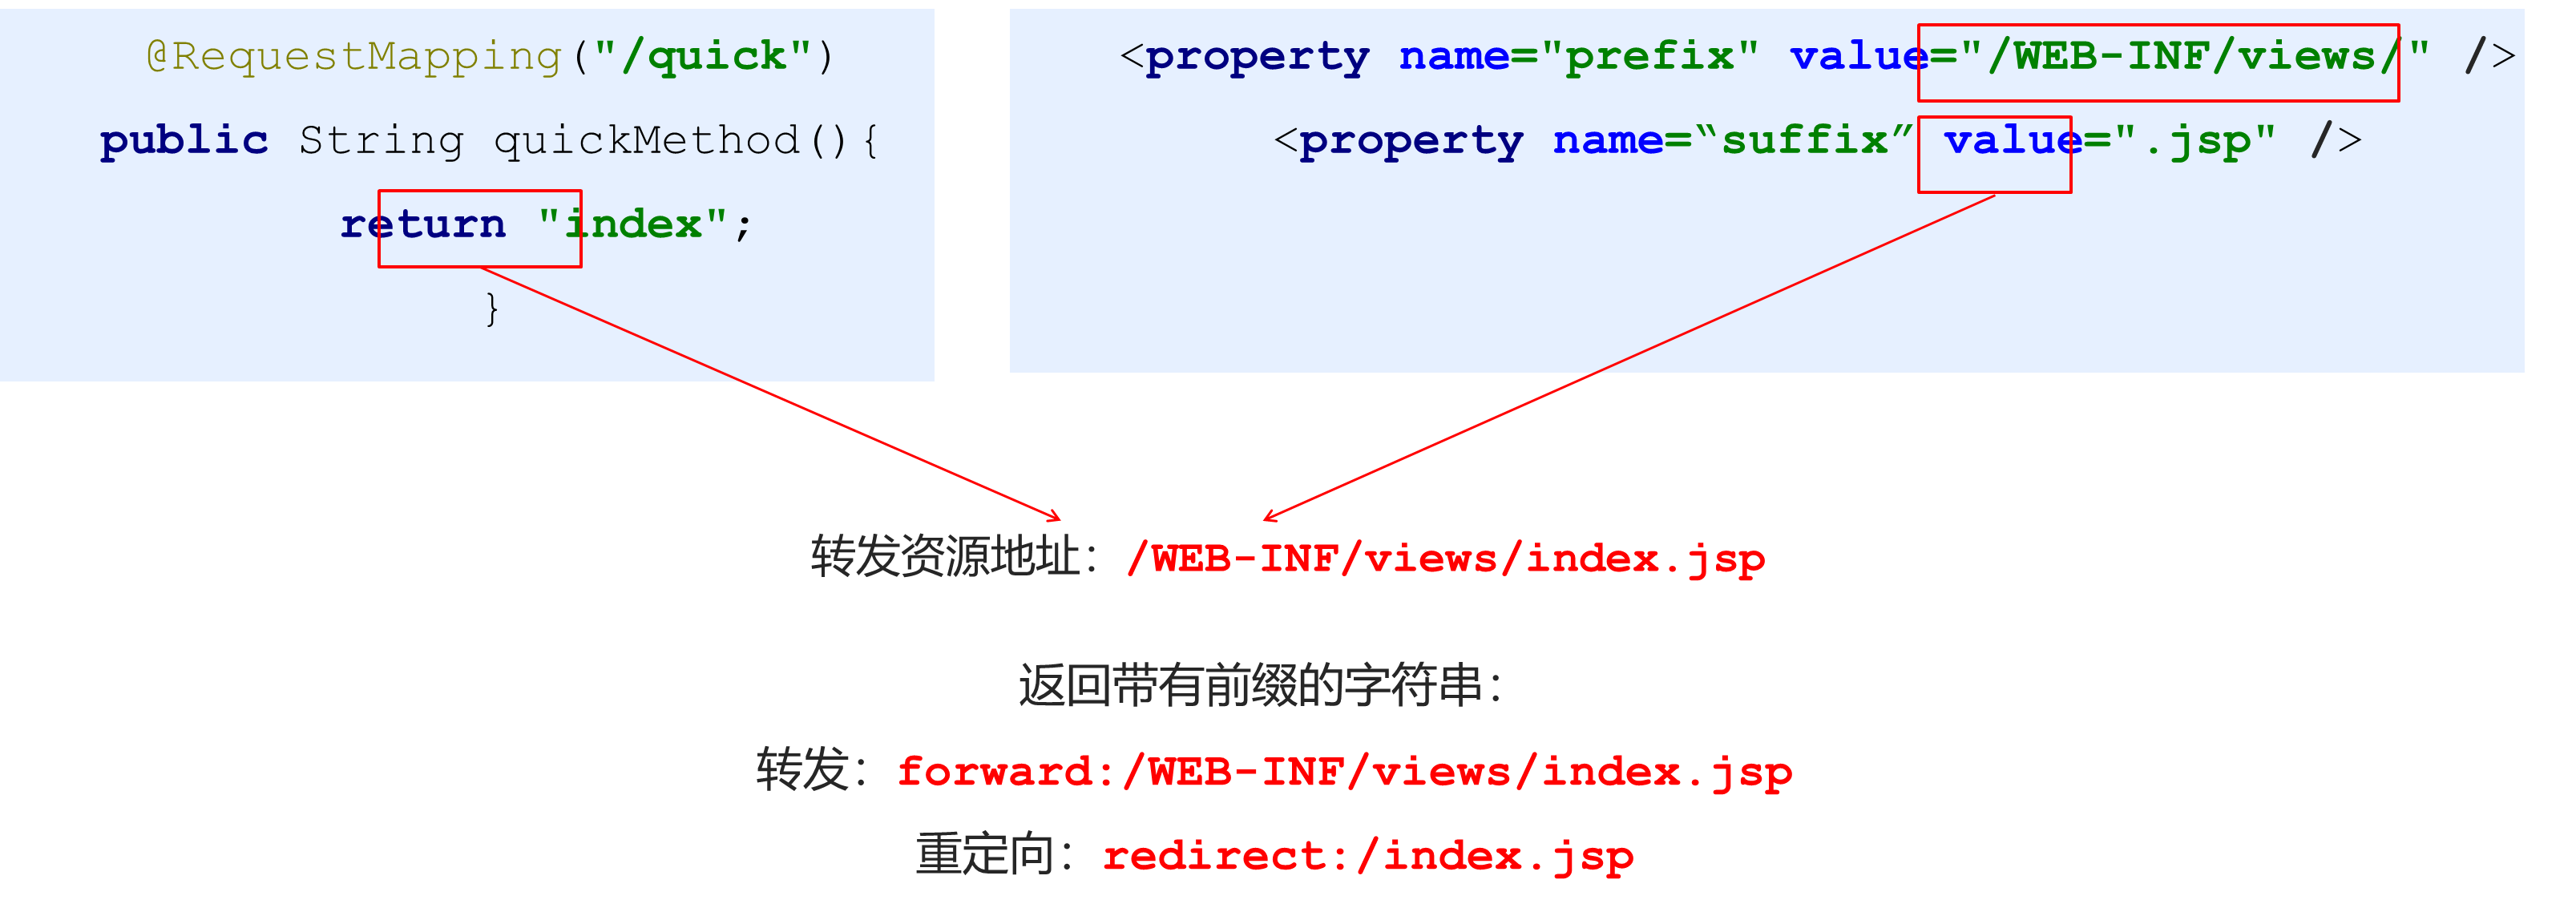
package com.example.springmvc_test1.Controllers;

import org.springframework.stereotype.Controller;
import org.springframework.web.bind.annotation.RequestMapping;
import org.springframework.web.bind.annotation.RequestMethod;
import org.springframework.web.servlet.ModelAndView;

@Controller
public class QuickController {

    // 当发生quick请求时 调用quickMethod()方法
    @RequestMapping(value = "/quick", method = RequestMethod.POST,
            params = {"accountName", "haha"})
    public String quickMethod() {
        System.out.println("quickMethod running.....");
        return "default";
    }
}
<beans xmlns="http://www.springframework.org/schema/beans"
xmlns:mvc="http://www.springframework.org/schema/mvc"
xmlns:context="http://www.springframework.org/schema/context"
xmlns:xsi="http://www.w3.org/2001/XMLSchema-instance"
xsi:schemaLocation="http://www.springframework.org/schema/beans
http://www.springframework.org/schema/beans/spring-beans.xsd
http://www.springframework.org/schema/mvc
http://www.springframework.org/schema/mvc/spring-mvc.xsd
http://www.springframework.org/schema/context
http://www.springframework.org/schema/context/spring-context.xsd">
<!--配置注解扫描-->
<context:component-scan base-package="com.example.springmvc_test1"/>
<!--配置内部资源视图解析器-->
<bean class="org.springframework.web.servlet.view.InternalResourceViewResolver">
<property name="prefix" value="/WEB-INF/views/"/>
<property name="suffix" value=".jsp"/>
</bean>
</beans>2.4.1.2.2. 返回ModelAndView对象
<beans xmlns="http://www.springframework.org/schema/beans"
       xmlns:mvc="http://www.springframework.org/schema/mvc"
       xmlns:context="http://www.springframework.org/schema/context"
       xmlns:xsi="http://www.w3.org/2001/XMLSchema-instance"
       xsi:schemaLocation="http://www.springframework.org/schema/beans
       http://www.springframework.org/schema/beans/spring-beans.xsd
       http://www.springframework.org/schema/mvc
       http://www.springframework.org/schema/mvc/spring-mvc.xsd
       http://www.springframework.org/schema/context
       http://www.springframework.org/schema/context/spring-context.xsd">
    <!--配置注解扫描-->
    <context:component-scan base-package="com.example.springmvc_test1"/>

    <!--配置内部资源视图解析器-->
<!--    <bean class="org.springframework.web.servlet.view.InternalResourceViewResolver">-->
<!--        <property name="prefix" value="/WEB-INF/views/"/>-->
<!--        <property name="suffix" value=".jsp"/>-->
<!--    </bean>-->
</beans>
<?xml version="1.0" encoding="UTF-8"?>
<web-app xmlns="http://xmlns.jcp.org/xml/ns/javaee"
xmlns:xsi="http://www.w3.org/2001/XMLSchema-instance"
xsi:schemaLocation="http://xmlns.jcp.org/xml/ns/javaee http://xmlns.jcp.org/xml/ns/javaee/web-app_4_0.xsd"
version="4.0">
<!--全局参数-->
<!-- <context-param>-->
<!-- <param-name>contextConfigLocation</param-name>-->
<!-- <param-value>classpath:applicationContext.xml</param-value>-->
<!-- </context-param>-->
<!--Spring的监听器-->
<!-- <listener>-->
<!-- <listener-class>org.springframework.web.context.ContextLoaderListener</listener-class>-->
<!-- </listener>-->
<servlet>
<servlet-name>DispatcherServlet</servlet-name>
<servlet-class>org.springframework.web.servlet.DispatcherServlet</servlet-class>
<init-param>
<param-name>contextConfigLocation</param-name>
<param-value>classpath:applicationContext.xml</param-value>
</init-param>
<load-on-startup>1</load-on-startup>
</servlet>
<servlet-mapping>
<servlet-name>DispatcherServlet</servlet-name>
<url-pattern>/</url-pattern>
</servlet-mapping>
</web-app>@RequestMapping("/quick2")
public ModelAndView quickMethod2(){
ModelAndView modelAndView = new ModelAndView();
modelAndView.setViewName("redirect:index.jsp");
return modelAndView;
}
@RequestMapping("/quick3")
public ModelAndView quickMethod3(){
ModelAndView modelAndView = new ModelAndView();
modelAndView.setViewName("forward:/WEB-INF/views/index.jsp");
return modelAndView;
}package com.example.springmvc_test1.Controllers;
import org.springframework.stereotype.Controller;
import org.springframework.web.bind.annotation.RequestMapping;
import org.springframework.web.bind.annotation.RequestMethod;
import org.springframework.web.servlet.ModelAndView;
@Controller
public class QuickController {
// 当发生quick请求时 调用quickMethod()方法
@RequestMapping(value = "/quick", method = RequestMethod.POST,
params = {"accountName", "haha"})
public String quickMethod() {
System.out.println("quickMethod running.....");
return "default";
}
@RequestMapping("/quick2")
public ModelAndView quickMethod2() {
ModelAndView modelAndView = new ModelAndView();
modelAndView.setViewName("redirect:index.jsp");
return modelAndView;
}
@RequestMapping("/quick3")
public ModelAndView quickMethod3() {
ModelAndView modelAndView = new ModelAndView();
modelAndView.setViewName("forward:/WEB-INF/views/default.jsp");
return modelAndView;
}
@RequestMapping(value = "/quick4")
public ModelAndView quickMethod4() {
ModelAndView modelAndView = new ModelAndView();
modelAndView.setViewName("redirect:/WEB-INF/views/default.jsp");
return modelAndView;
}
}
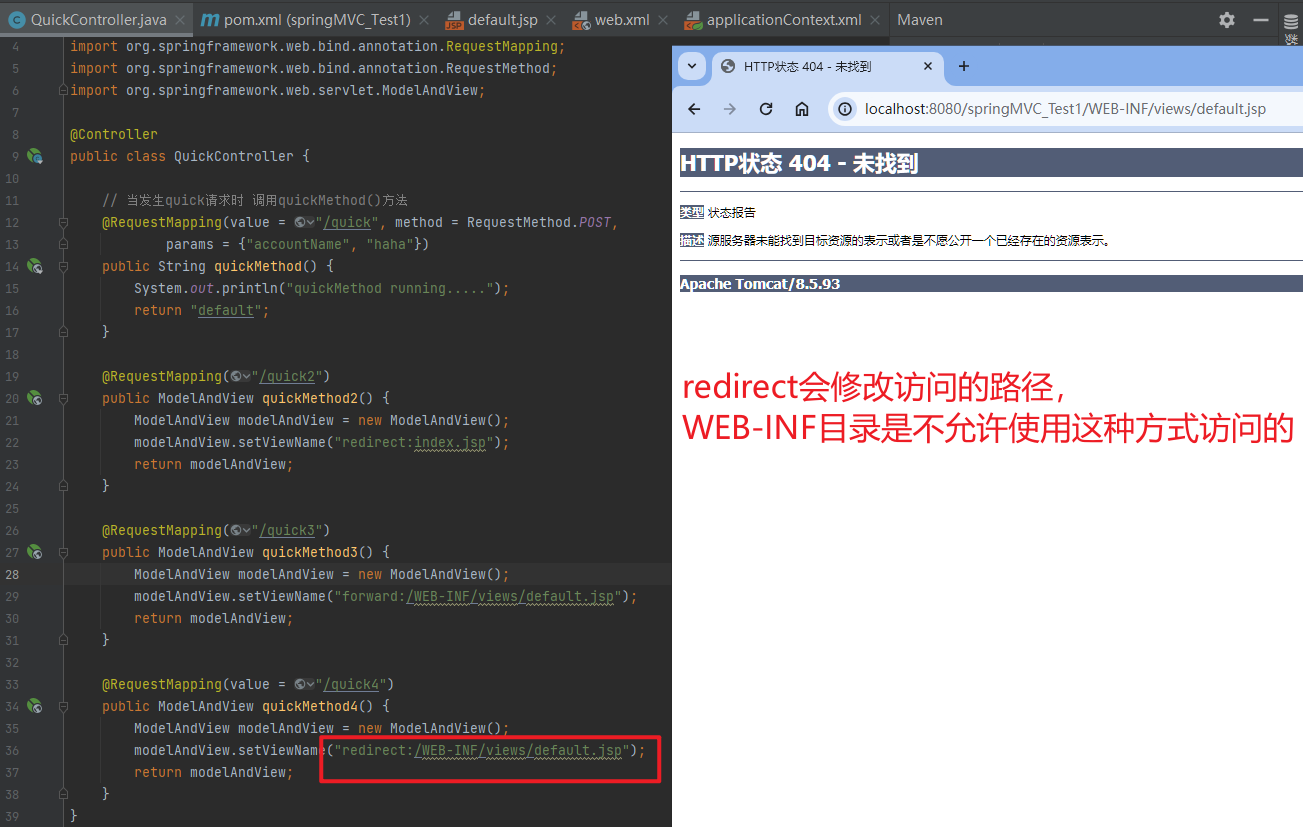
2.4.1.2.3. 向request域存储数据
在进行转发时,往往要向request域中存储数据,在jsp页面中显示,那么Controller中怎样向request域中存储数据呢?
- 测试
<%--
  Created by IntelliJ IDEA.
  User: hunter
  Date: 2023-10-20
  Time: 0:03
  To change this template use File | Settings | File Templates.
--%>
<%@ page contentType="text/html;charset=UTF-8" language="java" %>
<html>
<head>
    <title>Title</title>
</head>
<body>
default jsp
<%
    Object name = request.getAttribute("name");
    response.getWriter().write(name.toString());

//    try{
//        Object name = request.getAttribute("name");
//        response.getWriter().write(name.toString());
//    }
//    catch (Exception e){
//
//    }
%>
</body>
</html>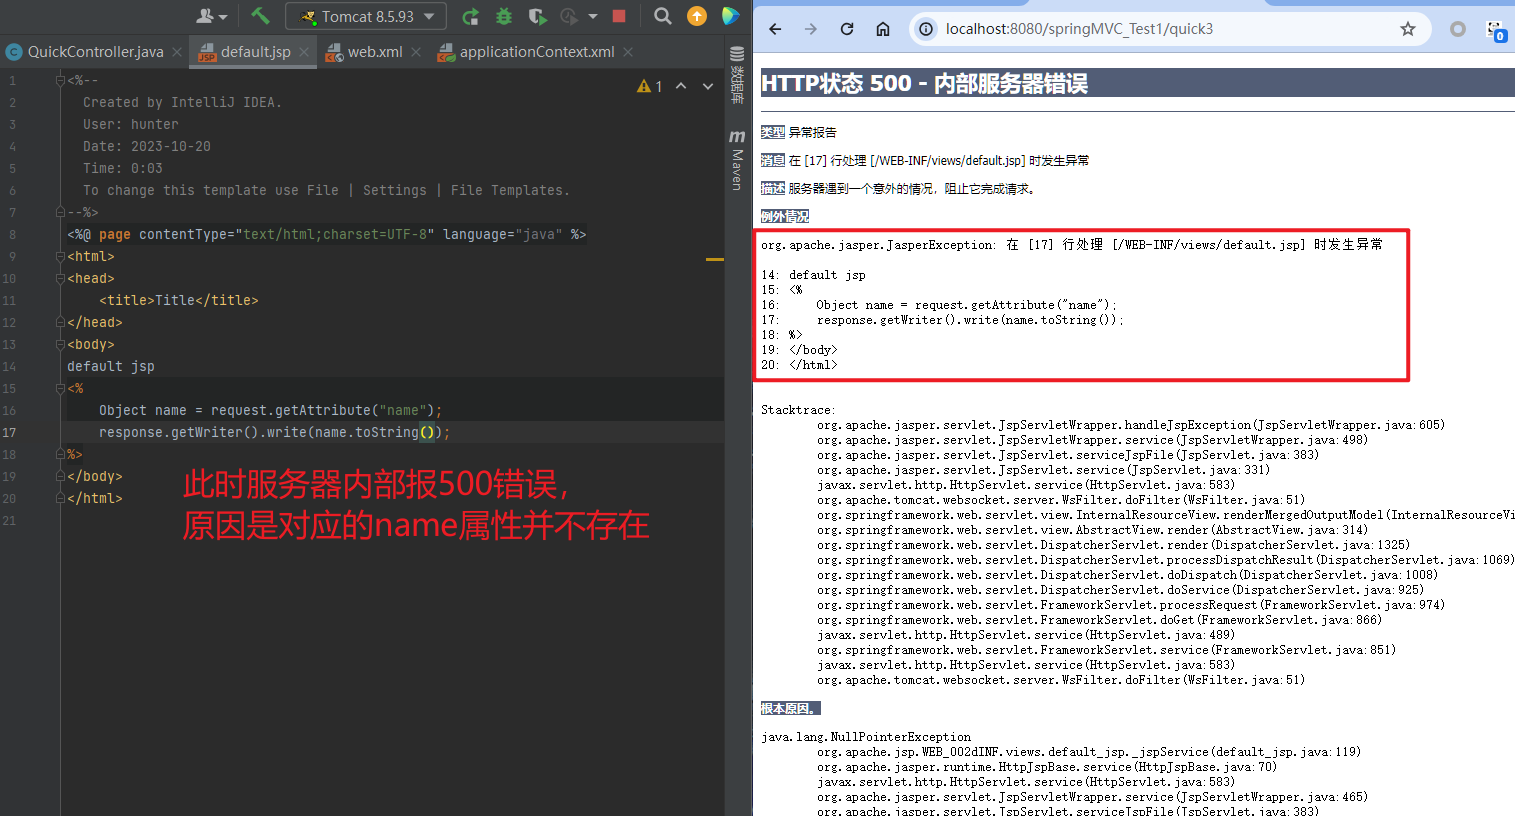
使用try抛出异常
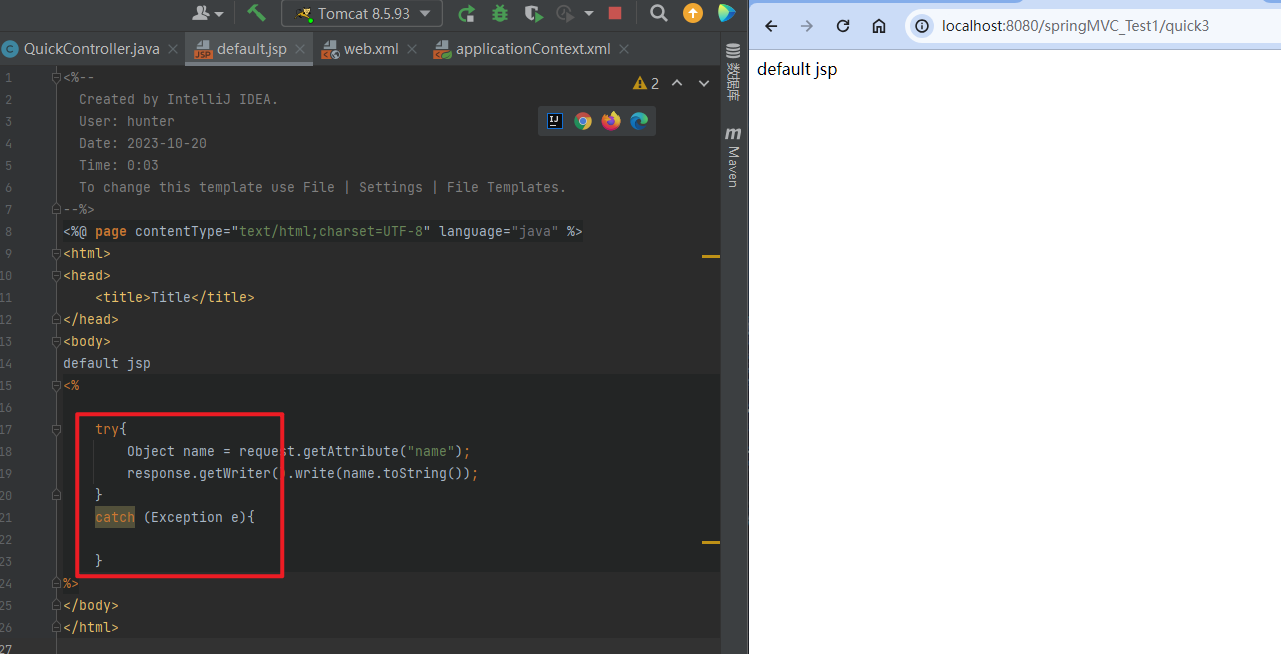
- 使用
addObject()方法
① X 通过SpringMVC框架注入的request对象setAttribute()方法设置
@RequestMapping("/quick")
public String quickMethod(HttpServletRequest request){
request.setAttribute("name","zhangsan");
return "index";
}
② 通过ModelAndView的addObject()方法设置
package com.example.springmvc_test1.Controllers;

import org.springframework.stereotype.Controller;
import org.springframework.web.bind.annotation.RequestMapping;
import org.springframework.web.bind.annotation.RequestMethod;
import org.springframework.web.servlet.ModelAndView;

@Controller
public class QuickController {

    // 当发生quick请求时 调用quickMethod()方法
    @RequestMapping(value = "/quick", method = RequestMethod.POST,
            params = {"accountName", "haha"})
    public String quickMethod() {
        System.out.println("quickMethod running.....");
        return "default";
    }

    @RequestMapping("/quick2")
    public ModelAndView quickMethod2() {
        ModelAndView modelAndView = new ModelAndView();
        modelAndView.setViewName("redirect:index.jsp");
        return modelAndView;
    }

    @RequestMapping("/quick3")
    public ModelAndView quickMethod3() {
        ModelAndView modelAndView = new ModelAndView();
        modelAndView.setViewName("forward:/WEB-INF/views/default.jsp");
        modelAndView.addObject("name", "hehe");
        return modelAndView;
    }

    @RequestMapping(value = "/quick4")
    public ModelAndView quickMethod4() {
        ModelAndView modelAndView = new ModelAndView();
        modelAndView.setViewName("redirect:/WEB-INF/views/default.jsp");
        return modelAndView;
    }
}
<%--
Created by IntelliJ IDEA.
User: hunter
Date: 2023-10-20
Time: 0:03
To change this template use File | Settings | File Templates.
--%>
<%@ page contentType="text/html;charset=UTF-8" language="java" %>
<html>
<head>
<title>Title</title>
</head>
<body>
default jsp
<%
try{
Object name = request.getAttribute("name");
response.getWriter().write(name.toString());
}
catch (Exception e){
}
%>
</body>
</html>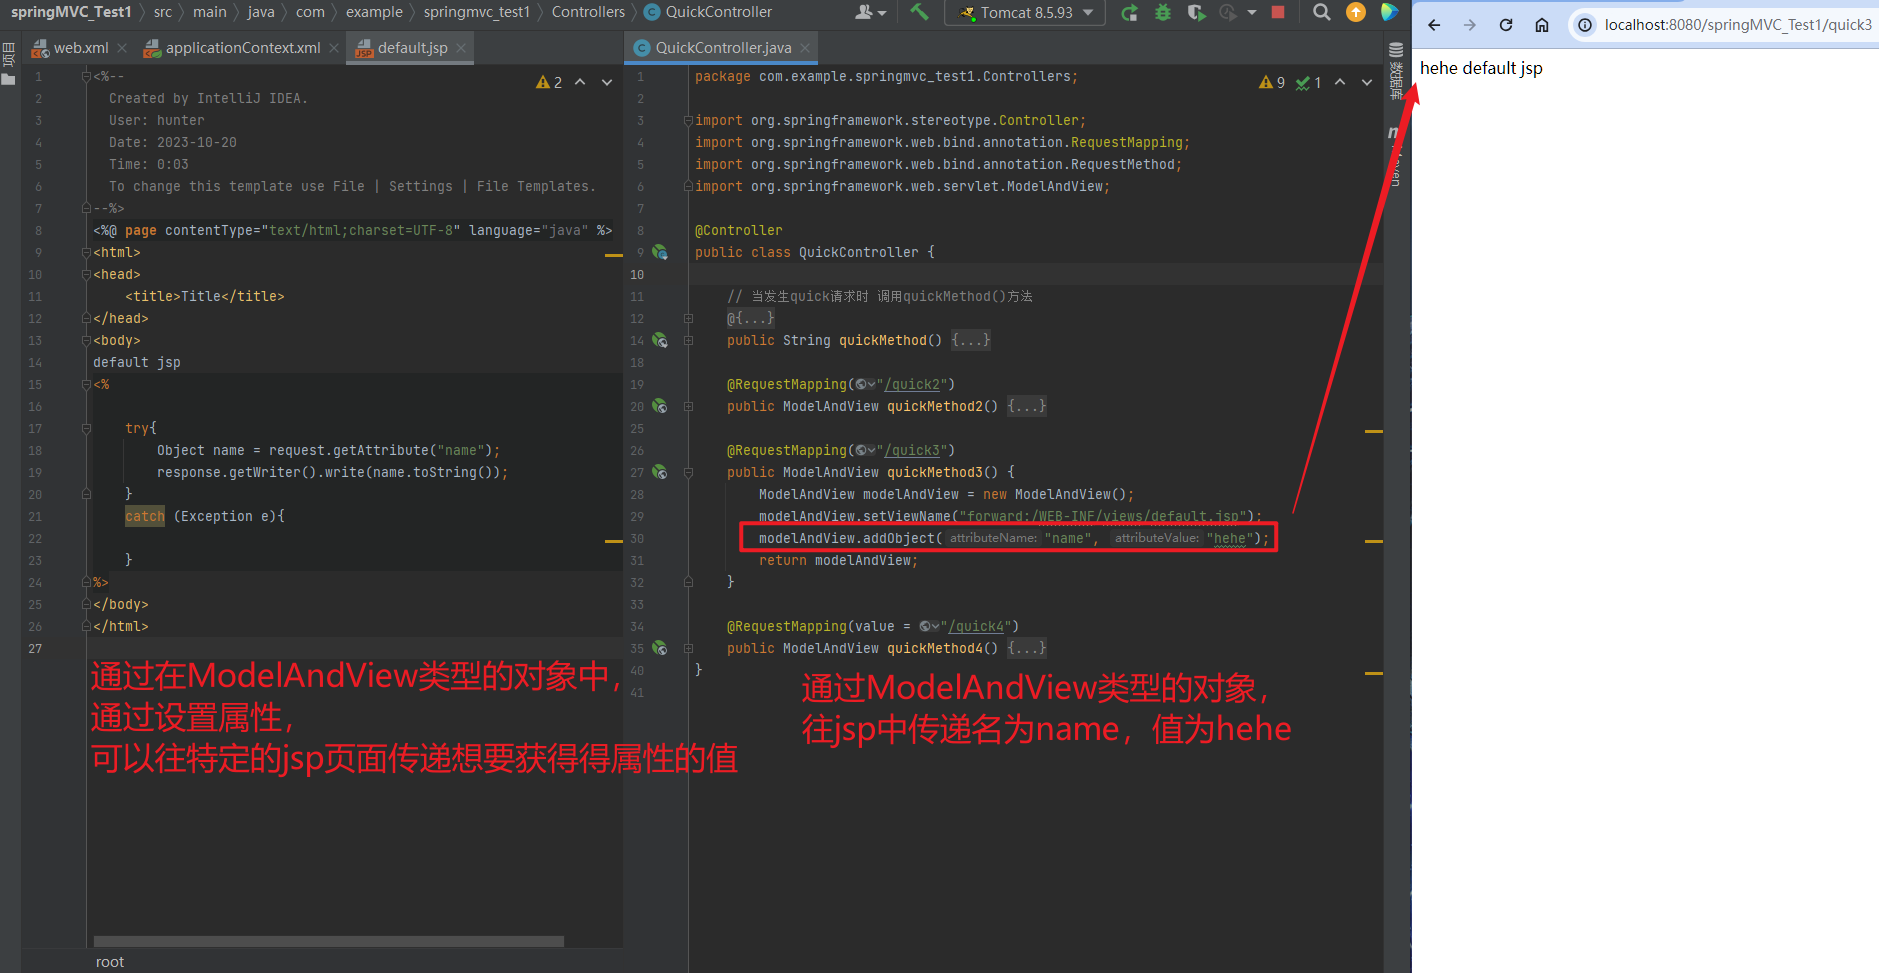
2.4.1.3. 回写数据
2.4.1.3.1. 直接返回字符串
Web基础阶段,客户端访问服务器端,如果想直接回写字符串作为响应体返回的话,只需要使用
response.getWriter().print("hello world")即可,那么在Controller中想直接回写字符串该怎样呢?
① 通过SpringMVC框架注入的response对象,使用response.getWriter().print("hello world")回写数据,此时不需要视图跳转,业务方法返回值为void。
package com.example.springmvc_test1.Controllers;

import org.springframework.stereotype.Controller;
import org.springframework.web.bind.annotation.RequestMapping;
import org.springframework.web.bind.annotation.RequestMethod;
import org.springframework.web.servlet.ModelAndView;

import javax.servlet.http.HttpServletResponse;
import java.io.IOException;

@Controller
public class QuickController {

    // 当发生quick请求时 调用quickMethod()方法
    @RequestMapping(value = "/quick", method = RequestMethod.POST,
            params = {"accountName", "haha"})
    public String quickMethod() {
        System.out.println("quickMethod running.....");
        return "default";
    }

    @RequestMapping("/quick2")
    public ModelAndView quickMethod2() {
        ModelAndView modelAndView = new ModelAndView();
        modelAndView.setViewName("redirect:index.jsp");
        return modelAndView;
    }

    @RequestMapping("/quick3")
    public ModelAndView quickMethod3() {
        ModelAndView modelAndView = new ModelAndView();
        modelAndView.setViewName("forward:/WEB-INF/views/default.jsp");
        modelAndView.addObject("name", "hehe");
        return modelAndView;
    }

    @RequestMapping(value = "/quick4")
    public ModelAndView quickMethod4() {
        ModelAndView modelAndView = new ModelAndView();
        modelAndView.setViewName("redirect:/WEB-INF/views/default.jsp");
        return modelAndView;
    }

    @RequestMapping(value = "quick5")
    public void quickMethod5(HttpServletResponse response) throws IOException {
        response.getWriter().write("helloworld");
    }
}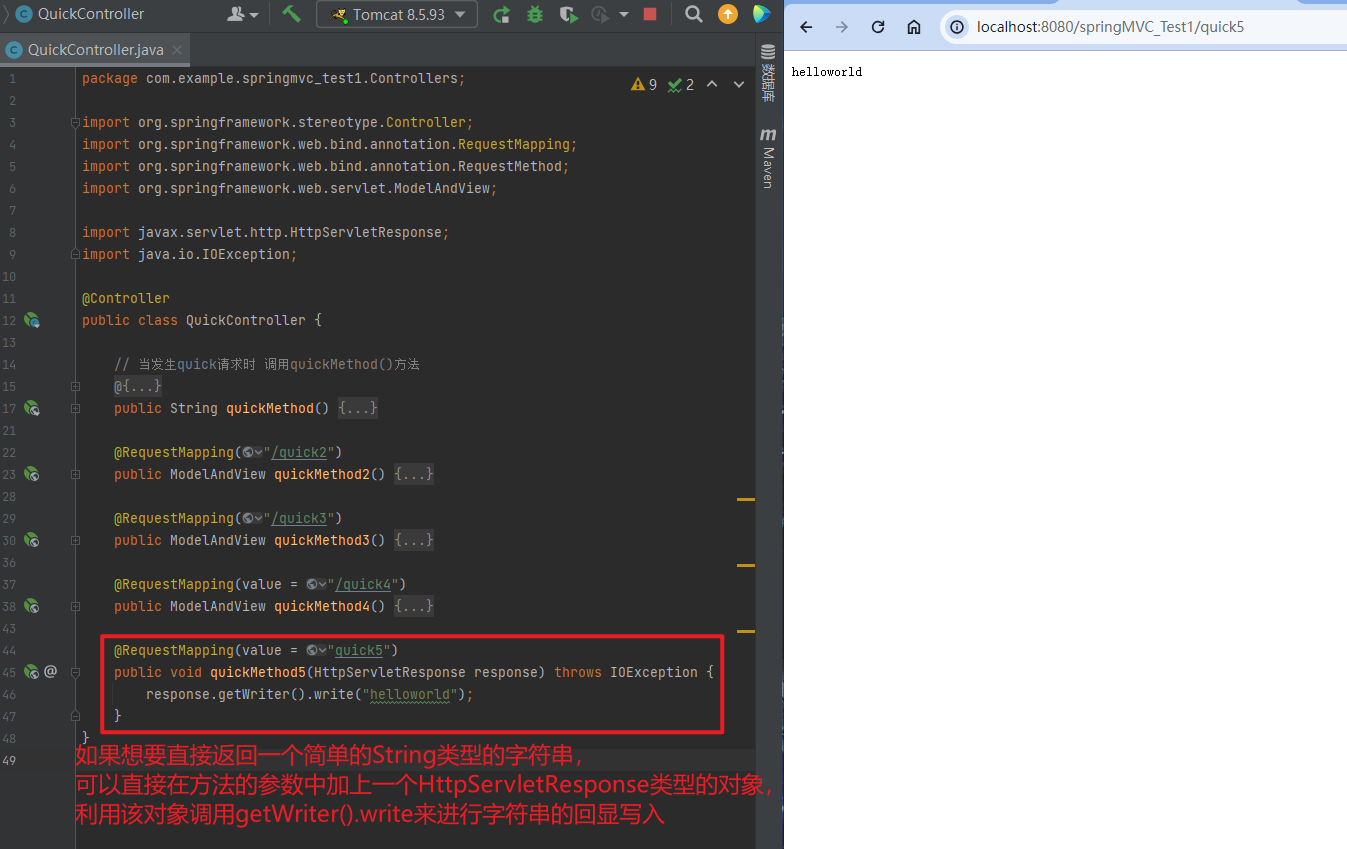
② 将需要回写的字符串直接返回,但此时需要通过@ResponseBody注解告知SpringMVC框架,方法返回的字符串不是跳转是直接在http响应体中返回。
@RequestMapping(value = "quick6")
// @ResponseBody
public String quickMethod6() throws IOException {
    return "hello springMvc!";
}
package com.example.springmvc_test1.Controllers;
import org.springframework.stereotype.Controller;
import org.springframework.web.bind.annotation.RequestMapping;
import org.springframework.web.bind.annotation.RequestMethod;
import org.springframework.web.bind.annotation.ResponseBody;
import org.springframework.web.servlet.ModelAndView;
import javax.servlet.http.HttpServletResponse;
import java.io.IOException;
@Controller
public class QuickController {
// 当发生quick请求时 调用quickMethod()方法
@RequestMapping(value = "/quick", method = RequestMethod.POST,
params = {"accountName", "haha"})
public String quickMethod() {
System.out.println("quickMethod running.....");
return "default";
}
@RequestMapping("/quick2")
public ModelAndView quickMethod2() {
ModelAndView modelAndView = new ModelAndView();
modelAndView.setViewName("redirect:index.jsp");
return modelAndView;
}
@RequestMapping("/quick3")
public ModelAndView quickMethod3() {
ModelAndView modelAndView = new ModelAndView();
modelAndView.setViewName("forward:/WEB-INF/views/default.jsp");
modelAndView.addObject("name", "hehe");
return modelAndView;
}
@RequestMapping(value = "/quick4")
public ModelAndView quickMethod4() {
ModelAndView modelAndView = new ModelAndView();
modelAndView.setViewName("redirect:/WEB-INF/views/default.jsp");
return modelAndView;
}
@RequestMapping(value = "quick5")
public void quickMethod5(HttpServletResponse response) throws IOException {
response.getWriter().write("helloworld");
}
@RequestMapping(value = "quick6")
@ResponseBody
public String quickMethod6() throws IOException {
return "hello springMvc!";
}
}不加@ResponseBody注解
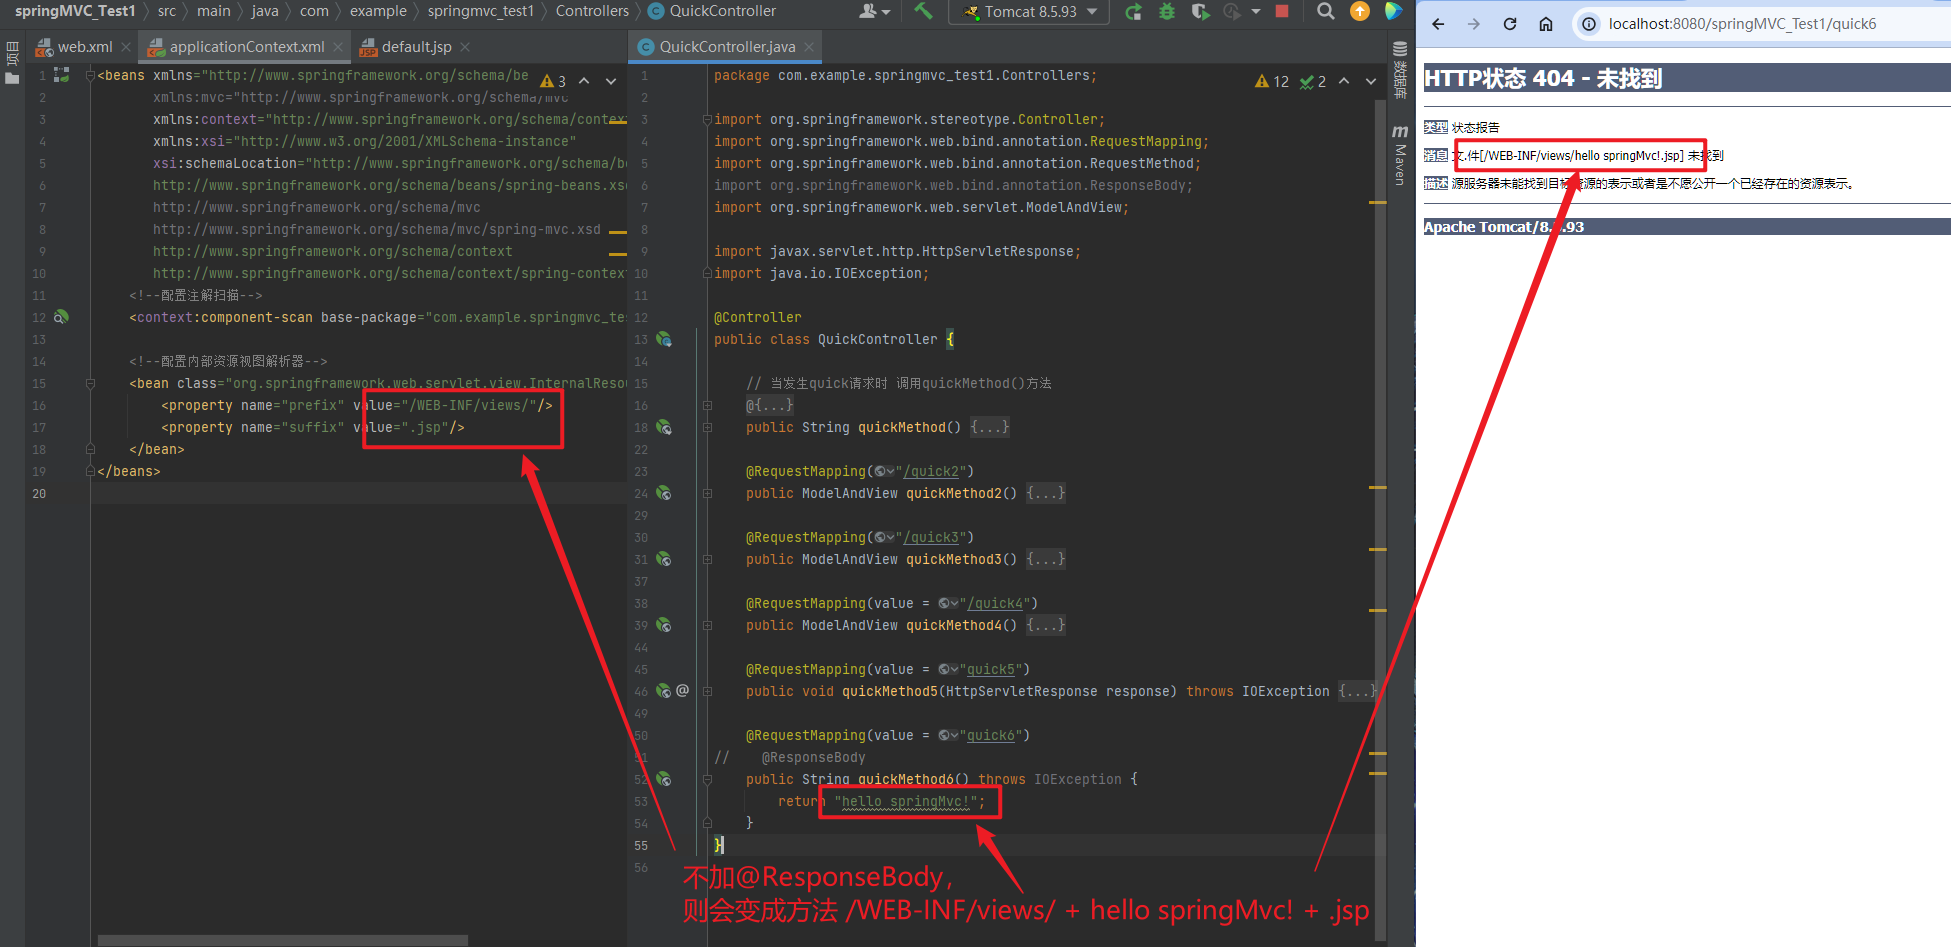
加@ResponseBody注解
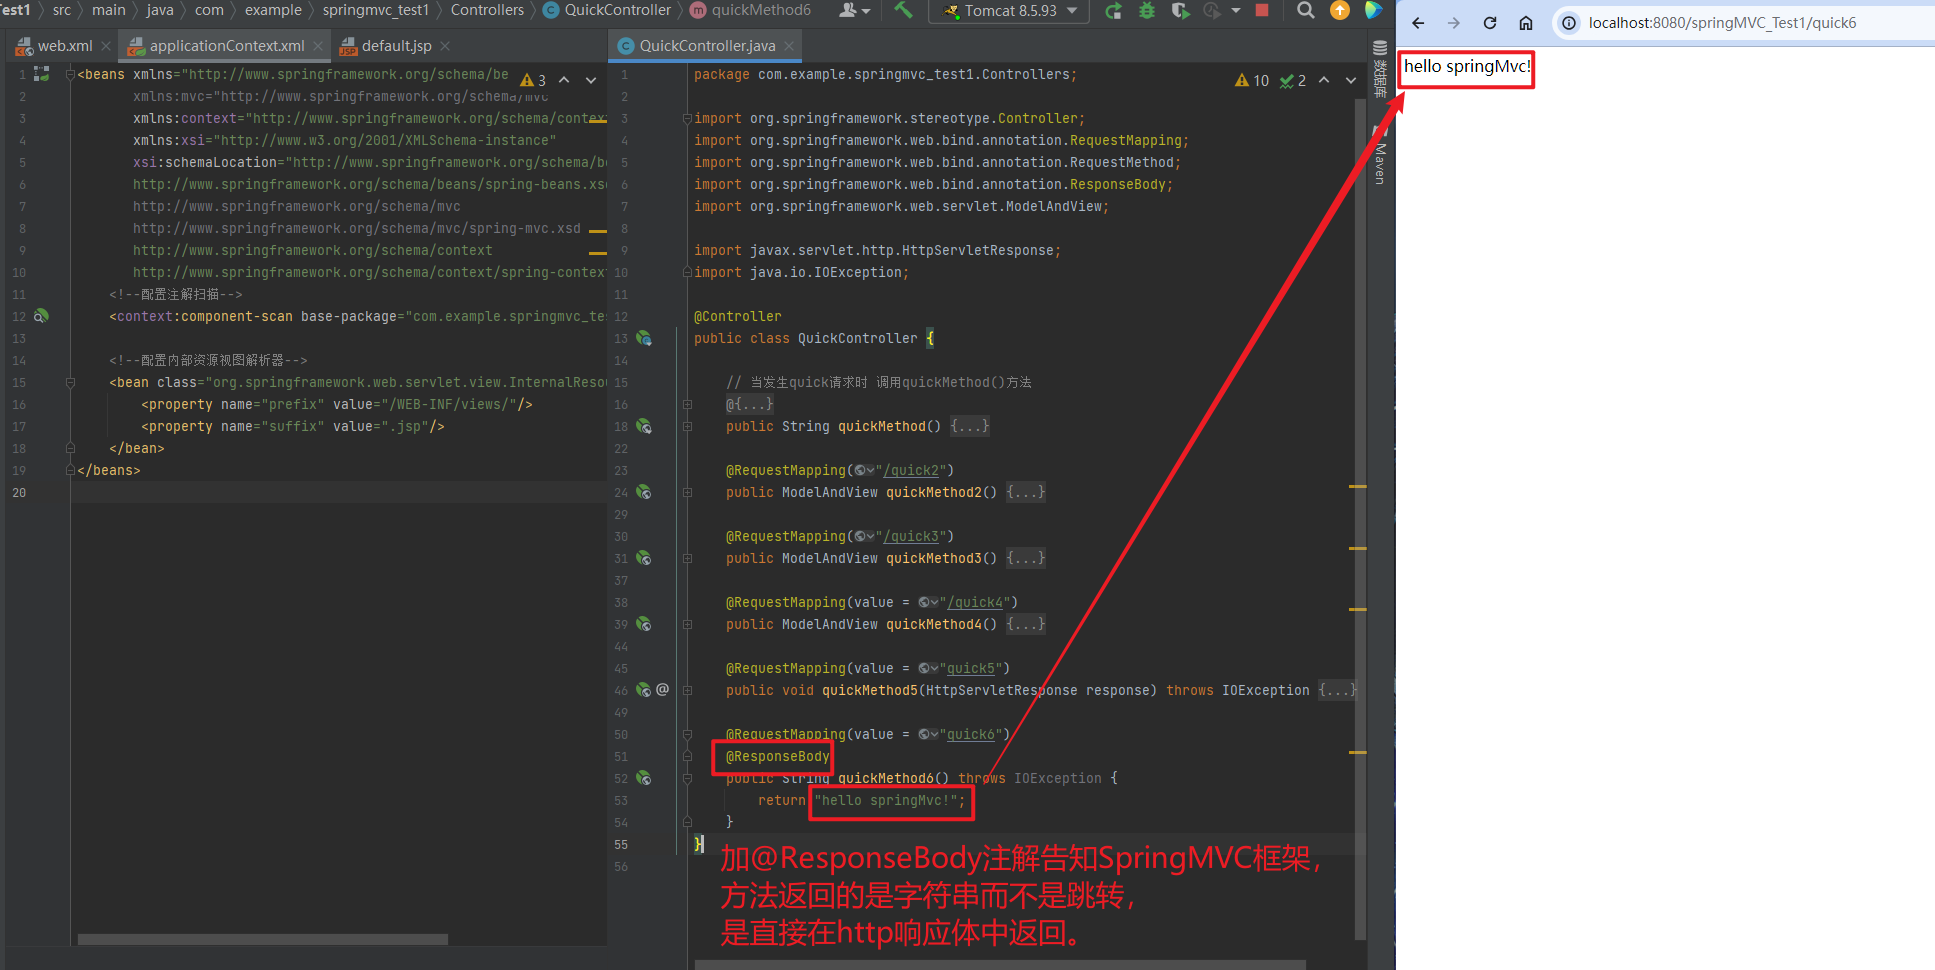
在异步项目中,客户端与服务器端往往要进行json格式字符串交互,此时我们可以手动拼接json字符串返回。
@RequestMapping(value = "quick6")
@ResponseBody
public String quickMethod6() throws IOException {
	// String name1 = "hello springMvc!";
    String name2 = "{\"name\":\"zhangsan\",\"age\":18}";
    return name2;
}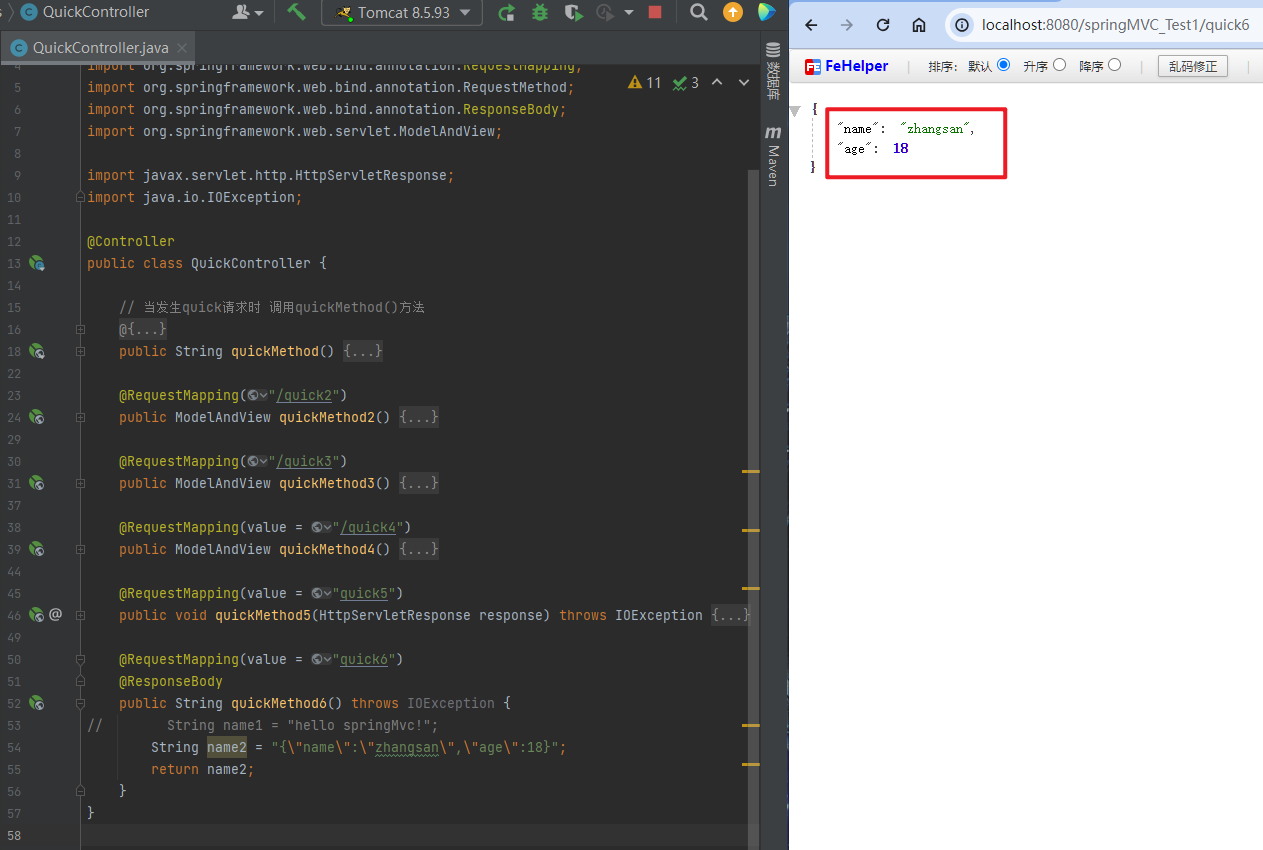
上述方式手动拼接json格式字符串的方式很麻烦,开发中往往要将复杂的java对象转换成json格式的字符串,我们可以使用web阶段学习过的json转换工具jackson进行转换,导入jackson坐标。
<!--jackson-->
<dependency>
	<groupId>com.fasterxml.jackson.core</groupId>
	<artifactId>jackson-core</artifactId>
	<version>2.9.0</version>
</dependency>
<dependency>
	<groupId>com.fasterxml.jackson.core</groupId>
	<artifactId>jackson-databind</artifactId>
	<version>2.9.0</version>
</dependency>
<dependency>
	<groupId>com.fasterxml.jackson.core</groupId>
	<artifactId>jackson-annotations</artifactId>
	<version>2.9.0</version>
</dependency>
<?xml version="1.0" encoding="UTF-8"?>
<project xmlns="http://maven.apache.org/POM/4.0.0"
xmlns:xsi="http://www.w3.org/2001/XMLSchema-instance"
xsi:schemaLocation="http://maven.apache.org/POM/4.0.0 https://maven.apache.org/xsd/maven-4.0.0.xsd">
<modelVersion>4.0.0</modelVersion>
<groupId>com.example</groupId>
<artifactId>springMVC_Test1</artifactId>
<version>1.0-SNAPSHOT</version>
<name>springMVC_Test1</name>
<packaging>war</packaging>
<properties>
<project.build.sourceEncoding>UTF-8</project.build.sourceEncoding>
<maven.compiler.target>1.8</maven.compiler.target>
<maven.compiler.source>1.8</maven.compiler.source>
<junit.version>5.7.1</junit.version>
</properties>
<!--dependencies 依赖包的意思-->
<dependencies>
<dependency>
<groupId>javax.servlet</groupId>
<artifactId>javax.servlet-api</artifactId>
<version>4.0.1</version>
<scope>provided</scope>
</dependency>
<dependency>
<groupId>org.junit.jupiter</groupId>
<artifactId>junit-jupiter-api</artifactId>
<version>${junit.version}</version>
<scope>test</scope>
</dependency>
<dependency>
<groupId>org.junit.jupiter</groupId>
<artifactId>junit-jupiter-engine</artifactId>
<version>${junit.version}</version>
<scope>test</scope>
</dependency>
<!--mybatis坐标-->
<dependency>
<groupId>org.mybatis</groupId>
<artifactId>mybatis</artifactId>
<version>3.5.4</version>
</dependency>
<!--mysql驱动坐标-->
<dependency>
<groupId>mysql</groupId>
<artifactId>mysql-connector-java</artifactId>
<version>5.1.39</version>
<scope>runtime</scope>
</dependency>
<!--单元测试坐标-->
<dependency>
<groupId>junit</groupId>
<artifactId>junit</artifactId>
<version>4.12</version>
<scope>test</scope>
</dependency>
<!--日志坐标-->
<dependency>
<groupId>log4j</groupId>
<artifactId>log4j</artifactId>
<version>1.2.12</version>
</dependency>
<dependency>
<groupId>org.junit.jupiter</groupId>
<artifactId>junit-jupiter</artifactId>
<version>RELEASE</version>
<scope>compile</scope>
</dependency>
<!-- 分页助手 -->
<dependency>
<groupId>com.github.pagehelper</groupId>
<artifactId>pagehelper</artifactId>
<version>3.7.5</version>
</dependency>
<dependency>
<groupId>com.github.jsqlparser</groupId>
<artifactId>jsqlparser</artifactId>
<version>0.9.1</version>
</dependency>
<!--导入spring的context坐标,context依赖core、beans、expression-->
<dependency>
<groupId>org.springframework</groupId>
<artifactId>spring-context</artifactId>
<version>5.0.5.RELEASE</version>
</dependency>
<!-- C3P0连接池 -->
<dependency>
<groupId>c3p0</groupId>
<artifactId>c3p0</artifactId>
<version>0.9.1.2</version>
</dependency><!-- Druid连接池 -->
<dependency>
<groupId>com.alibaba</groupId>
<artifactId>druid</artifactId>
<version>1.1.10</version>
</dependency>
<!-- mysql驱动 -->
<dependency>
<groupId>mysql</groupId>
<artifactId>mysql-connector-java</artifactId>
<version>5.1.39</version>
</dependency>
<!--此处需要注意的是,spring5 及以上版本要求 junit 的版本必须是 4.12 及以上-->
<dependency>
<groupId>org.springframework</groupId>
<artifactId>spring-test</artifactId>
<version>5.0.5.RELEASE</version>
</dependency>
<dependency>
<groupId>junit</groupId>
<artifactId>junit</artifactId>
<version>4.12</version>
<scope>test</scope>
</dependency>
<dependency>
<groupId>junit</groupId>
<artifactId>junit</artifactId>
<version>4.12</version>
<scope>compile</scope>
</dependency>
<!--导入spring的context坐标,context依赖aop-->
<dependency>
<groupId>org.springframework</groupId>
<artifactId>spring-context</artifactId>
<version>5.0.5.RELEASE</version>
</dependency>
<!-- aspectj的织入 -->
<dependency>
<groupId>org.aspectj</groupId>
<artifactId>aspectjweaver</artifactId>
<version>1.8.13</version>
</dependency>
<dependency>
<groupId>org.springframework</groupId>
<artifactId>spring-web</artifactId>
<version>5.0.5.RELEASE</version>
</dependency>
<!--Spring坐标-->
<dependency>
<groupId>org.springframework</groupId>
<artifactId>spring-context</artifactId>
<version>5.0.5.RELEASE</version>
</dependency>
<!--SpringMVC坐标-->
<dependency>
<groupId>org.springframework</groupId>
<artifactId>spring-webmvc</artifactId>
<version>5.0.5.RELEASE</version>
</dependency>
<!--Servlet坐标-->
<dependency>
<groupId>javax.servlet</groupId>
<artifactId>servlet-api</artifactId>
<version>2.5</version>
</dependency>
<!--Jsp坐标-->
<dependency>
<groupId>javax.servlet.jsp</groupId>
<artifactId>jsp-api</artifactId>
<version>2.0</version>
</dependency>
<!--jackson-->
<dependency>
<groupId>com.fasterxml.jackson.core</groupId>
<artifactId>jackson-core</artifactId>
<version>2.9.0</version>
</dependency>
<dependency>
<groupId>com.fasterxml.jackson.core</groupId>
<artifactId>jackson-databind</artifactId>
<version>2.9.0</version>
</dependency>
<dependency>
<groupId>com.fasterxml.jackson.core</groupId>
<artifactId>jackson-annotations</artifactId>
<version>2.9.0</version>
</dependency>
</dependencies>
<build>
<plugins>
<plugin>
<groupId>org.apache.maven.plugins</groupId>
<artifactId>maven-war-plugin</artifactId>
<version>3.3.1</version>
</plugin>
</plugins>
</build>
</project>通过jackson转换json格式字符串,回写字符串。
package com.example.springmvc_test1.Controllers;

import com.example.springmvc_test1.Dao.User;
import com.fasterxml.jackson.databind.ObjectMapper;
import org.springframework.stereotype.Controller;
import org.springframework.web.bind.annotation.RequestMapping;
import org.springframework.web.bind.annotation.RequestMethod;
import org.springframework.web.bind.annotation.ResponseBody;
import org.springframework.web.servlet.ModelAndView;

import javax.servlet.http.HttpServletResponse;
import java.io.IOException;

@Controller
public class QuickController {

    // 当发生quick请求时 调用quickMethod()方法
    @RequestMapping(value = "/quick", method = RequestMethod.POST,
            params = {"accountName", "haha"})
    public String quickMethod() {
        System.out.println("quickMethod running.....");
        return "default";
    }

    @RequestMapping("/quick2")
    public ModelAndView quickMethod2() {
        ModelAndView modelAndView = new ModelAndView();
        modelAndView.setViewName("redirect:index.jsp");
        return modelAndView;
    }

    @RequestMapping("/quick3")
    public ModelAndView quickMethod3() {
        ModelAndView modelAndView = new ModelAndView();
        modelAndView.setViewName("forward:/WEB-INF/views/default.jsp");
        modelAndView.addObject("name", "hehe");
        return modelAndView;
    }

    @RequestMapping(value = "/quick4")
    public ModelAndView quickMethod4() {
        ModelAndView modelAndView = new ModelAndView();
        modelAndView.setViewName("redirect:/WEB-INF/views/default.jsp");
        return modelAndView;
    }

    @RequestMapping(value = "quick5")
    public void quickMethod5(HttpServletResponse response) throws IOException {
        response.getWriter().write("helloworld");
    }

    @RequestMapping(value = "quick6")
    @ResponseBody
    public String quickMethod6() throws IOException {
//        String name1 = "hello springMvc!";
        String name2 = "{\"name\":\"zhangsan\",\"age\":18}";
        return name2;
    }

    @RequestMapping(value = "quick7")
    @ResponseBody
    public String quickMethod7() throws IOException {
        User user = new User();
        user.setAddress("tianjin");
        user.setAge(10);
        user.setName("heha");
        ObjectMapper objectMapper = new ObjectMapper();
        return objectMapper.writeValueAsString(user);
    }
}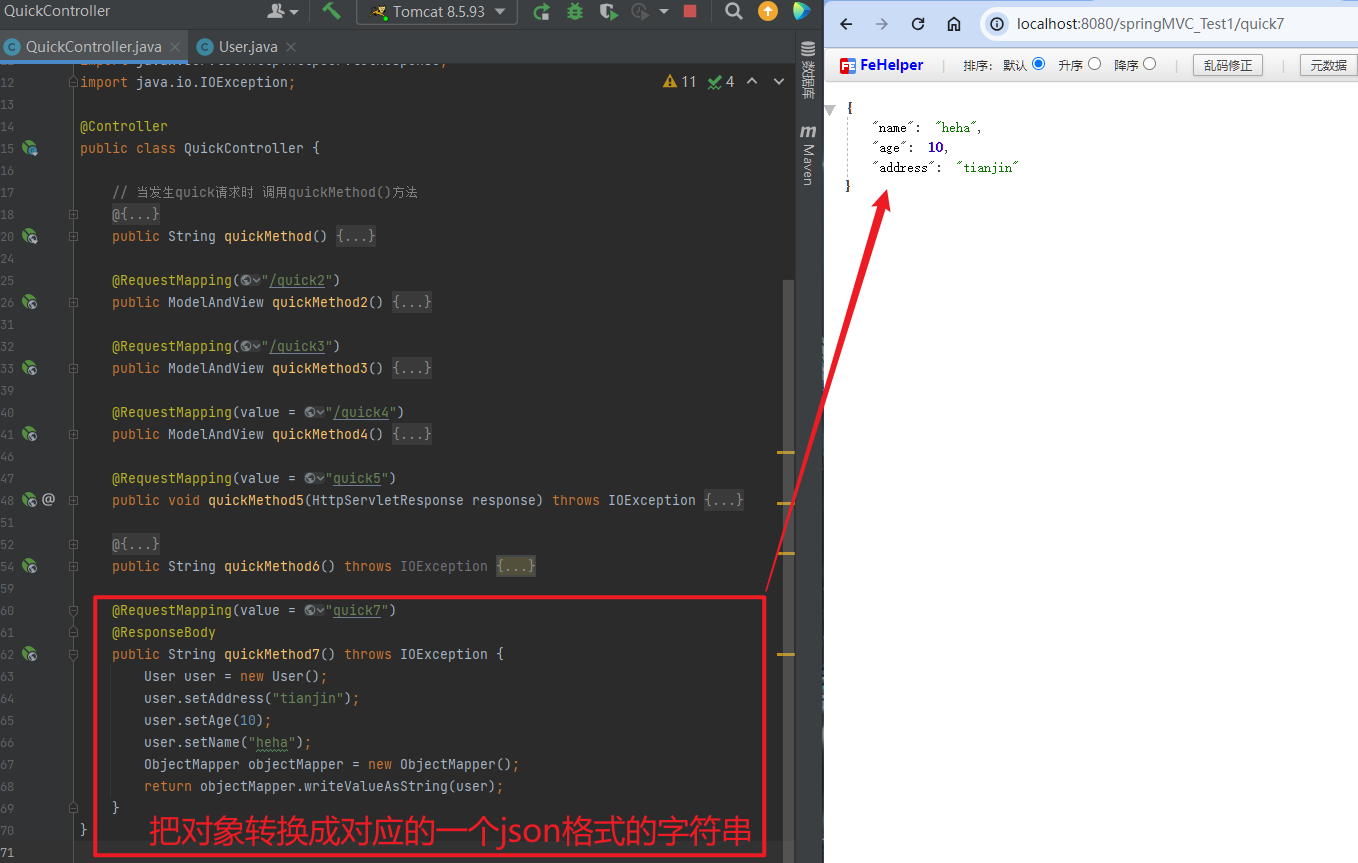
2.4.1.3.2. 返回对象或集合
通过SpringMVC帮助我们对对象或集合进行json字符串的转换并回写,为处理器适配器配置消息转换参数,指定使用jackson进行对象或集合的转换,因此需要在spring-mvc.xml中进行如下配置:
<bean class="org.springframework.web.servlet.mvc.method.annotation.RequestMappingHandlerAdapter">
    <property name="messageConverters">
        <list>
            <bean class="org.springframework.http.converter.json.MappingJackson2HttpMessageConverter">
            </bean>
        </list>
    </property>
</bean>
// @RequestMapping(value = "quick7")
// @ResponseBody
// public String quickMethod7() throws IOException {
// User user = new User();
// user.setAddress("tianjin");
// user.setAge(10);
// user.setName("heha");
// ObjectMapper objectMapper = new ObjectMapper();
// return objectMapper.writeValueAsString(user);
// }
@RequestMapping(value = "quick8")
@ResponseBody
public Object quickMethod8() throws IOException {
User user = new User();
user.setAddress("tianjin");
user.setAge(10);
user.setName("heha");
return user;
}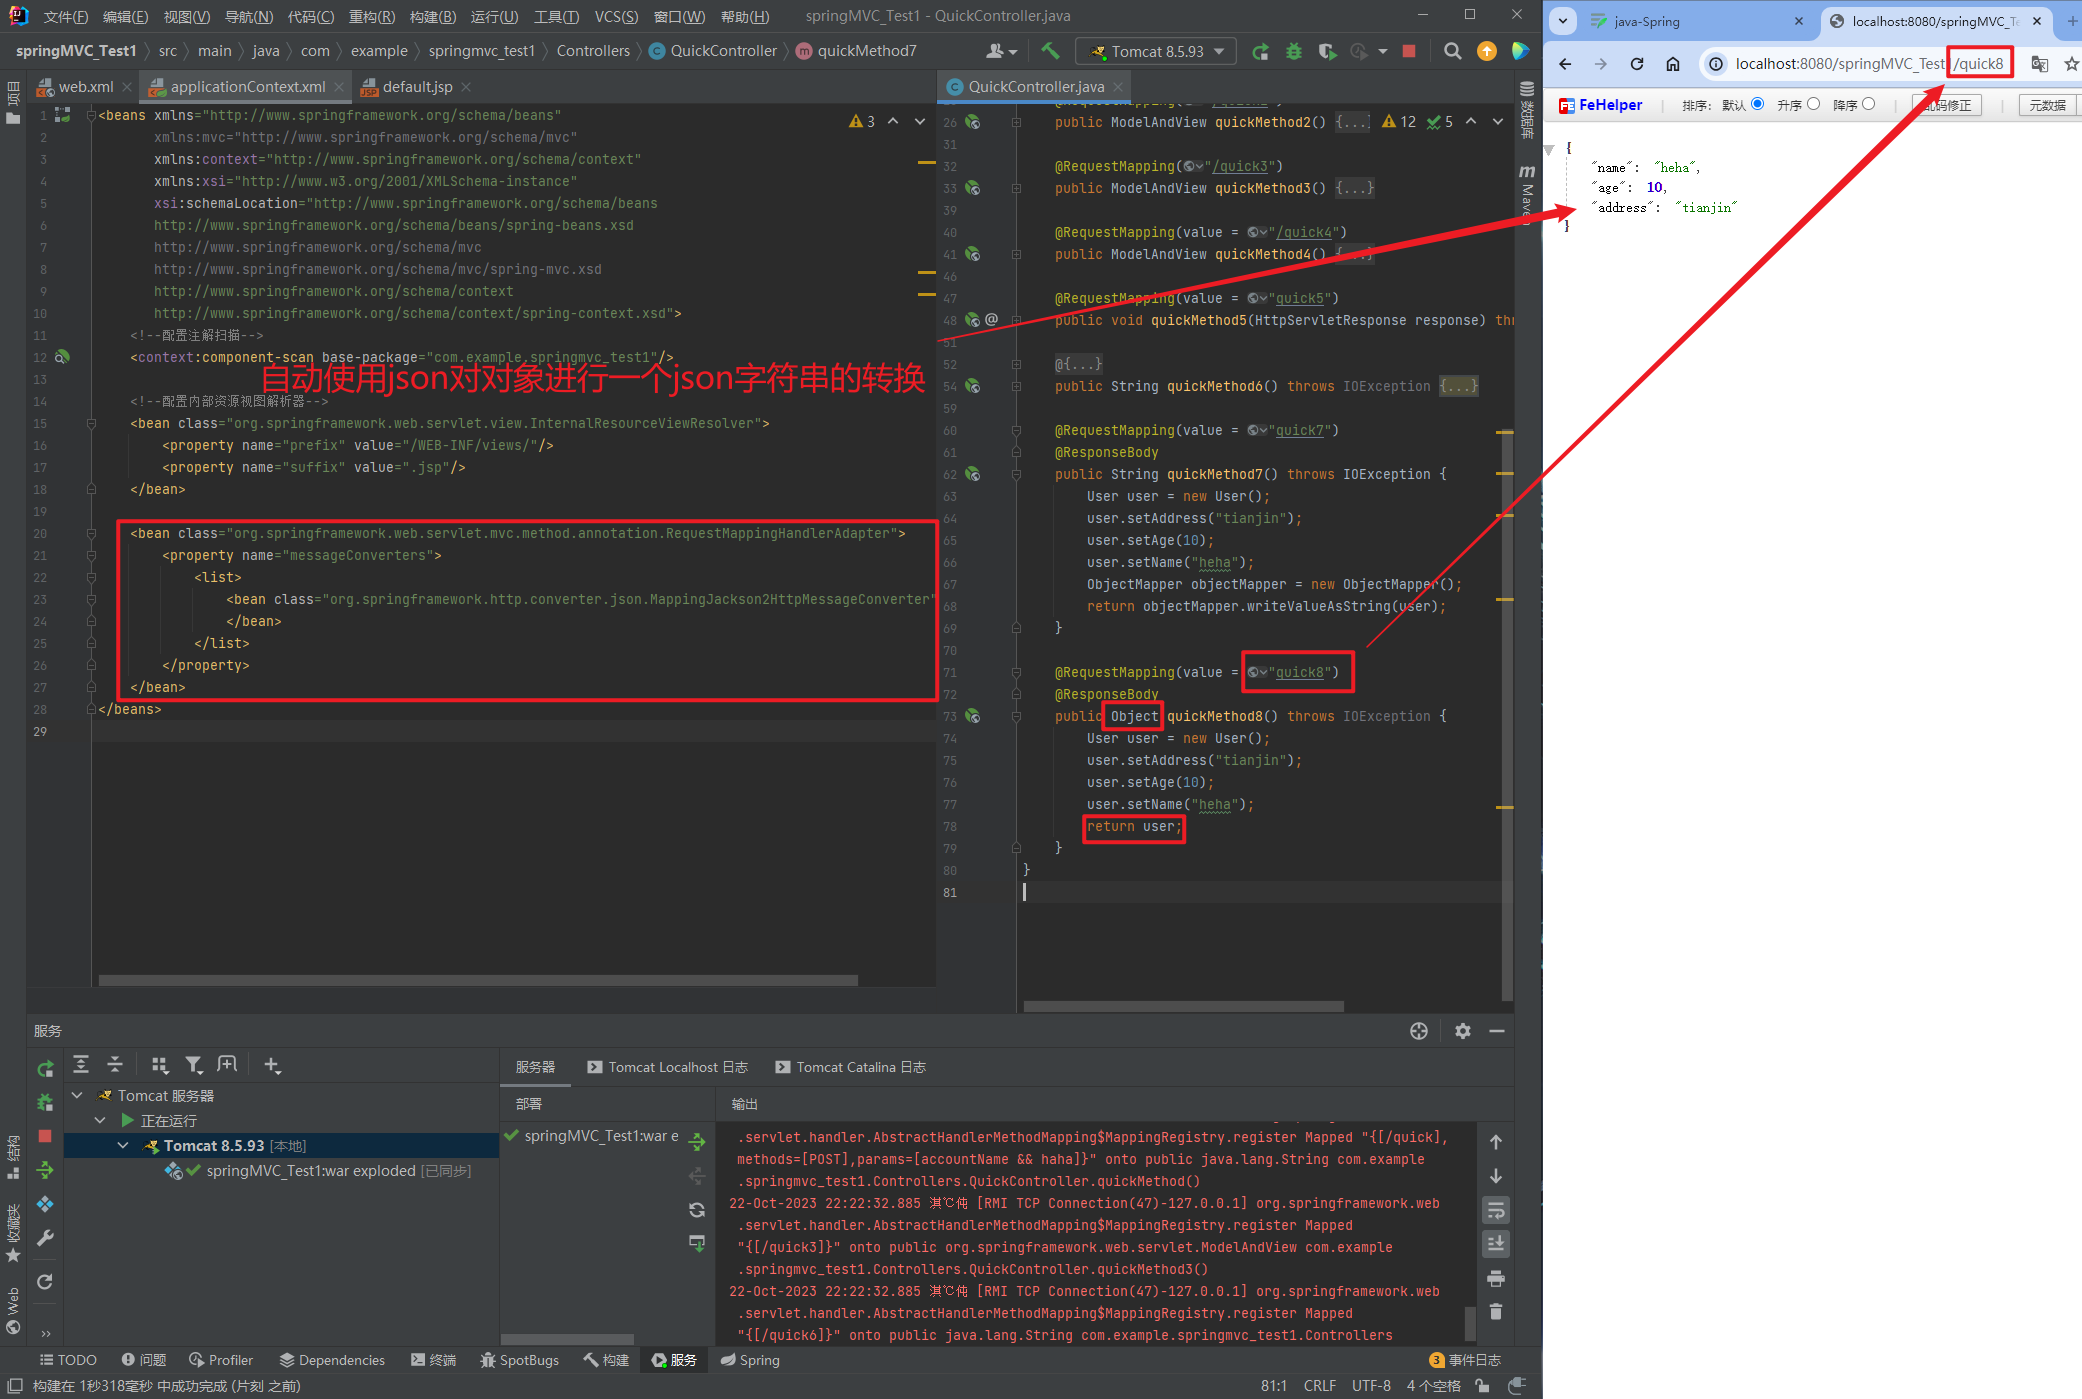
在方法上添加@ResponseBody就可以返回json格式的字符串,但是这样配置比较麻烦,配置的代码比较多,因此,我们可以使用mvc的注解驱动代替上述配置。
<!--mvc的注解驱动-->
<mvc:annotation-driven/>
在 SpringMVC 的各个组件中,处理器映射器、处理器适配器、视图解析器称为 SpringMVC 的三大组件。
使用<mvc:annotation-driven>自动加载 RequestMappingHandlerMapping(处理映射器)和
RequestMappingHandlerAdapter(处理适配器),可用在Spring-xml.xml配置文件中使用
<mvc:annotation-driven>替代注解处理器和适配器的配置。
同时使用<mvc:annotation-driven>默认底层就会集成jackson进行对象或集合的json格式字符串的转换。
2.4.1.4. 知识要点
SpringMVC的数据响应方式
- 页面跳转
直接返回字符串
通过ModelAndView对象返回
- 回写数据
直接返回字符串
返回对象或集合
2.4.2. SpringMVC获得请求数据
2.4.2.1. 获得请求参数
客户端请求参数的格式是:name=value&name=value… …
服务器端要获得请求的参数,有时还需要进行数据的封装,SpringMVC可以接收如下类型的参数:
- 基本类型参数
POJO类型参数- 数组类型参数
- 集合类型参数
2.4.2.2. 获得基本类型参数
Controller中的业务方法的参数名称要与请求参数的name一致,参数值会自动映射匹配。
@RequestMapping("/quick9")
@ResponseBody
public void quickMethod9(String name, int age) throws IOException {
    System.out.println(name);
    System.out.println(age);
}
http://localhost:8080/springMVC_Test1/quick9?name=hahaha&age=18
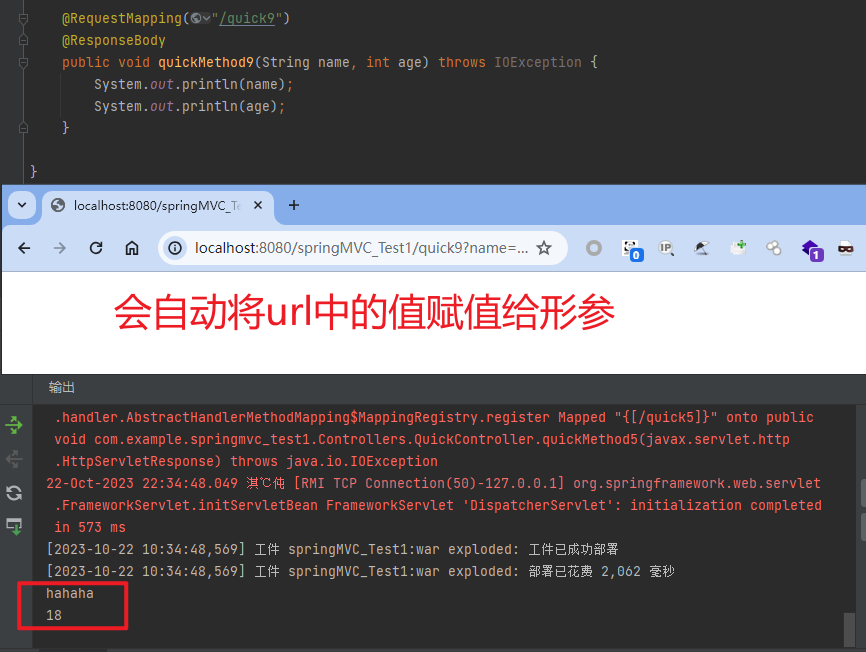
可以多传无用参数,但不能少传或错传有用参数
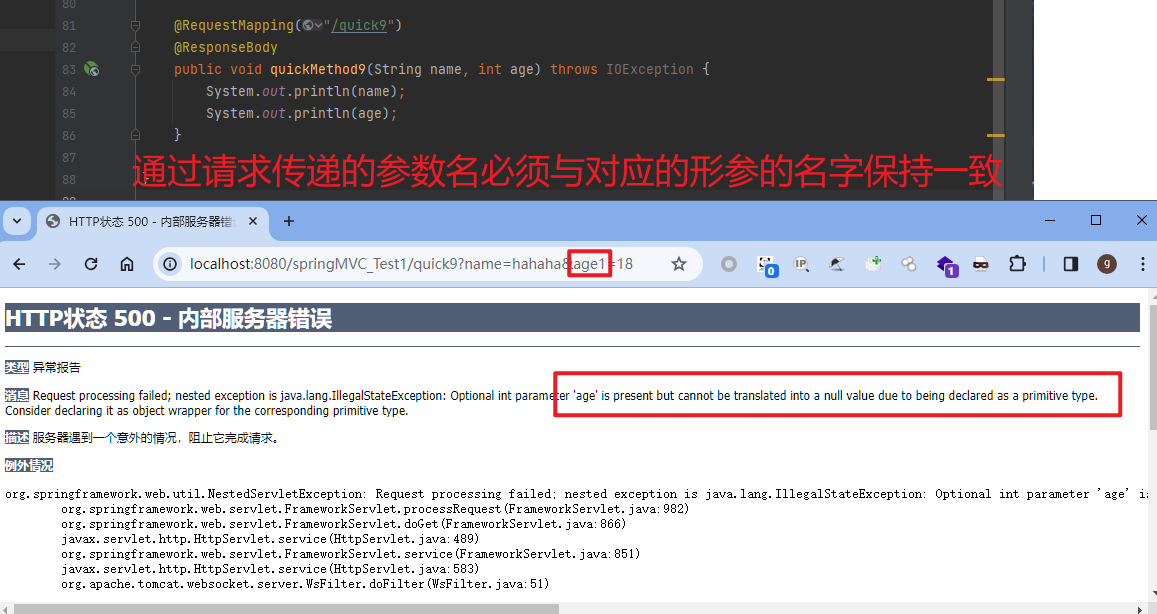
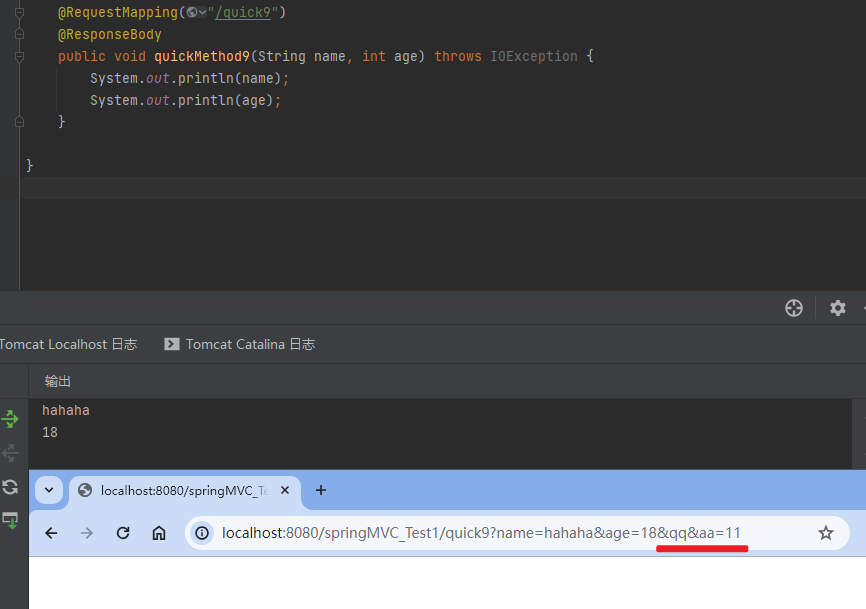
2.4.2.3. 获得POJO类型参数
Controller中的业务方法的POJO参数的属性名与请求参数的name一致,参数值会自动映射匹配。
@RequestMapping("/quick10")
@ResponseBody
public Object quickMethod10(User user) throws IOException {
    return user;
}
http://localhost:8080/springMVC_Test1/quick10?name=hahaha
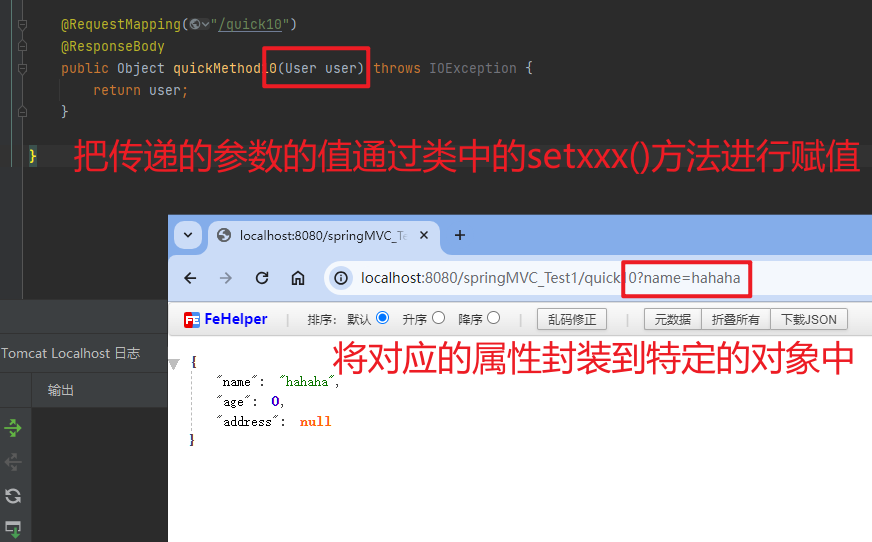
2.4.2.4. 获得数组类型参数
Controller中的业务方法数组名称与请求参数的name一致,参数值会自动映射匹配。
@RequestMapping("/quick11")
@ResponseBody
public void quickMethod11(String[] strs) throws IOException {
    System.out.println(Arrays.asList(strs));
}
http://localhost:8080/springMVC_Test1/quick11?strs=111&strs=222&strs=333
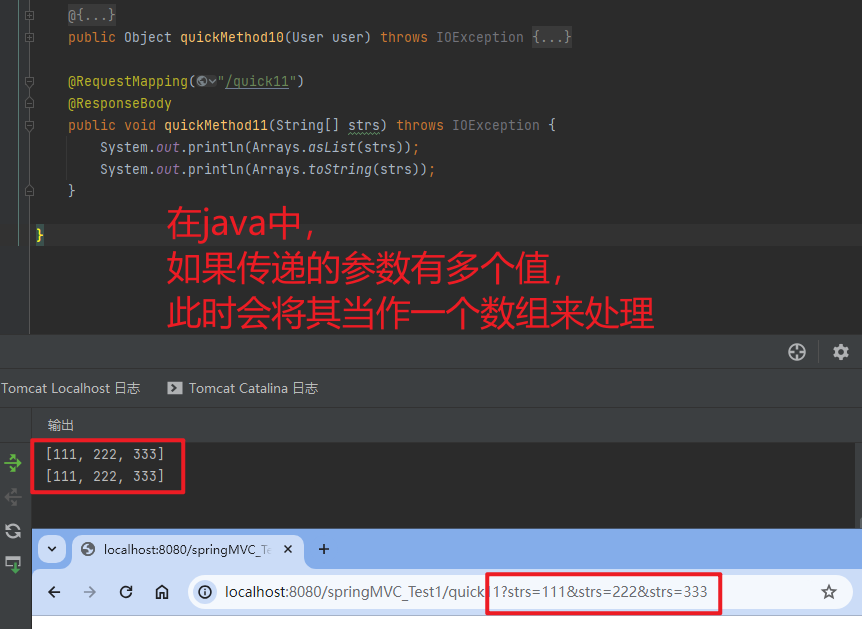
2.4.2.5. 获得集合类型参数
获得集合参数时,要将集合参数包装到一个POJO中才可以。
当使用ajax提交时,可以指定contentType为json形式,那么在方法参数位置使用@RequestBody可以直接接收集合数据而无需使用POJO进行包装。
注意:通过谷歌开发者工具抓包发现,没有加载到jquery文件,原因是SpringMVC的前端控制器DispatcherServlet的url-pattern配置的是/,代表对所有的资源都进行过滤操作,我们可以通过以下两种方式指定放行静态资源:
在applicationContext.xml配置文件中指定放行的资源
     <mvc:resources mapping="/js/**" location="/js/"/>
使用<mvc:default-servlet-handler/>标签
2.4.2.6. 请求数据乱码问题
当post请求时,数据会出现乱码,我们可以设置一个过滤器来进行编码的过滤。
<filter>
	<filter-name>CharacterEncodingFilter</filter-name>
	<filter-class>org.springframework.web.filter.CharacterEncodingFilter</filter-class>
	<init-param>
		<param-name>encoding</param-name>
		<param-value>UTF-8</param-value>
	</init-param>
</filter>
<filter-mapping>
	<filter-name>CharacterEncodingFilter</filter-name>
	<url-pattern>/*</url-pattern>
</filter-mapping>
2.4.2.7. 参数绑定注解@requestParam
当请求的参数名称与Controller的业务方法参数名称不一致时,就需要通过@RequestParam注解显示的绑定
http://localhost:8080/springMVC_Test1/quick14?username=111
<form action="${pageContext.request.contextPath}/quick14" method="post">
<input type="text" name="username"><br>
<input type="submit" value="提交"><br>
</form>
@RequestMapping("/quick14")
@ResponseBody
public void quickMethod14(@RequestParam("username") String name) throws IOException {
System.out.println(name);
}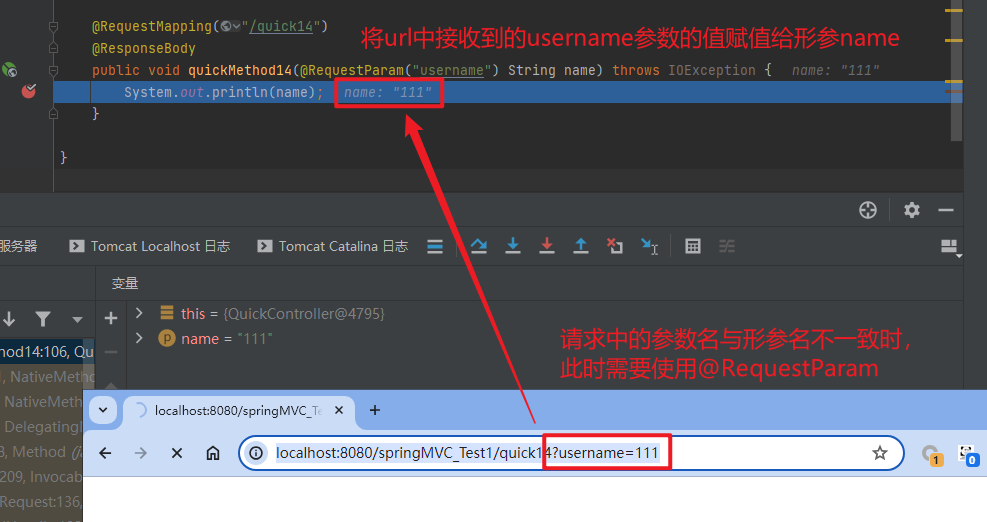
注解@RequestParam还有如下参数可以使用:
value:与请求参数名称
required:此在指定的请求参数是否必须包括,默认是true,提交时如果没有此参数则报错
defaultValue:当没有指定请求参数时,则使用指定的默认值赋值
@RequestMapping("/quick14")
@ResponseBody
public void quickMethod14(@RequestParam(value = "username", required = true) String name) throws IOException {
    System.out.println(name);
}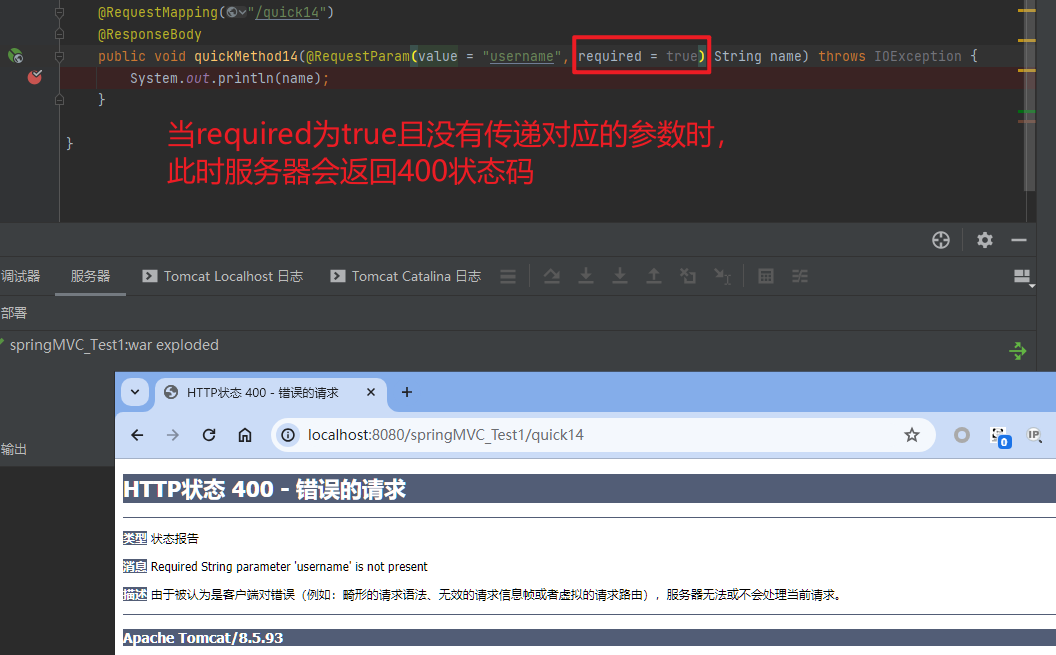
@RequestMapping("/quick14")
@ResponseBody
public void quickMethod14(@RequestParam(value = "username", required = true, defaultValue = "hehe") String name) throws IOException {
    System.out.println(name);
}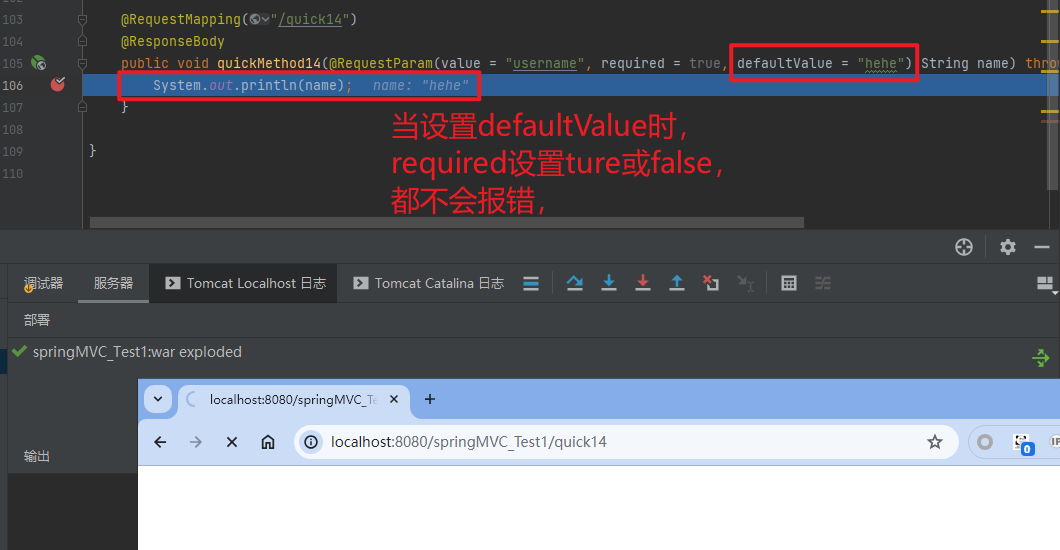
2.4.2.8. 获得Restful风格的参数
Restful是一种软件架构风格、设计风格,而不是标准,只是提供了一组设计原则和约束条件。主要用于客户端和服务器交互类的软件,基于这个风格设计的软件可以更简洁,更有层次,更易于实现缓存机制等。
Restful风格的请求是使用“url+请求方式”表示一次请求目的的,HTTP协议里面四个表示操作方式的动词如下:
GET:用于获取资源
POST:用于新建资源
PUT:用于更新资源
DELETE:用于删除资源
例如:
/user/1 GET: 得到 id = 1 的 user
/user/1 DELETE: 删除 id = 1 的 user
/user/1 PUT: 更新 id = 1 的 user
/user POST: 新增 user
上述url地址/user/1中的1就是要获得的请求参数,在SpringMVC中可以使用占位符进行参数绑定。地址/user/1可以写成/user/{id},占位符{id}对应的就是1的值。在业务方法中我们可以使用@PathVariable注解进行占位符的匹配获取工作
http://localhost:8080/springMVC_Test1/quick19/namenihao
@RequestMapping("/quick19/{name}")
@ResponseBody
public void quickMethod19(@PathVariable(value = "name", required = true) String name) {
    System.out.println(name);
}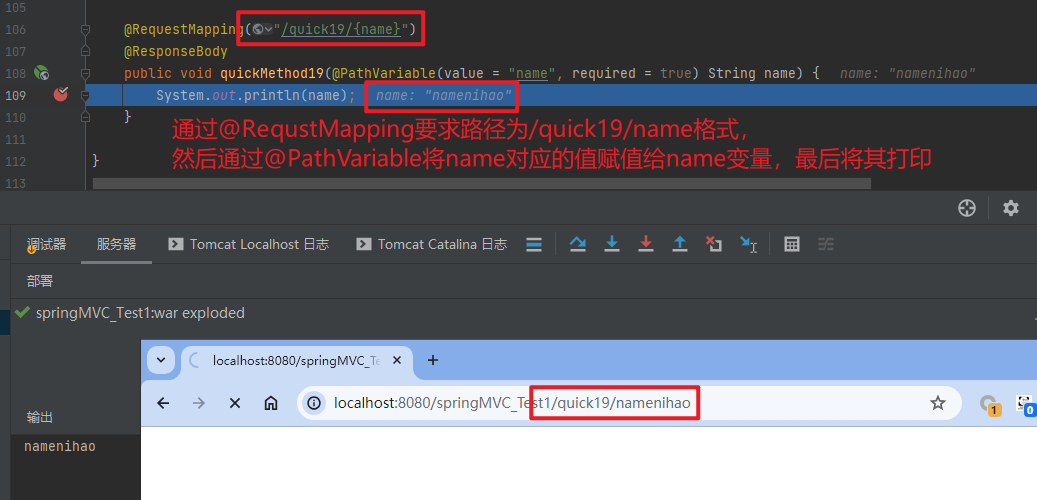
2.4.2.9. 自定义类型转换器converter
SpringMVC默认已经提供了一些常用的类型转换器,例如客户端提交的字符串转换成int型进行参数设置。
但是不是所有的数据类型都提供了转换器,没有提供的就需要自定义转换器,例如:日期类型的数据就需要自定义转换器。
当处理传入参数为特定类型想要转换为其他数据类型时,此时就可以调用
自定义类型转换器的开发步骤:
① 定义转换器类实现PersonConverter接口
package com.example.springmvc_test1.Converters;

import com.example.springmvc_test1.Dao.Person;
import org.springframework.core.convert.converter.Converter;

public class PersonConverter implements Converter<String, Person> {
    @Override
    public Person convert(String s) {
        System.out.println("conver called");
        return new Person();
    }
}
① 定义转换器类实现DateConverter接口
package com.example.springmvc_test1.Converters;

import org.springframework.core.convert.converter.Converter;

import java.text.ParseException;
import java.text.SimpleDateFormat;
import java.util.Date;

public class DateConverter implements Converter<String, Date> {
    @Override
    public Date convert(String source) {
        SimpleDateFormat format = new SimpleDateFormat("yyyy-MM-dd");
        try {
            Date date = format.parse(source);
            System.out.println(date);
            return date;
        } catch (ParseException e) {
            e.printStackTrace();
        }
        return null;
    }
}
② 在配置文件中声明转换器
<bean id="converterService"
      class="org.springframework.context.support.ConversionServiceFactoryBean">
    <property name="converters">
        <list>
            <bean class="com.example.springmvc_test1.Converters.DateConverter"/>
            <bean class="com.example.springmvc_test1.Converters.PersonConverter"/>
        </list>
    </property>
</bean>
③ 在<annotation-driven>中引用转换器
<mvc:annotation-driven conversion-service="converterService"/>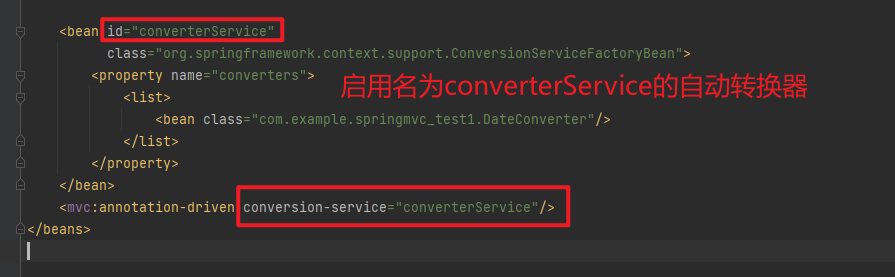
<beans xmlns="http://www.springframework.org/schema/beans"
       xmlns:mvc="http://www.springframework.org/schema/mvc"
       xmlns:context="http://www.springframework.org/schema/context"
       xmlns:xsi="http://www.w3.org/2001/XMLSchema-instance"
       xsi:schemaLocation="http://www.springframework.org/schema/beans
       http://www.springframework.org/schema/beans/spring-beans.xsd
       http://www.springframework.org/schema/mvc
       http://www.springframework.org/schema/mvc/spring-mvc.xsd
       http://www.springframework.org/schema/context
       http://www.springframework.org/schema/context/spring-context.xsd">
    <!--配置注解扫描-->
    <context:component-scan base-package="com.example.springmvc_test1"/>

    <!--配置内部资源视图解析器-->
    <bean class="org.springframework.web.servlet.view.InternalResourceViewResolver">
        <property name="prefix" value="/WEB-INF/views/"/>
        <property name="suffix" value=".jsp"/>
    </bean>

<!--    <bean class="org.springframework.web.servlet.mvc.method.annotation.RequestMappingHandlerAdapter">-->
<!--        <property name="messageConverters">-->
<!--            <list>-->
<!--                <bean class="org.springframework.http.converter.json.MappingJackson2HttpMessageConverter">-->
<!--                </bean>-->
<!--            </list>-->
<!--        </property>-->
<!--    </bean>-->

    <bean id="converterService"
          class="org.springframework.context.support.ConversionServiceFactoryBean">
        <property name="converters">
            <list>
                <bean class="com.example.springmvc_test1.Converters.DateConverter"/>
                <bean class="com.example.springmvc_test1.Converters.PersonConverter"/>
            </list>
        </property>
    </bean>
    <mvc:annotation-driven conversion-service="converterService"/>
</beans>注意:会与之前的json自动转换器冲突,或者设置id="converterService1"不同名
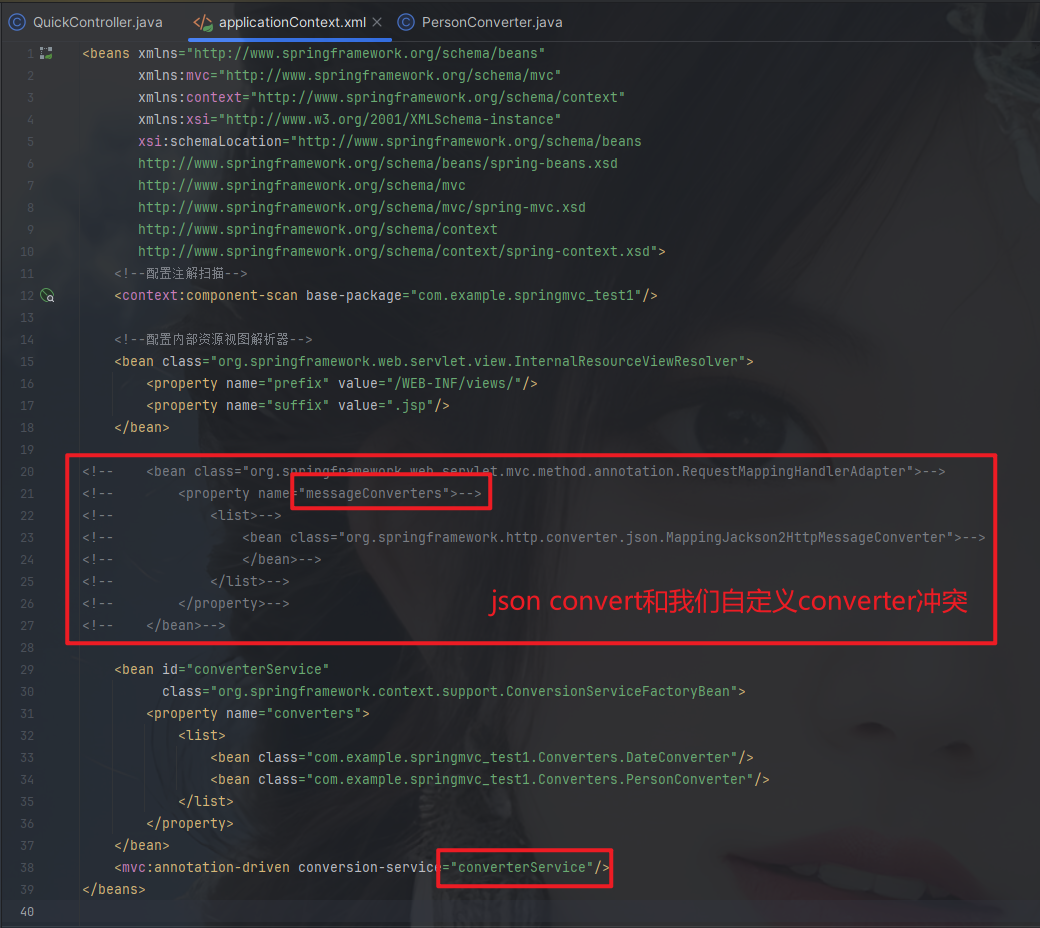
http://localhost:8080/springMVC_Test1/quick13?username=hahaha&person_str=per
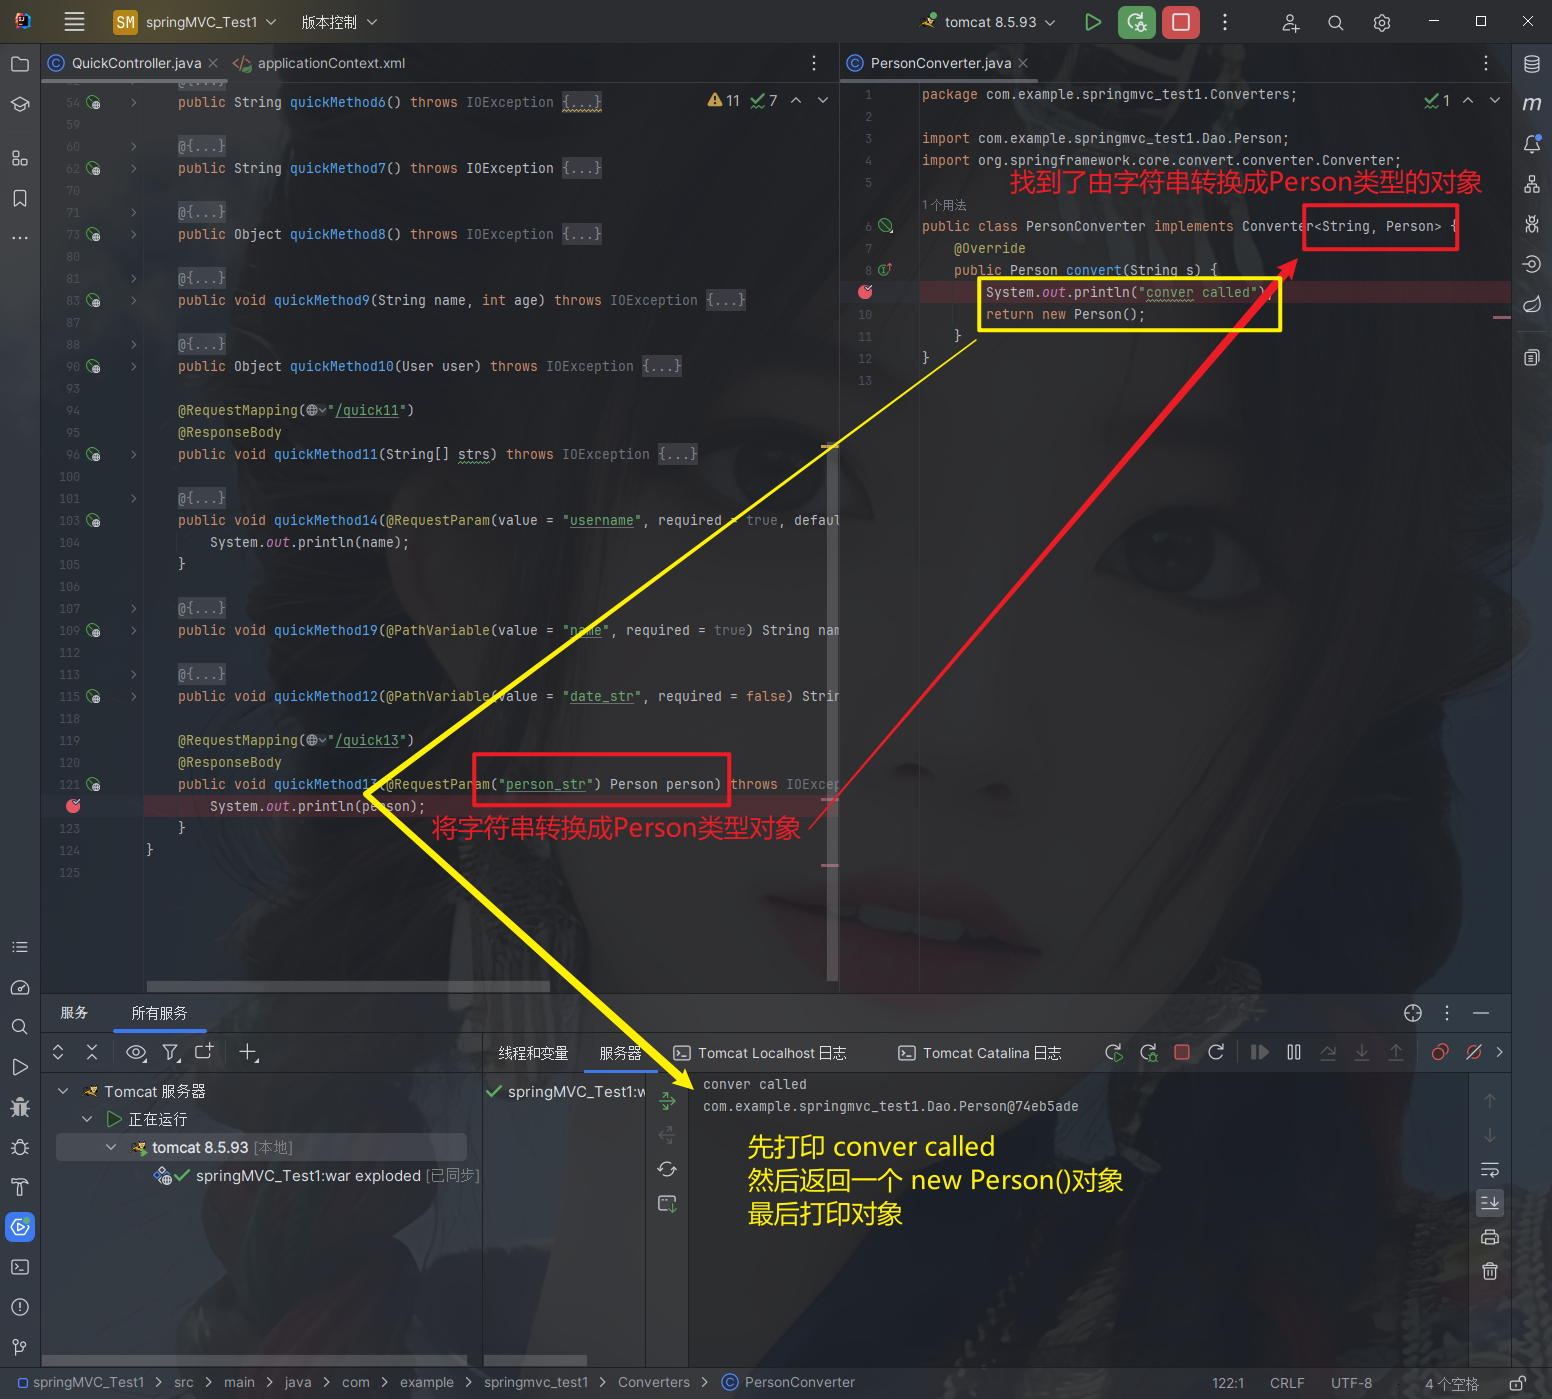
http://localhost:8080/springMVC_Test1/quick12/2021-11-12
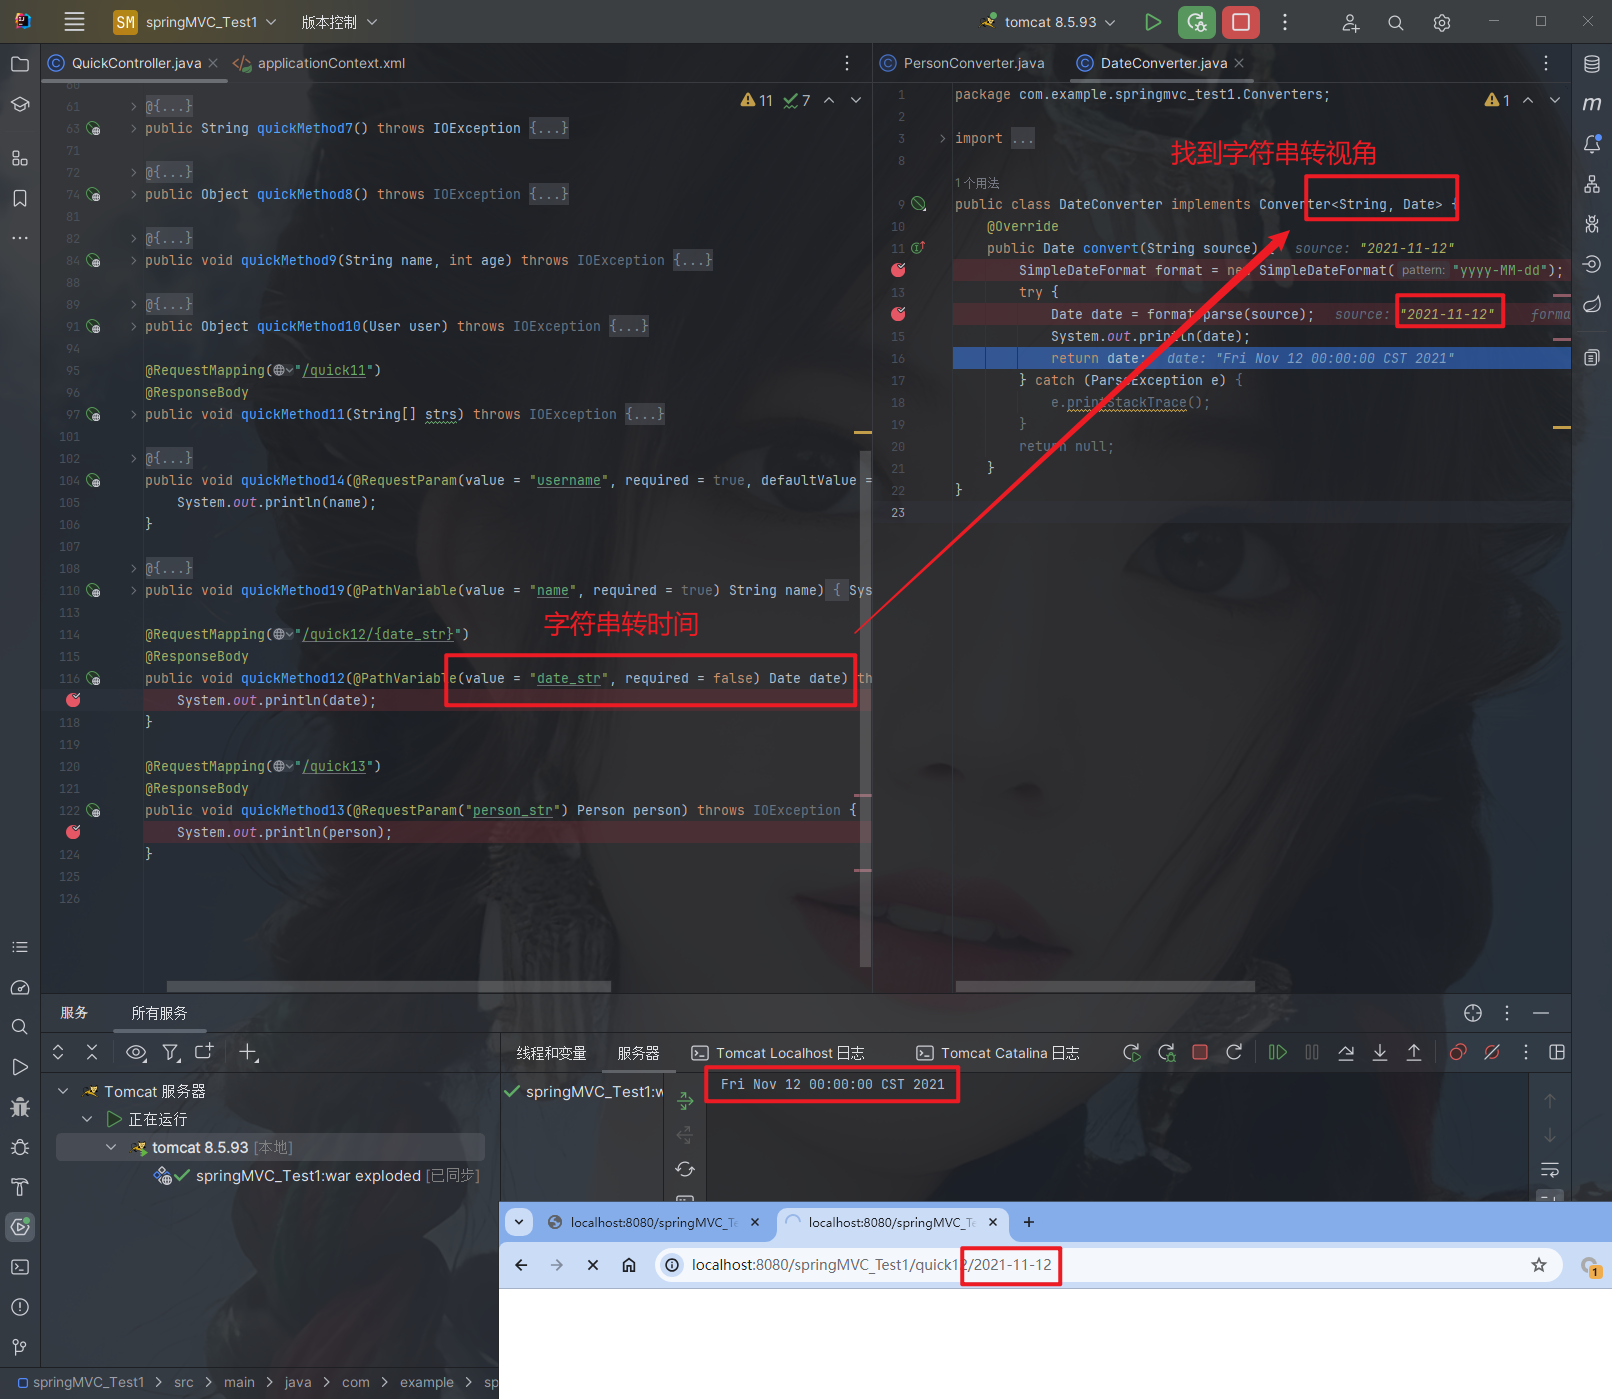
2.4.2.10. 获得Servlet相关API
SpringMVC支持使用原始ServletAPI对象作为控制器方法的参数进行注入,常用的对象如下:
HttpServletRequestHttpServletResponseHttpSession
@RequestMapping("/quick16")
@ResponseBody
public void quickMethod16(HttpServletRequest request, HttpServletResponse response, HttpSession session) {
    HttpSession httpSession = request.getSession();
    System.out.println(httpSession);
    System.out.println(request);
    System.out.println(response);
    System.out.println(session);
}此时默认的HttpSession与通过request.getSession()获取的值保持一致
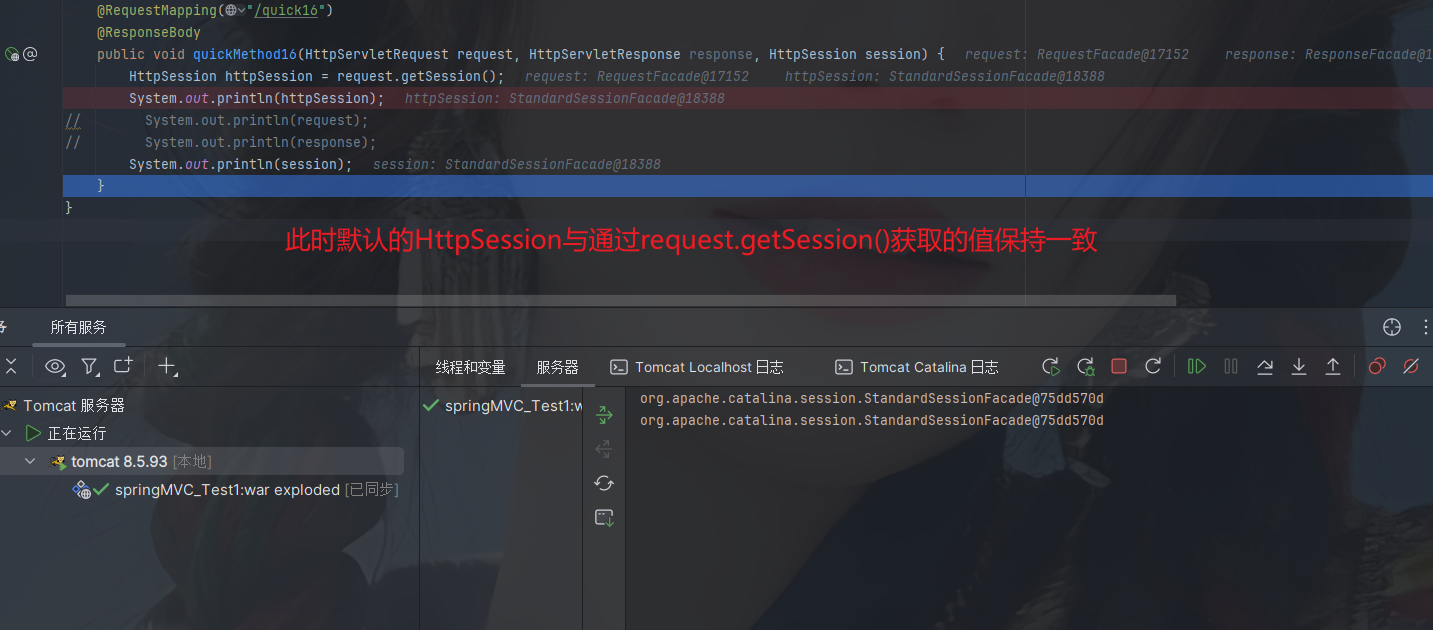
2.4.2.11. 获得请求头
@RequestHeader
使用@RequestHeader可以获得请求头信息,相当于web阶段学习的request.getHeader(name)
@RequestHeader注解的属性如下:
value:请求头的名称required:是否必须携带此请求头
@RequestMapping("/quick17")
@ResponseBody
public void quickMethod17(
        @RequestHeader(value = "User-Agent", required = false) String headerValue,
        @RequestHeader(value = "Accept-Encoding") String acceptEncoding,
        @RequestHeader(value = "test") Map<String, String> cookies) {
    System.out.println(headerValue);
    System.out.println(acceptEncoding);
	System.out.println(cookies);
}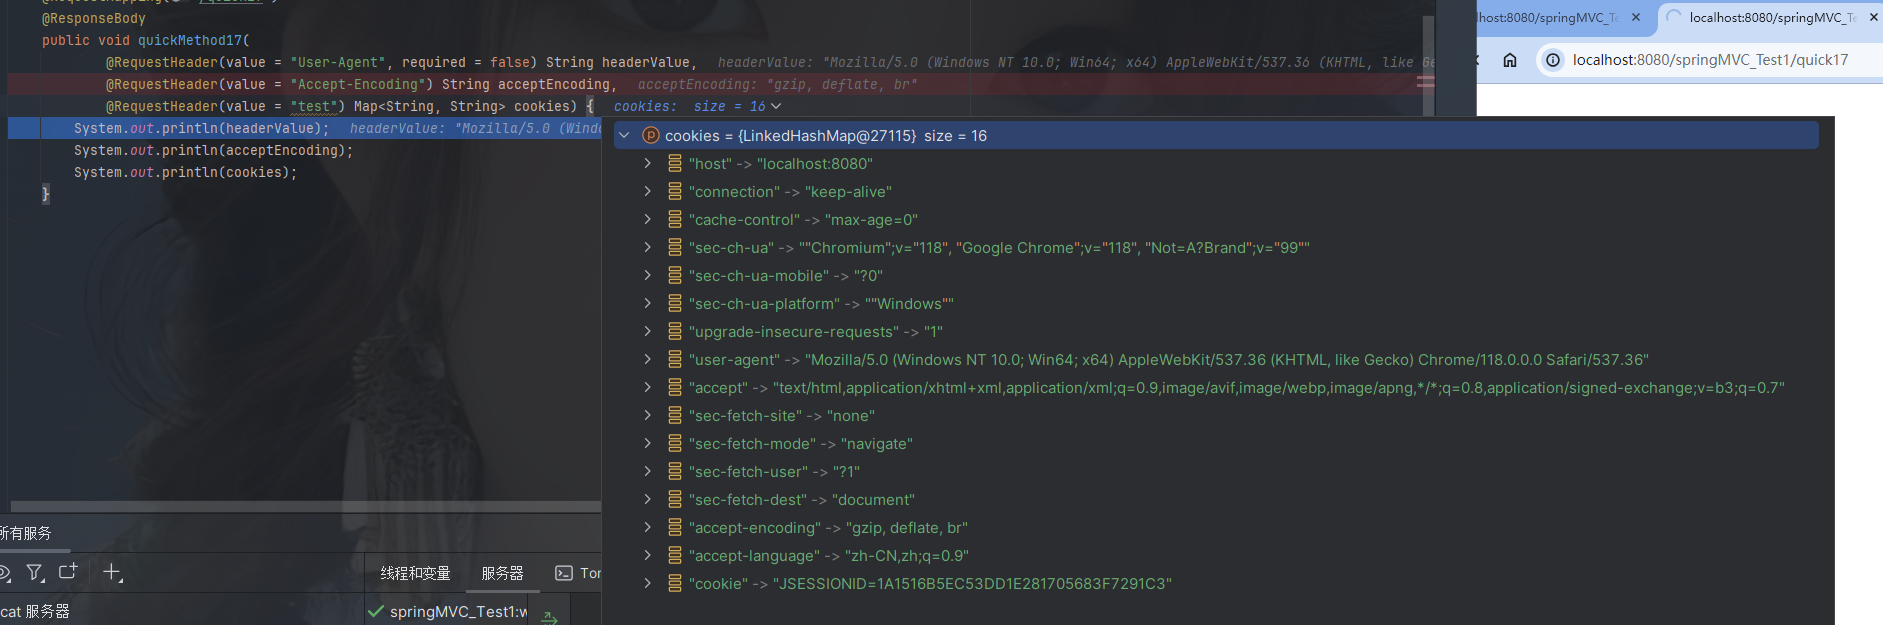
@CookieValue
使用@CookieValue可以获得指定Cookie的值
@CookieValue注解的属性如下:
value:指定cookie的名称required:是否必须携带此cookie
@RequestMapping("/quick18")
@ResponseBody
public void quickMethod18(@CookieValue(value = "JSESSIONID", required = false) String jsessionid) {
    System.out.println(jsessionid);
}
package com.example.springmvc_test1.Controllers;
import com.example.springmvc_test1.Dao.Person;
import com.example.springmvc_test1.Dao.User;
import com.fasterxml.jackson.databind.ObjectMapper;
import org.springframework.stereotype.Controller;
import org.springframework.web.bind.annotation.*;
import org.springframework.web.servlet.ModelAndView;
import javax.servlet.http.HttpServletRequest;
import javax.servlet.http.HttpServletResponse;
import javax.servlet.http.HttpSession;
import java.io.IOException;
import java.util.Arrays;
import java.util.Date;
import java.util.Map;
@Controller
public class QuickController {
// 当发生quick请求时 调用quickMethod()方法
@RequestMapping(value = "/quick", method = RequestMethod.POST,
params = {"accountName", "haha"})
public String quickMethod() {
System.out.println("quickMethod running.....");
return "default";
}
@RequestMapping("/quick2")
public ModelAndView quickMethod2() {
ModelAndView modelAndView = new ModelAndView();
modelAndView.setViewName("redirect:index.jsp");
return modelAndView;
}
@RequestMapping("/quick3")
public ModelAndView quickMethod3() {
ModelAndView modelAndView = new ModelAndView();
modelAndView.setViewName("forward:/WEB-INF/views/default.jsp");
modelAndView.addObject("name", "hehe");
return modelAndView;
}
@RequestMapping(value = "/quick4")
public ModelAndView quickMethod4() {
ModelAndView modelAndView = new ModelAndView();
modelAndView.setViewName("redirect:/WEB-INF/views/default.jsp");
return modelAndView;
}
@RequestMapping(value = "quick5")
public void quickMethod5(HttpServletResponse response) throws IOException {
response.getWriter().write("helloworld");
}
@RequestMapping(value = "quick6")
@ResponseBody
public String quickMethod6() throws IOException {
// String name1 = "hello springMvc!";
String name2 = "{\"name\":\"zhangsan\",\"age\":18}";
return name2;
}
@RequestMapping(value = "quick7")
@ResponseBody
public String quickMethod7() throws IOException {
User user = new User();
user.setAddress("tianjin");
user.setAge(10);
user.setName("heha");
ObjectMapper objectMapper = new ObjectMapper();
return objectMapper.writeValueAsString(user);
}
@RequestMapping(value = "quick8")
@ResponseBody
public Object quickMethod8() throws IOException {
User user = new User();
user.setAddress("tianjin");
user.setAge(10);
user.setName("heha");
return user;
}
@RequestMapping("/quick9")
@ResponseBody
public void quickMethod9(String name, int age) throws IOException {
System.out.println(name);
System.out.println(age);
}
@RequestMapping("/quick10")
@ResponseBody
public Object quickMethod10(User user) throws IOException {
return user;
}
@RequestMapping("/quick11")
@ResponseBody
public void quickMethod11(String[] strs) throws IOException {
System.out.println(Arrays.asList(strs));
System.out.println(Arrays.toString(strs));
}
@RequestMapping("/quick14")
@ResponseBody
public void quickMethod14(@RequestParam(value = "username", required = true, defaultValue = "hehe") String name) throws IOException {
System.out.println(name);
}
@RequestMapping("/quick19/{name}")
@ResponseBody
public void quickMethod19(@PathVariable(value = "name", required = true) String name) {
System.out.println(name);
}
@RequestMapping("/quick12/{date_str}")
public void quickMethod12(@PathVariable(value = "date_str", required = false) Date date) throws IOException {
System.out.println(date);
}
@RequestMapping("/quick13")
@ResponseBody
public void quickMethod13(@RequestParam("person_str") Person person) throws IOException {
System.out.println(person);
}
@RequestMapping("/quick16")
@ResponseBody
public void quickMethod16(HttpServletRequest request, HttpServletResponse response, HttpSession session) {
HttpSession httpSession = request.getSession();
System.out.println(httpSession);
// System.out.println(request);
// System.out.println(response);
System.out.println(session);
}
@RequestMapping("/quick17")
@ResponseBody
public void quickMethod17(
@RequestHeader(value = "User-Agent", required = false) String headerValue,
@RequestHeader(value = "Accept-Encoding") String acceptEncoding,
@RequestHeader(value = "test") Map<String, String> cookies) {
System.out.println(headerValue);
System.out.println(acceptEncoding);
System.out.println(cookies);
}
@RequestMapping("/quick18")
@ResponseBody
public void quickMethod18(@CookieValue(value = "JSESSIONID", required = false) String jsessionid) {
System.out.println(jsessionid);
}
}2.4.2.12. 文件上传
2.4.2.12.1. 文件上传客户端三要素
- 表单项
type="file" - 表单的提交方式是
post - 表单的
enctype属性是多部分表单形式,及enctype="multipart/form-data"
<%--
  Created by IntelliJ IDEA.
  User: HW
  Date: 2023-10-25
  Time: 13:58
  To change this template use File | Settings | File Templates.
--%>
<%@ page contentType="text/html;charset=UTF-8" language="java" %>
<html>
<head>
    <title>Title</title>
</head>
<body>
<h1>单文件上传测试</h1>
<form action="${pageContext.request.contextPath}/quick20" method="post"
      enctype="multipart/form-data">
    名称:<input type="text" name="name"><br>
    文件:<input type="file" name="file"><br>
    <input type="submit" value="提交"><br>
</form>

</body>
</html>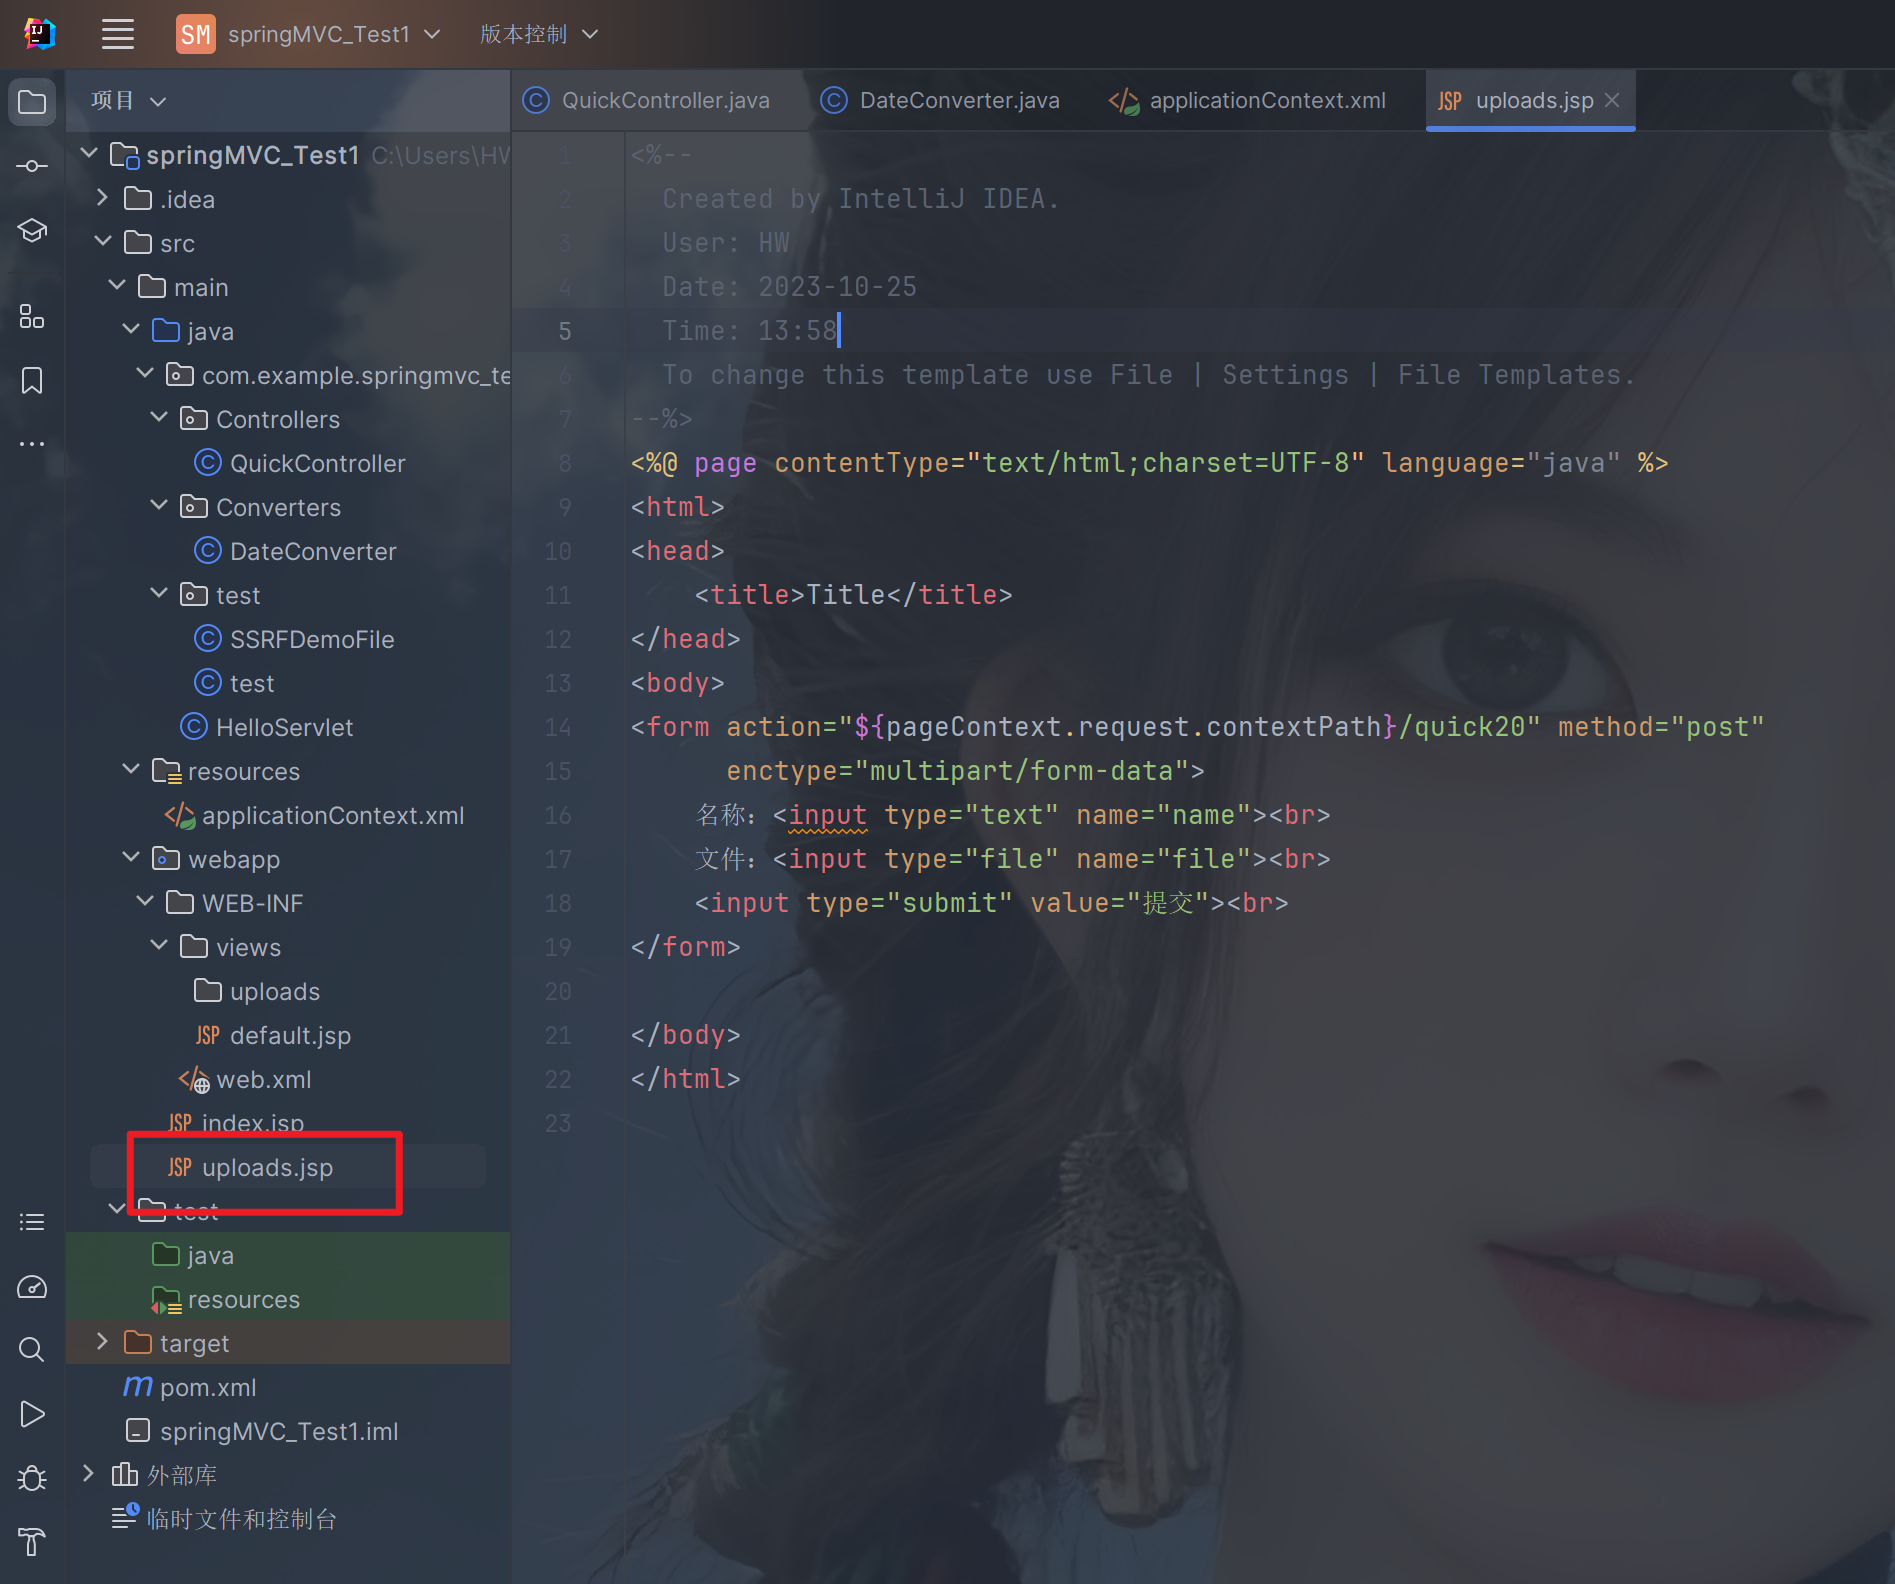
2.4.2.12.2. 文件上传原理
- 当
form表单修改为多部分表单时,request.getParameter()将失效。 enctype="application/x-www-form-urlencoded"时,form表单的正文内容格式是:key=value&key=value&key=value- 当
form表单的enctype取值为Mutilpart/form-data时,请求正文内容就变成多部分形式:
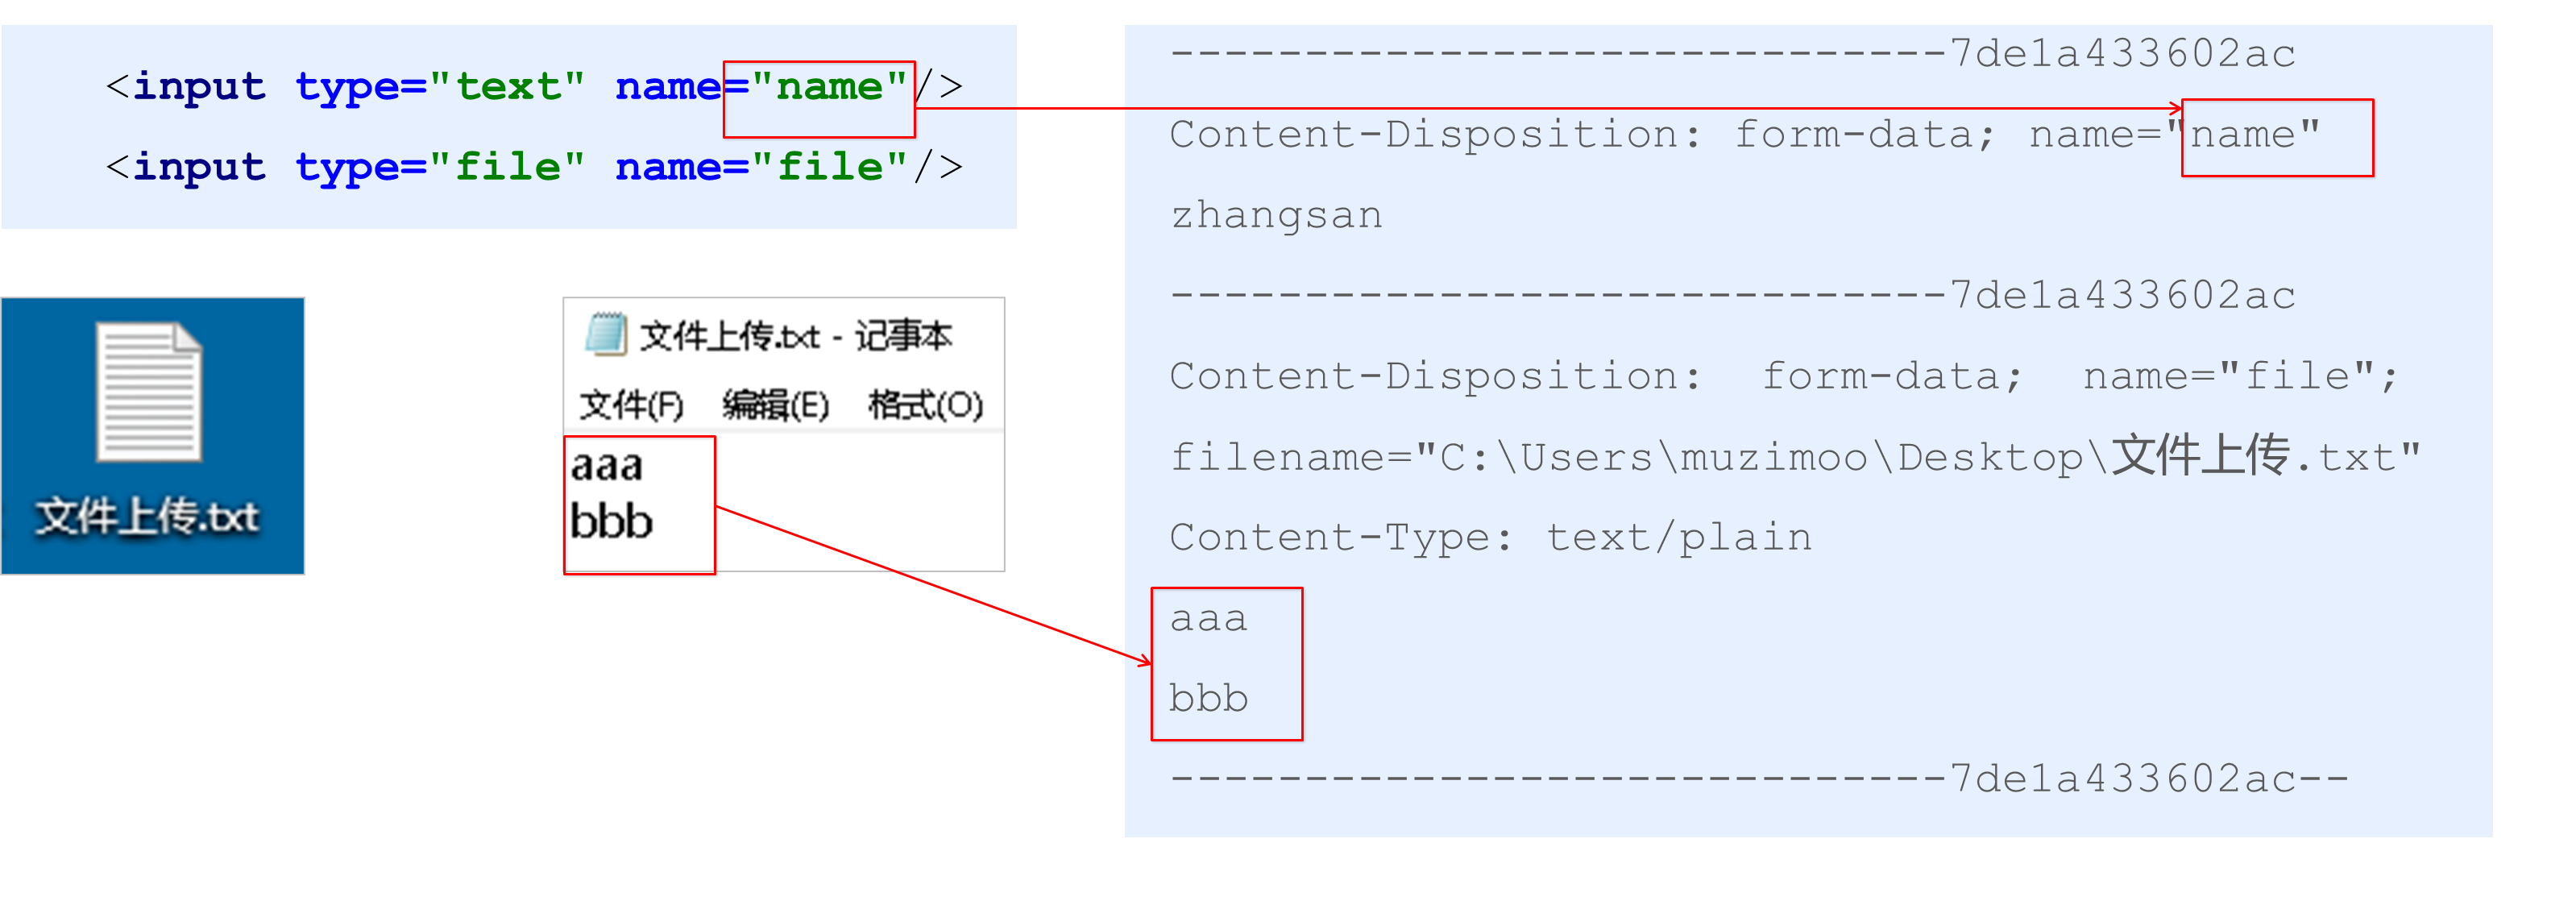
2.4.2.13. 单文件上传步骤
① 导入fileupload和io坐标
② 配置文件上传解析器
③ 编写文件上传代码
2.4.2.14. 单文件上传实现
① 导入fileupload和io坐标
<!--导入fileupload和io坐标-->
<dependency>
    <groupId>commons-fileupload</groupId>
    <artifactId>commons-fileupload</artifactId>
    <version>1.2.2</version>
</dependency>
<dependency>
    <groupId>commons-io</groupId>
    <artifactId>commons-io</artifactId>
    <version>2.4</version>
</dependency>
<?xml version="1.0" encoding="UTF-8"?>
<project xmlns="http://maven.apache.org/POM/4.0.0"
xmlns:xsi="http://www.w3.org/2001/XMLSchema-instance"
xsi:schemaLocation="http://maven.apache.org/POM/4.0.0 https://maven.apache.org/xsd/maven-4.0.0.xsd">
<modelVersion>4.0.0</modelVersion>
<groupId>com.example</groupId>
<artifactId>springMVC_Test1</artifactId>
<version>1.0-SNAPSHOT</version>
<name>springMVC_Test1</name>
<packaging>war</packaging>
<properties>
<project.build.sourceEncoding>UTF-8</project.build.sourceEncoding>
<maven.compiler.target>1.8</maven.compiler.target>
<maven.compiler.source>1.8</maven.compiler.source>
<junit.version>5.7.1</junit.version>
</properties>
<!--dependencies 依赖包的意思-->
<dependencies>
<dependency>
<groupId>javax.servlet</groupId>
<artifactId>javax.servlet-api</artifactId>
<version>4.0.1</version>
<scope>provided</scope>
</dependency>
<dependency>
<groupId>org.junit.jupiter</groupId>
<artifactId>junit-jupiter-api</artifactId>
<version>${junit.version}</version>
<scope>test</scope>
</dependency>
<dependency>
<groupId>org.junit.jupiter</groupId>
<artifactId>junit-jupiter-engine</artifactId>
<version>${junit.version}</version>
<scope>test</scope>
</dependency>
<!--mybatis坐标-->
<dependency>
<groupId>org.mybatis</groupId>
<artifactId>mybatis</artifactId>
<version>3.5.4</version>
</dependency>
<!--mysql驱动坐标-->
<dependency>
<groupId>mysql</groupId>
<artifactId>mysql-connector-java</artifactId>
<version>5.1.39</version>
<scope>runtime</scope>
</dependency>
<!--单元测试坐标-->
<dependency>
<groupId>junit</groupId>
<artifactId>junit</artifactId>
<version>4.12</version>
<scope>test</scope>
</dependency>
<!--日志坐标-->
<dependency>
<groupId>log4j</groupId>
<artifactId>log4j</artifactId>
<version>1.2.12</version>
</dependency>
<dependency>
<groupId>org.junit.jupiter</groupId>
<artifactId>junit-jupiter</artifactId>
<version>RELEASE</version>
<scope>compile</scope>
</dependency>
<!-- 分页助手 -->
<dependency>
<groupId>com.github.pagehelper</groupId>
<artifactId>pagehelper</artifactId>
<version>3.7.5</version>
</dependency>
<dependency>
<groupId>com.github.jsqlparser</groupId>
<artifactId>jsqlparser</artifactId>
<version>0.9.1</version>
</dependency>
<!--导入spring的context坐标,context依赖core、beans、expression-->
<dependency>
<groupId>org.springframework</groupId>
<artifactId>spring-context</artifactId>
<version>5.0.5.RELEASE</version>
</dependency>
<!-- C3P0连接池 -->
<dependency>
<groupId>c3p0</groupId>
<artifactId>c3p0</artifactId>
<version>0.9.1.2</version>
</dependency><!-- Druid连接池 -->
<dependency>
<groupId>com.alibaba</groupId>
<artifactId>druid</artifactId>
<version>1.1.10</version>
</dependency>
<!-- mysql驱动 -->
<dependency>
<groupId>mysql</groupId>
<artifactId>mysql-connector-java</artifactId>
<version>5.1.39</version>
</dependency>
<!--此处需要注意的是,spring5 及以上版本要求 junit 的版本必须是 4.12 及以上-->
<dependency>
<groupId>org.springframework</groupId>
<artifactId>spring-test</artifactId>
<version>5.0.2.RELEASE</version>
</dependency>
<dependency>
<groupId>junit</groupId>
<artifactId>junit</artifactId>
<version>4.12</version>
<scope>test</scope>
</dependency>
<dependency>
<groupId>junit</groupId>
<artifactId>junit</artifactId>
<version>4.12</version>
<scope>compile</scope>
</dependency>
<!--导入spring的context坐标,context依赖aop-->
<dependency>
<groupId>org.springframework</groupId>
<artifactId>spring-context</artifactId>
<version>5.0.5.RELEASE</version>
</dependency>
<!-- aspectj的织入 -->
<dependency>
<groupId>org.aspectj</groupId>
<artifactId>aspectjweaver</artifactId>
<version>1.8.13</version>
</dependency>
<dependency>
<groupId>org.springframework</groupId>
<artifactId>spring-web</artifactId>
<version>5.0.5.RELEASE</version>
</dependency>
<!--Spring坐标-->
<dependency>
<groupId>org.springframework</groupId>
<artifactId>spring-context</artifactId>
<version>5.0.5.RELEASE</version>
</dependency>
<!--SpringMVC坐标-->
<dependency>
<groupId>org.springframework</groupId>
<artifactId>spring-webmvc</artifactId>
<version>5.0.5.RELEASE</version>
</dependency>
<!--Servlet坐标-->
<dependency>
<groupId>javax.servlet</groupId>
<artifactId>servlet-api</artifactId>
<version>2.5</version>
</dependency>
<!--Jsp坐标-->
<dependency>
<groupId>javax.servlet.jsp</groupId>
<artifactId>jsp-api</artifactId>
<version>2.0</version>
</dependency>
<!--导入fileupload和io坐标-->
<dependency>
<groupId>commons-fileupload</groupId>
<artifactId>commons-fileupload</artifactId>
<version>1.2.2</version>
</dependency>
<dependency>
<groupId>commons-io</groupId>
<artifactId>commons-io</artifactId>
<version>2.4</version>
</dependency>
</dependencies>
<build>
<plugins>
<plugin>
<groupId>org.apache.maven.plugins</groupId>
<artifactId>maven-war-plugin</artifactId>
<version>3.3.1</version>
</plugin>
</plugins>
</build>
</project>② 配置文件上传解析器
<!--配置文件上传解析器-->
<bean id="multipartResolver" class="org.springframework.web.multipart.commons.CommonsMultipartResolver">
    <!--上传文件总大小-->
    <property name="maxUploadSize" value="5242800"/>
    <!--上传单个文件的大小-->
    <property name="maxUploadSizePerFile" value="5242800"/>
    <!--上传文件的编码类型-->
    <property name="defaultEncoding" value="UTF-8"/>
</bean>
<beans xmlns="http://www.springframework.org/schema/beans"
xmlns:mvc="http://www.springframework.org/schema/mvc"
xmlns:context="http://www.springframework.org/schema/context"
xmlns:xsi="http://www.w3.org/2001/XMLSchema-instance"
xsi:schemaLocation="http://www.springframework.org/schema/beans
http://www.springframework.org/schema/beans/spring-beans.xsd
http://www.springframework.org/schema/mvc
http://www.springframework.org/schema/mvc/spring-mvc.xsd
http://www.springframework.org/schema/context
http://www.springframework.org/schema/context/spring-context.xsd">
<!--配置注解扫描-->
<context:component-scan base-package="com.example.springmvc_test1"/>
<!--配置内部资源视图解析器-->
<bean class="org.springframework.web.servlet.view.InternalResourceViewResolver">
<property name="prefix" value="/WEB-INF/views/"/>
<property name="suffix" value=".jsp"/>
</bean>
<bean id="converterService" class="org.springframework.context.support.ConversionServiceFactoryBean">
<property name="converters">
<list>
<bean class="com.example.springmvc_test1.Converters.DateConverter"/>
<!--<bean class="com.example.springmvc_test1.Converters.PersonConverter"/>-->
</list>
</property>
</bean>
<mvc:annotation-driven conversion-service="converterService"/>
<!--配置文件上传解析器-->
<bean id="multipartResolver" class="org.springframework.web.multipart.commons.CommonsMultipartResolver">
<!--上传文件总大小-->
<property name="maxUploadSize" value="5242800"/>
<!--上传单个文件的大小-->
<property name="maxUploadSizePerFile" value="5242800"/>
<!--上传文件的编码类型-->
<property name="defaultEncoding" value="UTF-8"/>
</bean>
</beans>③ 编写文件上传代码
@RequestMapping("/quick20")
@ResponseBody
public void quickMethod20(String name, MultipartFile file) throws IOException, IOException {
    //获得文件名称
    String originalFilename = file.getOriginalFilename();
    //保存文件
    file.transferTo(new File("C:\Users\HW\Documents\IdeaProjects\springMVC_Test1\src\main\webapp\WEB-INF\views\uploads\\" + originalFilename));
}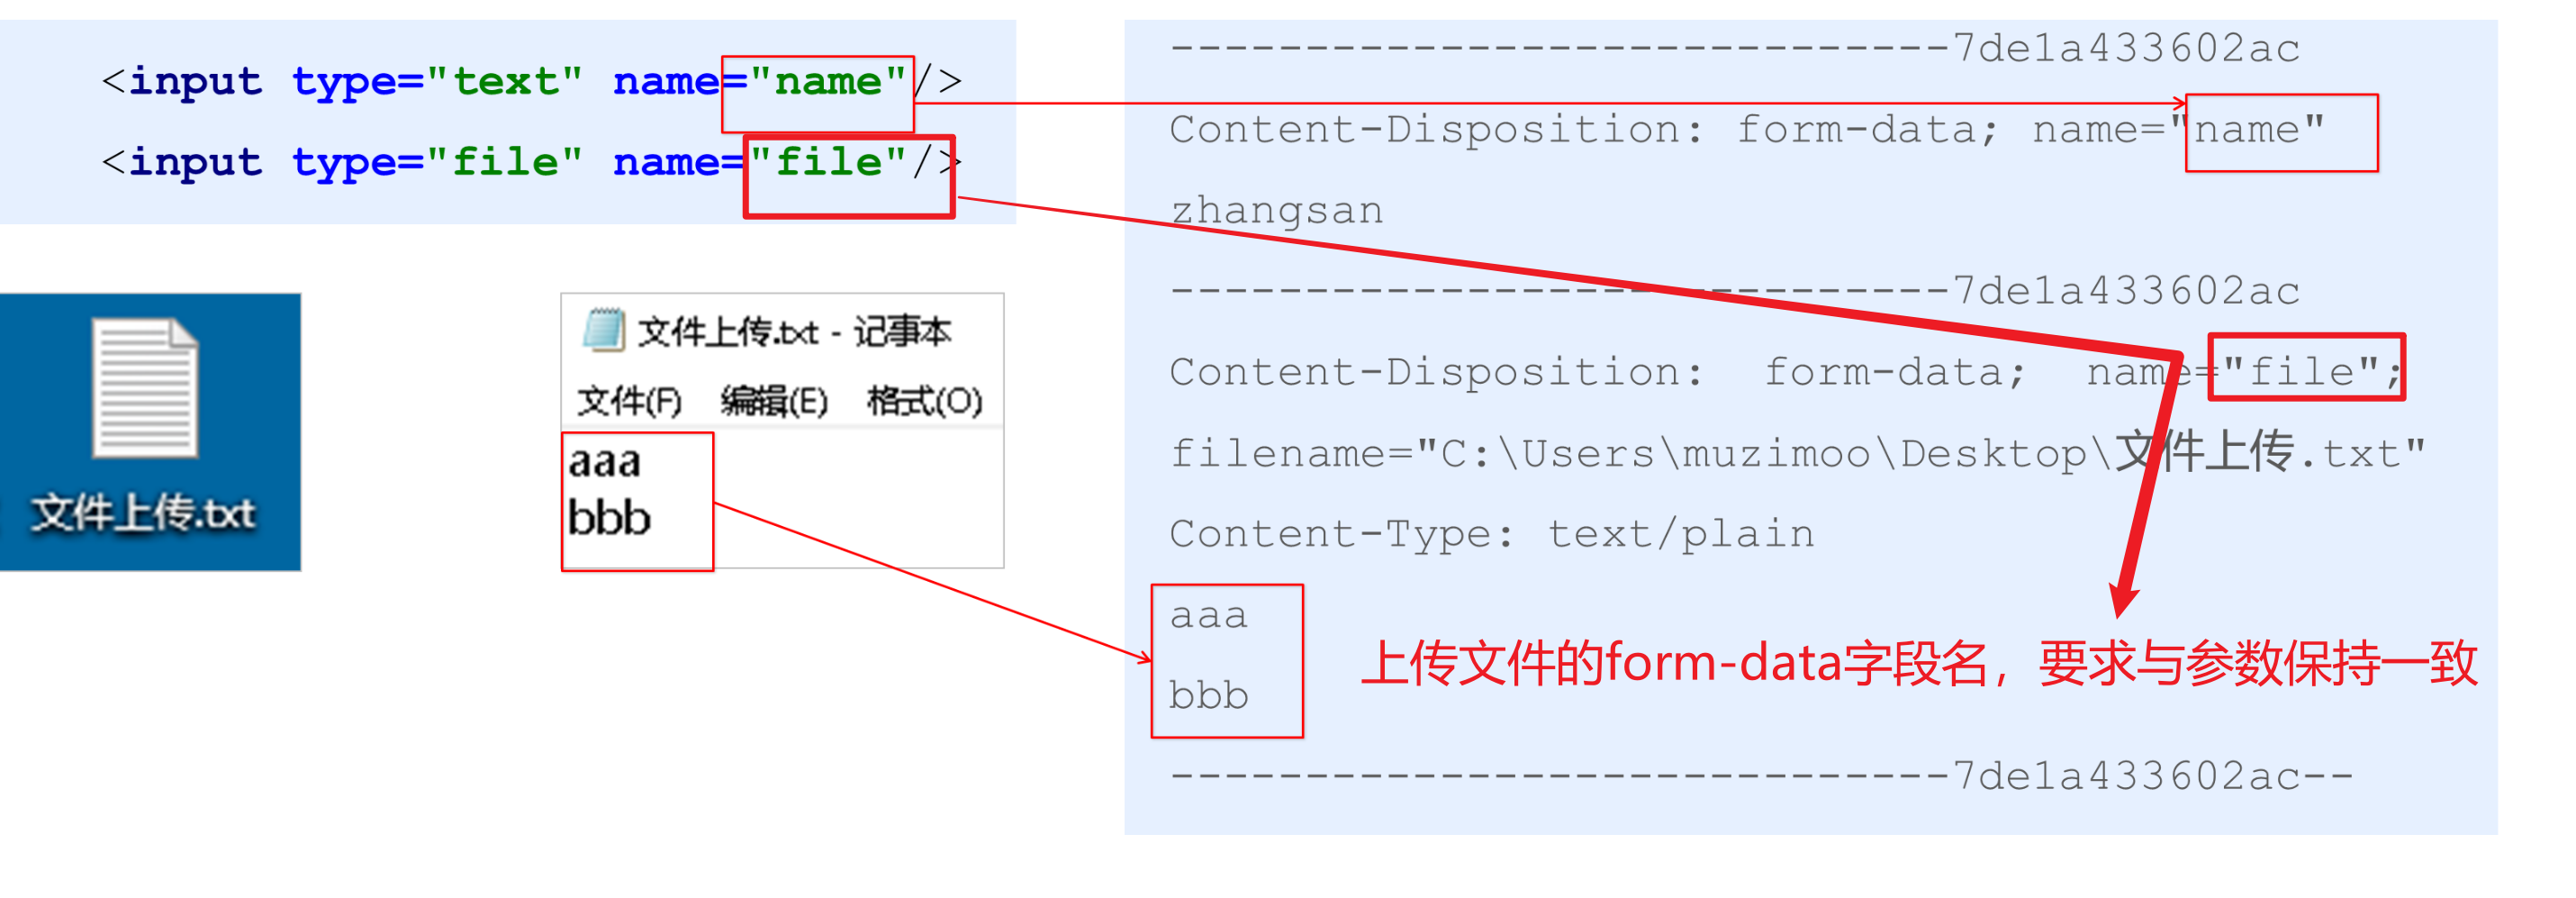
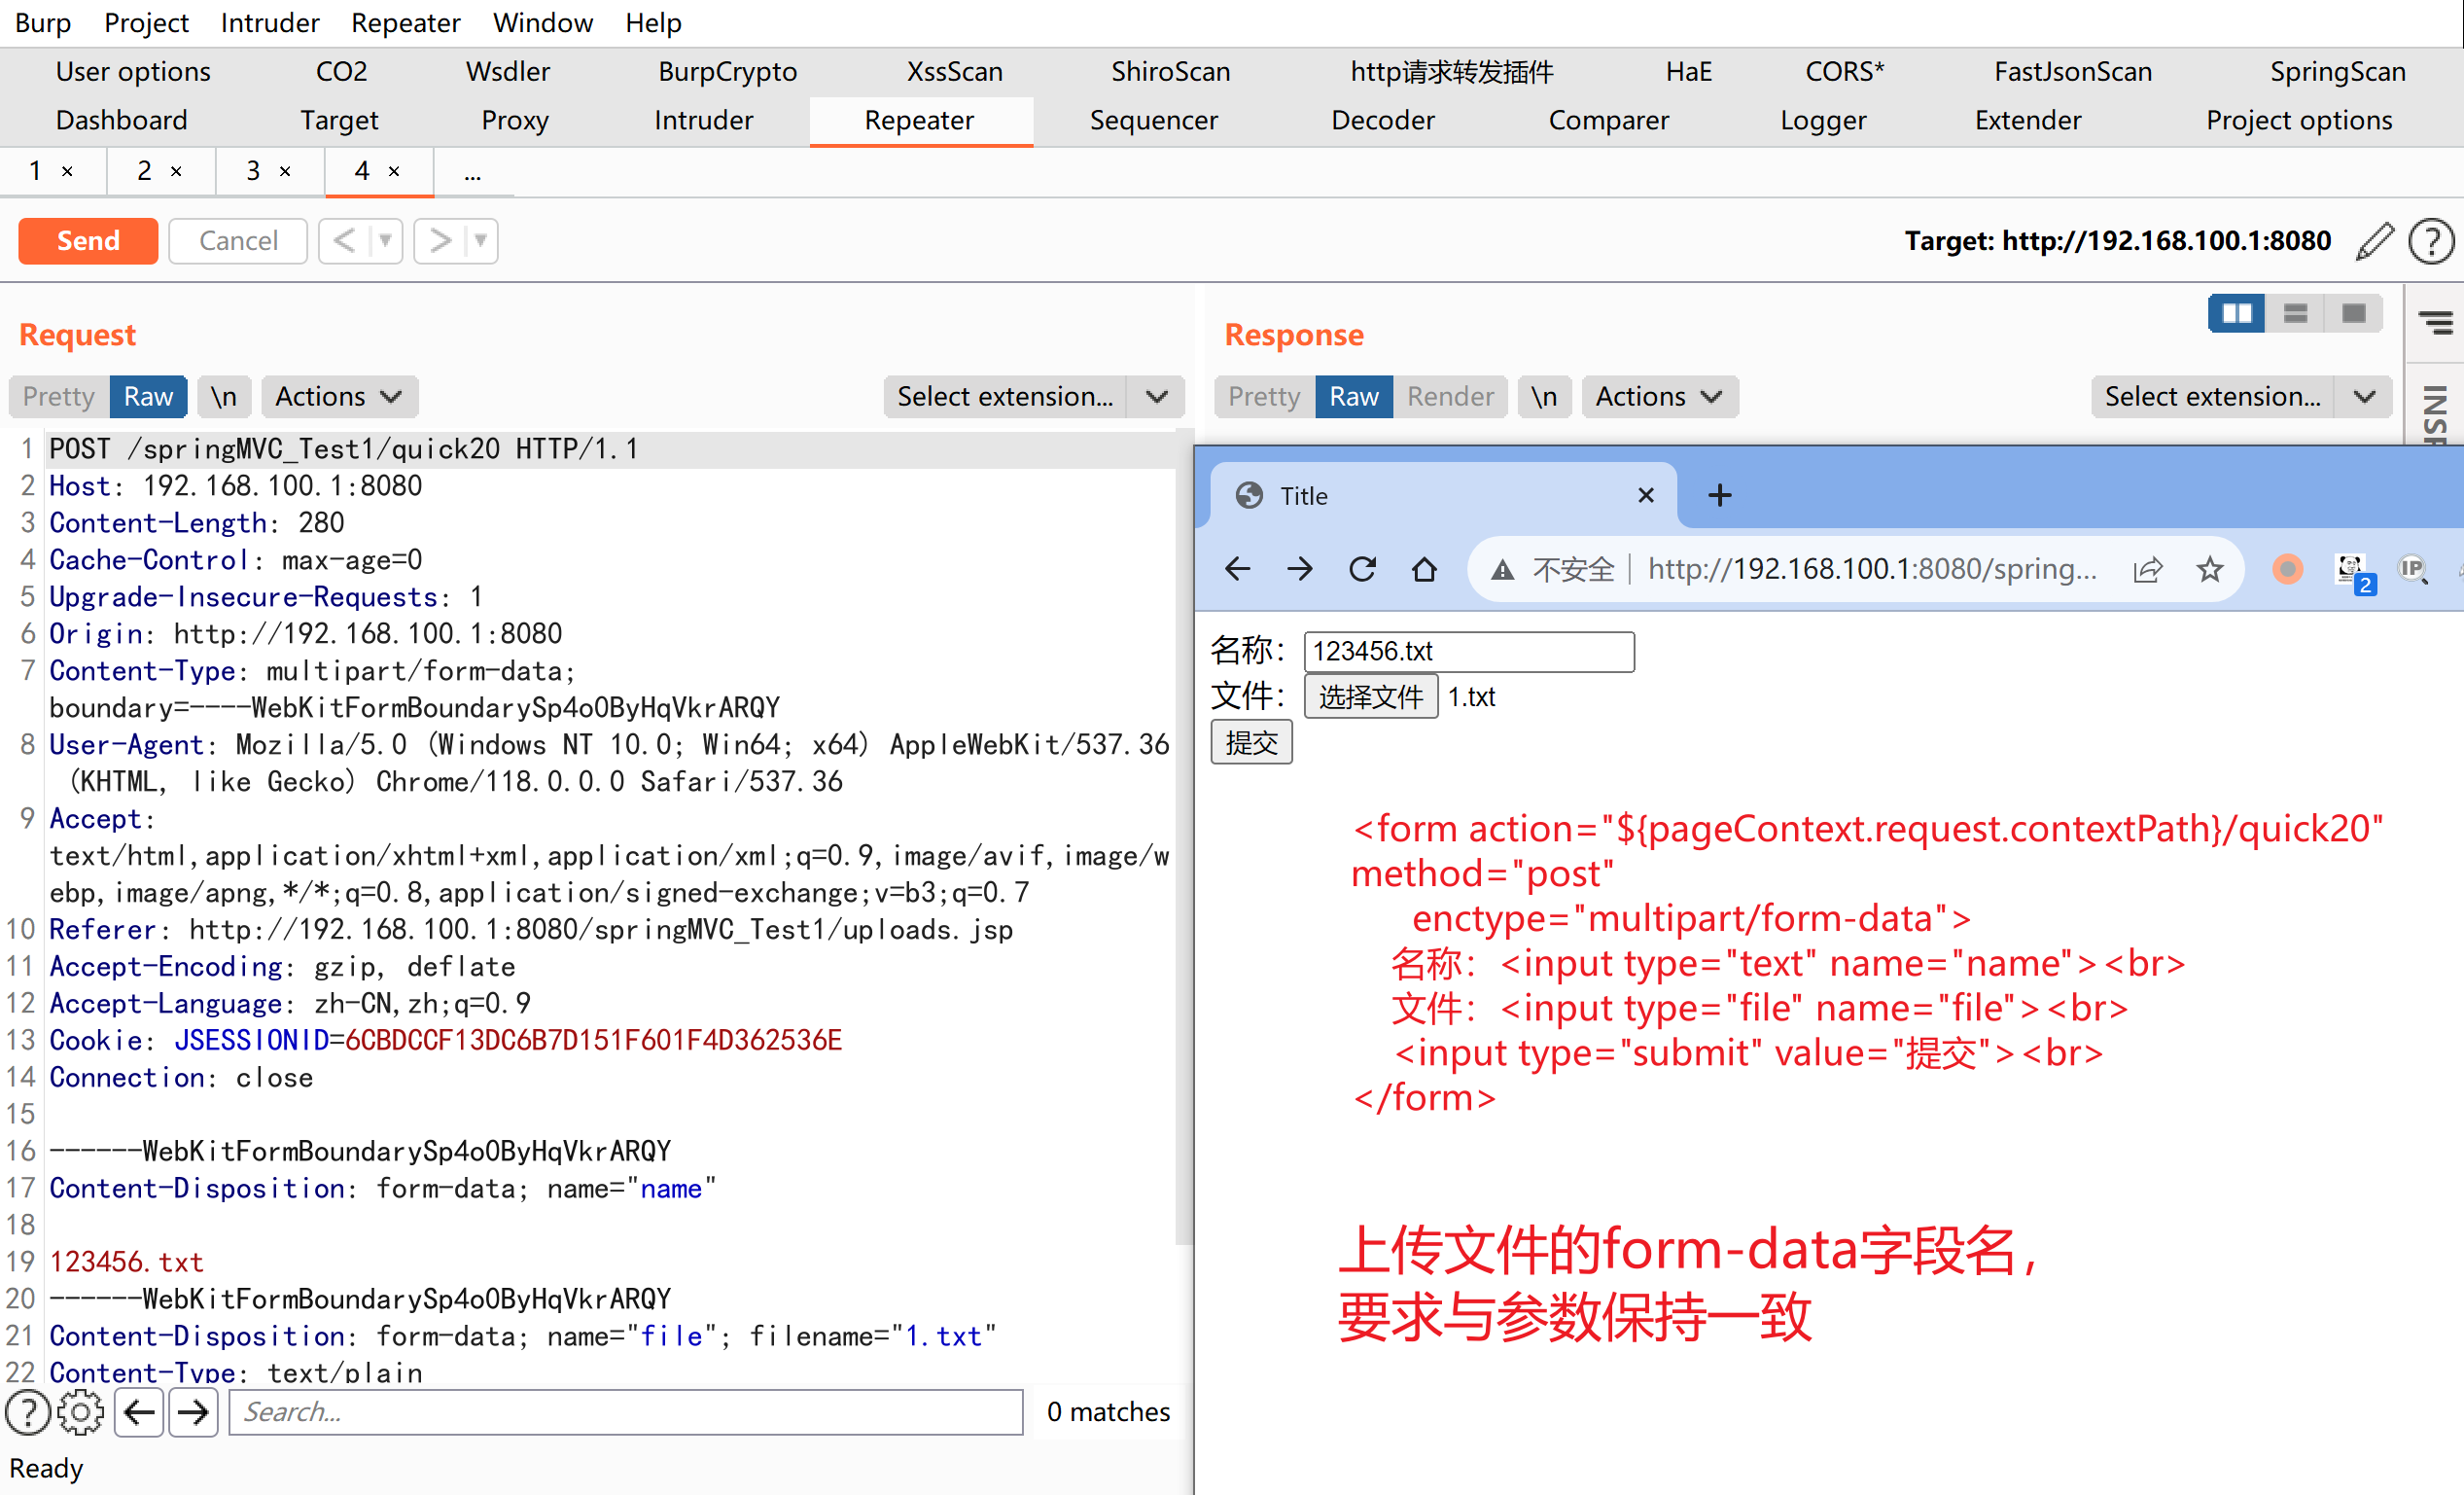
2.4.2.15. 多文件上传实现
多文件上传,只需要将页面修改为多个文件上传项,将方法参数MultipartFile类型修改为MultipartFile[]即可
<%--
  Created by IntelliJ IDEA.
  User: hunter
  Date: 2023-10-25
  Time: 21:31
  To change this template use File | Settings | File Templates.
--%>
<%@ page contentType="text/html;charset=UTF-8" language="java" %>
<html>
<head>
    <title>Title</title>
</head>
<body>
<h1>单文件上传测试</h1>
<form action="${pageContext.request.contextPath}/quick20" method="post"
      enctype="multipart/form-data">
    名称:<input type="text" name="name"><br>
    文件:<input type="file" name="file"><br>
    <input type="submit" value="提交"><br>
</form>

<h1>多文件上传测试</h1>
<form action="${pageContext.request.contextPath}/quick21" method="post" enctype="multipart/form-data">
    名称:<input type="text" name="name"><br>
    文件1:<input type="file" name="uploadFiles"><br>
    文件2:<input type="file" name="uploadFiles"><br>
    文件3:<input type="file" name="uploadFiles"><br>
    <input type="submit" value="提交"><br>
</form>

</body>
</html>
2.4.2.16. 多文件上传实现
@RequestMapping("/quick21")
@ResponseBody
public void quickMethod21(String name, MultipartFile[] uploadFiles) throws IOException {
for (MultipartFile uploadFile : uploadFiles) {
String originalFilename = uploadFile.getOriginalFilename();
uploadFile.transferTo(new File("C:\\Users\\hunter\\IdeaProjects\\springMVC_Test1\\src\\main\\webapp\\WEB-INF\\views\\uploads\\" + originalFilename));
}
}
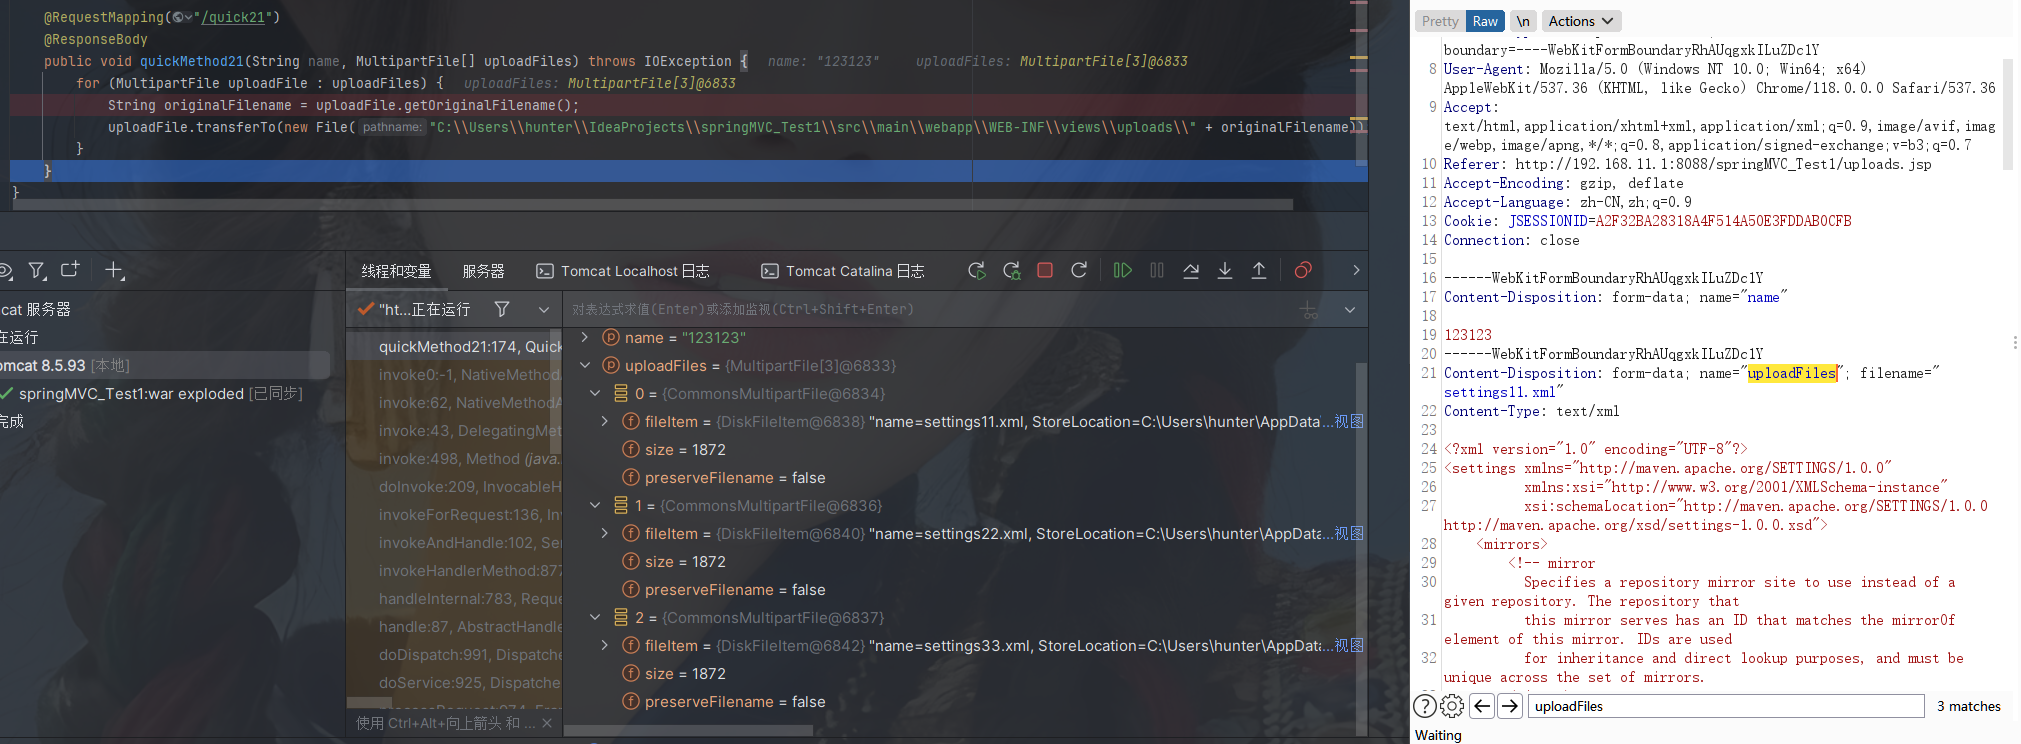
2.4.2.17. 知识要点
MVC实现数据请求方式
- 基本类型参数
POJO类型参数- 数组类型参数
- 集合类型参数
MVC获取数据细节
- 中文乱码问题
@RequestParam和@PathVariable- 自定义类型转换器
- 获得
Servlet相关API @RequestHeader和@CookieValue- 文件上传
2.5. SpringMVC拦截器
2.5.1. 拦截器(interceptor)的作用
Spring MVC的拦截器类似于 Servlet 开发中的过滤器 Filter,用于对处理器进行预处理和后处理。
将拦截器按一定的顺序联结成一条链,这条链称为拦截器链(Interceptor Chain)。在访问被拦截的方法或字段时,拦截器链中的拦截器就会按其之前定义的顺序被调用。拦截器也是AOP思想的具体实现。
2.5.2. 拦截器和过滤器区别
| 区别 | 过滤器 | 拦截器 |
| 使用范围 | 是 servlet 规范中的一部分,任何 Java Web 工程都可以使用 | 是 SpringMVC 框架自己的,只有使用了 SpringMVC 框架的工程才能用 |
| 拦截范围 | 在 url-pattern 中配置了/*之后,可以对所有要访问的资源拦截 | 只会拦截访问的控制器方法,如果访问的是 jsp,html,css,image或者js是不会进行拦截的 |
2.5.3. 拦截器是快速入门
自定义拦截器很简单,只有如下三步:
① 创建拦截器类实现HandlerInterceptor接口
package com.example.springmvc_test1.interceptors;
import org.springframework.web.servlet.HandlerInterceptor;
import org.springframework.web.servlet.ModelAndView;
import javax.servlet.http.HttpServletRequest;
import javax.servlet.http.HttpServletResponse;
public class MyHandlerInterceptor1 implements HandlerInterceptor {
public boolean preHandle(HttpServletRequest request, HttpServletResponse
response, Object handler) {
System.out.println("preHandle running...");
return true;
}
public void postHandle(HttpServletRequest request, HttpServletResponse
response, Object handler, ModelAndView modelAndView) {
System.out.println("postHandle running...");
}
public void afterCompletion(HttpServletRequest request, HttpServletResponse
response, Object handler, Exception ex) {
System.out.println("afterCompletion running...");
}
}② 配置拦截器
<!--配置拦截器-->
<mvc:interceptors>
<mvc:interceptor>
<mvc:mapping path="/**"/>
<bean class="com.example.springmvc_test1.interceptors.MyHandlerInterceptor1"/>
</mvc:interceptor>
</mvc:interceptors><beans xmlns="http://www.springframework.org/schema/beans"
xmlns:mvc="http://www.springframework.org/schema/mvc"
xmlns:context="http://www.springframework.org/schema/context"
xmlns:xsi="http://www.w3.org/2001/XMLSchema-instance"
xsi:schemaLocation="http://www.springframework.org/schema/beans
http://www.springframework.org/schema/beans/spring-beans.xsd
http://www.springframework.org/schema/mvc
http://www.springframework.org/schema/mvc/spring-mvc.xsd
http://www.springframework.org/schema/context
http://www.springframework.org/schema/context/spring-context.xsd">
<!--配置注解扫描-->
<context:component-scan base-package="com.example.springmvc_test1"/>
<!--配置内部资源视图解析器-->
<bean class="org.springframework.web.servlet.view.InternalResourceViewResolver">
<property name="prefix" value="/WEB-INF/views/"/>
<property name="suffix" value=".jsp"/>
</bean>
<bean id="converterService" class="org.springframework.context.support.ConversionServiceFactoryBean">
<property name="converters">
<list>
<bean class="com.example.springmvc_test1.Converters.DateConverter"/>
<!--<bean class="com.example.springmvc_test1.Converters.PersonConverter"/>-->
</list>
</property>
</bean>
<mvc:annotation-driven conversion-service="converterService"/>
<!--配置文件上传解析器-->
<bean id="multipartResolver" class="org.springframework.web.multipart.commons.CommonsMultipartResolver">
<!--上传文件总大小-->
<property name="maxUploadSize" value="5242800"/>
<!--上传单个文件的大小-->
<property name="maxUploadSizePerFile" value="5242800"/>
<!--上传文件的编码类型-->
<property name="defaultEncoding" value="UTF-8"/>
</bean>
<!--配置拦截器-->
<mvc:interceptors>
<mvc:interceptor>
<mvc:mapping path="/**"/>
<bean class="com.example.springmvc_test1.interceptors.MyHandlerInterceptor1"/>
</mvc:interceptor>
</mvc:interceptors>
</beans>③ 测试拦截器的拦截效果(编写目标方法)
@RequestMapping("/quick23")
@ResponseBody
public ModelAndView quickMethod23() throws IOException, ParseException {
System.out.println("目标方法执行....");
ModelAndView modelAndView = new ModelAndView();
modelAndView.addObject("name", "itcast");
modelAndView.setViewName("index");
return modelAndView;
}③ 测试拦截器的拦截效果(访问网址)
http://192.168.11.1:8088/springMVC_Test1/quick23
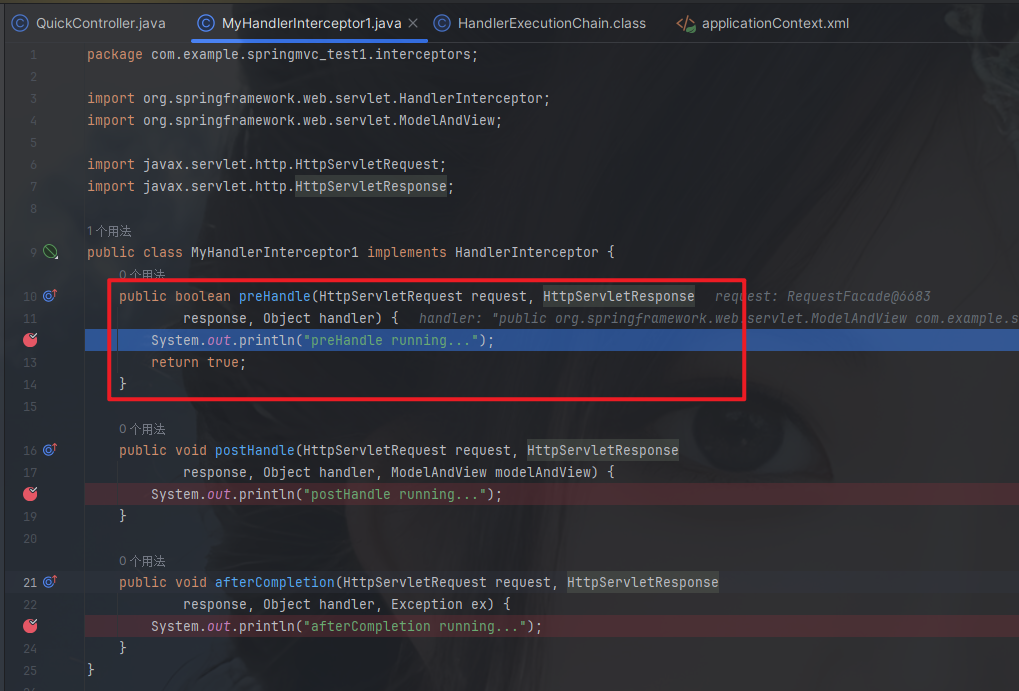
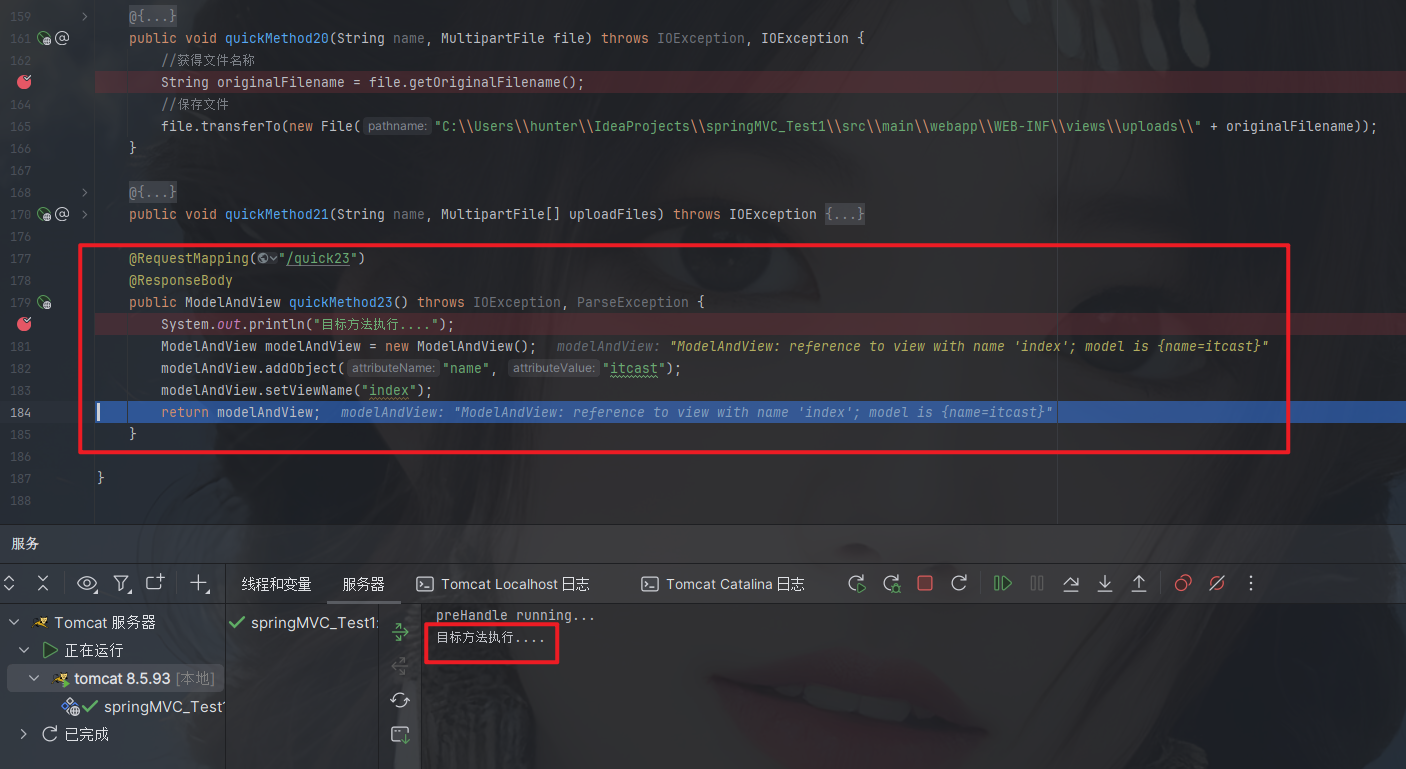

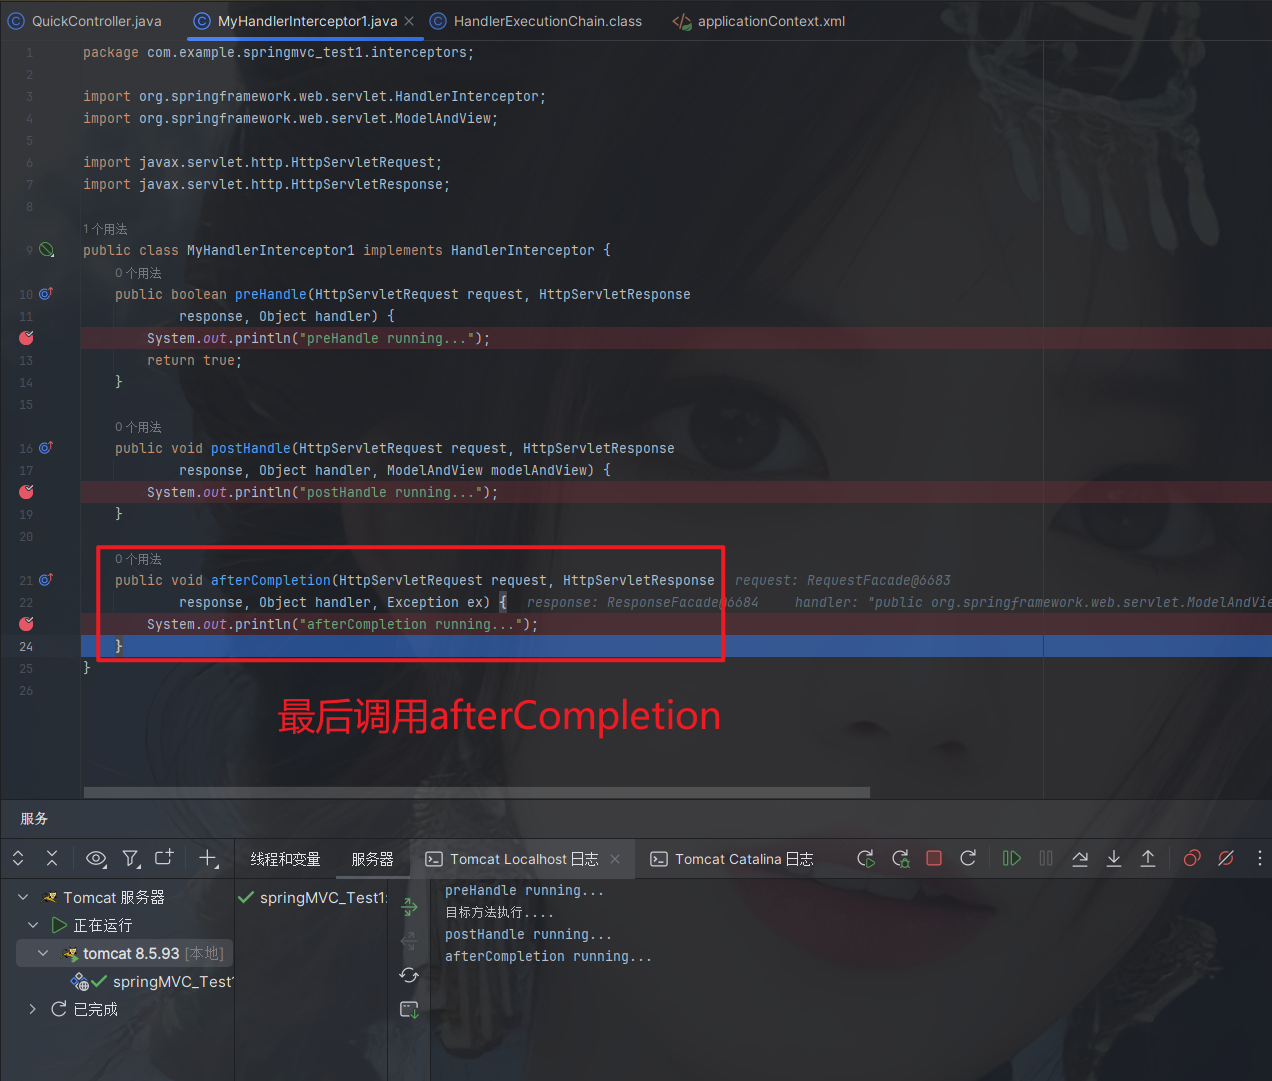
控制台打印结果
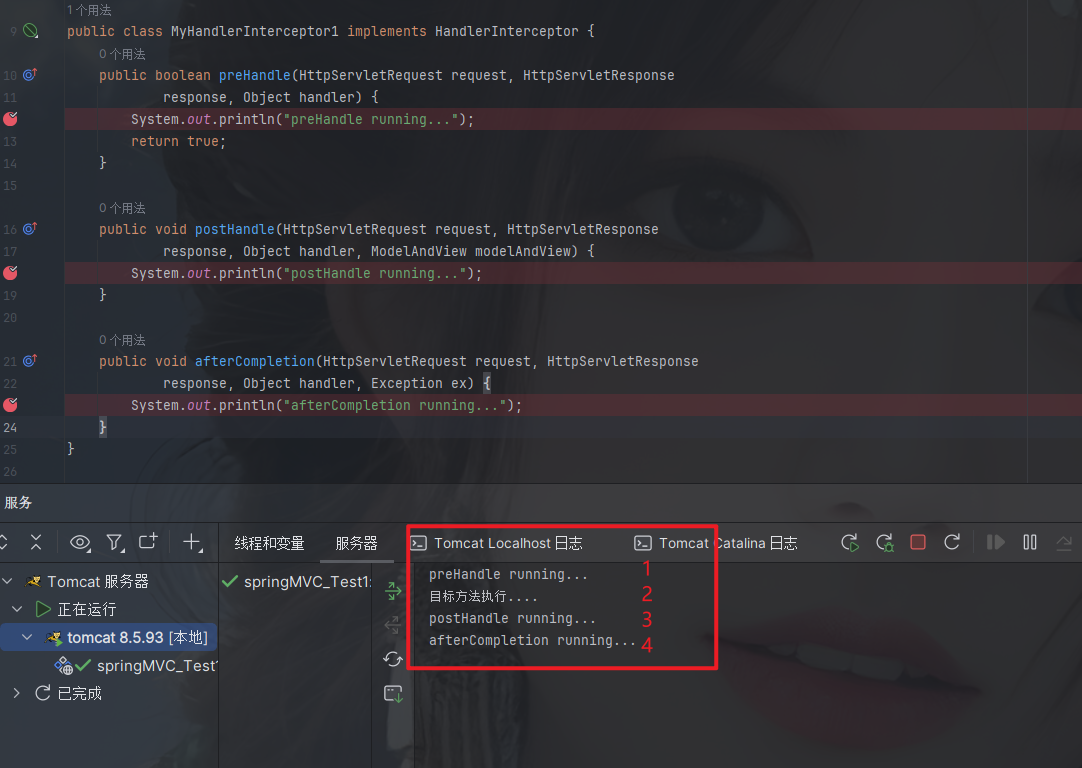
2.5.4. 多拦截器操作
同上,在编写一个MyHandlerInterceptor2操作,测试执行顺序
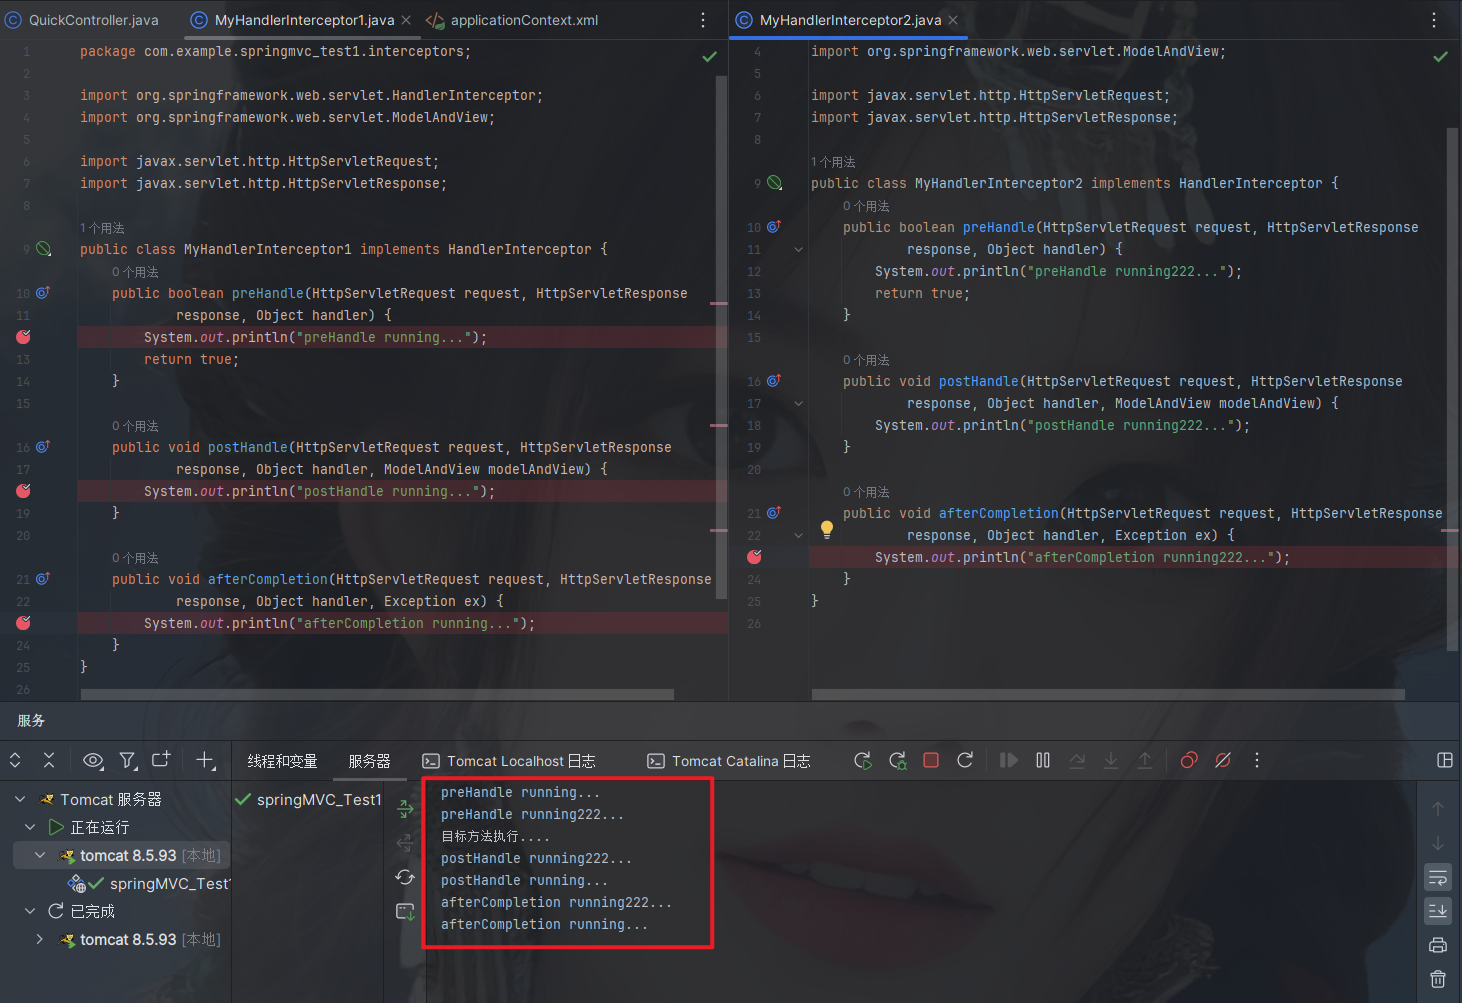
2.5.5. 拦截器方法说明
| 方法名 | 说明 |
preHandle() | 方法将在请求处理之前进行调用,该方法的返回值是布尔值Boolean类型的,当它返回为false时,表示请求结束,后续的Interceptor 和Controller 都不会再执行;当返回值为true时就会继续调用下一个Interceptor 的preHandle方法 |
postHandle() | 该方法是在当前请求进行处理之后被调用,前提是preHandle方法的返回值为true 时才能被调用,且它会在DispatcherServlet进行视图返回渲染之前被调用,所以我们可以在这个方法中对Controller处理之后的ModelAndView对象进行操作 |
afterCompletion() | 该方法将在整个请求结束之后,也就是在DispatcherServlet渲染了对应的视图之后执行,前提是preHandle方法的返回值为true 时才能被调用 |
2.5.6. 知识要点
自定义拦截器步骤
① 创建拦截器类实现HandlerInterceptor接口
② 配置拦截器
③ 测试拦截器的拦截效果
2.6. SpringMVC异常处理机制
2.6.1. 异常处理的思路

2.6.2. 异常处理步骤
① 创建异常处理器类实现HandlerExceptionResolver
package com.example.springmvc_test1.exceptions;
import org.springframework.web.servlet.HandlerExceptionResolver;
import org.springframework.web.servlet.ModelAndView;
import javax.servlet.http.HttpServletRequest;
import javax.servlet.http.HttpServletResponse;
public class MyExceptionResolver implements HandlerExceptionResolver {
@Override
public ModelAndView resolveException(HttpServletRequest httpServletRequest, HttpServletResponse httpServletResponse, Object o, Exception e) {
// 可以指定跳转到某个页面
ModelAndView modelAndView = new ModelAndView();
modelAndView.setViewName("exceptionPage");
return modelAndView;
}
}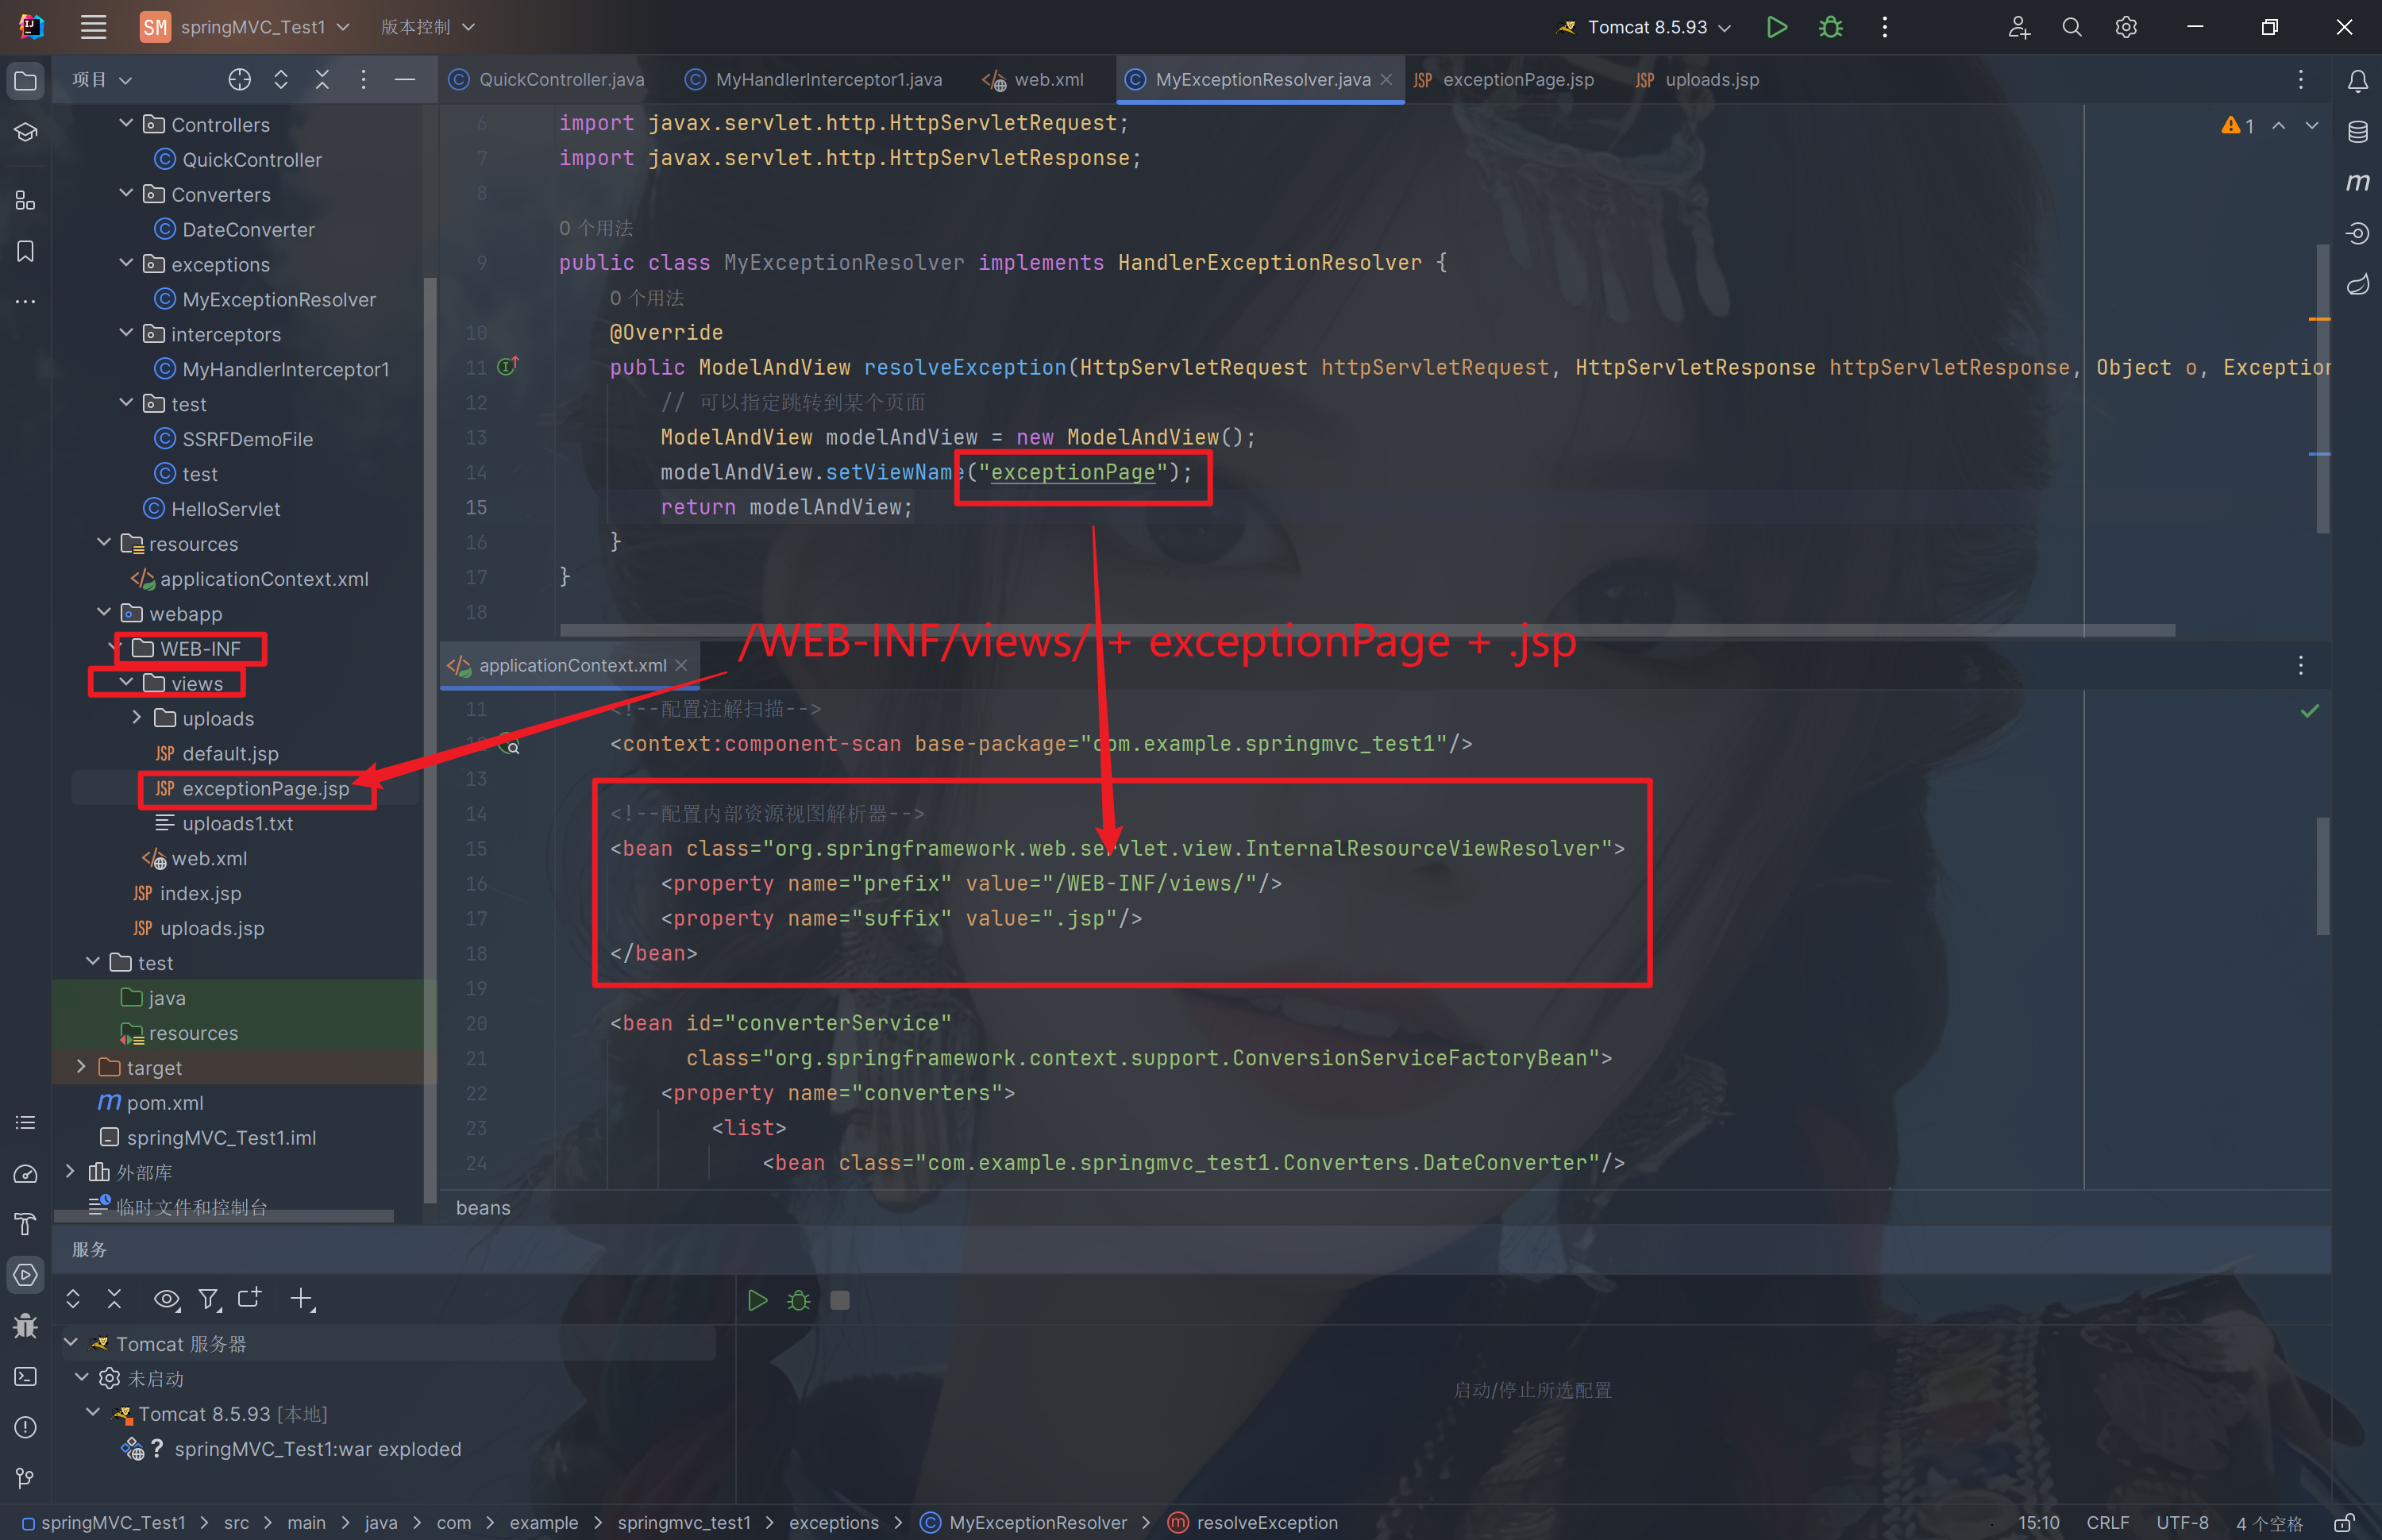
② 配置异常处理器
<!--配置异常处理器-->
<bean id="exceptionResolver" class="com.example.springmvc_test1.exceptions.MyExceptionResolver"/><beans xmlns="http://www.springframework.org/schema/beans"
xmlns:mvc="http://www.springframework.org/schema/mvc"
xmlns:context="http://www.springframework.org/schema/context"
xmlns:xsi="http://www.w3.org/2001/XMLSchema-instance"
xsi:schemaLocation="http://www.springframework.org/schema/beans
http://www.springframework.org/schema/beans/spring-beans.xsd
http://www.springframework.org/schema/mvc
http://www.springframework.org/schema/mvc/spring-mvc.xsd
http://www.springframework.org/schema/context
http://www.springframework.org/schema/context/spring-context.xsd">
<!--配置注解扫描-->
<context:component-scan base-package="com.example.springmvc_test1"/>
<!--配置内部资源视图解析器-->
<bean class="org.springframework.web.servlet.view.InternalResourceViewResolver">
<property name="prefix" value="/WEB-INF/views/"/>
<property name="suffix" value=".jsp"/>
</bean>
<!--配置异常处理器-->
<bean id="exceptionResolver" class="com.example.springmvc_test1.exceptions.MyExceptionResolver"/>
<bean id="converterService"
class="org.springframework.context.support.ConversionServiceFactoryBean">
<property name="converters">
<list>
<bean class="com.example.springmvc_test1.Converters.DateConverter"/>
<!-- <bean class="com.example.springmvc_test1.Converters.PersonConverter"/>-->
</list>
</property>
</bean>
<mvc:annotation-driven conversion-service="converterService"/>
<!--配置文件上传解析器-->
<bean id="multipartResolver" class="org.springframework.web.multipart.commons.CommonsMultipartResolver">
<!--上传文件总大小-->
<property name="maxUploadSize" value="5242800"/>
<!--上传单个文件的大小-->
<property name="maxUploadSizePerFile" value="5242800"/>
<!--上传文件的编码类型-->
<property name="defaultEncoding" value="UTF-8"/>
</bean>
<!--配置拦截器-->
<mvc:interceptors>
<mvc:interceptor>
<mvc:mapping path="/**"/>
<bean class="com.example.springmvc_test1.interceptors.MyHandlerInterceptor1"/>
</mvc:interceptor>
</mvc:interceptors>
</beans><?xml version="1.0" encoding="UTF-8"?>
<web-app xmlns="http://xmlns.jcp.org/xml/ns/javaee"
xmlns:xsi="http://www.w3.org/2001/XMLSchema-instance"
xsi:schemaLocation="http://xmlns.jcp.org/xml/ns/javaee http://xmlns.jcp.org/xml/ns/javaee/web-app_4_0.xsd"
version="4.0">
<!--全局参数-->
<!-- <context-param>-->
<!-- <param-name>contextConfigLocation</param-name>-->
<!-- <param-value>classpath:applicationContext.xml</param-value>-->
<!-- </context-param>-->
<!--Spring的监听器-->
<!-- <listener>-->
<!-- <listener-class>org.springframework.web.context.ContextLoaderListener</listener-class>-->
<!-- </listener>-->
<servlet>
<servlet-name>DispatcherServlet</servlet-name>
<servlet-class>org.springframework.web.servlet.DispatcherServlet</servlet-class>
<init-param>
<param-name>contextConfigLocation</param-name>
<param-value>classpath:applicationContext.xml</param-value>
</init-param>
<load-on-startup>1</load-on-startup>
</servlet>
<servlet-mapping>
<servlet-name>DispatcherServlet</servlet-name>
<url-pattern>/</url-pattern>
</servlet-mapping>
</web-app>③ 编写异常页面
<%--
Created by IntelliJ IDEA.
User: HW
Date: 2023-10-27
Time: 10:31
To change this template use File | Settings | File Templates.
--%>
<%@ page contentType="text/html;charset=UTF-8" language="java" %>
<html>
<head>
<title>exception Page</title>
</head>
<body>
this is exception page
</body>
</html>④ 测试异常跳转
@RequestMapping("/quick22")
@ResponseBody
public void quickMethod22() throws IOException, ParseException {
// SimpleDateFormat 可以解析日期
SimpleDateFormat simpleDateFormat = new SimpleDateFormat("yyyy-MM-dd");
simpleDateFormat.parse("abcde");
}访问页面,跳转到异常处理器类
跳转到指定页面,拼接/WEB-INF/views/ + exceptionPage + .jsp
跳转到exception.jsp页面
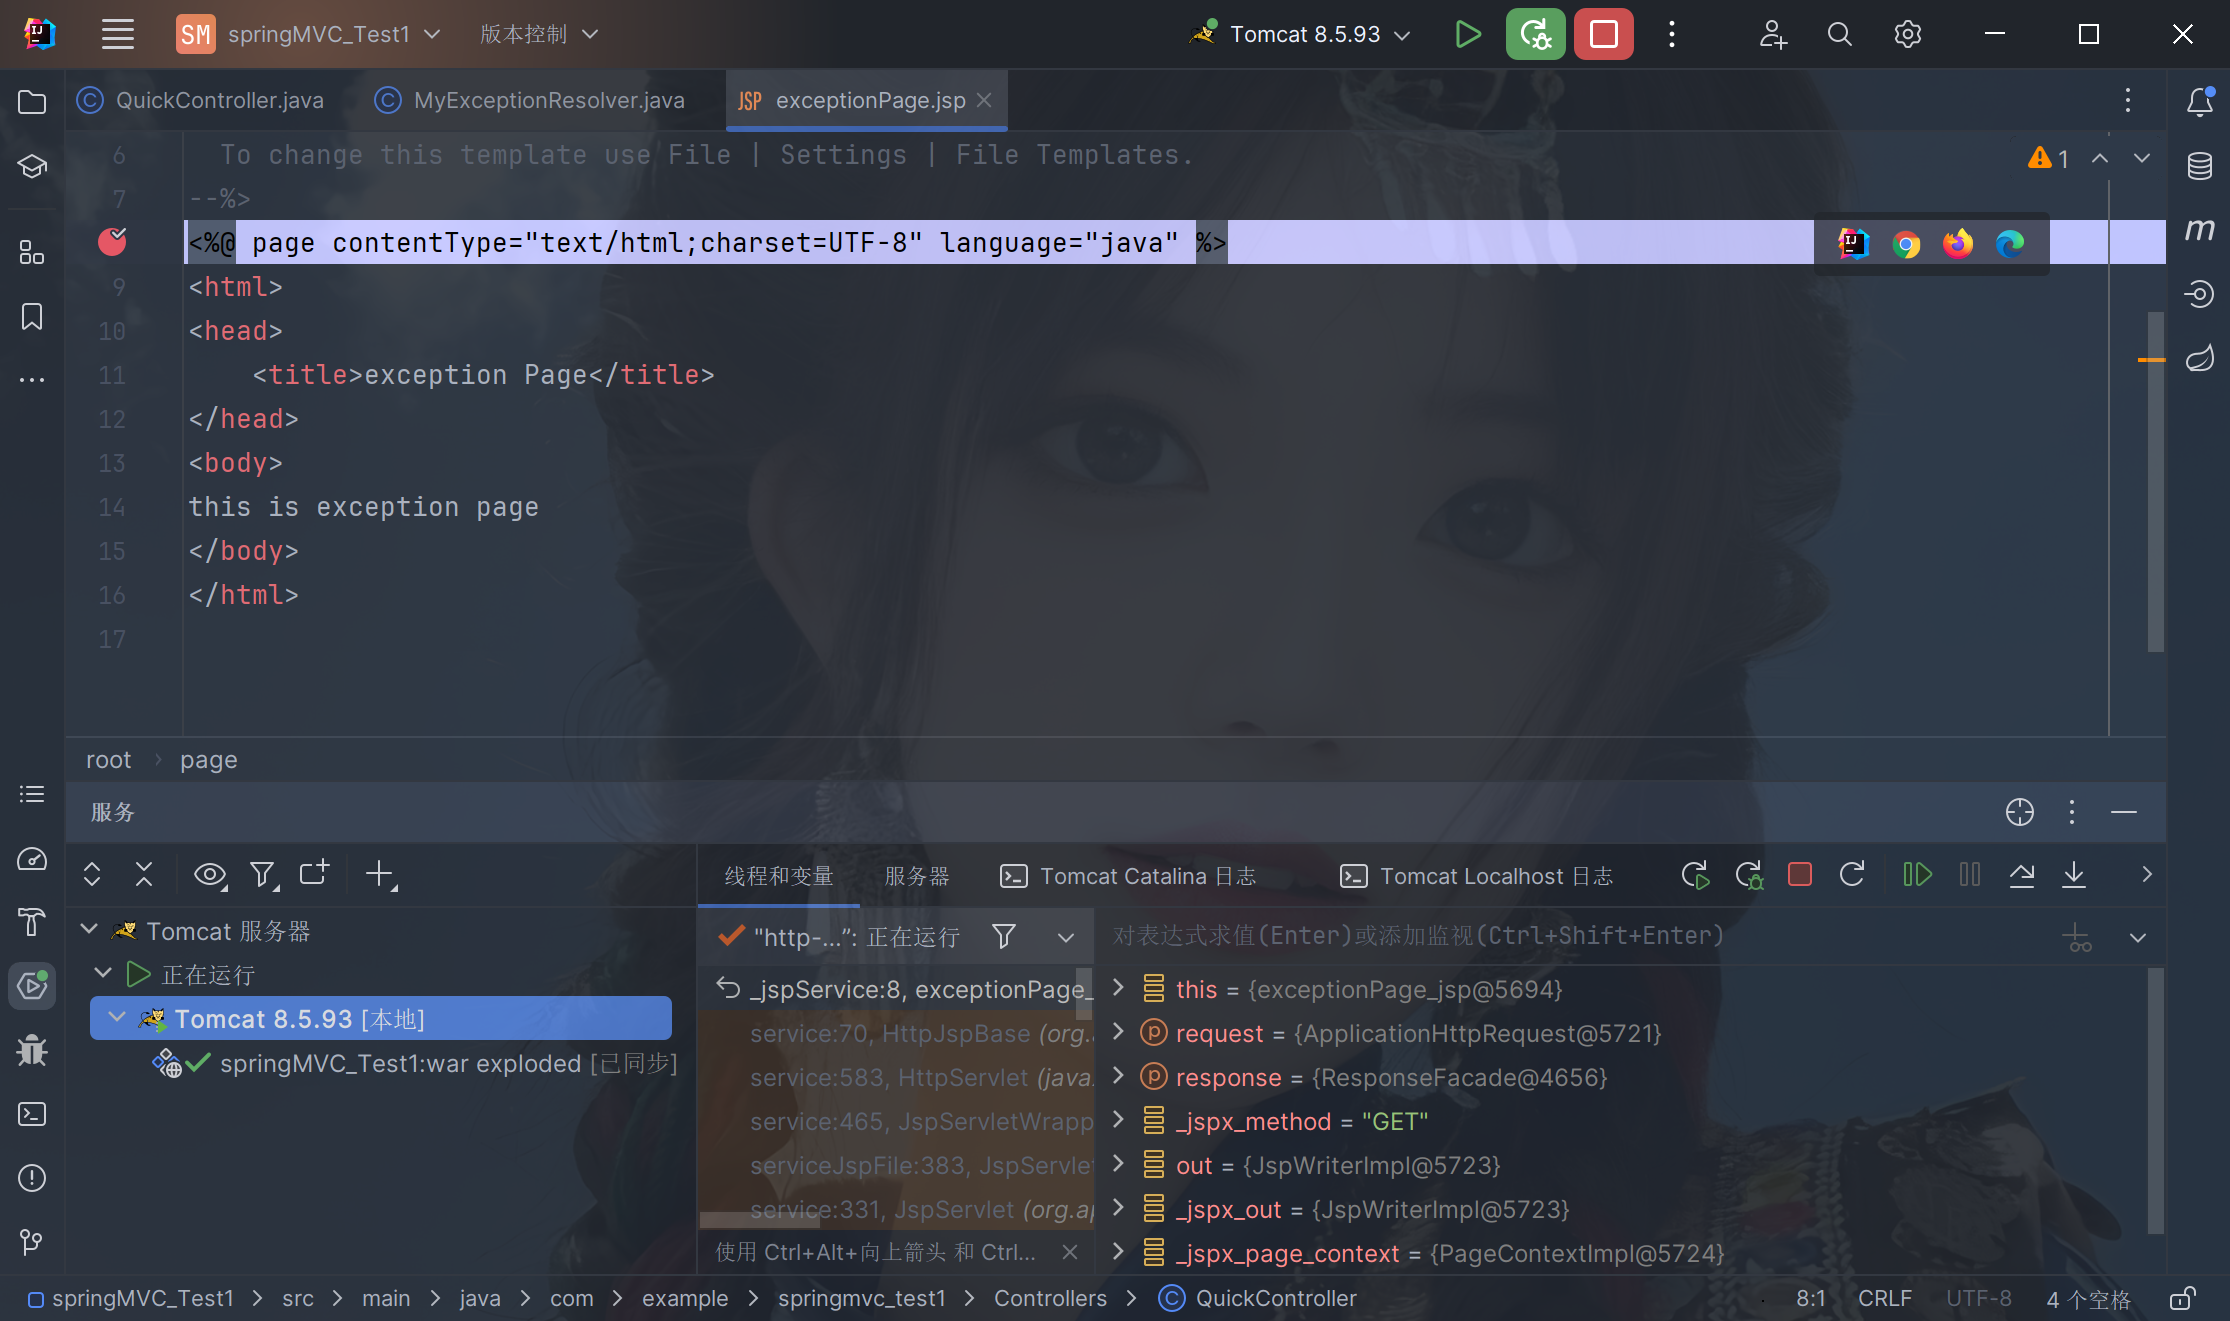
最终重定向到exception.jsp文件,如果执行报错,尽量隐藏报错信息
2.7. Spring-MVC复习
需要dependency包版本保持一致
